SQL Console for Relational Databases
Use the NineData SQL Console to query, edit, and manage relational databases from a browser-based workspace. The console supports SQL execution, object browsing, saved SQL, execution history, SQL development policy checks, and AI-assisted SQL workflows when AI features are enabled. The 5.3.3 release adds Snowflake support in SQL Console. When you open SQL Console, the console may require database-account and password verification first; follow the prompt shown by the current SaaS console. The trigger, prompt, and supported data-source scope depend on the current console.
Before you begin
The database to be managed has been added to NineData. For instructions, see Managing Data Sources.
The data source type must be one of the following: MySQL (including MySQL series instances), ShardingProxy, SQL Server, PostgreSQL, PolarDB PostgreSQL, PolarDB Oracle, PolarDB-X, Oracle, OceanBase Oracle, OceanBase MySQL, Db2, ClickHouse, Doris, SelectDB, DM (Da Meng), Kingbase for Oracle, Kingbase for PostgreSQL, Klustron, StarRocks, SingleStore, DWS, MaxCompute, AWS Redshift, Snowflake, openGauss, GaussDB, TiDB, GaiaDB, GaiaDB-X, Greenplum, Lindorm, Vastbase, VectorDB, GoldenDB, MariaDB, HANA, GBase8a, HaishanDB, OpenSearch, TDSQL Oracle, TDSQL PostgreSQL, YashanDB, or YashanDB MySQL.
You must have read-only or read-write permissions on the target data source.
tipRead-only permissions only support viewing the database and SELECT operations.
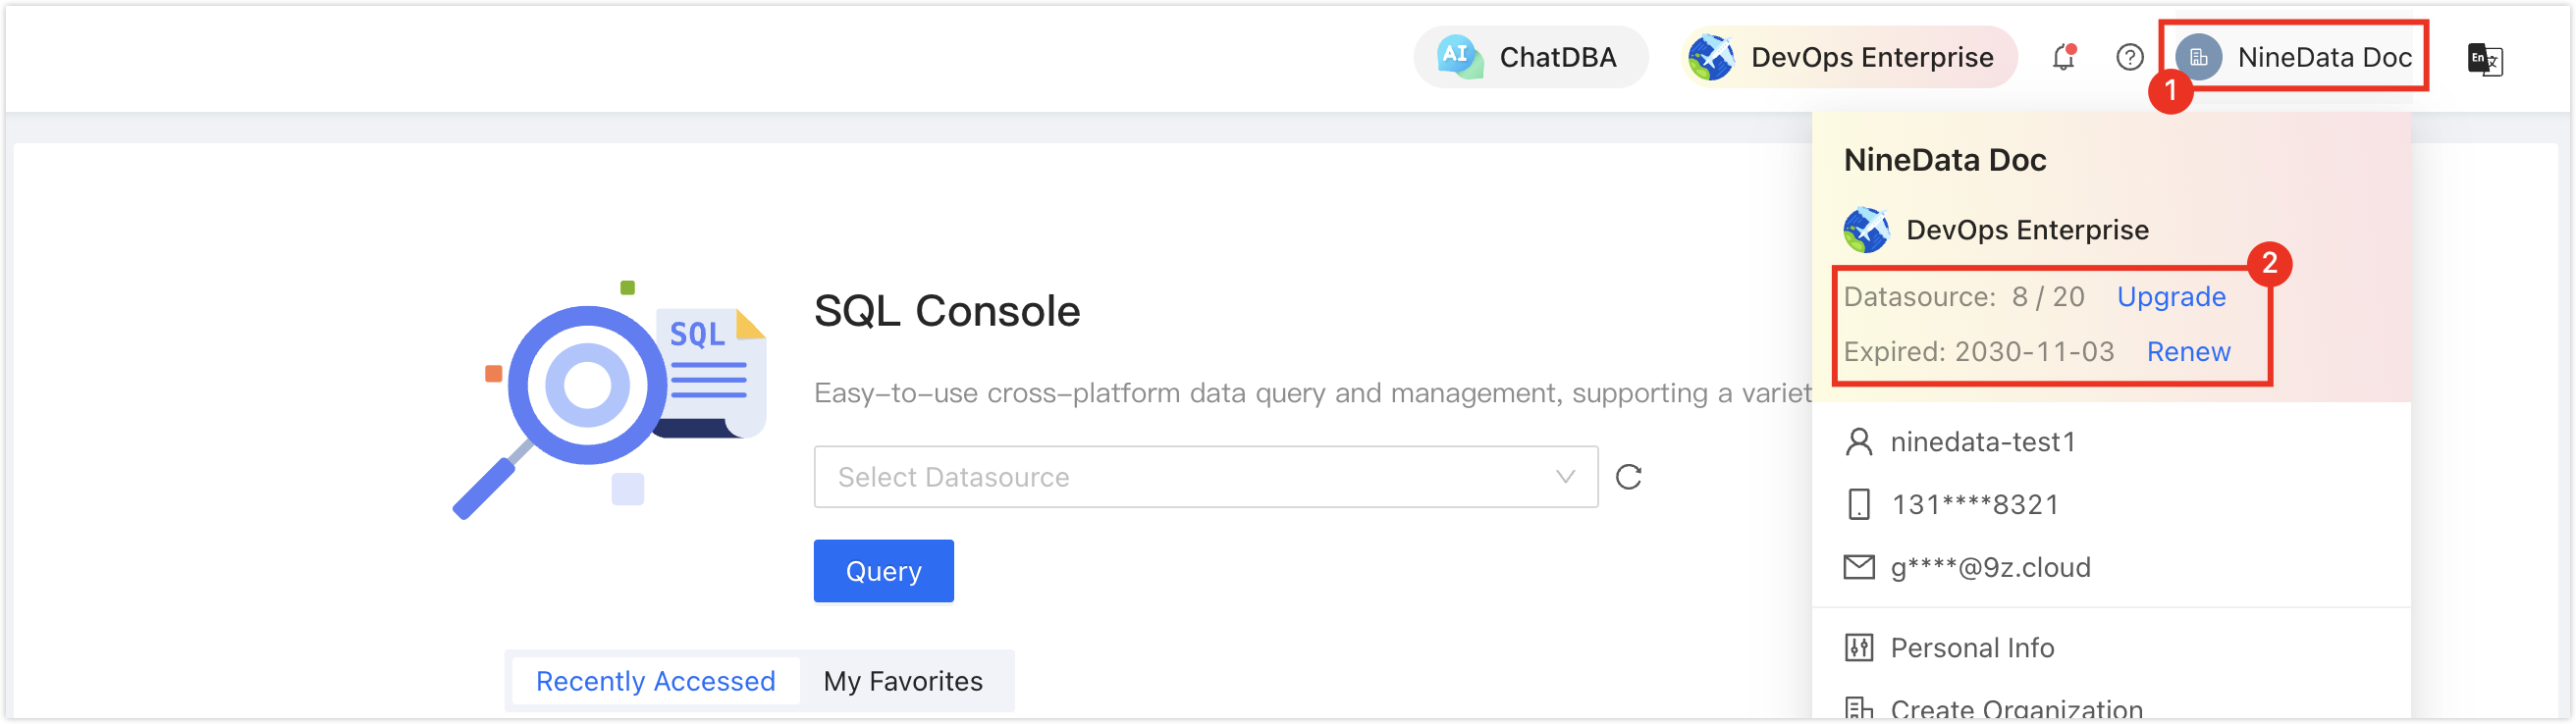
In the commercial versions (DevOps Pro, DevOps Enterprise), make sure your monthly or yearly subscription has not expired. An expired subscription may prevent you from using the Database DevOps service. Check the remaining quota and expiration date in the NineData Console header.
Features
NineData SQL Console provides several functions for managing relational data sources efficiently.
| Function | Description |
|---|---|
| Chat2SQL | Use NineData AI services to generate SQL statements or optimize existing SQL. Enter concise natural language to generate a query, or provide SQL and optimization goals for AI suggestions. |
| AI features |
|
| Execute SQL Statements |
|
| Visual Table Structure Design | Create or edit tables visually. For more information, see Design MySQL Table Structure, Design ClickHouse Table Structure, and Design PostgreSQL Table Structure. |
| SQL IntelliSense | When you type SQL statements in the SQL Console, SQL Console suggests keywords, functions, databases, tables, columns, SQL templates, grammar help, and grammar checks based on the current context. |
| Save SQL | View SQL | Save frequently used SQL statements to NineData and reuse them later from different browsers or hosts. |
| Workspace recovery | If the browser exits unexpectedly or the host becomes unavailable, sign in to the NineData console again and open SQL Console. NineData reloads previously opened data sources and executed SQL statements from the saved workspace state. |
| SQL Execution History | History records SQL statements executed by the current account in the NineData console and supports retrieval by data source, execution time, and SQL keywords. Copy SQL statements from execution history and run them again in the SQL Console. |
| SQL Development Policy Check | In organization modelThe organization model supports assigning different roles and resource management permissions to each user under the organization, suitable for multi-user collaborative development within the same organization, while ensuring data security and improving overall productivity., NineData checks every SQL statement executed in SQL Console against the SQL Development Policy configured by the Administrator. If a statement violates the policy, NineData blocks it. Users can modify and resubmit the SQL, or submit a SQL task, depending on the approval process configured by the Administrator. |
Procedure
Sign in to the NineData Console.
Go to DevOps > SQL Console.
tipIf a data source session is still open, NineData redirects you to that data source page.
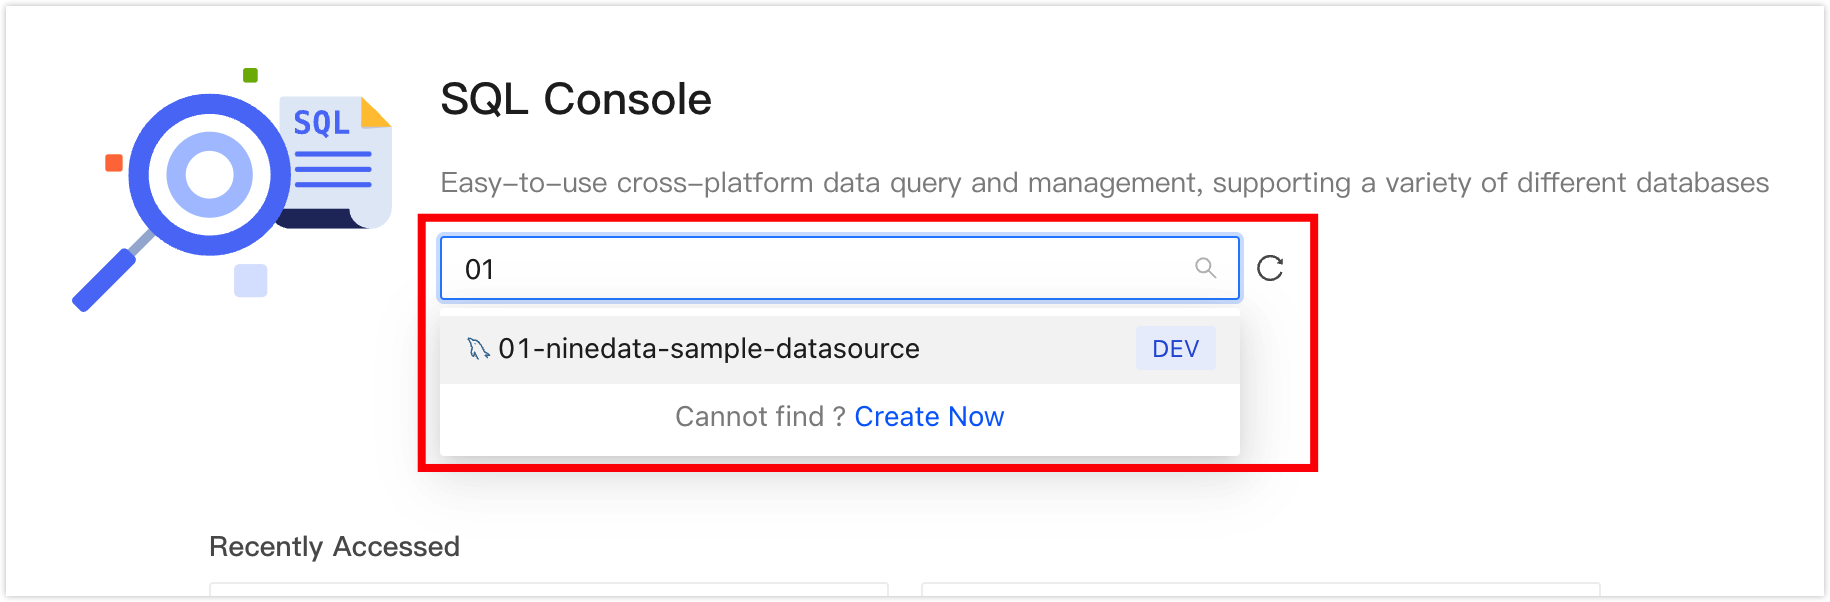
Click the text box below SQL Console. The data source selector displays the data sources that have been added to NineData. Select the target data source, and then click Query to open the SQL Console.
tip- If no data source exists yet, the page is empty. Click Create Datasource on the page.
If multiple data sources are available, enter complete or partial keywords for exact or fuzzy search. The searchable fields are:
Data source name
IP address
After the SQL Console opens, run SQL development operations on the selected data source. When the SQL Console guides you to create a task, it initializes a default task-mode selection; choose the option required by your workflow. The available options depend on the current console.
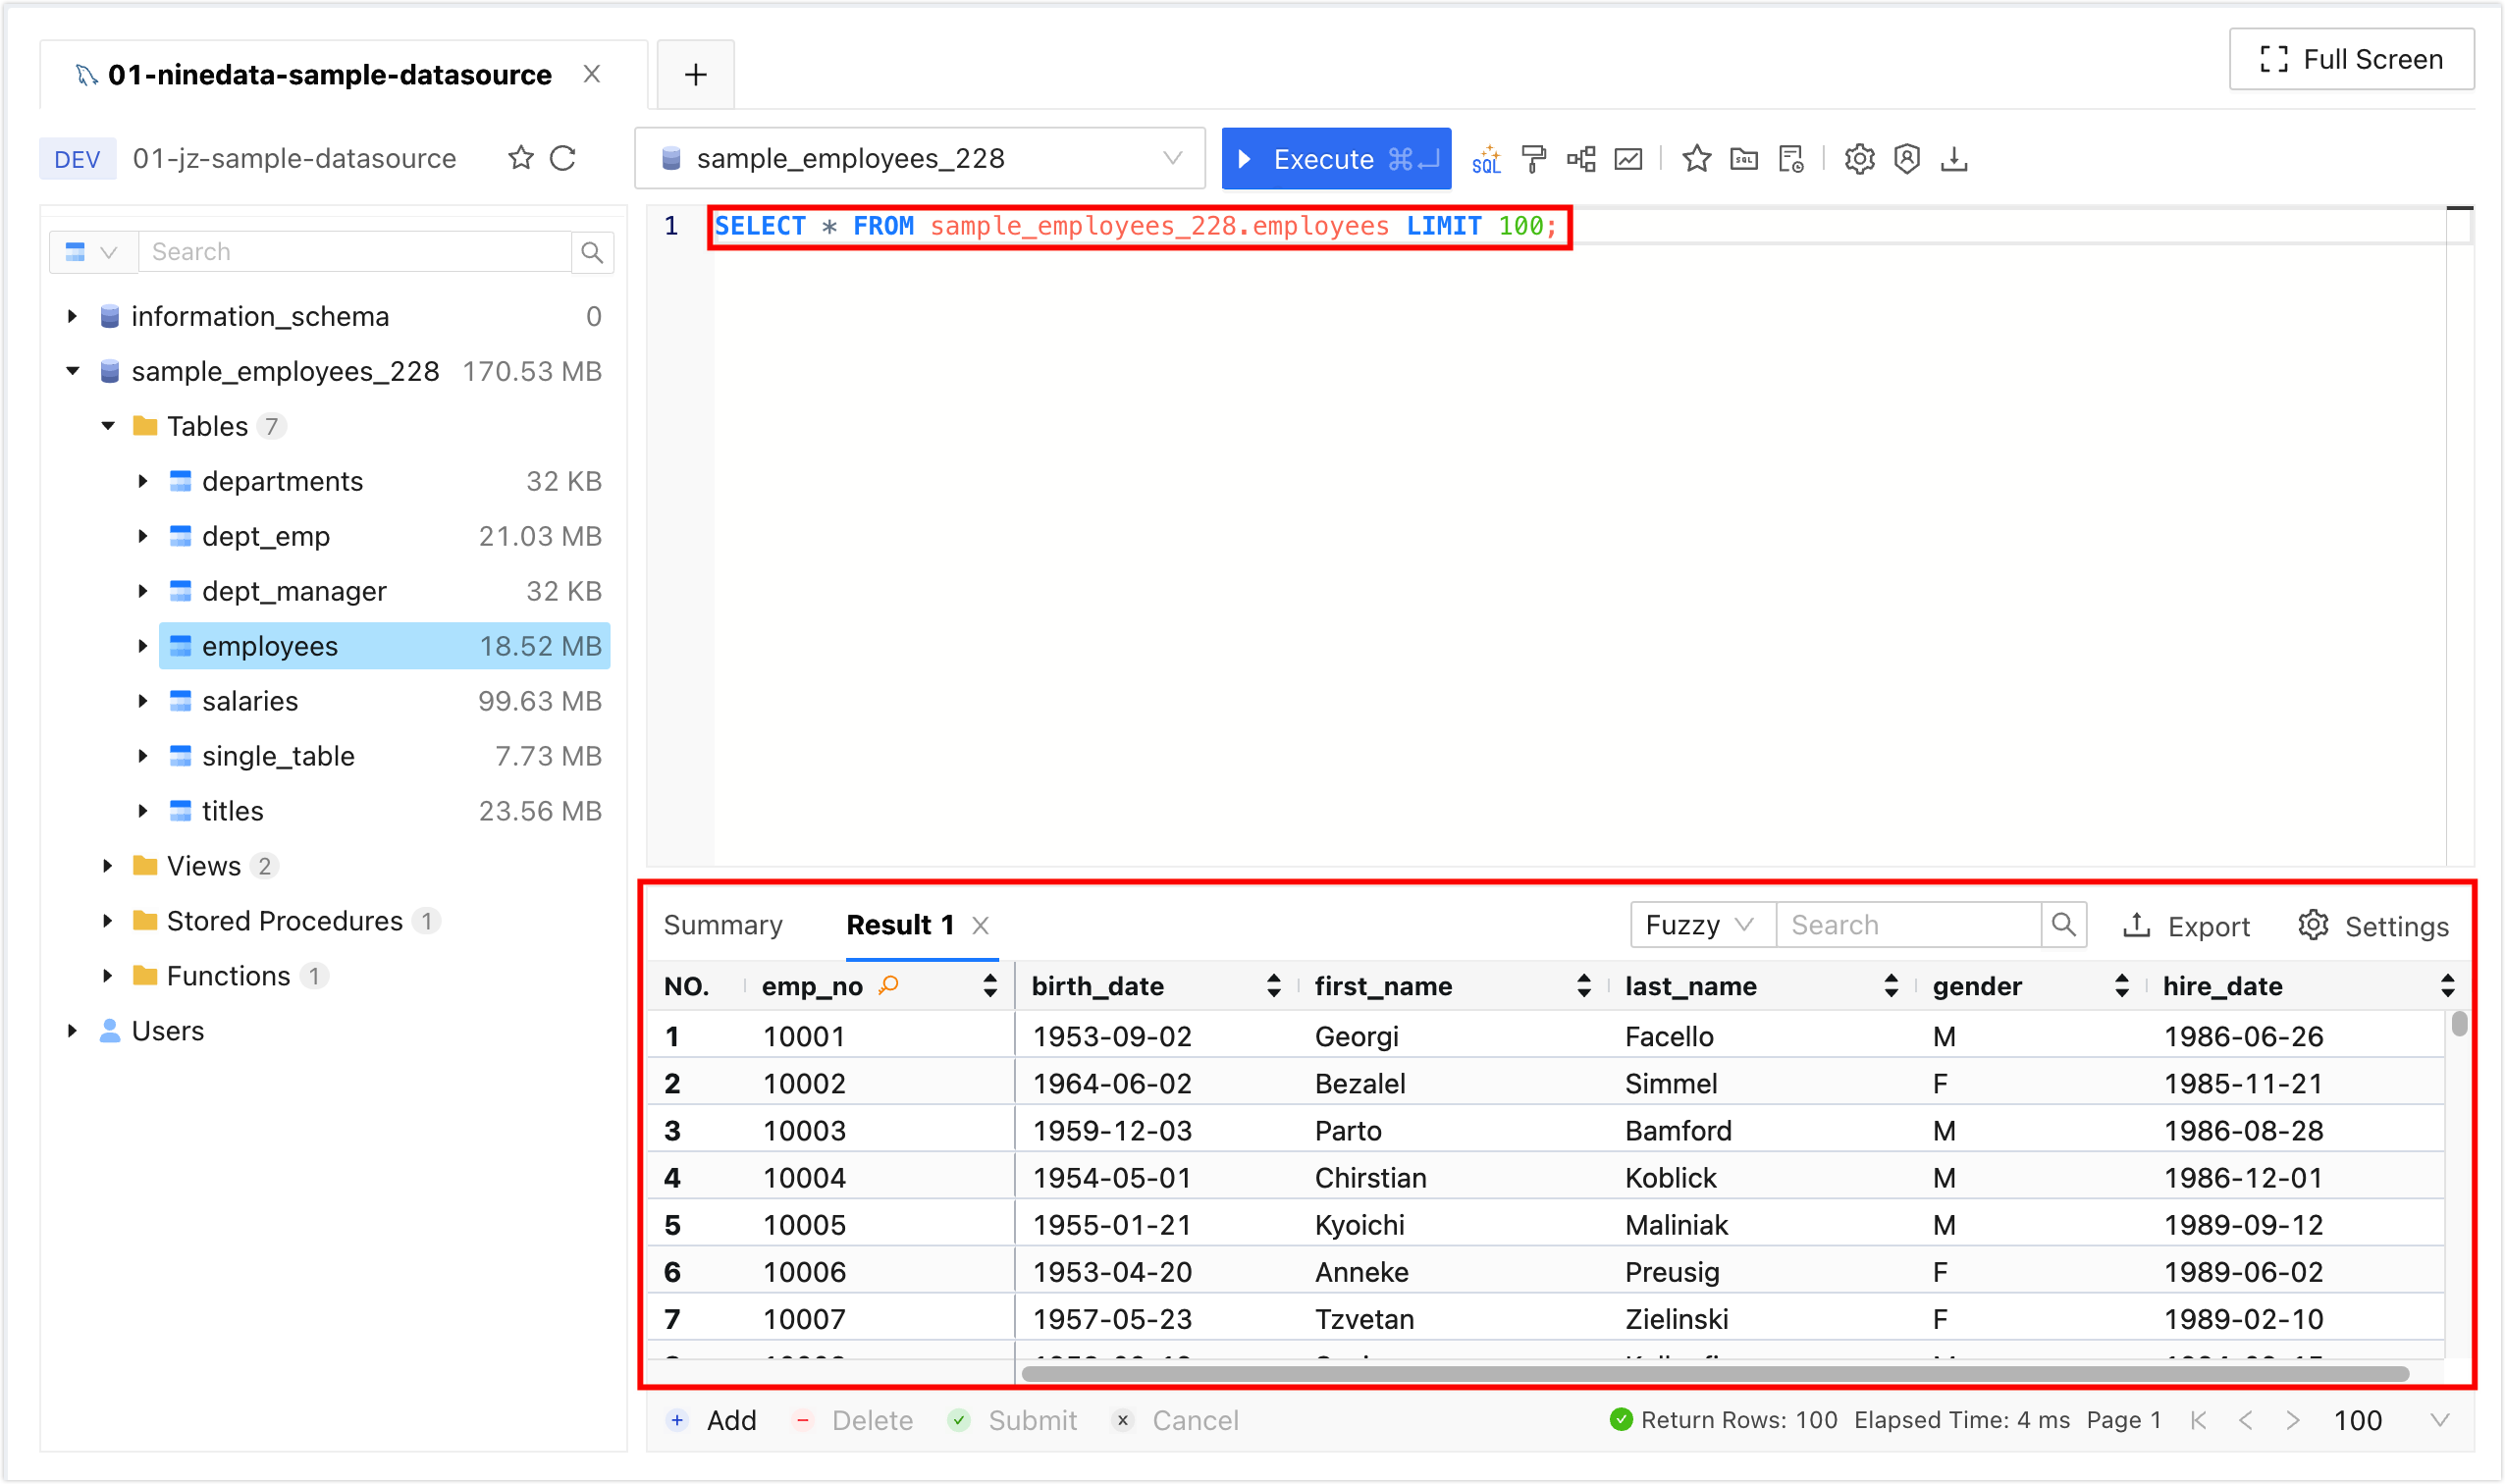
For interface details, see SQL Console interface.
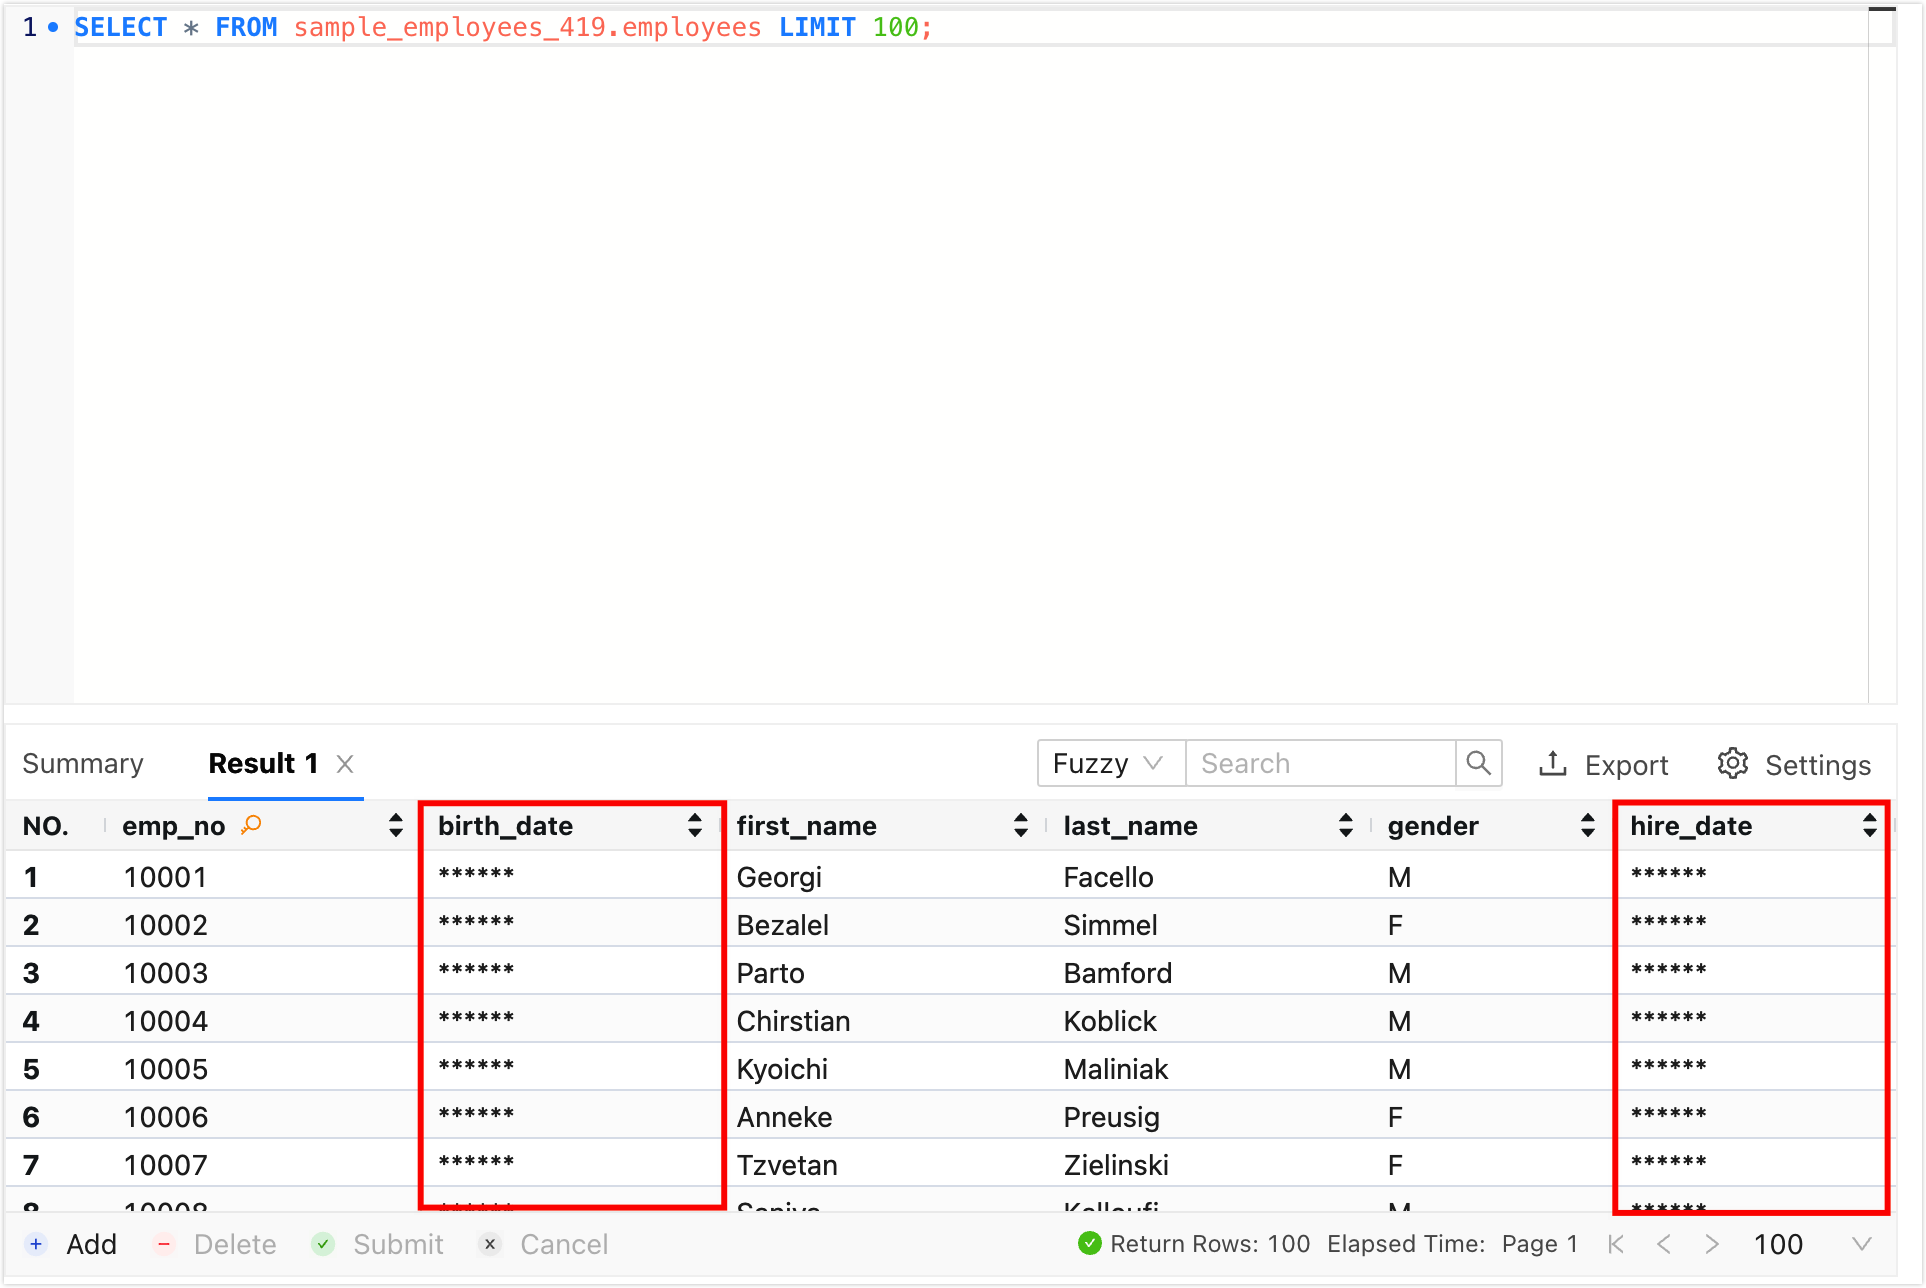
tipIf a sensitive data column is added to the target data source, the full content of the sensitive column remains hidden until you apply for sensitive column permission.
Result
The SQL Console opens the selected data source. Browse database objects, run SQL statements, inspect execution results, edit supported result sets, view SQL history, and use AI-assisted SQL features if they are enabled for the current edition.
SQL Console interface
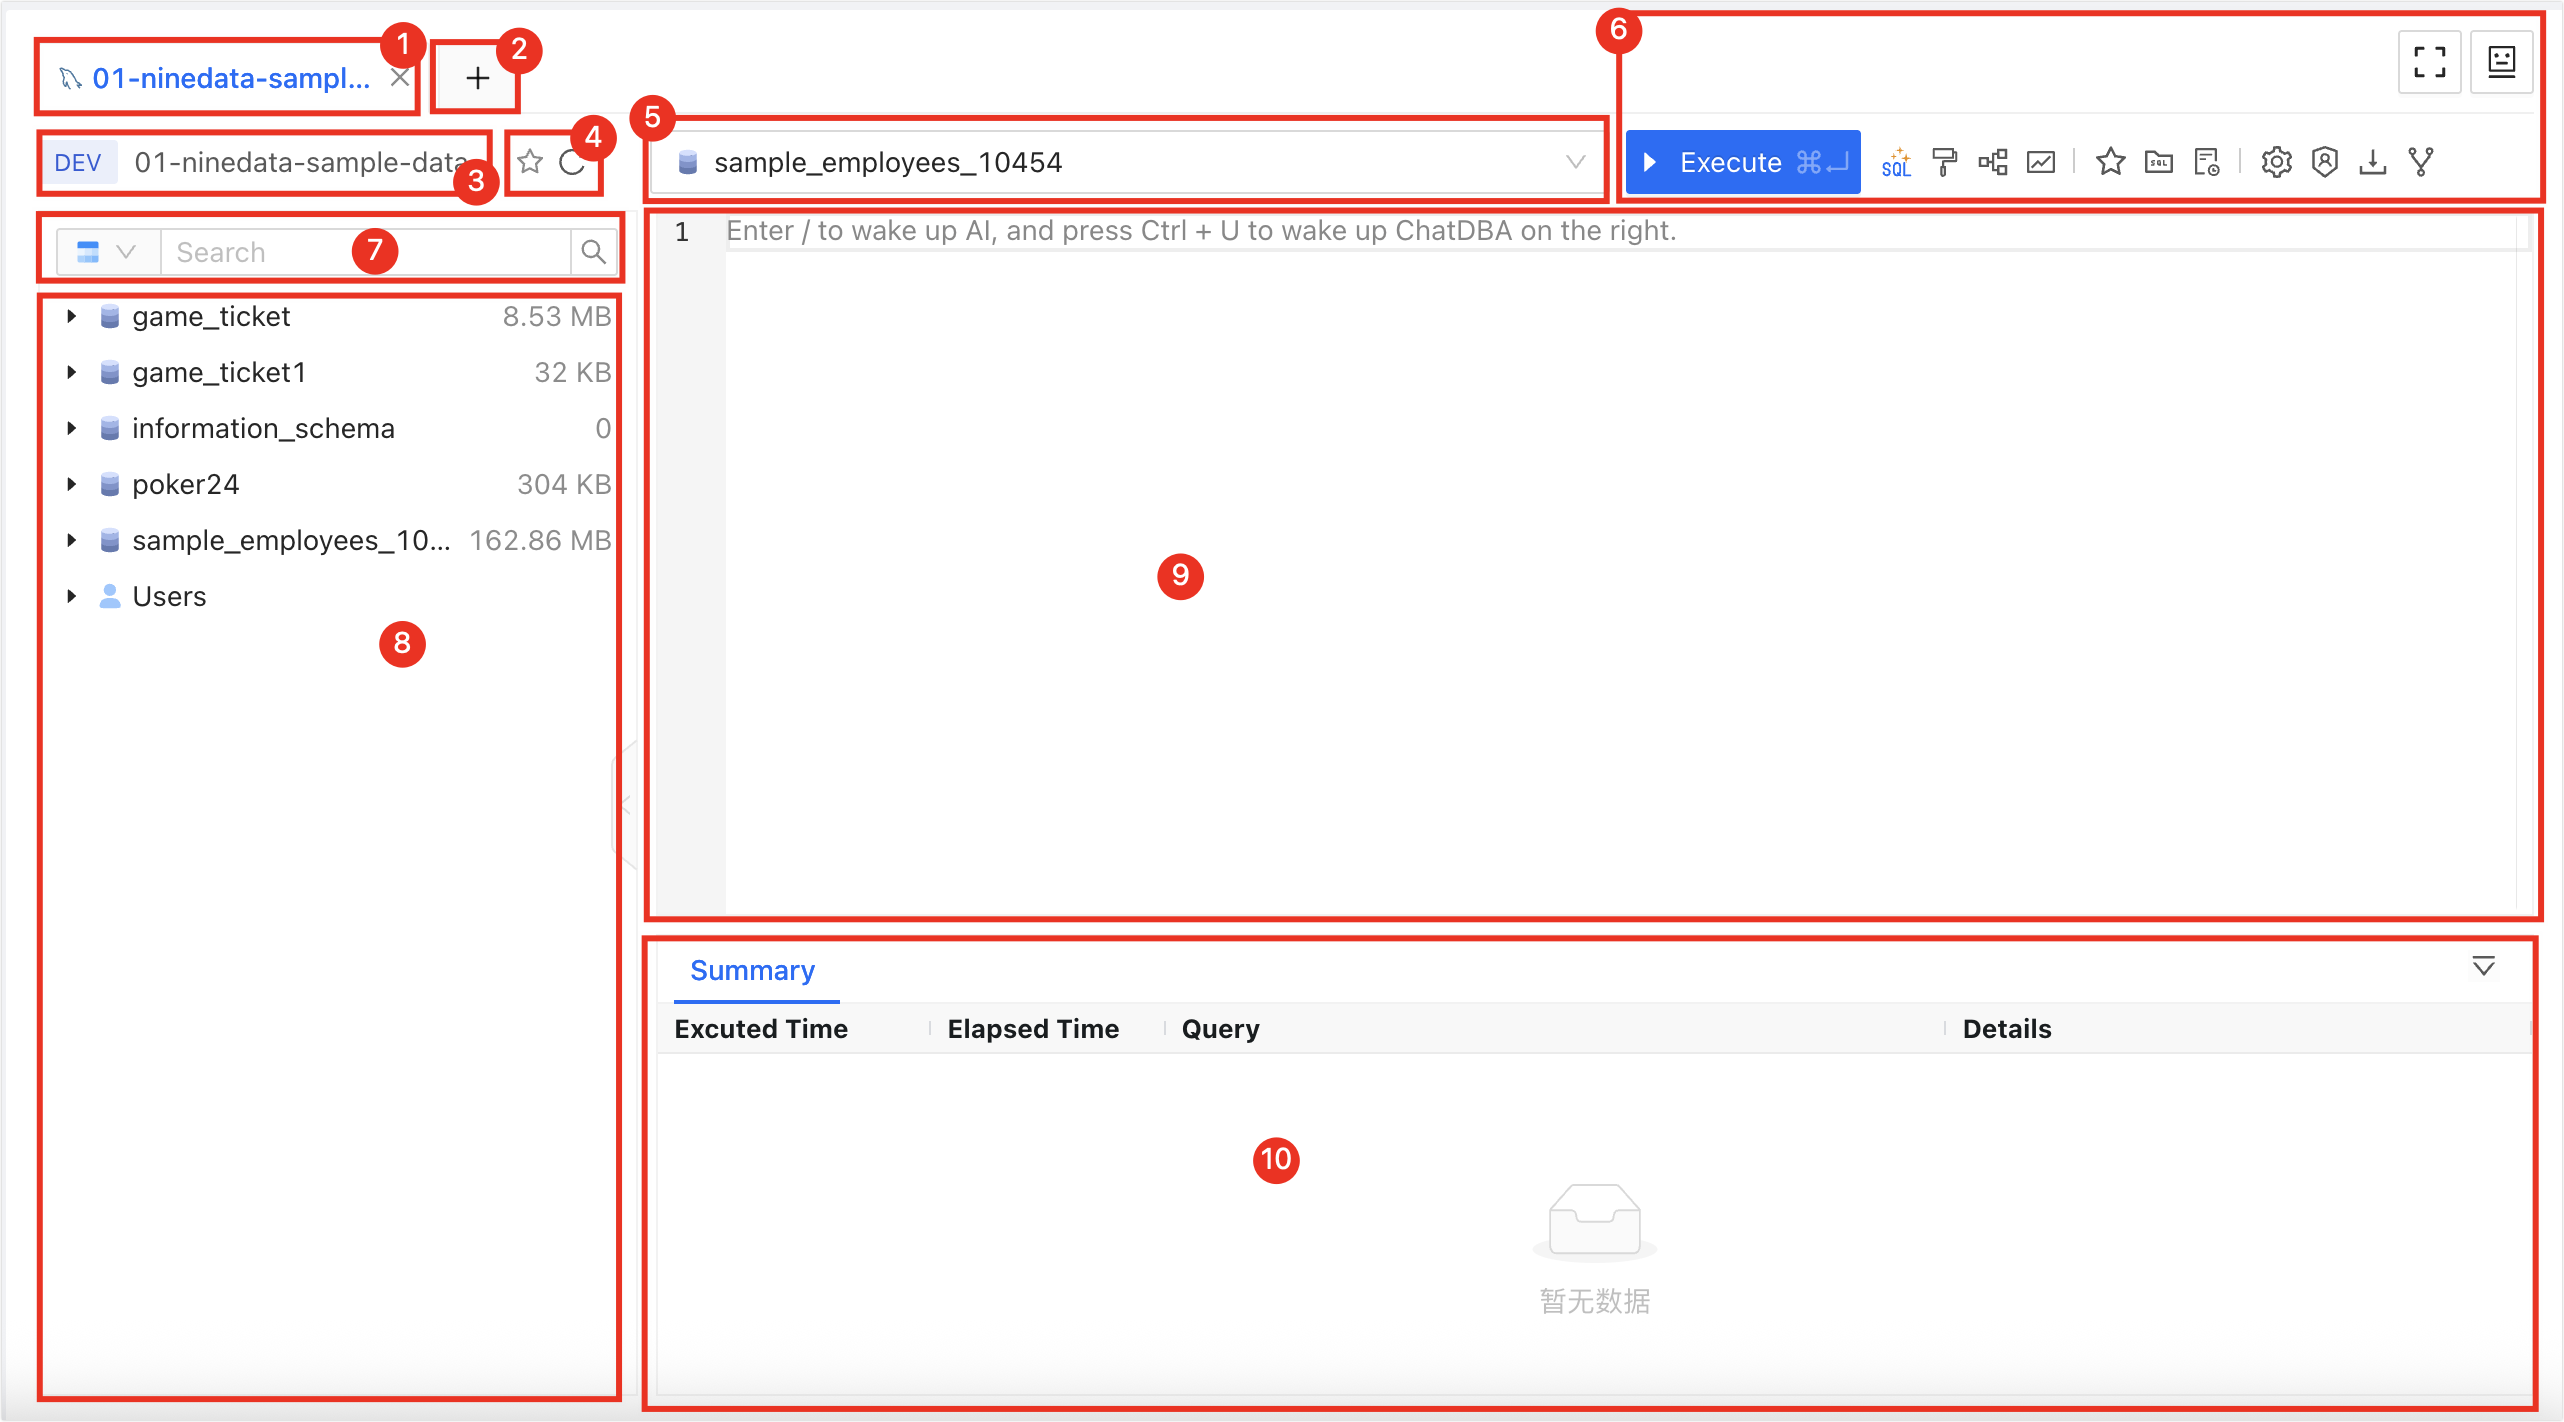
| Serial number | Function | Description |
|---|---|---|
| 1 | SQL console tab | Displays the SQL Console tab currently open for the data source. Click a tab to switch between multiple SQL Consoles. Click the X on the tab to close the corresponding SQL Console. Double-click a tab to rename it, and drag a tab to adjust its position. The context menu supports these actions:
|
| 2 | Open data source | Select and open another data source in SQL Console. |
| 3 | Data source information | Displays information about the current SQL Console data source, including the environment, IP address, and port number. |
| 4 | Favorite|Refresh |
|
| 5 | Database name | Select the target database for SQL operations. This is equivalent to the USE statement. |
| 6 | Function |
|
| 7 | Search | Search object names. Select an object type on the left, then search for the corresponding object name on the right. This supports databases, tables, columns, views, functions, stored procedures, triggers, events, and Packages. SQL Server supports keyword searches across object types. Object search currently supports MySQL, PostgreSQL, Oracle, DAMENG, and SQL Server. For other data sources, enter the table name to quickly locate the target data table. |
| 8 | Database list | Lists all databases and tables in the current data source. Supported functions vary by data source type:MySQL|OceanBase|PolarDB-X|PolarDB MySQL|AnalyticDB MySQL|TDSQL-C MySQL|GaussDB for MySQL|Aurora MySQL|GaiaDB|GaiaDB-X|GreatSQL | MariaDB
Oracle|OceanBase Oracle |DaMeng
SQL Server
ClickHouse
PostgreSQL|Greenplum|Klustron|DWS|openGauss|GaussDB| Vastbase
TiDB
Lindorm
Common Functions
|
| 9 | SQL editor | The SQL editor supports these features:
|
| 10 | Execution information and result set | Displays execution information and result sets for SQL queries.
|
 : Execute Execute the selected SQL statement.
 : SQL Optimize Analyze the SQL statement on the cursor line and provide optimization suggestions.
 : Format: Format the selected SQL statement for readability.
 : Execution Plan: View the execution plan of the selected SQL statement.
 : Favorite this SQL: Save all SQL statements in the current SQL Console to the SQL list for later use.
 : Favorites: View saved SQL statements. Insert the target SQL with Insert, or use Edit and Delete.
 : History: View the execution history of SQL on the target data source. Filter execution history by time period or search by keyword, such as SQL statement, database name, or error message.
 : Settings
 : View Threads (MySQL, ClickHouse, SQL Server, PostgreSQL, Oracle, OceanBase Oracle): Displays active connections on the current database server and the queries running in those connections. View Threads refresh intervals are 5, 10, 20, or 30 seconds.
 : Enable Admin Mode|Disable Admin Mode Only Administrator can use this mode. When enabled, SQL executed in SQL Console bypasses standardization and approval flows.
 : Import Demo Dataset Generate a test dataset in the current data source (only supported in
  : Logical E-R diagram (MySQL, OceanBase MySQL, PostgreSQL, Oracle, and SQL Server; the available scope depends on the current console) View the logical E-R diagram of the current database.
 : Full Screen Open SQL Console in full-screen browser mode. In full-screen mode, click
  Exit to restore the original SQL Console size.
 : AI Diagnosis opens the ChatDBA window in the SQL Console side panel. Use it to retrieve knowledge base content while writing SQL or to view AI diagnosis history.
 : Display the result set in column mode.
 : Display the result set in row mode.
 > Export Result: Export data in various formats. Choose the current page or all data, up to 10,000 rows.
 : Scrolls the result set to the bottom of the page. Clicking
  restores the view.
 icon to the right of the target column name, then enter a keyword in the text box to filter and search within that column.
- SQL Server: Right-click a view, stored procedure, function, or another non-table object and select Edit to modify its definition.
- SQL Server: Database and table objects load asynchronously and in pages. When a data source contains many objects, the actual loading status and displayed scope depend on the current console.
- SQL Server: Object search supports separate retrieval by object type. The searchable object types and search entry points depend on the current console.
- PostgreSQL, ADB-PG, and Greenplum: Generated table or function DDL includes the related
GRANTstatements, and partition-table display has been optimized. - ADB PostgreSQL: DDL display includes distributed-key, compression, and other related parameters.
- PostgreSQL, ADB-PG, Greenplum, GaussDB, openGauss, and DWS: Hover over a table name, column name, or index name to view object details.
- Oracle: Supports querying XML objects.
- TDSQL PostgreSQL (Oracle mode): Supports the Package folder, related compile and debug operations, and synonym object management. When creating a database, select Oracle mode or PostgreSQL mode. Table-object hover can display the table DDL, and execution plans can be collapsed. The available entry points depend on the current console.
- SQL Console object tree: Select an object and click AI to bring a SQL Tag containing data source information into ChatDBA. When editing a table, function, or other supported object, the data source and object information is also added to the AI context.
- SQL IDE: AI output can be filled back into the editor or used to replace existing code. NineData asks for confirmation before replacing existing code.
SQL Console result-set export supports TDSQL Oracle. The available export scope and formats depend on the current console.
In the Greenplum SQL Console object tree, select a function to edit its definition or start a debugging session.
FAQ
Question: What should I do if an error is reported when opening the MySQL data source through the SQL console
The user specified as a definer ('mysql.infoschema'@'localhost') does not exist?Answer: Create a user through an account in the local MySQL client
mysql.infoschemaand grant privileges. Then run these commands:Create the user:
mysql> CREATE USER 'mysql.infoschema'@'localhost' IDENTIFIED BY '<Password>';tipExample:
mysql> CREATE USER 'mysql.infoschema'@'localhost' IDENTIFIED BY '12345';Grant privileges:
mysql> GRANT ALL PRIVILEGES ON *.* TO 'mysql.infoschema'@'localhost';