SQL Console for Redis-Compatible Databases
Use the NineData SQL Console to manage Redis-compatible databases, run Redis commands, inspect keys, edit key values, and review command execution results.
Background
Redis is an in-memory data structure store commonly used for caching, queues, and real-time analytics. Managing Redis data safely often requires command knowledge and operational experience.
NineData SQL Console helps you manage Redis databases more easily. View and edit Redis data, and create, delete, rename, or update Redis keys.
Features
NineData SQL Console provides several features that help you manage Redis-compatible data sources.
| Feature | Description |
|---|---|
| AI intelligent assistance | Converts short natural-language requests into Redis commands. |
| Visual management | Supports visual operations such as accessing and viewing data, creating, deleting, renaming, and modifying the expiration time of keys, and adding, deleting, and modifying the content of keys. |
| Editor | Provides a command-line mode that supports powerful Redis commands and options to meet various needs. The Redis commands supported by the editor are listed in the appendix. |
| Workspace recovery | After an unexpected browser exit or host failure, sign in to the NineData console and open SQL Console again. NineData restores previously opened data sources and executed commands because the workspace state is saved in the cloud. |
| Execution history | History records commands executed by the current account in the NineData console. Search by data source, execution time, command keyword, or other fields, then copy and rerun commands from history. |
| SQL specification check | In organization modeOrganization mode supports assigning roles and resource permissions to users in the same organization. It is suitable for team collaboration, data security, and productivity management., NineData checks every command executed in SQL Console against the SQL development policy configured by Administrator. Commands that do not comply with the policy are blocked. |
Use cases
Use SQL Console for Redis-compatible databases to:
- Developers: Manage and edit Redis data during application development.
- Database administrators: Add, edit, and delete Redis data from a visual interface.
- Operations teams: Monitor and analyze Redis database status to find and resolve issues quickly.
Limitations
- Displaying the size of a Key is only supported in Redis version 4.0.0 and above.
- Managing Keys of Stream type is only supported in Redis version 5.0.0 and above.
Before you begin
The target database has been added to NineData. For instructions, see Manage data sources.
The data source must be Redis (version 3.0.0 or higher) or PegaDB.
In the organizational mode (DevOps Enterprise), you must have read-only, DML, or DDL permissions on the target data source.
tipRead-only permission only supports query operations.
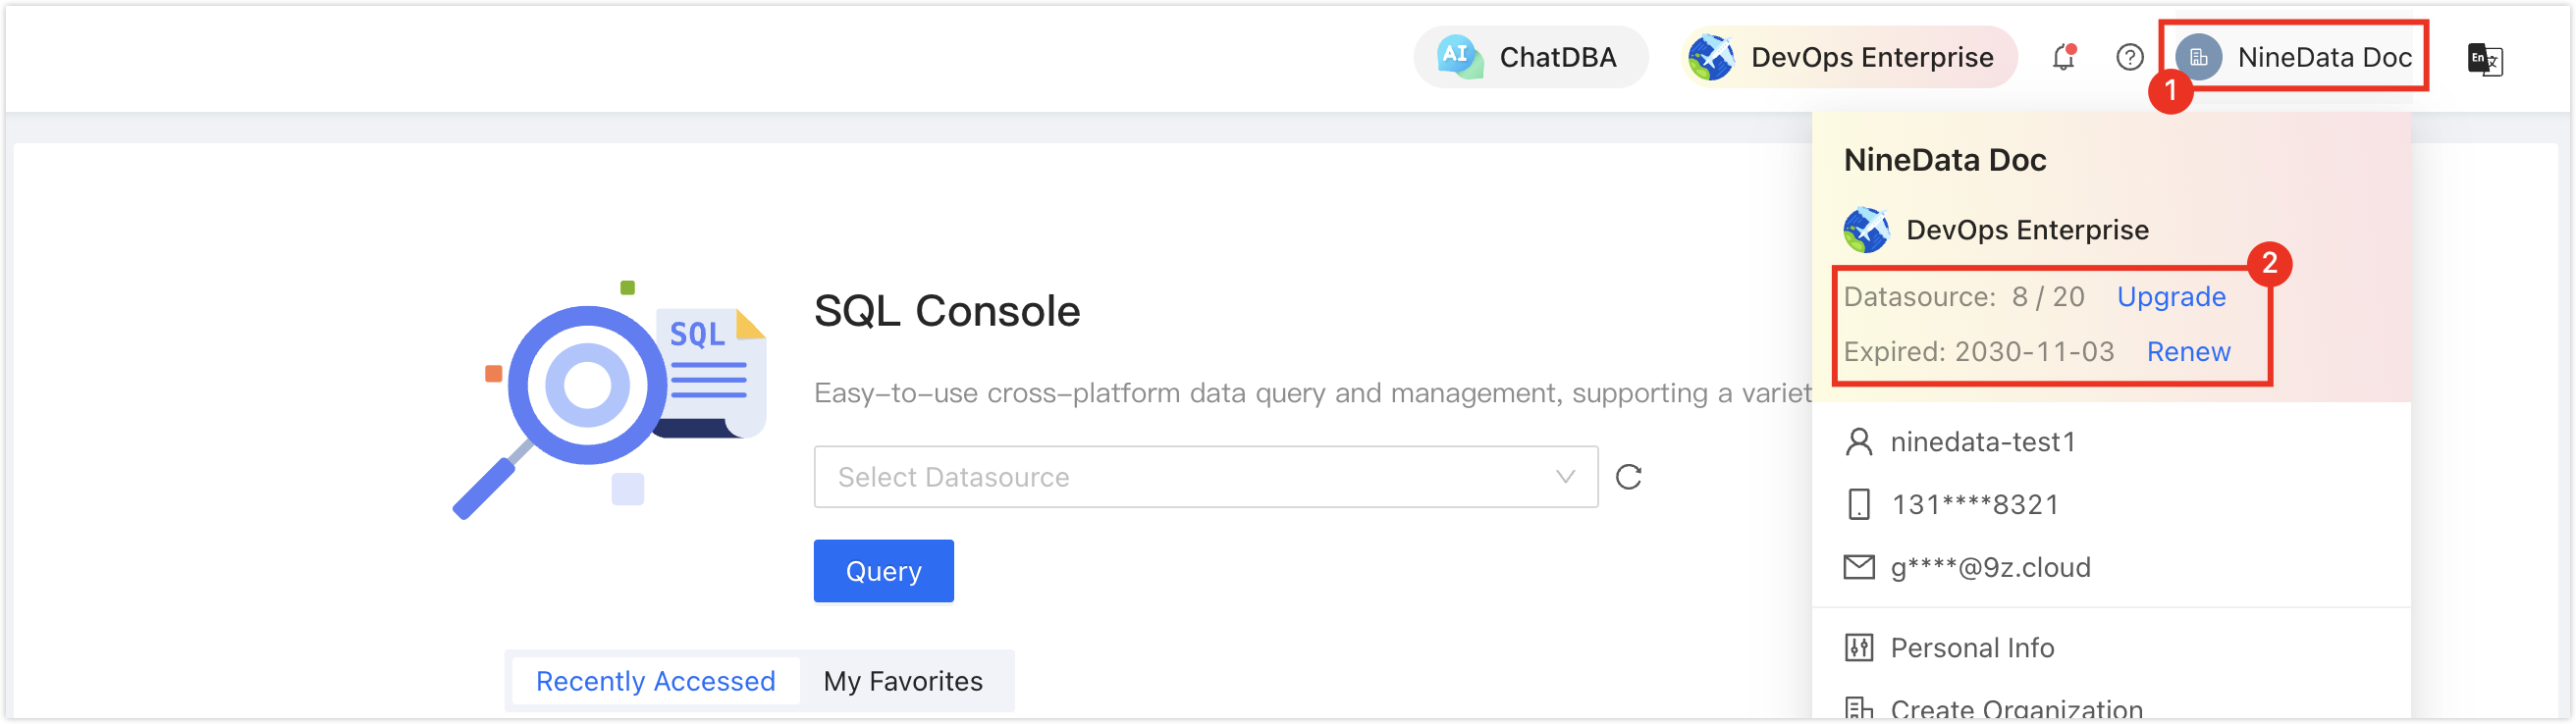
In the commercial versions (DevOps Pro, DevOps Enterprise), make sure your monthly or yearly subscription has not expired. An expired subscription may prevent you from using the Database DevOps service. Check the remaining quota and expiration date in the NineData Console header.
Interface reference
Visual Editor
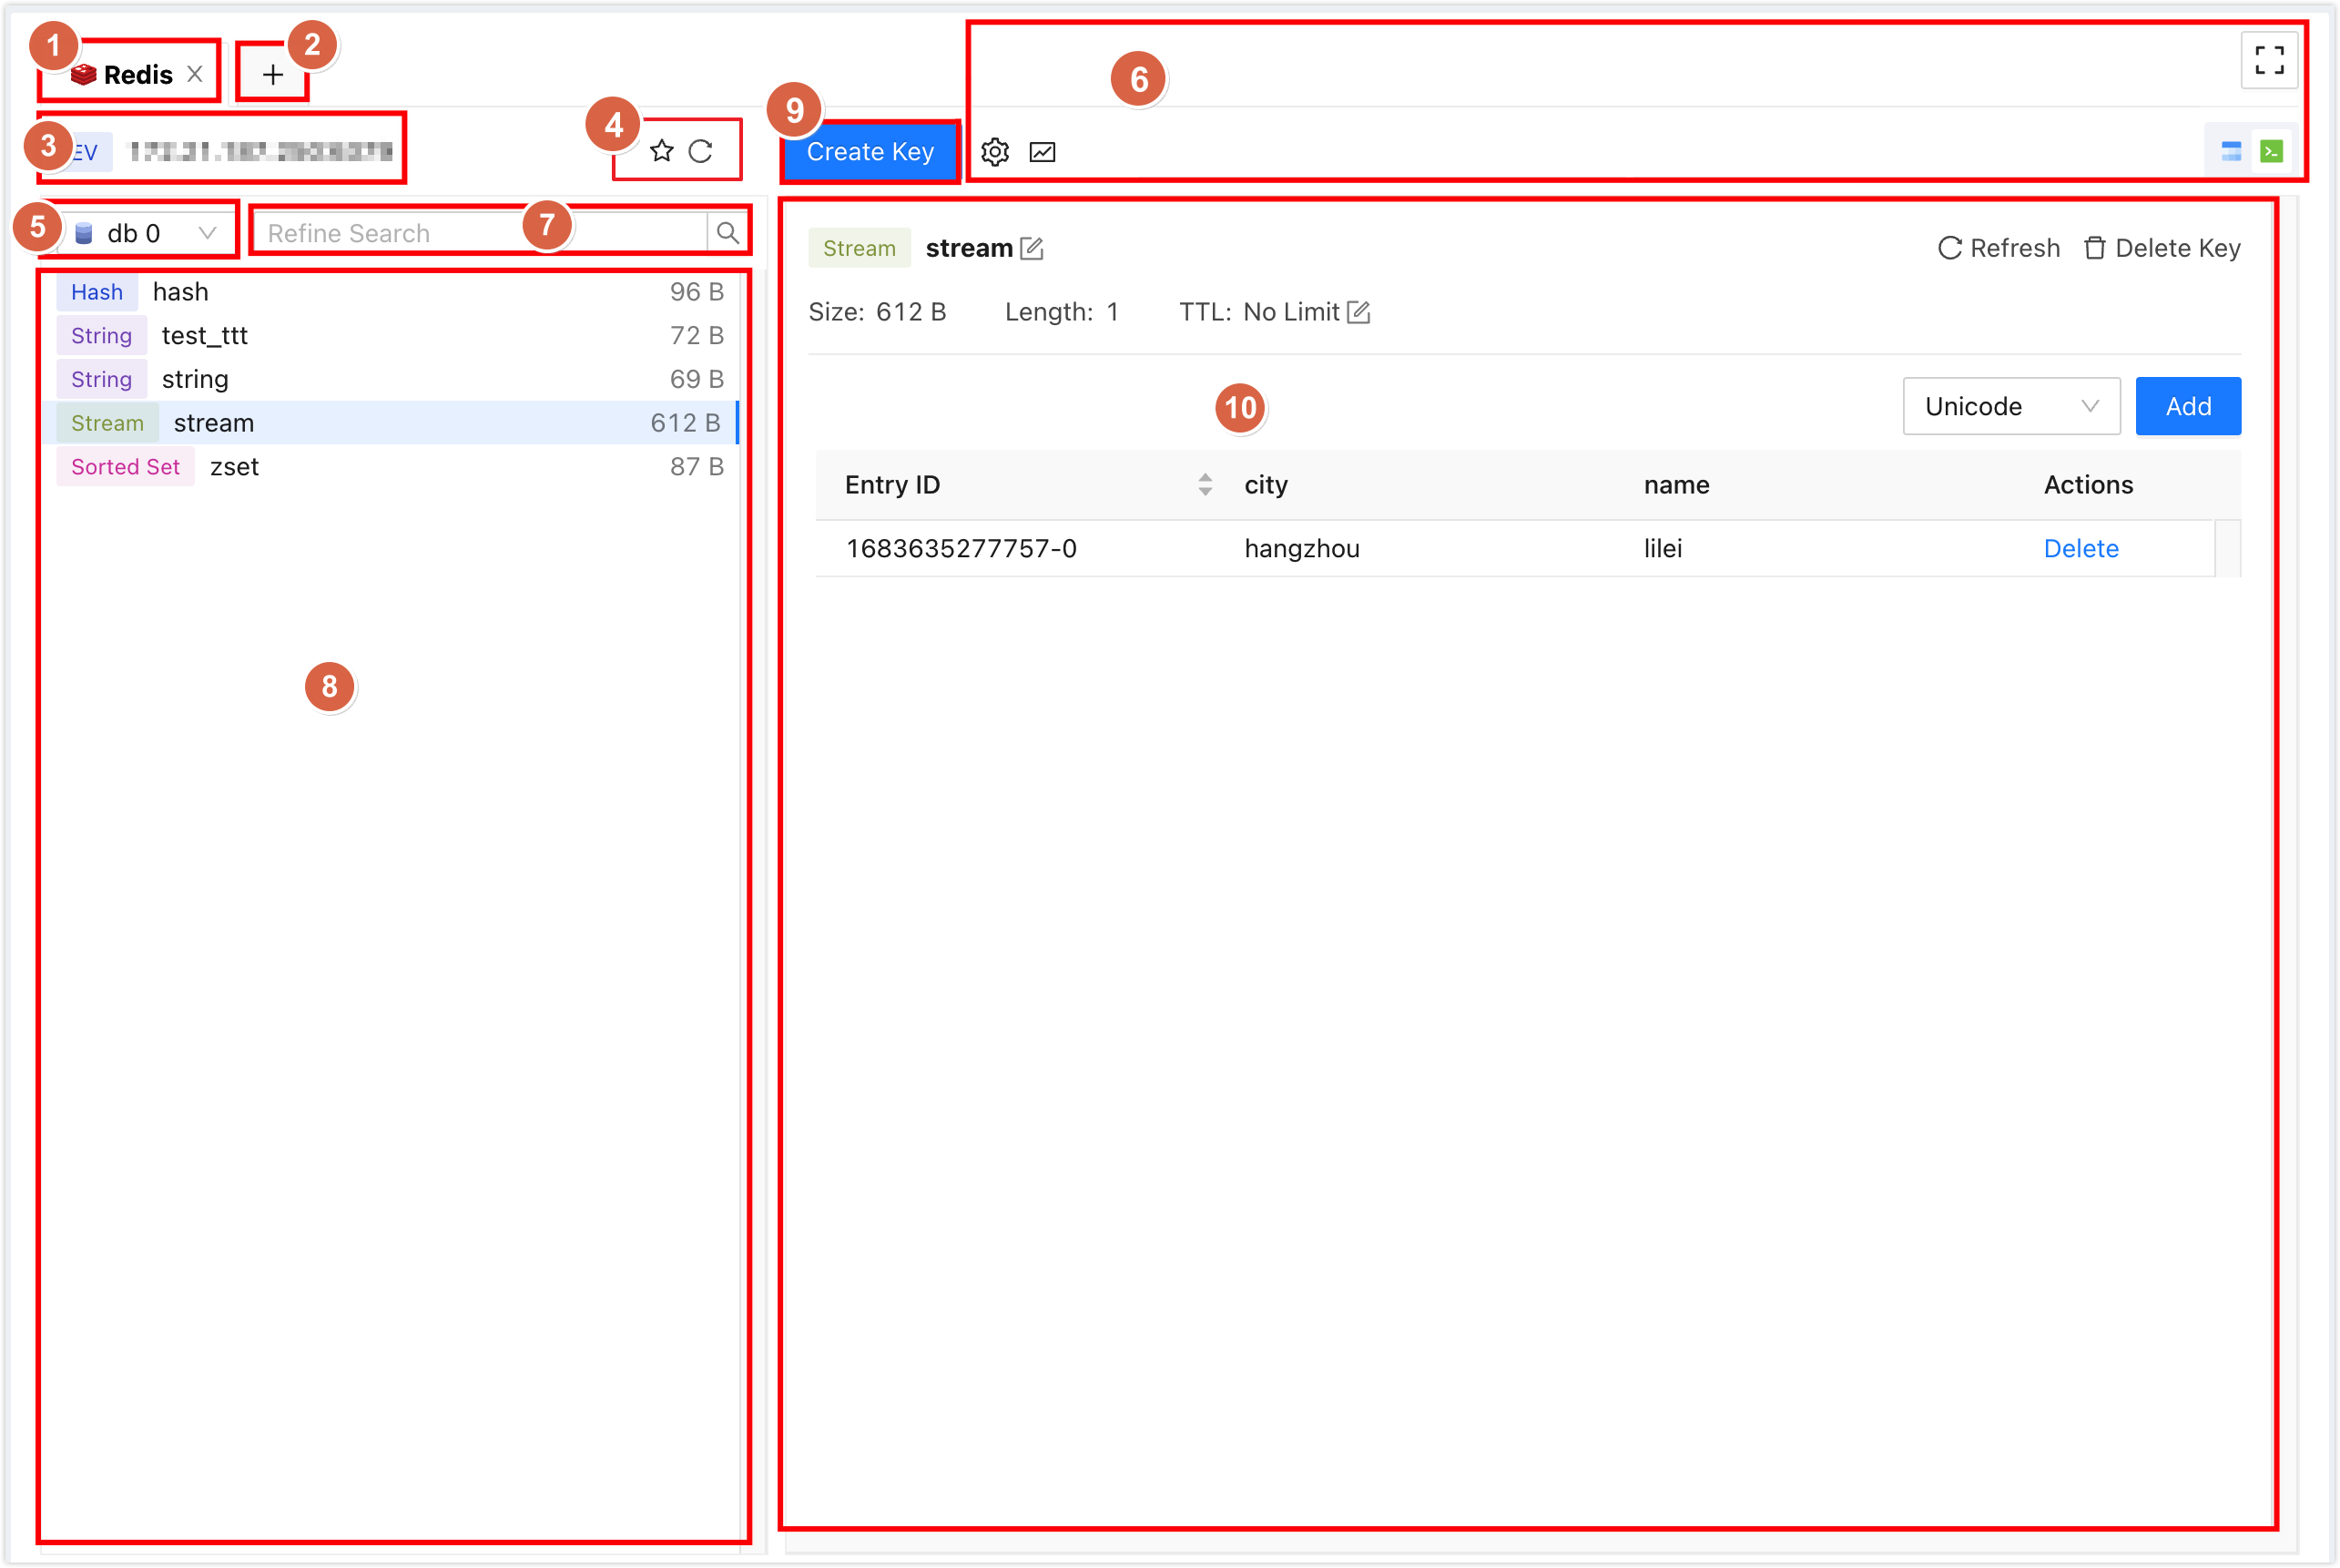
Index Feature Description 1 SQL Tab Displays the SQL Console tab currently open for the data source. Click a tab to switch between SQL Consoles, or click X to close a SQL Console. The right-click menu supports these actions: - Instance Details: Open the current data source details window.
- New Query: Open a new data source SQL console.
- Close Tab: Close the current tab.
2 Open Data Source Select and open a new data source SQL console. 3 Data Source Information Displays the data source information for the current SQL console, including environment, IP address, and port number.
Right-click menu:- Instance Details: Show detailed information of the current data source, including username, connection address, running time, and connection count, etc.
- Refresh: Refresh the data source information.
4 Favorite|Refresh - Favorite: Click the favorite icon to add the current data source to My Favorites for quick access when opening a new SQL Console.
- Refresh: Refresh the data in the current data source.
5 Database Name Switches the Redis database.
Right-click menu:- Database Details: View detailed information about the target database, including database name, default character set, database size, total number of keys, etc.
- Create Key: Create a new key. The creation options depend on the Key Type. Follow the on-screen instructions.
- New Query: Open a new SQL tab window.
6 Function Buttons  : Settings
- Results: Choose Overwrite or Append.
- Overwrite (default): The new result set overwrites the previous execution result.
- Append: Open new result sets in a new tab.
- Theme: Change the SQL Console theme. Choose Light or Dark.
- Font Size: Drag the slider to adjust the font size of SQL statements in the SQL Console. Default values:
- Windows: 16
- MacOS: 13
- Results: Choose Overwrite or Append.
 : View Threads Displays active connections on the current database server and the queries running in those connections. View Threads refresh intervals are 5, 10, 20, or 30 seconds.
 : Visualize Switch to visualization mode.
 : Editor Switch to editor mode.
 : Full Screen Open SQL Console in full-screen browser mode. In full-screen mode, click
  Exit in the toolbar to restore the original SQL Console size.
7 Search Quickly search for the target key by entering the key name. It supports both exact search by entering the complete key name and fuzzy search by entering partial characters with an asterisk (*) wildcard. 8 Key List Displays the keys in the current database, with a default load of 100 keys. To load more, scroll to the end of the list and click Load More to load another 100 keys. The Key List supports these actions: - Rename Key: Right-click the target key, click Rename Key, enter the new key name in the text box below New Name, and then click OK.
- Delete Key: Right-click the target key, click Delete Key, and then click OK to delete the current key.
- Modify TTL: Right-click the target key, click Modify TTL, enter an integer in the text box below TTL or click the
 button next to the text box to adjust the number up or down, the unit is in seconds, and then click OK. To remove the expiration time, delete the number in the text box and click OK.
 - Create Key: Right-click any key, click Create Key, and open the Create Key tab. Configure Key Type as required. Creation options vary by Key Type. Follow the page prompts. After configuration, click Create Key to create the key.
- New Query: Right-click any key, click New Query, to open a new SQL tab window.
- Refresh: Right-click any key, click Refresh, to refresh the key list.
9 Create Key Create a new key. Click Create Key to open the Create Key tab. Configure Key Type as required. Creation options vary by Key Type. Follow the page prompts. After configuration, click Create Key to create the key.
Note: To close the Create Key tab, click the icon on the tab.
10 Key Details Click a key in the Key List to display its details here. For keys with data exceeding 100 records, only the first 100 records are loaded by default. Click Load More at the bottom of the page to load another 100 records.
The Key Details area supports these actions on the key:- Common Operations:
- Change Key Name: Click the
 icon to the right of the key name, enter the new key name in the text box, and then click
  .
. - Refresh Key Content: Click the
 icon to refresh the content of the key.
 - Delete Key: Click the
 icon, and then click OK to delete the current key.
 - Change Key Expiry: Click the icon next to TTL, enter an integer in the text box, or click the button next to the text box to adjust the number up or down. The unit is in seconds. Then click . To remove the expiration time, delete the number in the text box and click .
- View Key Size (Only available in version 4.0.0 and above) and Length.
- Change the Display Format of Key Data: Click the drop-down box to the left of the search box, which is set to Unicode by default. Select the desired display format.
- Search Data in the Key (except for Stream type): Supports both exact and fuzzy searches. Click the
 icon to view the search results.
- Exact Search: Enter the complete field or value for an exact search.
- Fuzzy Search: Enter a partial string with an asterisk wildcard (*) for fuzzy search.
- Change Key Name: Click the
- Operations on Key Data: Depending on the type of key, different operations are supported. Typically, supported actions include adding, editing, and deleting data in the key. See the console for specific details.
Command Line Editor
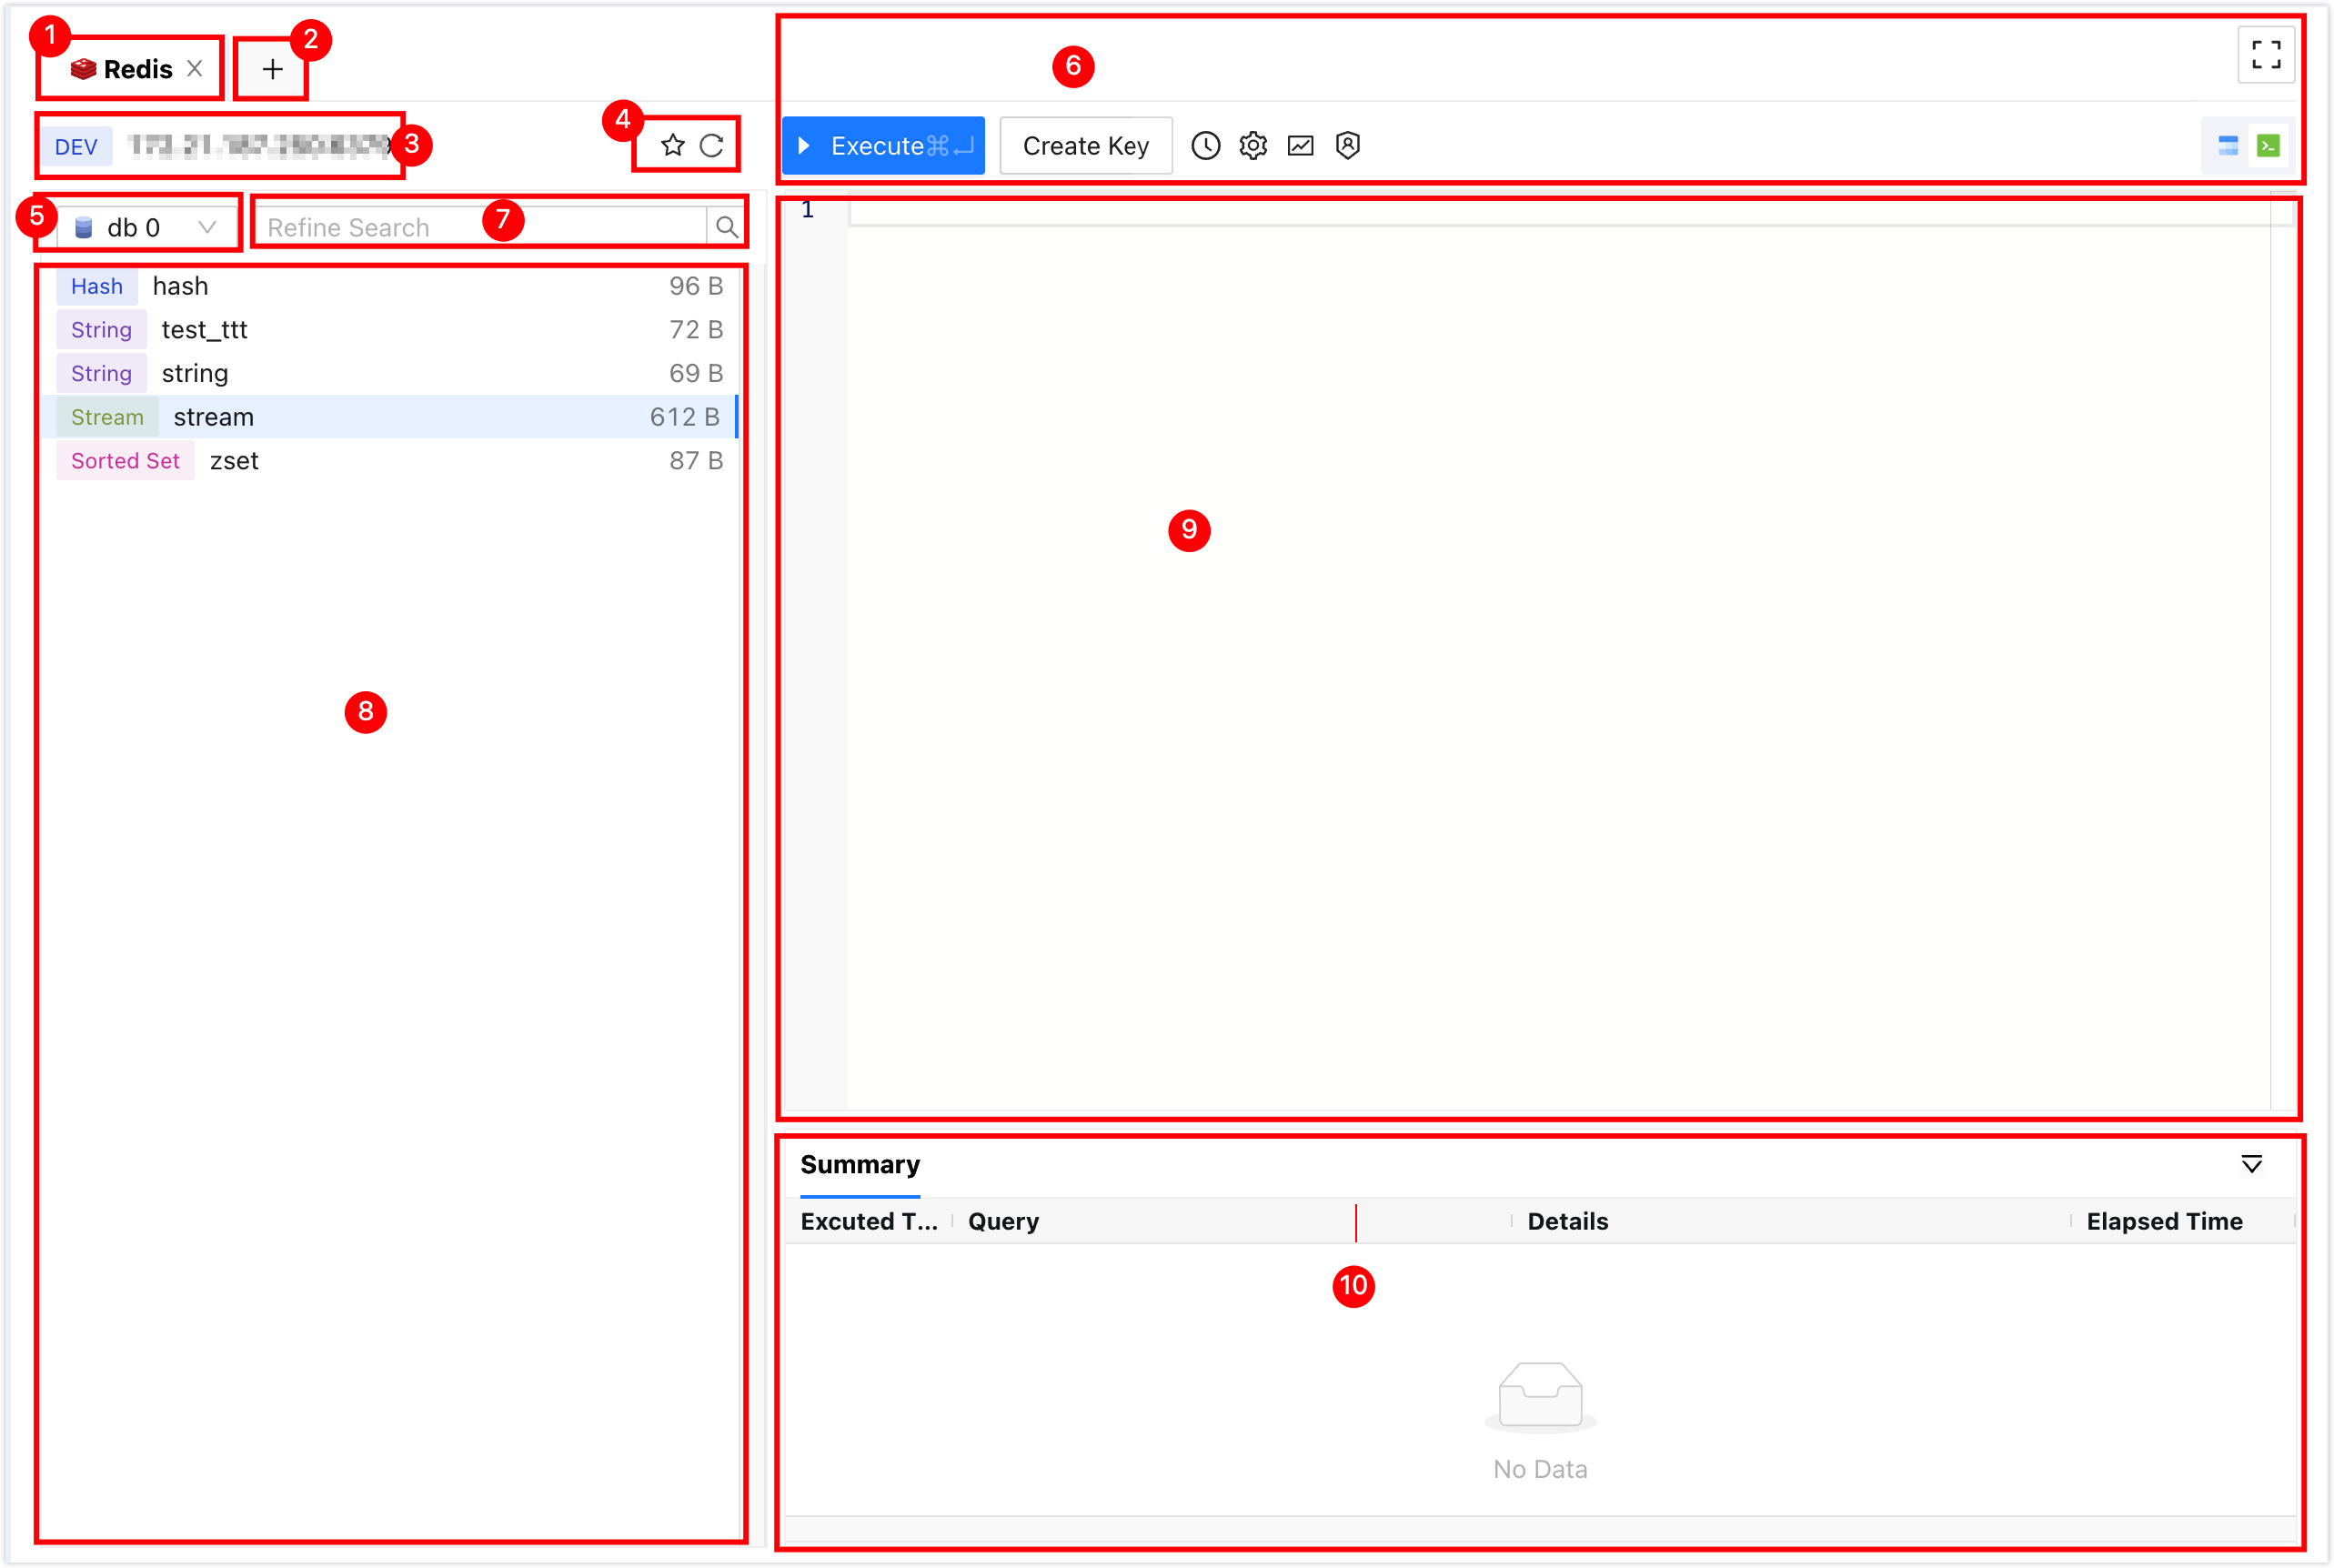
Number Function Description 1 SQL Tab Displays the SQL Console tab currently open for the data source. Click a tab to switch between SQL Consoles, or click X to close a SQL Console. The right-click menu supports the following actions: - Instance Details: Open the details window for the current data source.
- New Query: Open a new SQL console for a different data source.
- Close Tab: Close the current tab.
2 Open Data Source Select and open a new SQL console for a different data source. 3 Data Source Information Display information about the data source of the current SQL console, including environment, IP address, and port number.
Right-click menu:- Instance Details: Show detailed information about the current data source, including username, connection address, runtime, and number of connections.
- Refresh: Refresh the data source information.
4 Favorite|Refresh - Favorite: Click the favorite icon to add the current data source to My Favorites for quick access when opening a new SQL Console.
- Refresh: Refresh the data in the current data source.
5 Database Name Switch Redis databases or node addresses in cluster mode.
Commands for switching node addresses in cluster mode includeKEYS,SCAN,CLUSTER FLUSHSLOTS,CLUSTER MYID,CLUSTER MYSHARDID,CLUSTER ADDSLOTS,CLUSTER ADDSLOTSRANGE,CLUSTER DELSLOTS, andCLUSTER DELSLOTSRANGE. Run other commands on any node.
Right-click menu:- Database Details: View detailed information about the target database, including database name, default character set, database size, total number of keys, etc.
- Create Key: Create a new key. The creation options depend on the selected Key Type. Follow the on-screen instructions.
- New Query: Open a new SQL console tab.
6 Function Buttons  : Execute Execute the selected Redis command.
- Create Key: Open the Create Key tab. Choose Key Type. The available options depend on the selected Key Type. Follow the on-screen instructions, and click Create Key when finished.
- : View Threads: Displays active connections on the current database server and the queries running in those connections. View Threads refresh intervals are 5, 10, 20, or 30 seconds.
 : Favorite this SQL: Save all SQL statements in the current SQL Console to the SQL list for later use.
 : Favorites: View saved SQL statements, insert the target SQL with Insert, or use Edit and Delete.
 : History View the command execution history of the target data source. Filter execution history by date or search by keyword, such as command, database number, or error message. Click Copy in the Actions column of the target execution history row to copy it to the clipboard.
- : Settings Set the display mode for the result set and the font size of the SQL console.
- Results: Select either Overwrite or Append.
- Overwrite (default): New result sets replace the previous execution result.
- Append: Open new result sets in a new tab.
- Theme: Change the SQL Console theme. Choose Light or Dark.
- Font Size: Adjust the font size of the commands in the SQL console by dragging the slider. Default values:
- Windows: 16
- MacOS: 13
- Results: Select either Overwrite or Append.
- View Threads: Displays active connections on the current database server and the queries running in those connections.
 : Enable Admin Mode|Disable Admin Mode Only Administrator can use this mode. When enabled, commands executed in SQL Console bypass standardization and approval flows.
- : Visualize Switch to visualization mode.
- : Editor Switch to editor mode.
- : Full Screen Open SQL Console in full-screen browser mode. In full-screen mode, click in the toolbar to restore the original size of the SQL console.
7 Search Quickly find the target key by entering the key name. Supports searching with the complete key name for precise search, or using partial characters with asterisks (*) as wildcards for fuzzy search. 8 Key List Displays the keys in the current database, with 100 keys loaded by default. To load more keys, scroll to the end of the list and click Load More to load another 100 keys. The Key List supports these actions: - Rename Key: Right-click the target key, click Rename Key, enter the new key name in the text box below New Name, and then click OK.
- Delete Key: Right-click the target key, click Delete Key, and then click OK.
- Modify TTL: Right-click the target key, click Modify TTL, enter an integer in the text box below TTL, or click the button to adjust the number up or down. The unit is seconds. Then click OK. To remove the expiration time, delete the number in the text box and click OK.
- Create Key: Right-click any key, click Create Key, and open the Create Key tab. Choose Key Type. Creation options vary by the selected Key Type, so follow the on-screen prompts. Once configured, click Create Key.
- New Query: Right-click any key, click New Query, to open a new SQL console tab.
- Refresh: Right-click any key, click Refresh to refresh the key list.
9 Command Line Window A window for executing Redis commands. It supports the following features: - Execute Redis commands: Supports executing single or multiple commands.
- Syntax highlighting.
- Right-click menu:
- Execute: Execute the SQL statement at the cursor position.
- Favorite this SQL: Save all commands in the current SQL Console to favorites for later use.
- Favorites: View saved commands, insert the target command with Insert, or use Edit and Delete.
- History: View the command execution history of the target data source. Filter command execution history by time period, or search by keyword, such as SQL statement, database name, or error message.
- View Threads: Display information about active connections on the current database server and the queries running in those connections.
- General operations: Use Cut, Copy, Paste, and Select All.
- Select Current SQL: Select the SQL statement at the cursor position.
10 Execution Information, Result Set Displays command execution information and result sets. - Execution Information: Includes execution time, executed command, execution status, execution details, and related fields.
- Result Set: Displays the command results. Available actions:
- Search within the result set. Supports Fuzzy and Exact.
- Click the small arrow next to the column name to sort the result set.
- View SQL Statement for Result Set: Hover over the target result set tab to view the SQL statement for that result set.
Procedure
Sign in to the NineData Console.
Go to DevOps > SQL Console.
tipIf a data source session is still open, NineData redirects you to that data source page.
Click the text box below SQL Console. The data source selector displays the data sources you have added. Select the target data source, and then click Query to go to the SQL Console.
tip- If no data source exists yet, the page is empty. Click Create Datasource on the page.
If you have multiple data sources, enter complete or partial keywords for exact or fuzzy search. The searchable fields are as follows:
Data source name
IP address
:::
- After SQL Console opens, manage the Redis-compatible data source. For interface details, see Interface reference.
Result
The SQL Console opens the selected Redis-compatible data source. Switch databases, browse and edit keys, run Redis commands, inspect execution results, and review command history.
Appendix: Command List Supported by Redis Editor
- Bitmap
- Connection Management
- Generic
- Cluster management
- Geospatial Indices
- Hash
- HyperLogLog
- List
- Set
- SortedSet
- Stream
- String
| Keyword | Supported Version | Command Format |
|---|---|---|
| BITCOUNT | 2.6.0 | BITCOUNT key [start end] |
| BITFIELD | 3.2.0 | BITFIELD key [GET type offset] [SET type offset value] [INCRBY type offset increment] [OVERFLOW WRAP|SAT|FAIL] |
| BITFIELD_RO | 6.0.0 | BITFIELD_RO key [GET encoding offset [GET encoding offset ...]] |
| BITOP | 2.6.0 | BITOP <AND | OR | XOR | NOT> destkey key [key ...] |
| BITPOS | 2.8.7 | BITPOS key bit [start [end [BYTE | BIT]]] |
| GETBIT | 2.2.0 | GETBIT key offset |
| SETBIT | 2.2.0 | SETBIT key offset value |
| Keyword | Supported Version | Command Format |
|---|---|---|
| SELECT | 1.0.0 | SELECT index |
| Keyword | Supported Version | Command Format |
|---|---|---|
| COPY | 6.2.0 | COPY source destination [DB destination-db] [REPLACE] |
| DEL | 1.0.0 | DEL key [key ...] |
| DUMP | 2.6.0 | DUMP key |
| EXISTS | 1.0.0 | EXISTS key [key ...] |
| EXPIRE | 1.0.0 | EXPIRE key seconds [NX | XX | GT | LT] |
| EXPIREAT | 1.2.0 | EXPIREAT key unix-time-seconds [NX | XX | GT | LT] |
| EXPIRETIME | 7.0.0 | EXPIRETIME key |
| MIGRATE | 2.6.0 | MIGRATE host port <key | ""> destination-db timeout [COPY] [REPLACE] [AUTH password | AUTH2 username password] [KEYS key [key ...]] |
| MOVE | 1.0.0 | MOVE key db |
| OBJECT ENCODING | 2.3.3 | OBJECT ENCODING key |
| OBJECT FREQ | 4.0.0 | OBJECT FREQ key |
| OBJECT IDLETIME | 2.2.3 | OBJECT IDLETIME key |
| OBJECT REFCOUNT | 2.2.3 | OBJECT REFCOUNT key |
| PERSIST | 2.2.0 | PERSIST key |
| PEXPIRE | 2.6.0 | PEXPIRE key milliseconds [NX | XX | GT | LT] |
| PEXPIREAT | 2.6.0 | PEXPIREAT key unix-time-milliseconds [NX | XX | GT | LT] |
| PEXPIRETIME | 7.0.0 | PEXPIRETIME key |
| PTTL | 2.6.0 | PTTL key |
| RANDOMKEY | 1.0.0 | RANDOMKEY |
| RENAME | 1.0.0 | RENAME key newkey |
| RENAMENX | 1.0.0 | RENAMENX key newkey |
| RESTORE | 2.6.0 | RESTORE key ttl serialized-value [REPLACE] [ABSTTL] [IDLETIME seconds] [FREQ frequency] |
| SCAN | 2.8.0 | SCAN cursor [MATCH pattern] [COUNT count] [TYPE type] |
| SORT | 1.0.0 | SORT key [BY pattern] [LIMIT offset count] [GET pattern [GET pattern ...]] [ASC | DESC] [ALPHA] [STORE destination] |
| SORT_RO | 7.0.0 | SORT_RO key [BY pattern] [LIMIT offset count] [GET pattern [GET pattern ...]] [ASC | DESC] [ALPHA] |
| TOUCH | 3.2.1 | TOUCH key [key ...] |
| TTL | 1.0.0 | TTL key |
| TYPE | 1.0.0 | TYPE key |
| UNLINK | 4.0.0 | UNLINK key [key ...] |
| Keyword | Supported Version | Command Format |
|---|---|---|
| ASKING | 3.0.0 | ASKING |
| CLUSTER ADDSLOTS | 3.0.0 | CLUSTER ADDSLOTS slot [slot ...] |
| CLUSTER ADDSLOTSRANGE | 7.0.0 | CLUSTER ADDSLOTSRANGE start-slot end-slot [start-slot end-slot ...] |
| CLUSTER BUMPEPOCH | 3.0.0 | CLUSTER BUMPEPOCH |
| CLUSTER COUNT-FAILURE-REPORTS | 3.0.0 | CLUSTER COUNT-FAILURE-REPORTS node-id |
| CLUSTER COUNTKEYSINSLOT | 3.0.0 | CLUSTER COUNTKEYSINSLOT slot |
| CLUSTER DELSLOTS | 3.0.0 | CLUSTER DELSLOTS slot [slot ...] |
| CLUSTER DELSLOTSRANGE | 7.0.0 | CLUSTER DELSLOTSRANGE start-slot end-slot [start-slot end-slot ...] |
| CLUSTER FLUSHSLOTS | 3.0.0 | CLUSTER FLUSHSLOTS |
| CLUSTER FORGET | 3.0.0 | CLUSTER FORGET node-id |
| CLUSTER GETKEYSINSLOT | 3.0.0 | CLUSTER GETKEYSINSLOT slot count |
| CLUSTER INFO | 3.0.0 | CLUSTER INFO |
| CLUSTER KEYSLOT | 3.0.0 | CLUSTER KEYSLOT key |
| CLUSTER LINKS | 7.0.0 | CLUSTER LINKS |
| CLUSTER MEET | 3.0.0 | CLUSTER MEET ip port [cluster-bus-port] |
| CLUSTER MYID | 3.0.0 | CLUSTER MYID |
| CLUSTER MYSHARDID | 7.2.0 | CLUSTER MYSHARDID |
| CLUSTER NODES | 3.0.0 | CLUSTER NODES |
| CLUSTER REPLICAS | 5.0.0 | CLUSTER REPLICAS node-id |
| CLUSTER REPLICATE | 3.0.0 | CLUSTER REPLICATE node-id |
| CLUSTER RESET | 3.0.0 | CLUSTER RESET [HARD | SOFT] |
| CLUSTER SAVECONFIG | 3.0.0 | CLUSTER SAVECONFIG |
| CLUSTER SET-CONFIG-EPOCH | 3.0.0 | CLUSTER SET-CONFIG-EPOCH config-epoch |
| CLUSTER SETSLOT | 3.0.0 | CLUSTER SETSLOT slot <IMPORTING node-id | MIGRATING node-id | NODE node-id | STABLE> |
| CLUSTER SHARDS | 7.0.0 | CLUSTER SHARDS |
| CLUSTER SLAVES | 3.0.0 | CLUSTER SLAVES node-id |
| CLUSTER SLOTS | 3.0.0 | CLUSTER SLOTS |
| READONLY | 3.0.0 | READONLY |
| READWRITE | 3.0.0 | READWRITE |
| Keyword | Supported Version | Command Format |
|---|---|---|
| GEOADD | 3.2.0 | GEOADD key [NX | XX] [CH] longitude latitude member [longitude latitude member ...] |
| GEODIST | 3.2.0 | GEODIST key member1 member2 [M | KM | FT | MI] |
| GEOHASH | 3.2.0 | GEOHASH key [member [member ...]] |
| GEOPOS | 3.2.0 | GEOPOS key [member [member ...]] |
| GEORADIUS | 3.2.0 | GEORADIUS key longitude latitude radius <M | KM | FT | MI> [WITHCOORD] [WITHDIST] [WITHHASH] [COUNT count [ANY]] [ASC | DESC] [STORE key] [STOREDIST key] |
| GEO RADIUS_RO | 3.2.10 | GEORADIUS_RO key longitude latitude radius <M | KM | FT | MI> [WITHCOORD] [WITHDIST] [WITHHASH] [COUNT count [ANY]] [ASC | DESC] |
| GEORADIUS BYMEMBER | 3.2.0 | GEORADIUSBYMEMBER key member radius <M | KM | FT | MI> [WITHCOORD] [WITHDIST] [WITHHASH] [COUNT count [ANY]] [ASC | DESC] [STORE key] [STOREDIST key] |
| GEORADIUS BYMEMBER_RO | 3.2.10 | GEORADIUSBYMEMBER_RO key member radius <M | KM | FT | MI> [WITHCOORD] [WITHDIST] [WITHHASH] [COUNT count [ANY]] [ASC | DESC] |
| GEOSEARCH | 6.2.0 | GEOSEARCH key <FROMMEMBER member | FROMLONLAT longitude latitude> <BYRADIUS radius <M | KM | FT | MI> | BYBOX width height <M | KM | FT | MI>> [ASC | DESC] [COUNT count [ANY]] [WITHCOORD] [WITHDIST] [WITHHASH] |
| GEOSEARCH STORE | 6.2.0 | GEOSEARCHSTORE destination source <FROMMEMBER member | FROMLONLAT longitude latitude> <BYRADIUS radius <M | KM | FT | MI> | BYBOX width height <M | KM | FT | MI>> [ASC | DESC] [COUNT count [ANY]] [STOREDIST] |
| Keyword | Supported Version | Command Format |
|---|---|---|
| HDEL | 2.0.0 | HDEL key field [field ...] |
| HEXISTS | 2.0.0 | HEXISTS key field |
| HGET | 2.0.0 | HGET key field |
| HGETALL | 2.0.0 | HGETALL key |
| HINCRBY | 2.0.0 | HINCRBY key field increment |
| HINCRBYFLOAT | 2.6.0 | HINCRBYFLOAT key field increment |
| HKEYS | 2.0.0 | HKEYS key |
| HLEN | 2.0.0 | HLEN key |
| HMGET | 2.0.0 | HMGET key field [field ...] |
| HMSET | 2.0.0 | HMSET key field value [field value ...] |
| HRANDFIELD | 6.2.0 | HRANDFIELD key [count [WITHVALUES]] |
| HSET | 2.0.0 | HSET key field value |
| HSETNX | 2.0.0 | HSETNX key field value |
| HVALS | 2.0.0 | HVALS key |
| HSCAN | 2.8.0 | HSCAN key cursor [MATCH pattern] [COUNT count] |
| HSTRLEN | 3.2.0 | HSTRLEN key field |
| Keyword | Supported Version | Command Format |
|---|---|---|
| PFADD | 2.8.9 | PFADD key [element [element ...]] |
| PFCOUNT | 2.8.9 | PFCOUNT key [key ...] |
| PFMERGE | 2.8.9 | PFMERGE destkey [sourcekey [sourcekey ...]] |
| Keyword | Supported Version | Command Format |
|---|---|---|
| LINDEX | 1.0.0 | LINDEX key index |
| LINSERT | 2.2.0 | LINSERT key <BEFORE | AFTER> pivot element |
| LLEN | 1.0.0 | LLEN key |
| LMOVE | 6.2.0 | LMOVE source destination <LEFT | RIGHT> <LEFT | RIGHT> |
| LMPOP | 7.0.0 | LMPOP numkeys key [key ...] <LEFT | RIGHT> [COUNT count] |
| LPOP | 1.0.0 | LPOP key [count] |
| LPOS | 6.0.6 | LPOS key element [RANK rank] [COUNT num-matches] [MAXLEN len] |
| LPUSH | 1.0.0 | LPUSH key element [element ...] |
| LPUSHX | 2.2.0 | LPUSHX key element [element ...] |
| LRANGE | 1.0.0 | LRANGE key start stop |
| LREM | 1.0.0 | LREM key count element |
| LSET | 1.0.0 | LSET key index element |
| LTRIM | 1.0.0 | LTRIM key start stop |
| RPOP | 1.0.0 | RPOP key [count] |
| RPOPLPUSH | 1.2.0 | RPOPLPUSH source destination |
| RPUSH | 1.0.0 | RPUSH key element [element ...] |
| RPUSHX | 2.2.0 | RPUSHX key element [element ...] |
| Keyword | Supported Version | Command Format |
|---|---|---|
| SADD | 1.0.0 | SADD key member [member ...] |
| SCARD | 1.0.0 | SCARD key |
| SDIFF | 1.0.0 | SDIFF key [key ...] |
| SDIFFSTORE | 1.0.0 | SDIFFSTORE destination key [key ...] |
| SINTER | 1.0.0 | SINTER key [key ...] |
| SINTERCARD | 7.0.0 | SINTERCARD numkeys key [key ...] [LIMIT limit] |
| SINTERSTORE | 1.0.0 | SINTERSTORE destination key [key ...] |
| SISMEMBER | 1.0.0 | SISMEMBER key member |
| SMEMBERS | 1.0.0 | SMEMBERS key |
| SMISMEMBER | 6.2.0 | SMISMEMBER key member [member ...] |
| SMOVE | 1.0.0 | SMOVE source destination member |
| SPOP | 1.0.0 | SPOP key [count] |
| SRANDMEMBER | 1.0.0 | SRANDMEMBER key [count] |
| SREM | 1.0.0 | SREM key member [member ...] |
| SSCAN | 2.8.0 | SSCAN key cursor [MATCH pattern] [COUNT count] |
| SUNION | 1.0.0 | SUNION key [key ...] |
| SUNIONSTORE | 1.0.0 | SUNIONSTORE destination key [key ...] |
| Keyword | Supported Version | Command Format |
|---|---|---|
| ZADD | 1.2.0 | ZADD key [NX | XX] [GT | LT] [CH] [INCR] score member [score member ...] |
| ZCARD | 1.2.0 | ZCARD key |
| ZCOUNT | 2.0.0 | ZCOUNT key min max |
| ZDIFF | 6.2.0 | ZDIFF numkeys key [key ...] [WITHSCORES] |
| ZDIFFSTORE | 6.2.0 | ZDIFFSTORE destination numkeys key [key ...] |
| ZINCRBY | 1.2.0 | ZINCRBY key increment member |
| ZINTER | 6.2.0 | ZINTER numkeys key [key ...] [WEIGHTS weight [weight ...]] [AGGREGATE <SUM | MIN | MAX>] [WITHSCORES] |
| ZINTERCARD | 7.0.0 | ZINTERCARD numkeys key [key ...] [LIMIT limit] |
| ZINTERSTORE | 2.0.0 | ZINTERSTORE destination numkeys key [key ...] [WEIGHTS weight [weight ...]] [AGGREGATE <SUM | MIN | MAX>] |
| ZLEXCOUNT | 2.8.9 | ZLEXCOUNT key min max |
| ZMPOP | 7.0.0 | ZMPOP numkeys key [key ...] <MIN | MAX> [COUNT count] |
| ZMSCORE | 6.2.0 | ZMSCORE key member [member ...] |
| ZPOPMAX | 5.0.0 | ZPOPMAX key [count] |
| ZPOPMIN | 5.0.0 | ZPOPMIN key [count] |
| ZRAND MEMBER | 6.2.0 | ZRANDMEMBER key [count [WITHSCORES]] |
| ZRANGE | 1.2.0 | ZRANGE key start stop [BYSCORE | BYLEX] [REV] [LIMIT offset count] [WITHSCORES] |
| ZRANGEBYLEX | 2.8.9 | ZRANGEBYLEX key min max [LIMIT offset count] |
| ZRANGE BYSCORE | 1.0.5 | ZRANGEBYSCORE key min max [WITHSCORES] [LIMIT offset count] |
| ZRANGESTORE | 6.2.0 | ZRANGESTORE dst src min max [BYSCORE | BYLEX] [REV] [LIMIT offset count] |
| ZRANK | 2.0.0 | ZRANK key member [WITHSCORE] |
| ZREM | 1.2.0 | ZREM key member [member ...] |
| ZREMRANGE BYLEX | 2.8.9 | ZREMRANGEBYLEX key min max |
| ZREMRANGE BYRANK | 2.0.0 | ZREMRANGEBYRANK key start stop |
| ZREMRANGE BYSCORE | 1.2.0 | ZREMRANGEBYSCORE key min max |
| ZREVRANGE | 1.2.0 | ZREVRANGE key start stop [WITHSCORES] |
| ZREVRANGE BYLEX | 2.8.9 | ZREVRANGEBYLEX key max min [LIMIT offset count] |
| ZREVRANGE BYSCORE | 2.2.0 | ZREVRANGEBYSCORE key max min [WITHSCORES] [LIMIT offset count] |
| ZREVRANK | 2.0.0 | ZREVRANK key member [WITHSCORE] |
| ZSCAN | 2.8.0 | ZSCAN key cursor [MATCH pattern] [COUNT count] |
| ZSCORE | 1.2.0 | ZSCORE key member |
| ZUNION | 6.2.0 | ZUNION numkeys key [key ...] [WEIGHTS weight [weight ...]] [AGGREGATE <SUM | MIN | MAX>] [WITHSCORES] |
| ZUNIONSTORE | 2.0.0 | ZUNIONSTORE destination numkeys key [key ...] [WEIGHTS weight [weight ...]] [AGGREGATE <SUM | MIN | MAX>] |
| Keyword | Supported Version | Command Format |
|---|---|---|
| XACK | 5.0.0 | XACK key group id [id ...] |
| XAUTOCLAIM | 6.2.0 | XAUTOCLAIM key group consumer min-idle-time start [COUNT count] [JUSTID] |
| XCLAIM | 5.0.0 | XCLAIM key group consumer min-idle-time id [id ...] [IDLE ms] [TIME unix-time-milliseconds] [RETRYCOUNT count] [FORCE] [JUSTID] [LASTID lastid] |
| XDEL | 5.0.0 | XDEL key id [id ...] |
| XGROUP CREATE | 5.0.0 | XGROUP CREATE key group <id | $> [MKSTREAM] [ENTRIESREAD entries-read] |
| XGROUP CREATECONSUMER | 6.2.0 | XGROUP CREATECONSUMER key group consumer |
| XGROUP DELCONSUMER | 5.0.0 | XGROUP DELCONSUMER key group consumer |
| XGROUP DESTROY | 5.0.0 | XGROUP DESTROY key group |
| XGROUP SETID | 5.0.0 | XGROUP SETID key group <id | $> [ENTRIESREAD entries-read] |
| XINFO CONSUMERS | 5.0.0 | XINFO CONSUMERS key group |
| XINFO GROUPS | 5.0.0 | XINFO GROUPS key |
| XINFO STREAM | 5.0.0 | XINFO STREAM key [FULL [COUNT count]] |
| XLEN | 5.0.0 | XLEN key |
| XPENDING | 5.0.0 | XPENDING key group [[IDLE min-idle-time] start end count [consumer]] |
| XRANGE | 5.0.0 | XRANGE key start end [COUNT count] |
| XREVRANGE | 5.0.0 | XREVRANGE key end start [COUNT count] |
| XTRIM | 5.0.0 | XTRIM key <MAXLEN | MINID> [= | ~] threshold [LIMIT count] |
| Keyword | Supported Version | Command Format |
|---|---|---|
| APPEND | 2.0.0 | APPEND key value |
| DECR | 1.0.0 | DECR key |
| DECRBY | 1.0.0 | DECRBY key decrement |
| GET | 1.0.0 | GET key |
| GETDEL | 6.2.0 | GETDEL key |
| GETEX | 6.2.0 | GETEX key [EX seconds | PX milliseconds | EXAT unix-time-seconds | PXAT unix-time-milliseconds | PERSIST] |
| GETRANGE | 2.4.0 | GETRANGE key start end |
| GETSET | 1.0.0 | GETSET key value |
| INCR | 1.0.0 | INCR key |
| INCRBY | 1.0.0 | INCRBY key increment |
| INCRBYFLOAT | 2.6.0 | INCRBYFLOAT key increment |
| LCS | 7.0.0 | LCS key1 key2 [LEN] [IDX] [MINMATCHLEN min-match-len] [WITHMATCHLEN] |
| MGET | 1.0.0 | MGET key [key ...] |
| MSET | 1.0.1 | MSET key value [key value ...] |
| MSETNX | 1.0.1 | MSETNX key value [key value ...] |
| PSETEX | 2.6.0 | PSETEX key milliseconds value |
| SET | 1.0.0 | SET key value [NX | XX] [GET] [EX seconds | PX milliseconds | EXAT unix-time-seconds | PXAT unix-time-milliseconds | KEEPTTL] |
| SETEX | 2.0.0 | SETEX key seconds value |
| SETNX | 1.0.0 | SETNX key value |
| SETRANGE | 2.2.0 | SETRANGE key offset value |
| STRLEN | 2.2.0 | STRLEN key |
| SUBSTR | 1.0.0 | SUBSTR key start end |