Manage sensitive data
Use sensitive data management to mark one or more columns in a data source as sensitive columns. Users who are not authorized to view sensitive columns cannot see the content of those columns.
Overview
NineData sensitive data management helps protect sensitive information stored in databases. Add sensitive columns manually or use scan tasks to identify sensitive columns.
Automatic sensitive-column detection uses three main components: Sensitivity Level, Data Type, and Masking Algorithm.
- Sensitivity Level: Provides six levels from S0 to S5; the higher the number, the higher the security level. S0 indicates non-sensitive fields. Each level from S1 to S5 corresponds to different approval processes, allowing administrators to configure various approval strategies for classified and hierarchical management of sensitive data.
- Data Type: Defines the type of sensitive data. NineData provides 27 data types by default. Each data type is associated with Sensitivity Level, Masking Algorithm, and Detection Rules. When Detection Rules matches a column, NineData associates the data type with that column and classifies the column.
- Masking Algorithm: Defines how sensitive columns are masked. NineData provides 33 masking algorithms by default and supports custom masking algorithms.
Based on these components, NineData can scan all databases or specified databases. Scan tasks can run once or periodically, which helps keep sensitive-column configuration up to date when new fields are added.
The Dashboard dashboard shows sensitive data information for the current organization, including data sources that support sensitive data protection, data sources with sensitive data enabled, sensitivity levels, tables with sensitive data enabled, sensitive column counts, and sensitive data access counts. For details, see View the sensitive data dashboard.
Before you begin
- You have created or joined an organization, and this organization has subscribed to either DevOps Pro or DevOps Enterprise. Please ensure that your annual or monthly subscription is still active. For more information, please refer to Manage Organizations.
- Your current account has switched to the target organization. For more information, please refer to Switching to an Organization.
The data source that contains sensitive fields has been added to NineData. For details, see Add data sources.
The supported data source types for sensitive data are MySQL, SQL Server, PostgreSQL, Oracle, OceanBase Oracle, Db2, TiDB, OceanBase MySQL, GreatSQL, MariaDB, ClickHouse, Doris, SelectDB, Greenplum, StarRocks, SingleStore, Lindorm, and AnalyticDB for PostgreSQL, as well as TDSQL for MySQL, GaussDB, and openGauss.
To set sensitive columns for views, the data source type must be MySQL, Db2, PostgreSQL, TiDB, or TDSQL MySQL.
To use automatic sensitive-column detection, make sure the data source type is MySQL (including MySQL-compatible data sources), SQL Server, PostgreSQL, Oracle, GaussDB, or openGauss.
Notes
- The Administrator role can view all sensitive columns without authorization.
- Only users with Sensitive Data Management permission can manage the sensitive-data pages.
- Under DevOps Pro, only up to three data sources can be configured with sensitive columns; DevOps Enterprise has no such limitation.
Procedure
Add sensitive columns to data sources with scan tasks
Sign in to the NineData Console.
- In the left navigation bar, click Datasource>Sensitive Data.
On the Datasource tab, NineData lists all data sources that support sensitive data configuration. Find the target data source and click Scan Setting under Actions
 .
.To start a scan with default configurations, click Immediate Scan under Actions for the target data source
, and then choose whether the scan result takes effect immediately in Scan Results Activate Immediately.To scan multiple data sources in batch, select the checkboxes on the left of the target data sources, and then click Immediate Scan or Scan Setting at the top of the page.
Configure the parameters in the table, and click OK.
Parameter Description Scanning Object Scanning scope for sensitive columns. Supported options are All Databases and Specified Databases. - All Databases: Scan all databases and tables in the current data source.
- Specified Databases: Specify databases manually. This option supports single and multiple selections.
Scan Mode Scan mode. Supported options are Single Scan and Periodic Scan. - Single Scan: Perform a one-time scan of sensitive columns in the database.
- Periodic Scan: Scan sensitive columns in the database periodically.
Time Zone Time zone for the scan start time (Excuted Time). - Single Scan: Optional. If Excuted Time is not specified, leave the time zone empty.
- Periodic Scan: Required. Select the time zone for the scan start time.
Periodic (Visible when Periodic Scan is selected) Scanning cycle for sensitive columns. Supported options are Week and Month. Select one or more days of the week or dates of the month.
Selecting Every day runs the scan once every day.Launch Time Start time of the sensitive-column scan. - Single Scan: Optional. Select the date and time. If not specified, the scan starts immediately after configuration.
- Periodic Scan: Required. Select the time point.
Scan Results Activate Immediately Controls whether scanned sensitive columns take effect immediately after the scan finishes. Click the Scan Task tab to view scan tasks. On this page, perform these operations:
Adding Sensitive Columns: If you selected No for Scan Results Activate Immediately, manually confirm the newly added sensitive columns from the scan results. Click the number under Adding Sensitive Columns, select the sensitive columns to activate in the dialog, and then click Implementing Identified Results or Marked As Insensitive.
Terminate Scan: For tasks whose Status is Scanning, click Terminate Scan in the Actions column to stop the scan in advance.
Rescan: If a scan task fails, click Rescan in the Actions column of the target task to restart the scan.
Manually add sensitive columns to data sources
If NineData does not detect the sensitive columns you require, add them manually.
Sign in to the NineData Console.
- In the left navigation bar, click Datasource>Sensitive Data.
On the Datasource tab, NineData lists all data sources that support sensitive data configuration. Find the target data source and click Details under Actions.
On the Details page, click the Select dropdown, and select All from the menu.
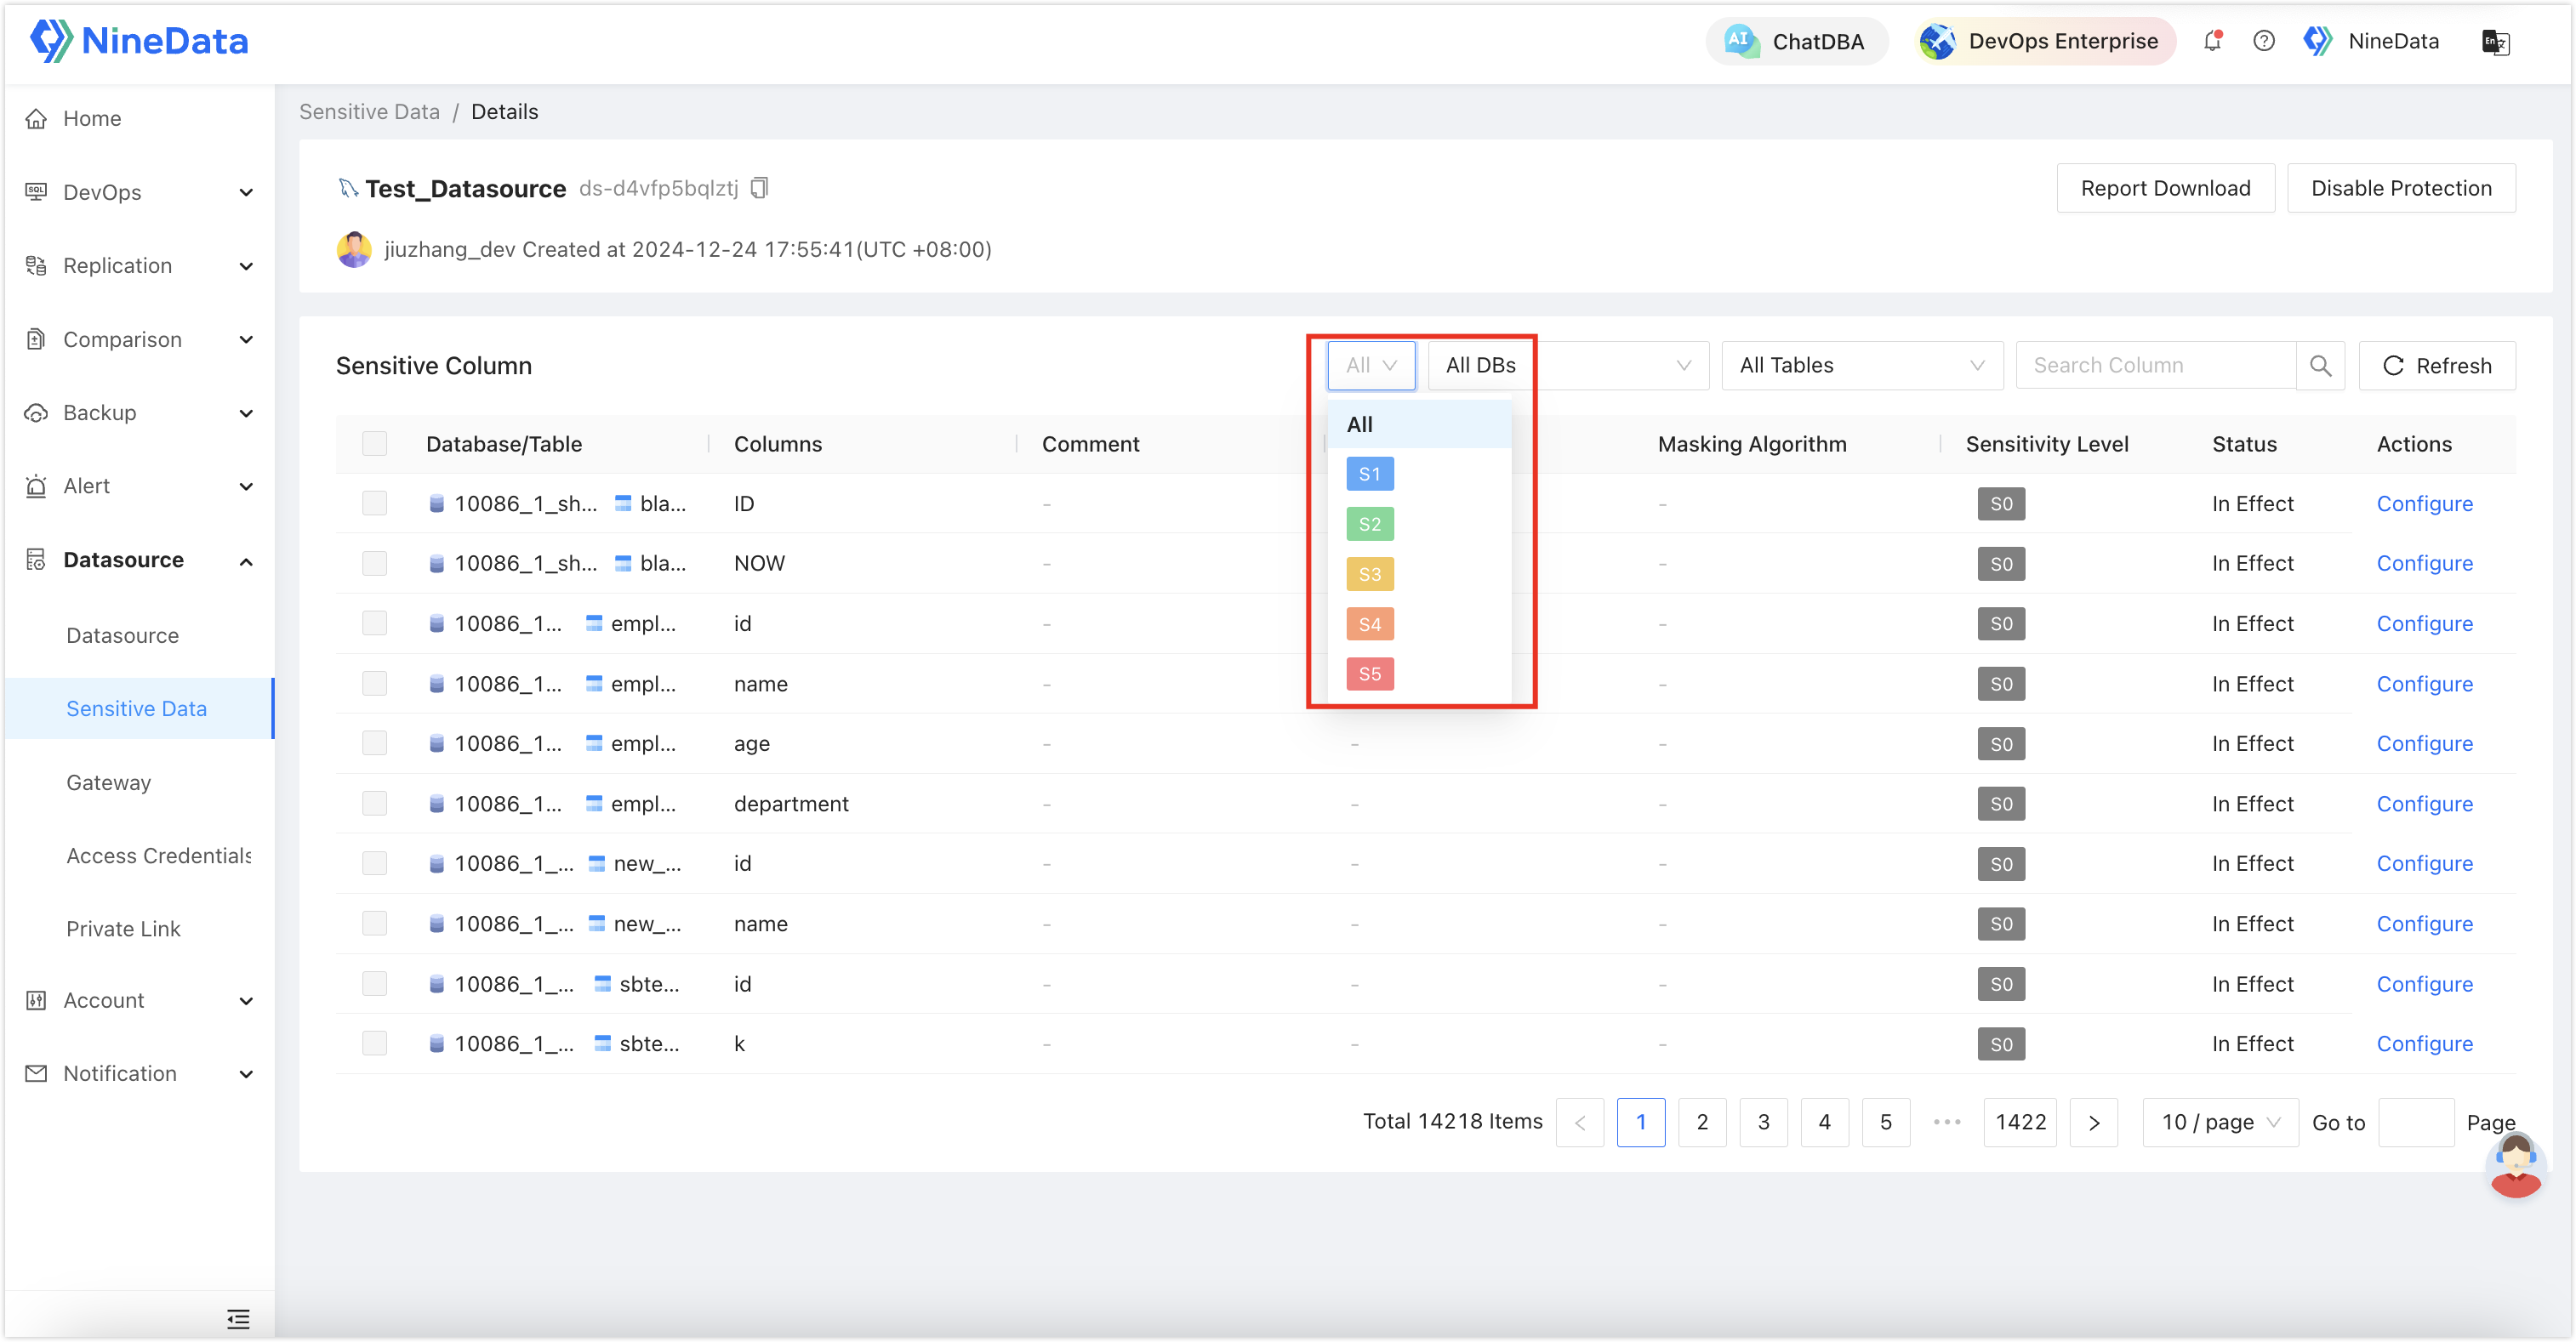
Locate the target column and click Configure under the Actions column. Configure:
- Data Type
- Masking Algorithm
- Sensitivity Level Then click OK.
tipFor large column lists:
- Filter by database/table first
- Use column name search for quick navigation
Manage sensitive columns
For existing sensitive columns, adjust Data Type, Masking Algorithm, and Sensitivity Level.
Sign in to the NineData Console.
- In the left navigation bar, click Datasource>Sensitive Data.
Manage sensitive columns from either the data source level or the sensitive column level.
At the data source level: On the Datasource tab, find the target data source and click Details under Actions.
At the sensitive column level: Click the Sensitive Column tab. NineData lists all sensitive columns that have been added. Search by sensitivity level, data source name, database name, table name, or column name.
Find the target sensitive column, click the
 icon for the item you want to adjust, and then select the new option.
Cancel periodic sensitive-column scans
Periodic scan tasks run based on the schedule configured by the user. To stop a periodic scan, cancel it manually.
Sign in to the NineData Console.
- In the left navigation bar, click Datasource>Sensitive Data.
- On the Datasource tab, find the target data source and click Cancel Scan under Actions .
- In the confirmation dialog, click OK.
Terminate pending scan tasks
Scan tasks enter Pending Exec status when they have a scheduled execution time. Cancel these pending tasks when needed.
Sign in to the NineData Console.
- In the left navigation bar, click Datasource>Sensitive Data.
On the Scan Task tab, find the scan task whose status is Pending Exec, and click Terminate Scan under Actions.
Confirm by clicking Terminate in the dialog.
View the sensitive data dashboard
System administrators can view the sensitive data dashboard to understand the sensitive data status of the current organization.
Dashboard fields
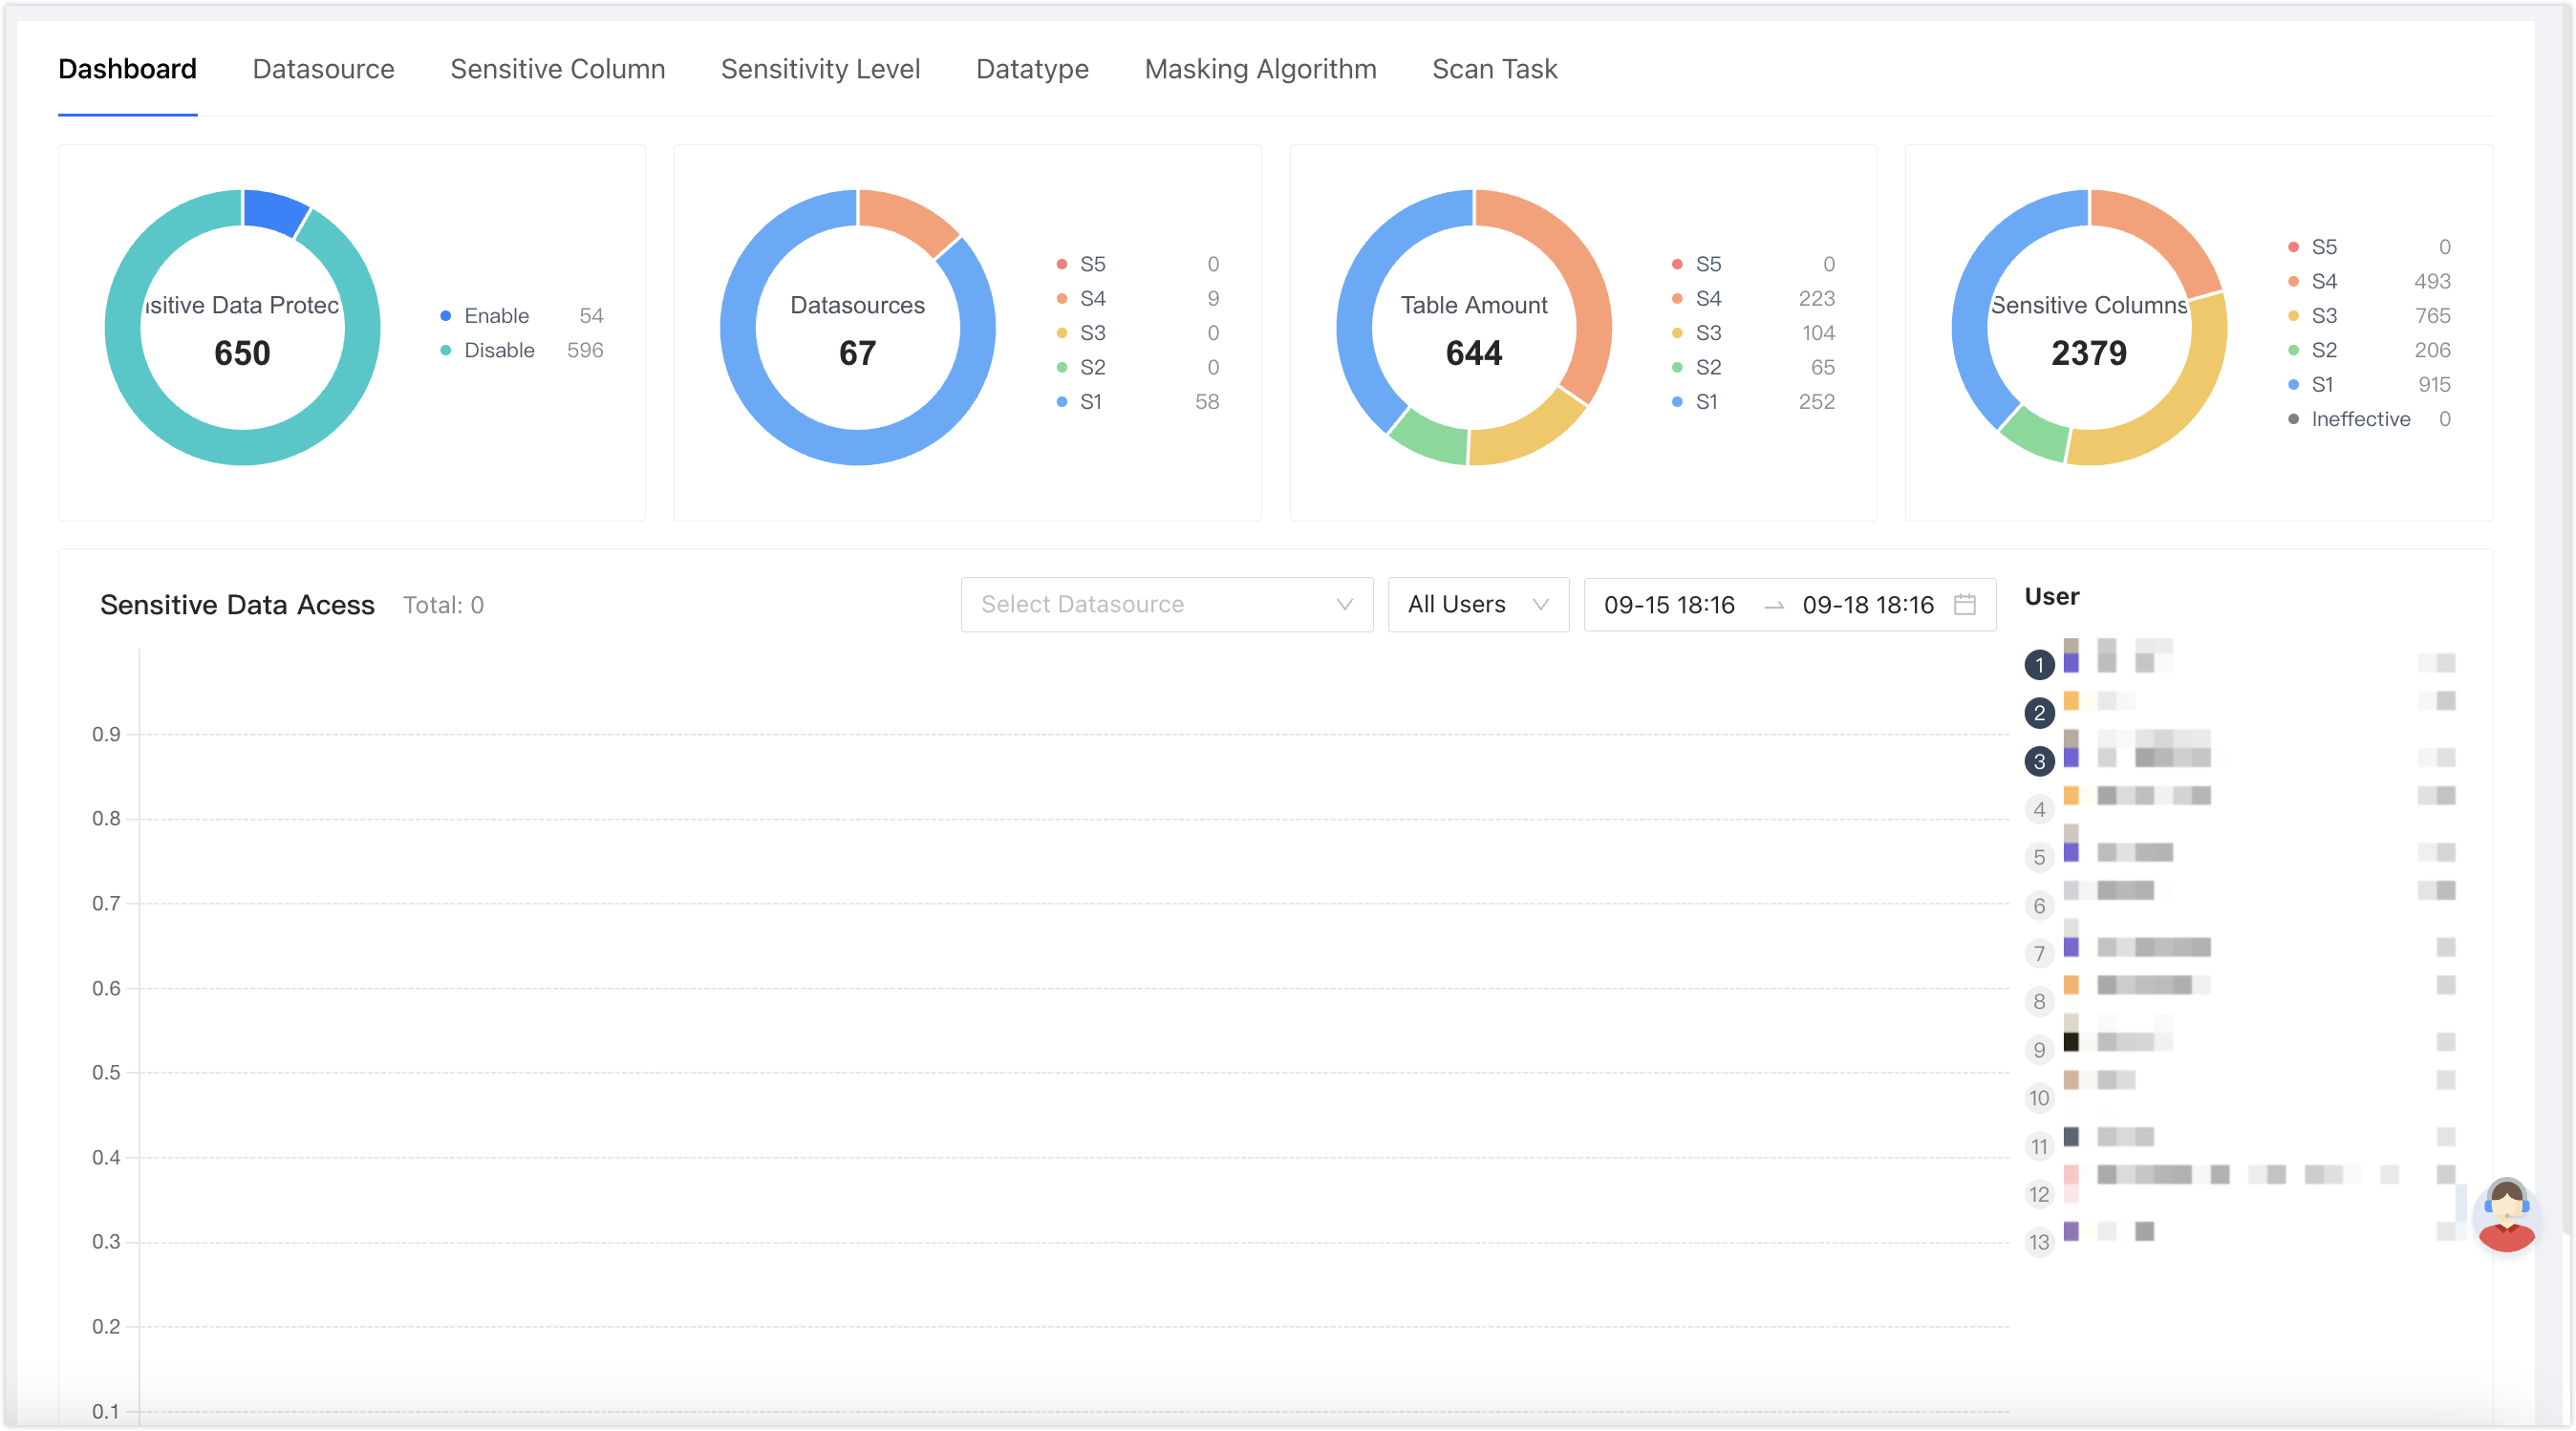
- Sensitive Data Protection: The total number of data sources supporting sensitive data within the current organization, and the status of sensitive data activation.
- Datasources: The total number of data sources that have enabled sensitive data protection, and the sensitivity level of each data source. For example, if Datasources shows 1 and S3 shows 1, one data source has enabled sensitive data protection and the highest sensitive column level in that data source is S3.
- Table Amount: The total number of tables that have enabled sensitive data protection, and the sensitivity level of each table. For example, if Table Amount shows 1 and S3 shows 1, one table has enabled sensitive data protection and the highest sensitive column level in that table is S3.
- Sensitive Columns: The total number of sensitive columns within the current organization, and the sensitivity levels corresponding to these sensitive columns.
- Sensitive Data Acess: Displays the number of times sensitive data has been accessed, and the users who have accessed sensitive data.
Procedure
Sign in to the NineData Console.
- In the left navigation bar, click Datasource>Sensitive Data.
- Click the Dashboard tab to view.
Result
Sensitive column settings, scan tasks, and dashboard data reflect the operations you perform in the sensitive data module.