Get started with Database DevOps Professional or Enterprise Edition
Use this quickstart to set up NineData Database DevOps Professional or Enterprise Edition, invite organization members, add a data source, assign permissions, and run governed SQL changes.
Choose your starting point:
Edition promotion
Database DevOps Professional Edition offers 10 instances for permanent free use.
Procedure
1. Create a NineData account
Open the NineData Registration Page.
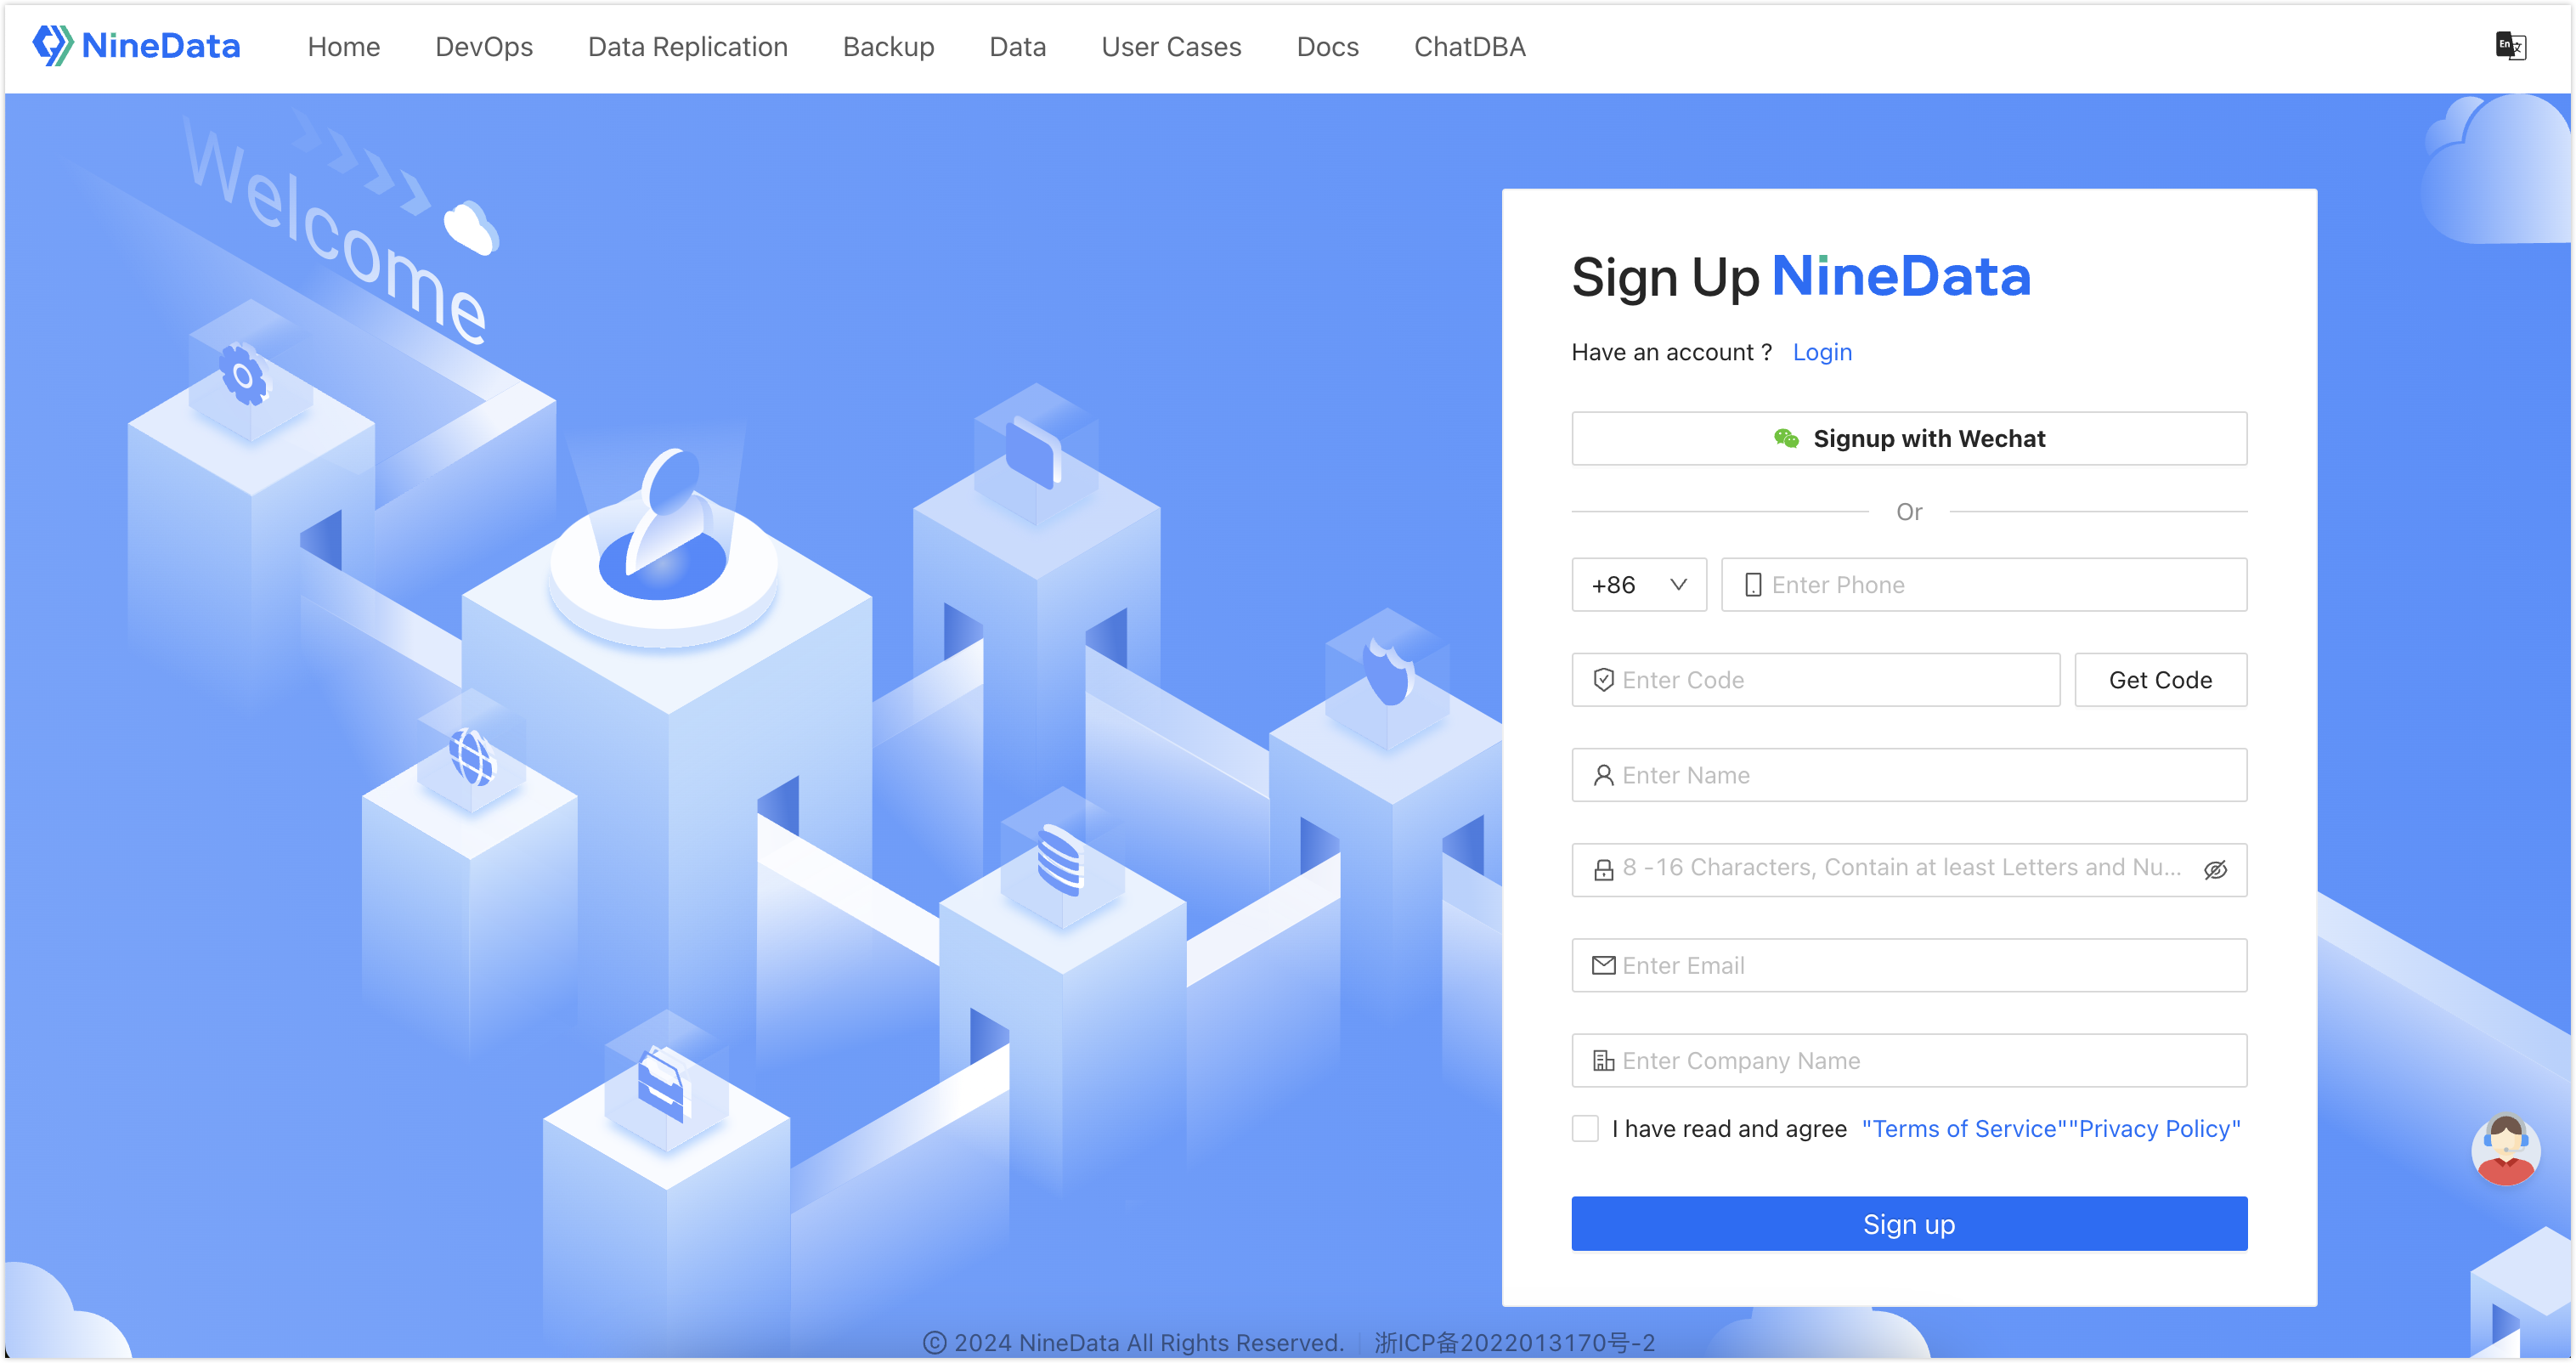
Enter your phone number and click Get Verification Code. After you receive the verification code from NineData, enter the code.
tipOnly phone numbers from Mainland China are currently supported. If you use a phone number outside the +86 region, receive the verification code by email.
Enter your username and password.
tipThe password must meet the following requirements:
Use letters, numbers, and special characters.
Use 8 to 16 characters.
Include both letters and numbers.
Do not include spaces.
Enter your email address and company name, read the Terms of Service and Privacy Policy, select I have read and agree, and then click Sign up.
tipIf you already entered your email address earlier, skip this field.
2. Sign in to NineData
Open the NineData Login Page.
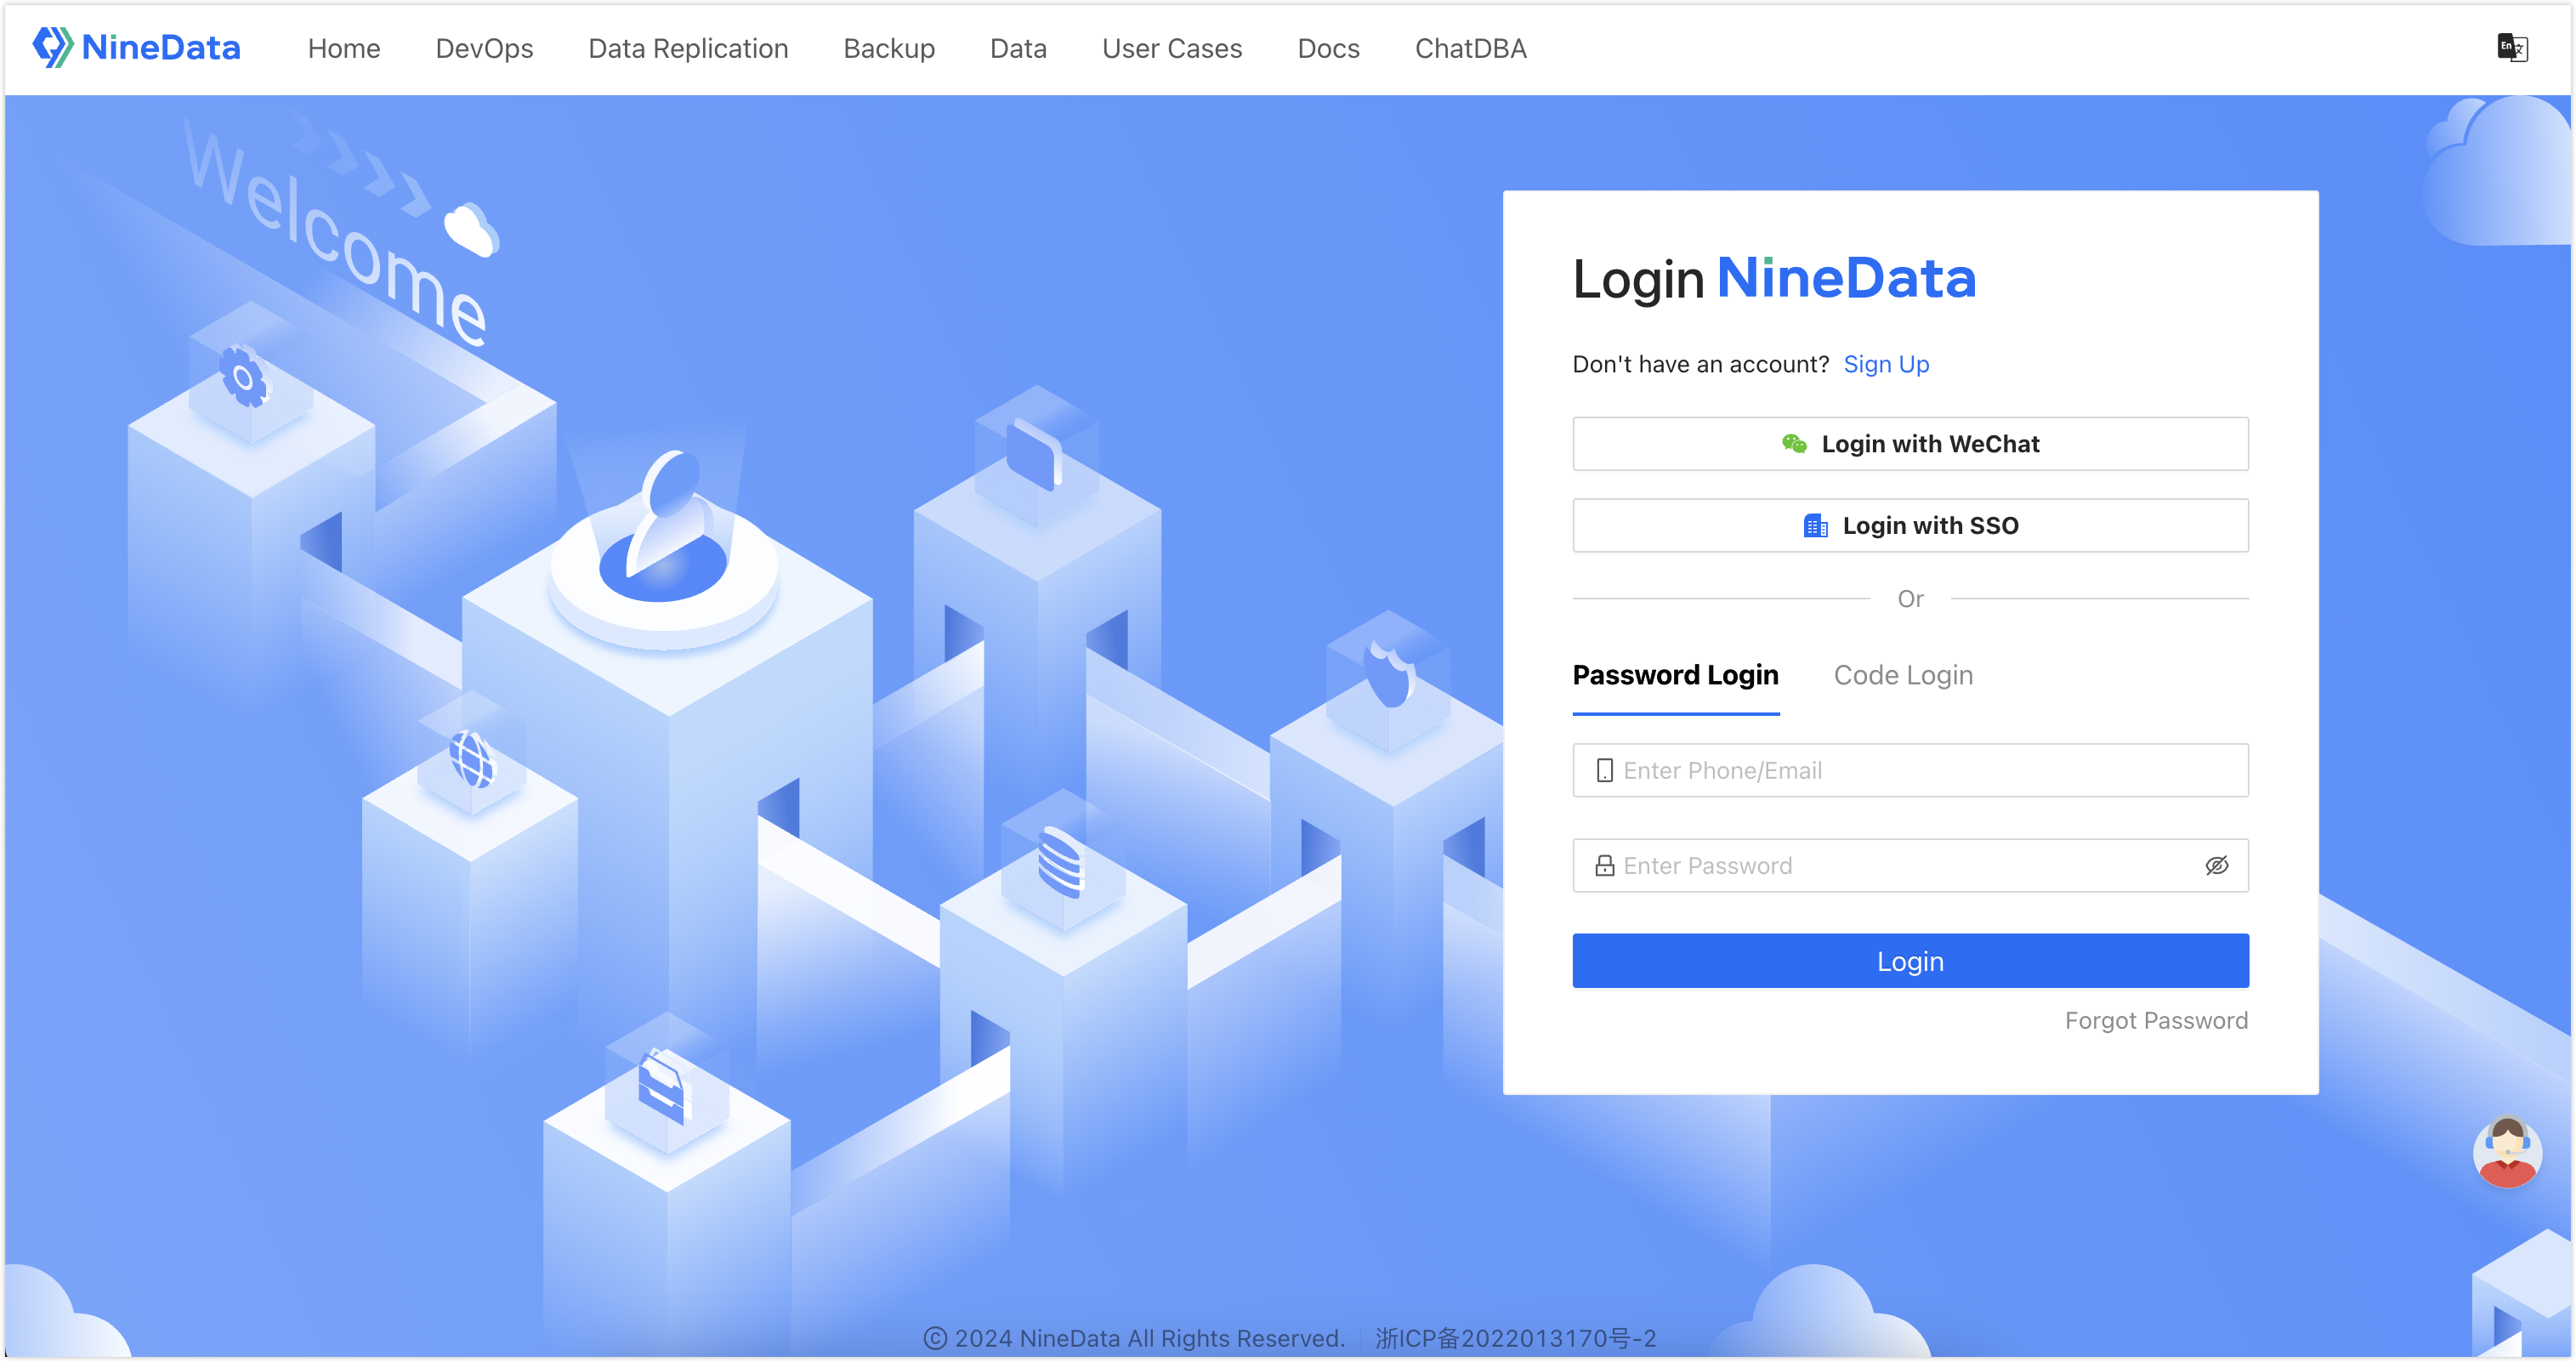
Choose one of the following sign-in methods: Password Login, Code Login, Login With SSO, or Login with WeChat .
Password Login: Enter the phone number or email address used during registration, enter the password, and then click Login.
tip- If you use a phone number outside the +86 region, sign in with the email address used during registration.
- If you forgot your login password, click Forgot Password and follow the prompts to Reset Password.
Code Login: Click Code Login, enter the phone number used during registration, click Get Code, enter the verification code sent by NineData, and then click Login.
tipIf you use a phone number outside the +86 region, enter the email address used during registration to receive the verification code.
Login With SSO: Sign in with SSO. For details, see Sign in to NineData through SSO.
Login with WeChat : Sign in to NineData by scanning the WeChat QR code.
3. Invite organization members
Sign in to the NineData Console.
From the left sidebar, go to Account > User.
tipIf Account is unavailable, confirm that the console is in organization mode. To switch from personal mode to organization mode, see Switch to Organization.
On the User page, click Invite.
In the Invite window, enter the email address of the member to invite, assign a role to that member, and then click OK. To invite multiple users at once, click Add.
Role DescriptionEach role contains a set of permissions. Users bound to a role inherit the permissions of that role. Create custom roles to grant only the permissions your team needs. For more information, see Manage Roles.
Click OK to send the invitation. NineData sends an invitation email to the user. After the user accepts the invitation and completes registration or sign-in, the user joins the organization.
4. Add a data source
This guide uses an Alibaba Cloud RDS MySQL public instance as the example data source. For other connection scenarios, see Create Data Sources.
Add these NineData service node IPs to the whitelist of the Alibaba Cloud RDS MySQL instance. For whitelist instructions, see the Alibaba Cloud official documentation.
- Hangzhou: 121.199.39.25
- Beijing: 123.57.58.208
- Zhangjiakou: 39.98.193.245
- Shenzhen: 112.74.171.41
- Shanghai: 116.63.42.85
Sign in to the NineData Console.
From the left sidebar, go to Datasource > Datasource.
Follow the page prompts to configure the data source.
After you finish the configuration, click Connection Test next to Create Datasource to test the connection. If the test returns Connection Successfully, click Create Datasource to add the data source. Otherwise, review the connection settings and test again.
tipFor detailed data source setup instructions, see Create Data Sources.
5. Configure data source access permissions
NineData supports three authorization methods. Permissions granted through these methods coexist and do not override each other. This section uses authorizing through roles as an example to show how to grant data source access permissions to organization members.
| Authorization Method | Authorization Initiator | Description |
|---|---|---|
| Request through approval workflow | Organization Member | Organization members request permissions through Access Application. Use this method for temporary access when the member does not have the required permissions. |
| Authorize through Roles | System Administrator | A system administrator assigns roles to organization members for group-based permission management. When a member leaves the project, remove the role assignment. |
| Direct Authorization by Administrator | System Administrator | A system administrator authorizes specific members directly. Use this method when permissions must be tailored for an individual user. |
Sign in to the NineData Console.
From the left sidebar, go to Account > Role.
tipIf Account is unavailable, confirm that the console is in organization mode. To switch from personal mode to organization mode, see Switch to Organization.
Click Create Role.
In the Create Role window, enter a role name that identifies its purpose. Up to 16 characters are supported.
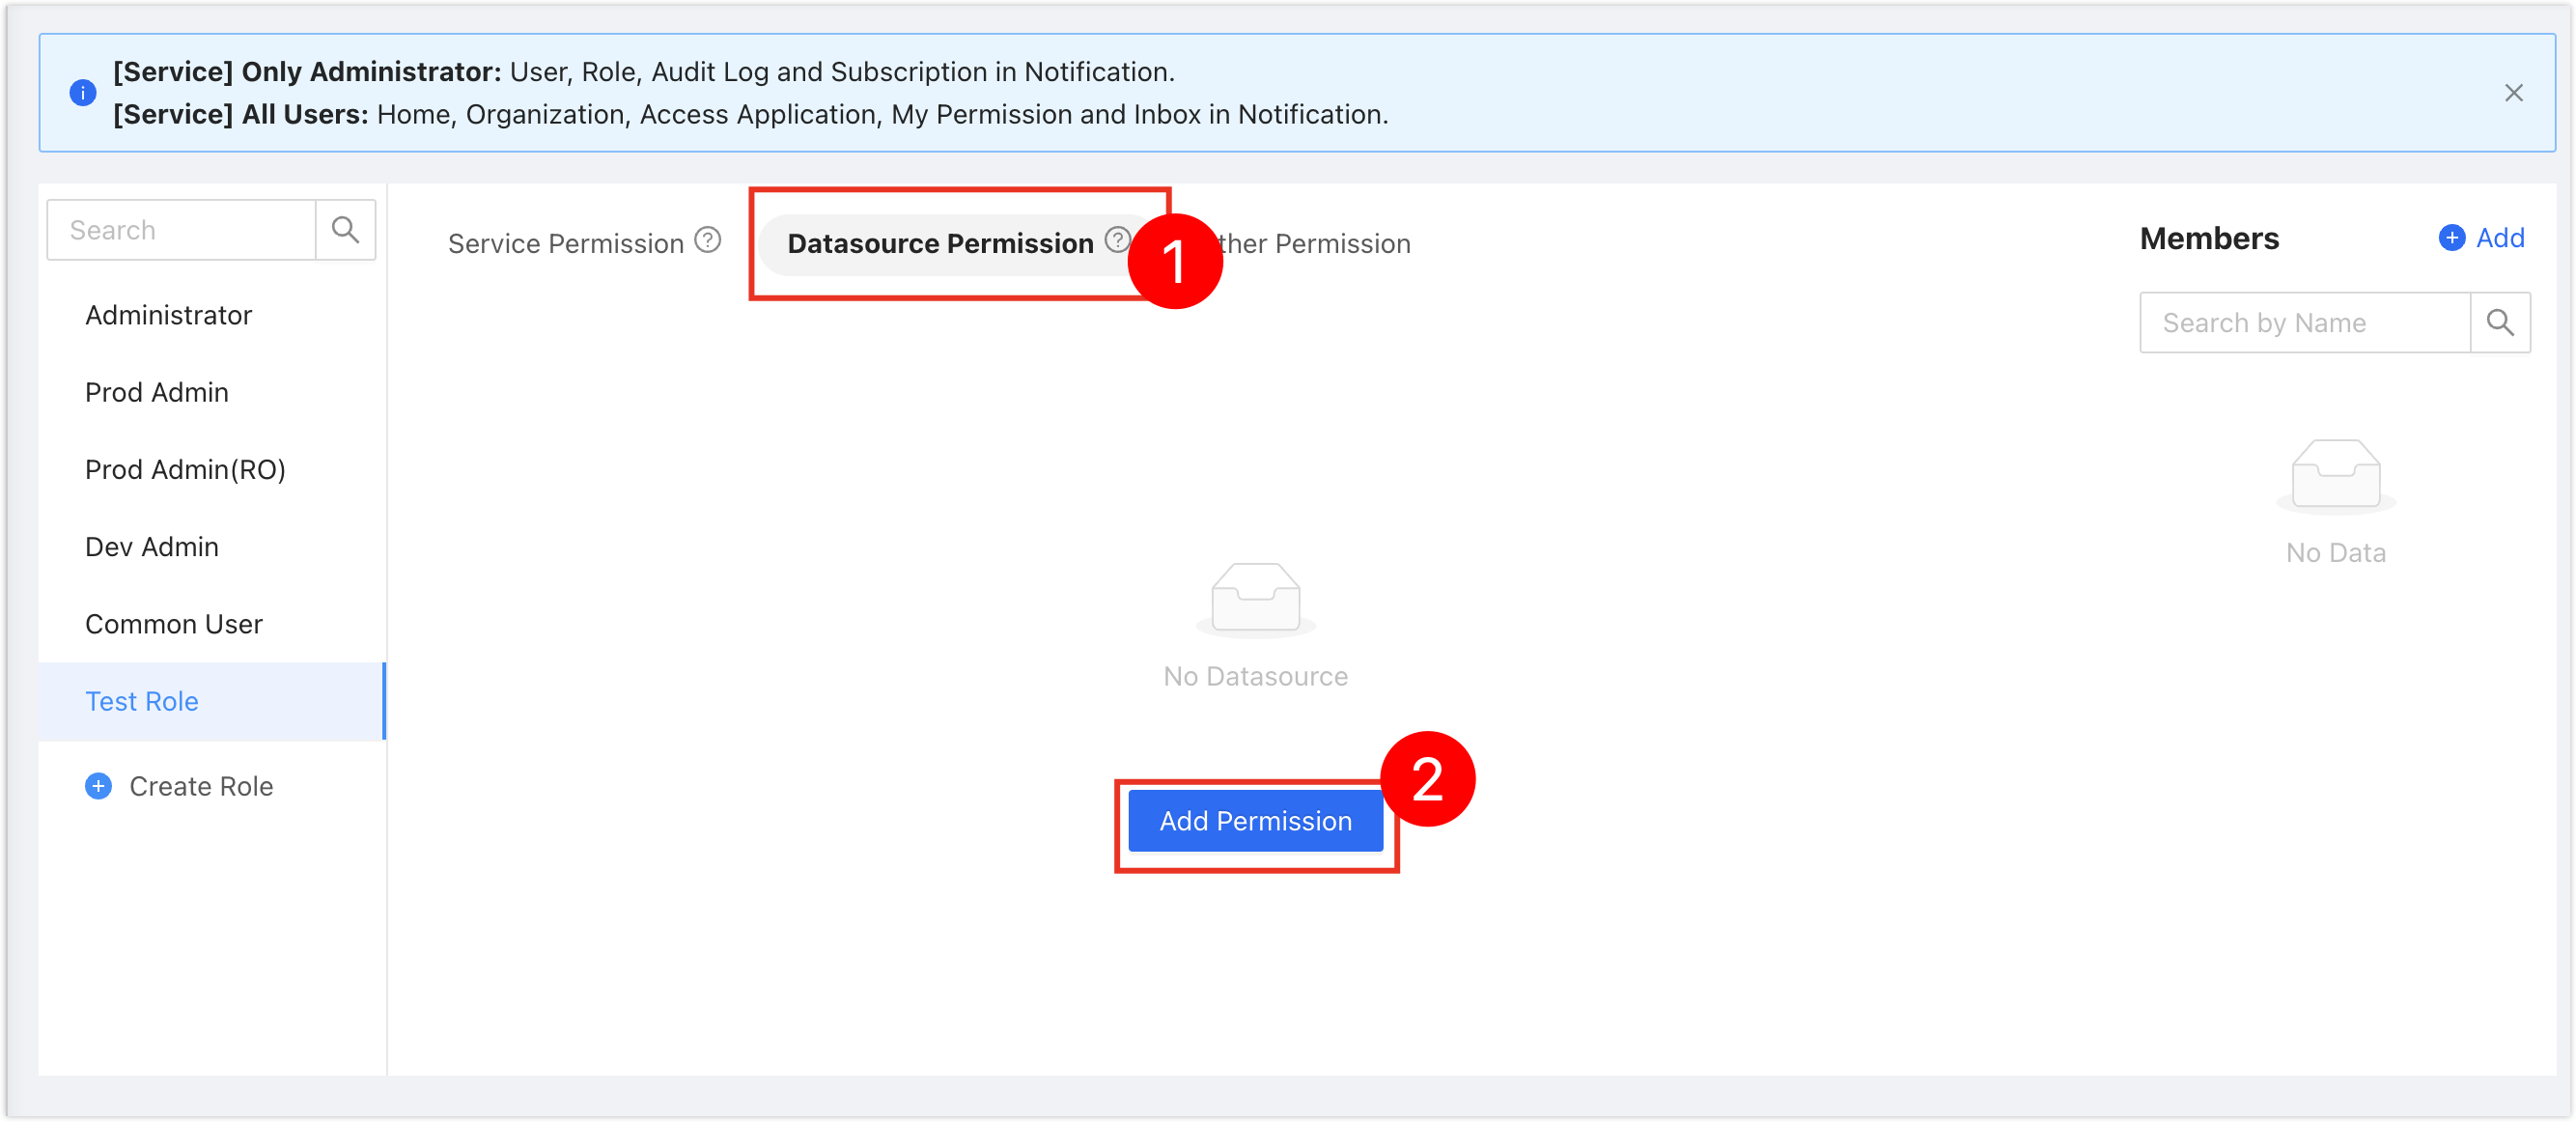
Click OK to create the role. The console opens the permission configuration page for the new role. Under the Datasource Permission tab, click Add Permission.
In the Add Permission window, select Environment or Datasource to grant permissions to the new role, then click OK.
tip- Environment: Authorize based on the environment configured during Adding Data Sources. An environment may be bound to multiple data sources.
- Datasource: Directly select the corresponding data source for authorization.
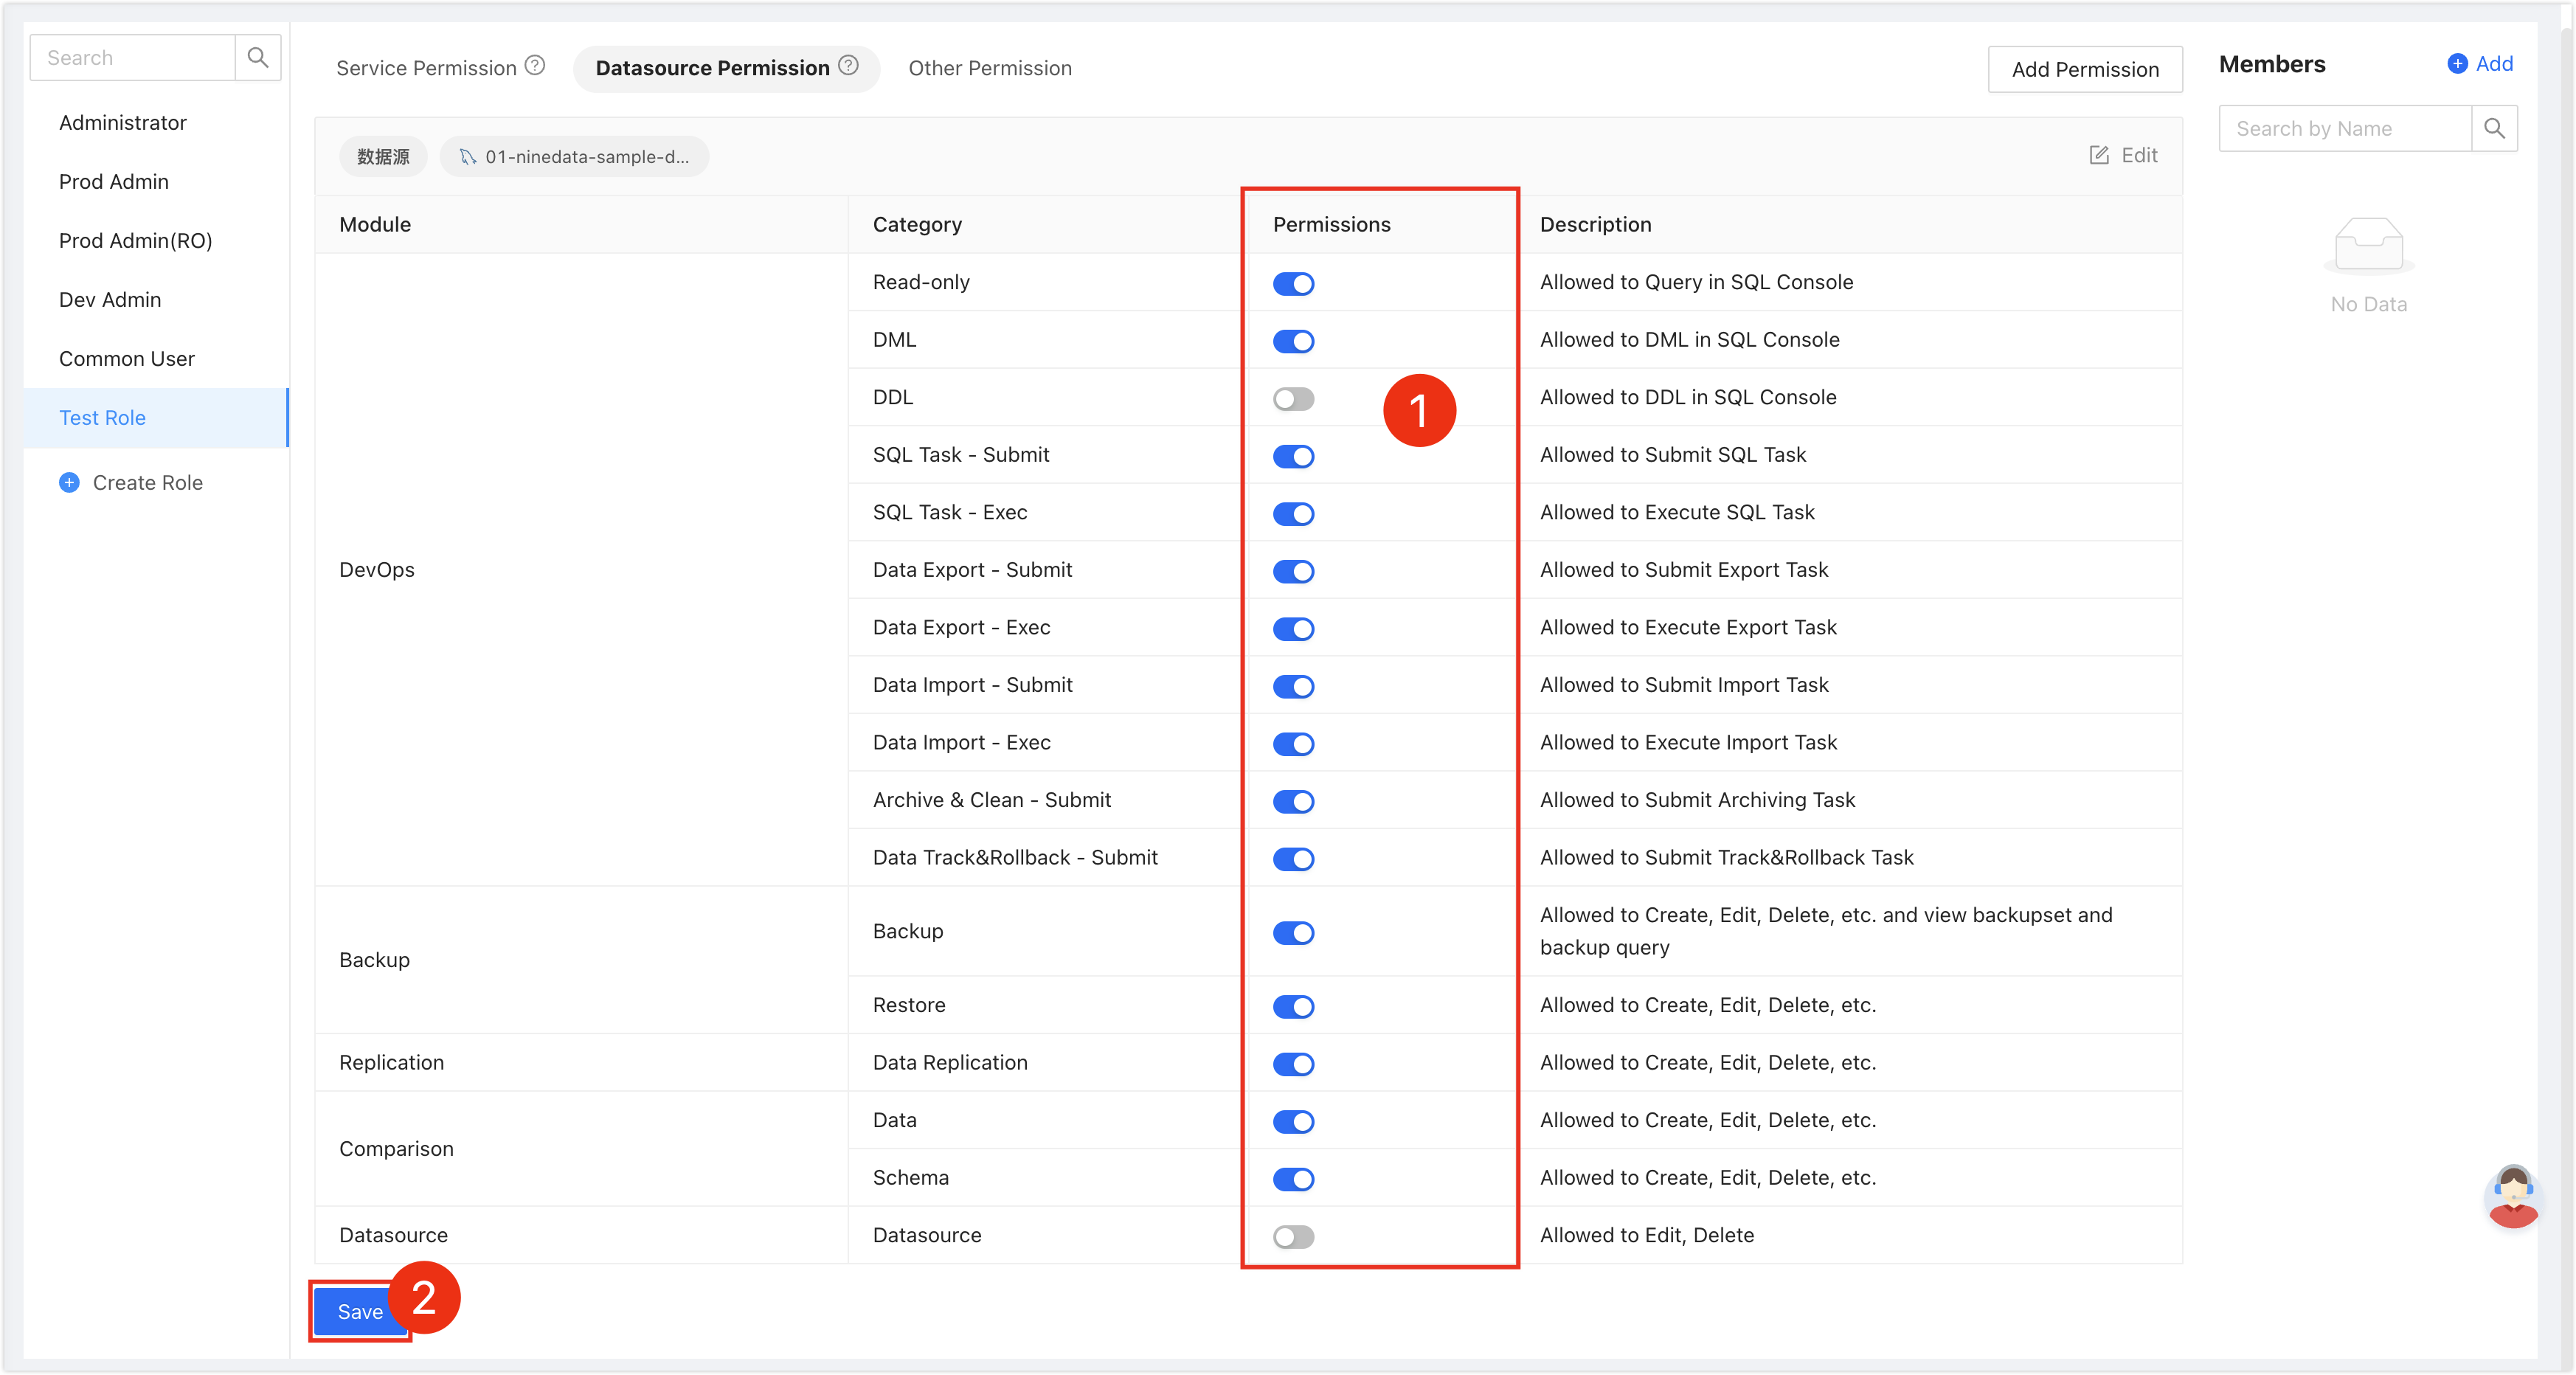
Configure the permissions for each module of the data source, then click Save.
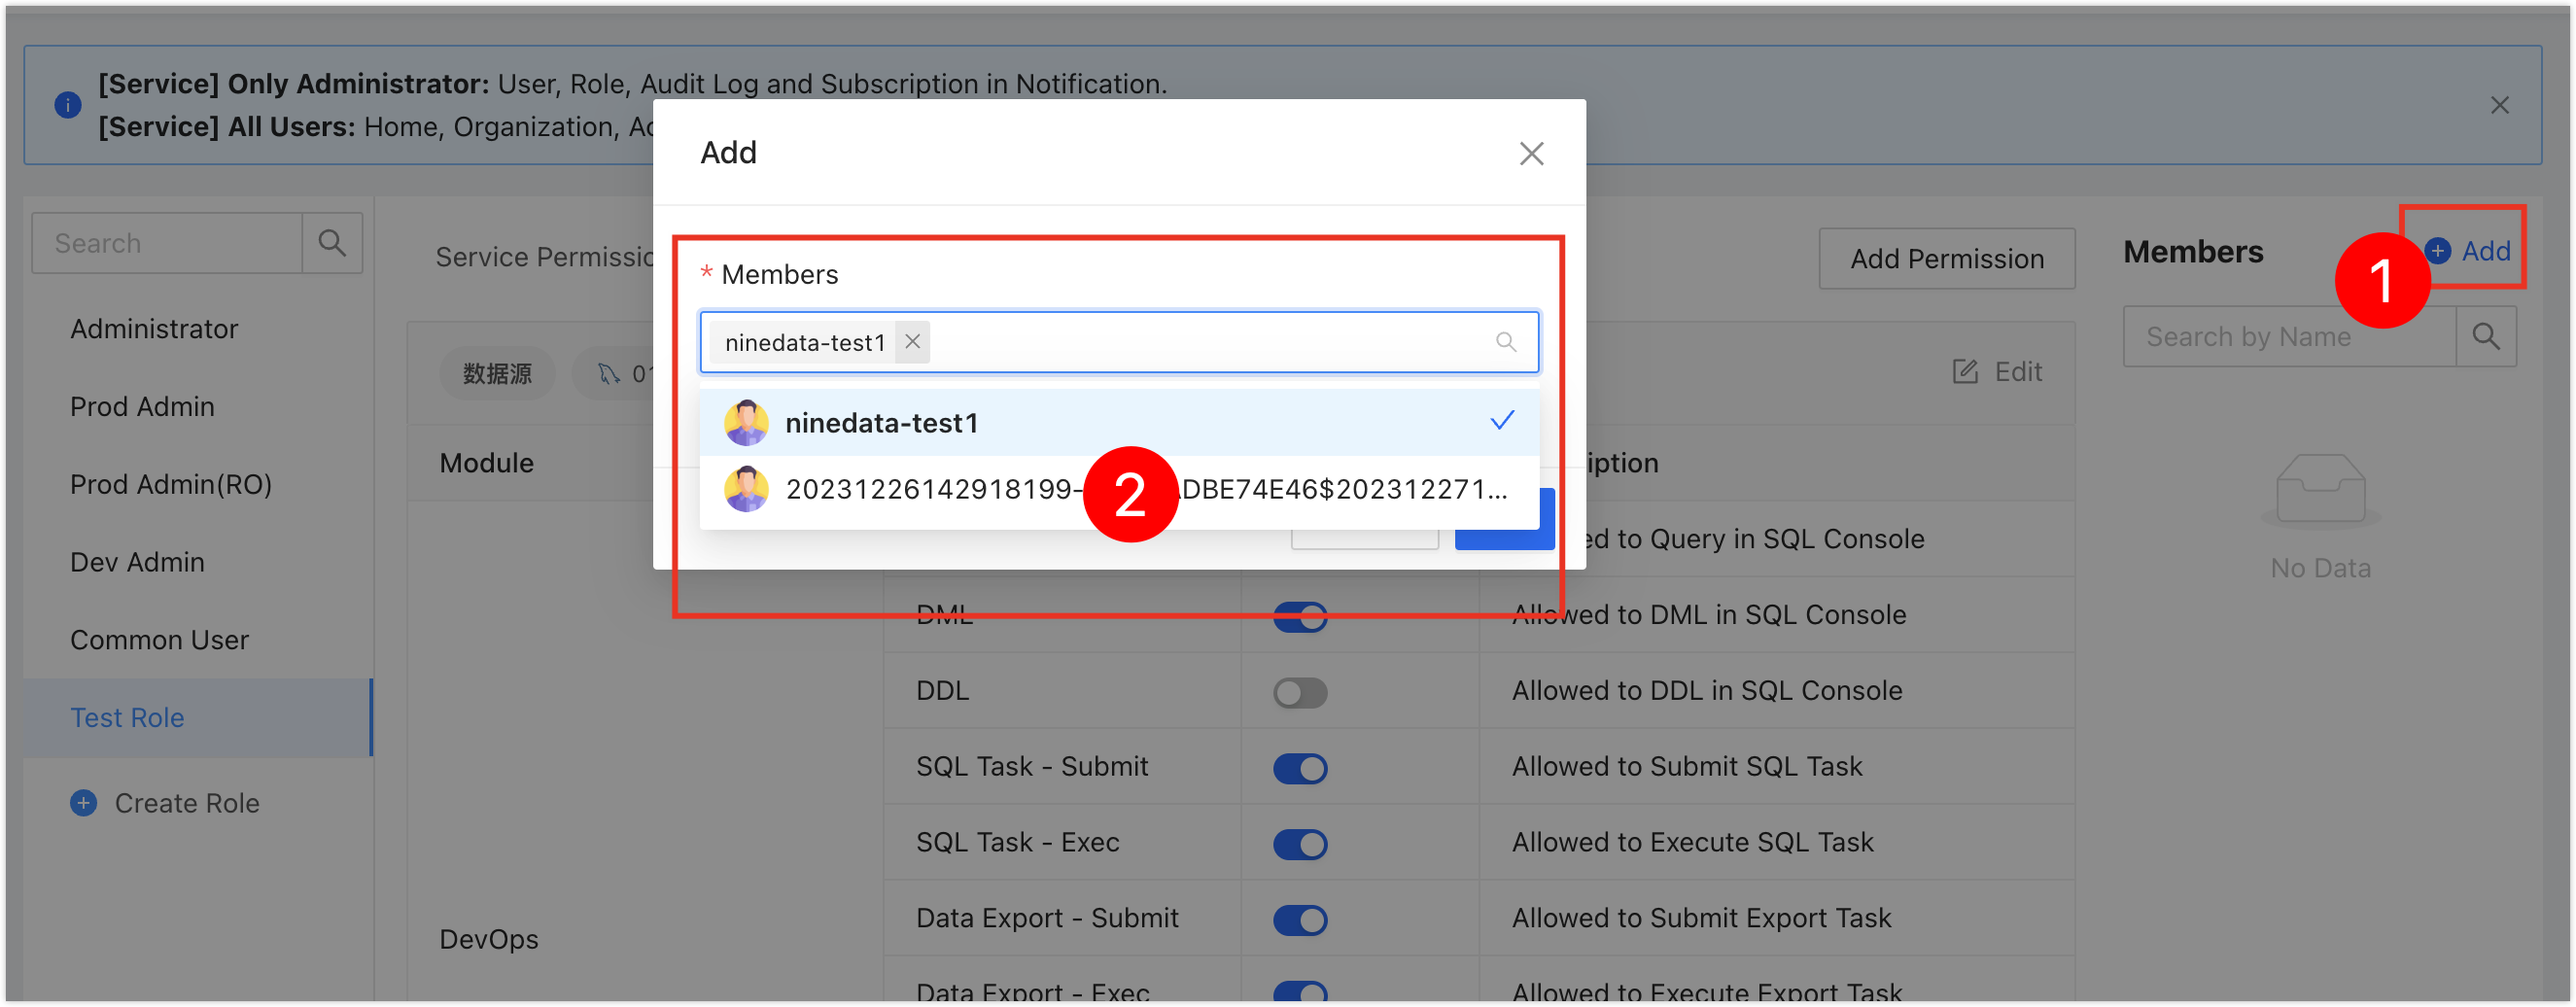
Next to Members, click Add. In the Add window, select one or more members to bind to this role.
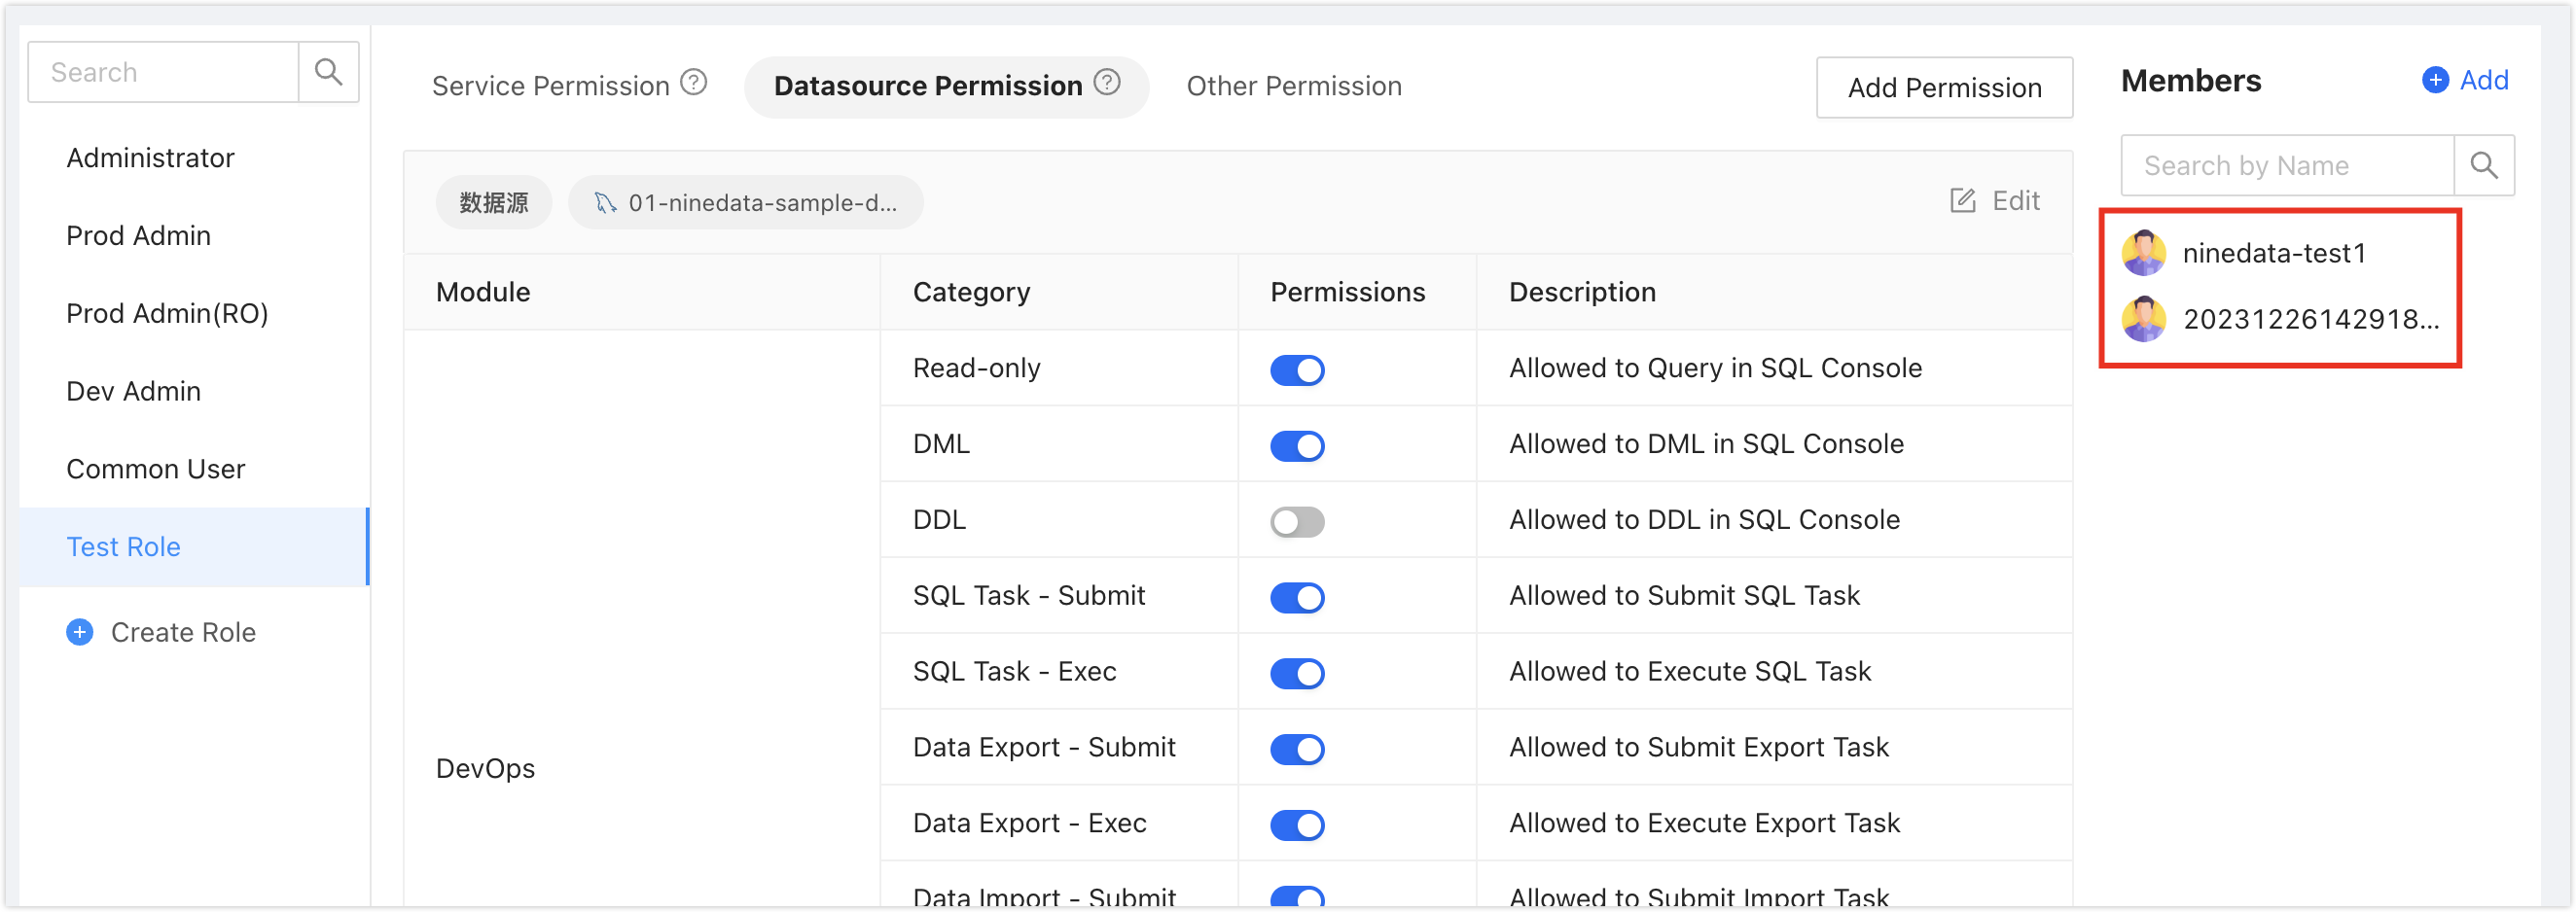
After you click OK, the selected members appear in Members on the right. These members can now access the corresponding data sources.
6. Manage data with SQL Console
Sign in to the NineData Console.
From the left sidebar, go to DevOps > SQL Console.
tipIf you previously opened a data source and did not close it, NineData opens that data source page.
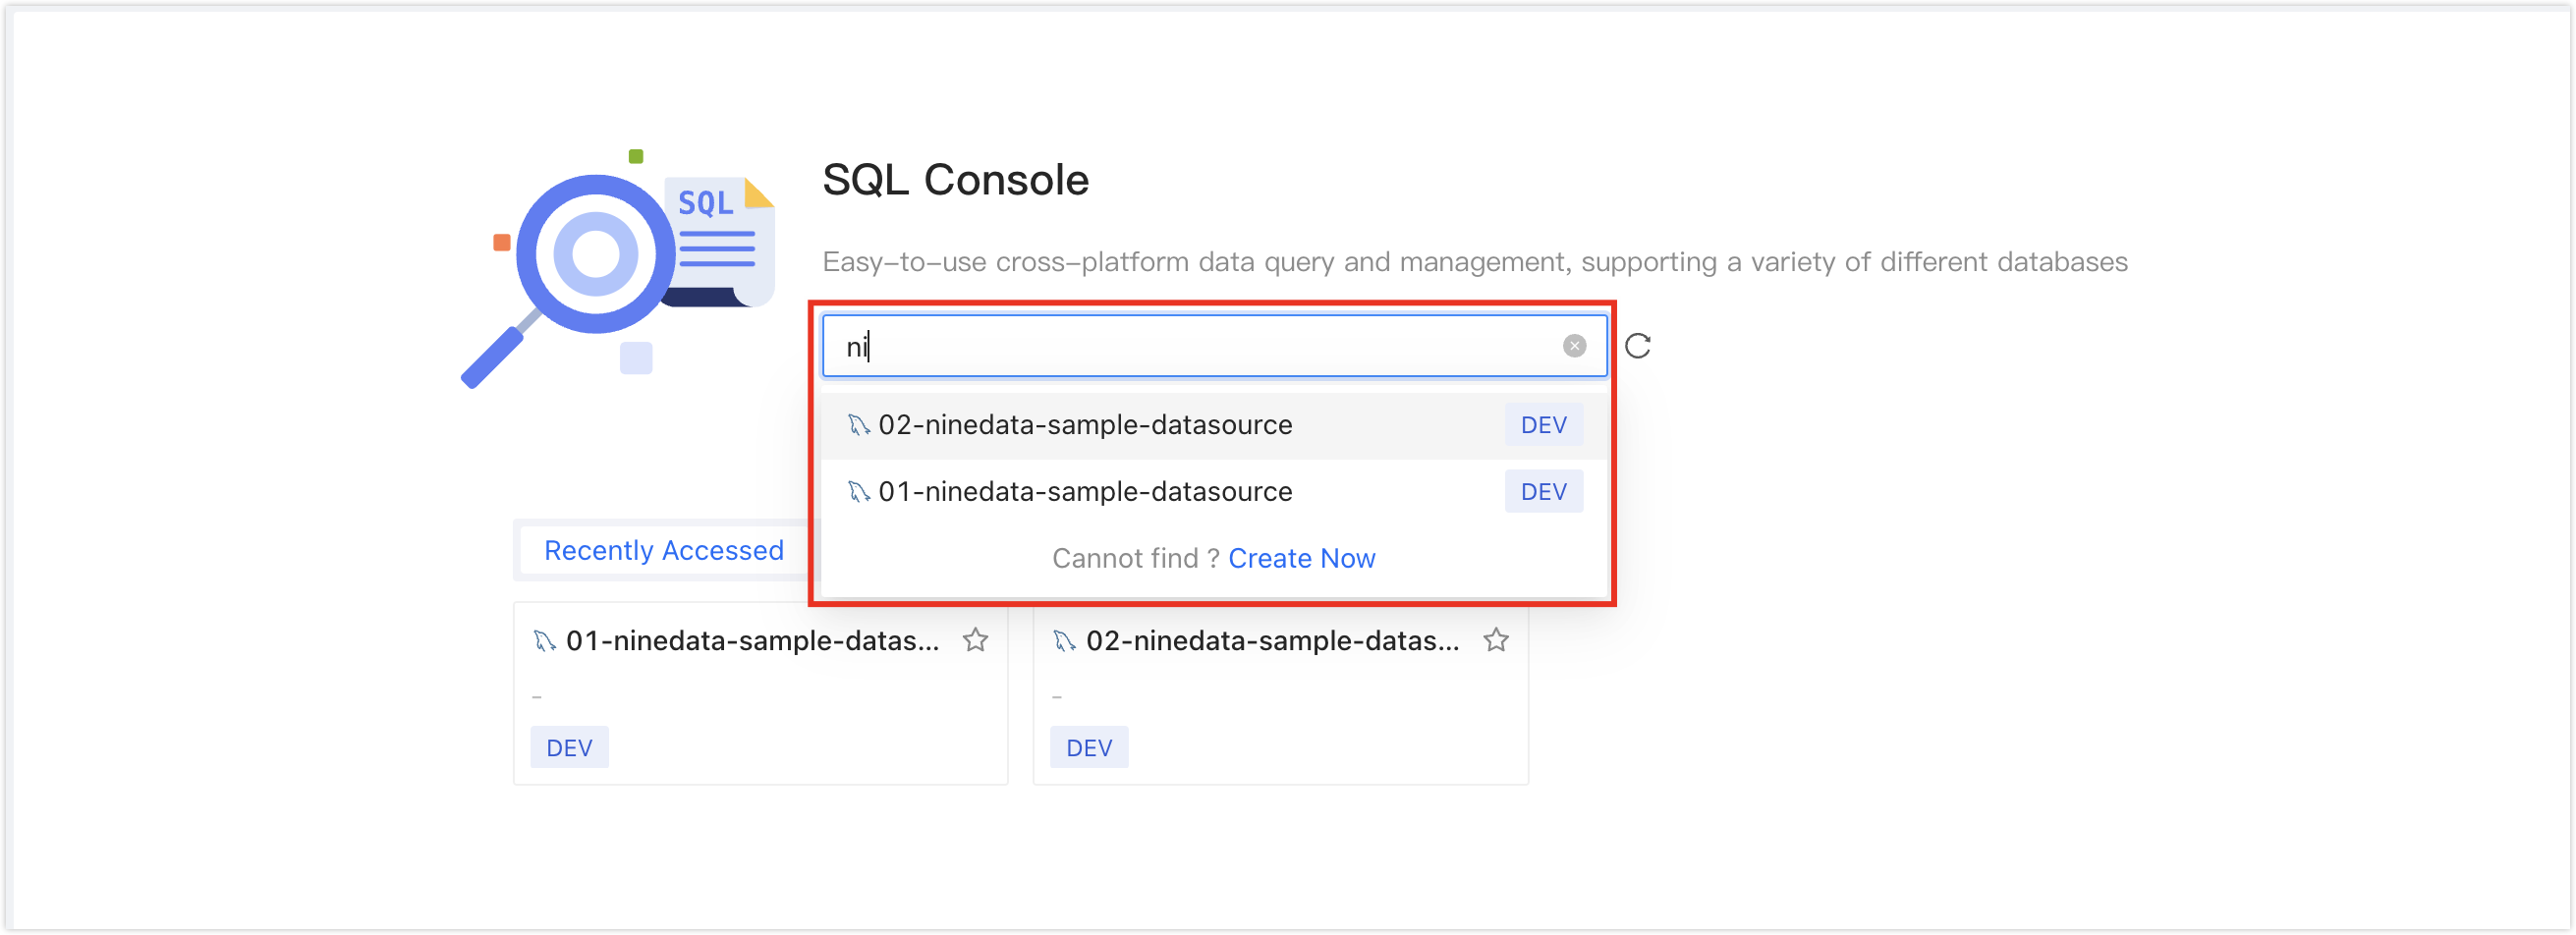
Click the text box under SQL Console. The data source selector opens. Select the target data source and click Query to open SQL Console.
tipTo find a data source, enter full or partial keywords for exact or fuzzy search. These fields are searchable:
Data source name
IP address
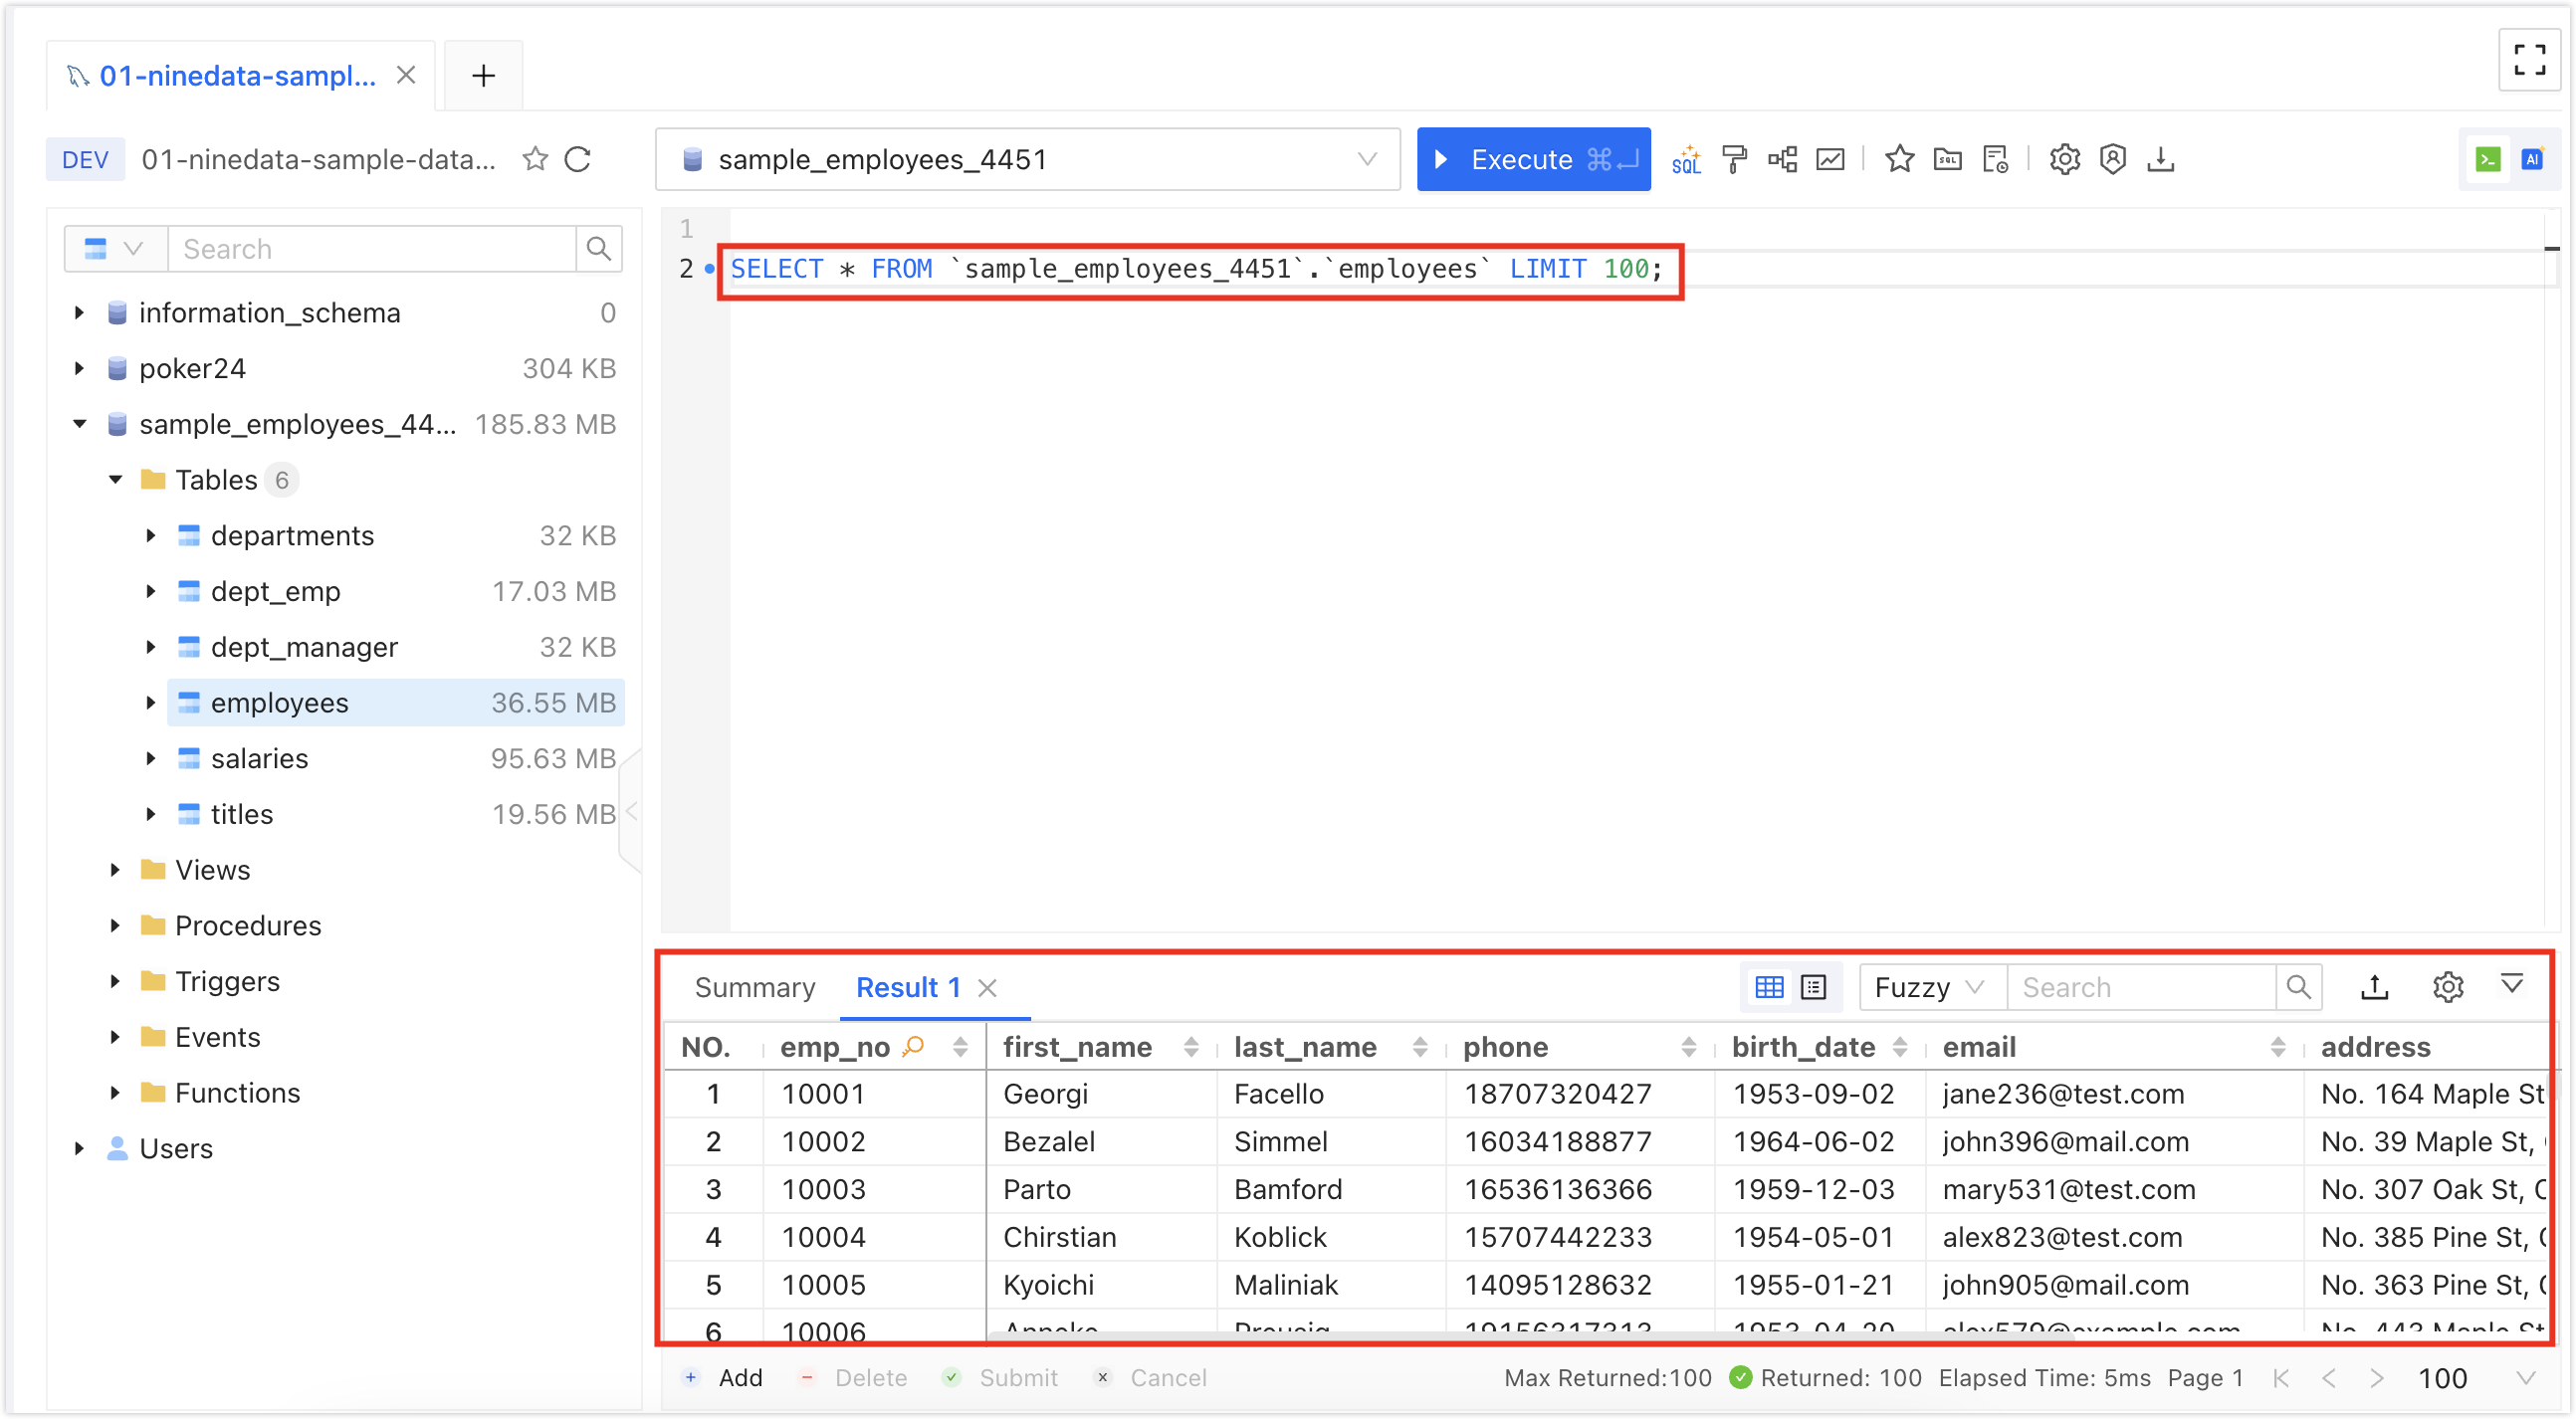
After opening SQL Console, run data management operations on the data source.
For production changes, configure SQL development specifications and disable direct changes in SQL Console. Use SQL tasks with pre-audit, approval, and backup controls to reduce operational risk. For more information, see Release production changes.
7. Release production changes
For production databases, use SQL development specifications together with SQL tasks so every change follows a controlled approval workflow.
Disable SQL Console changes for production databases
From the left sidebar, go to DevOps > Policy & Process.
On the Policy & Process page, click the SQL Dev Policy tab, and then click the Name associated with the production data source.
The console opens the Details page. Click the SQL Console tab, find these two rules, and use the settings in the table.
Rule Name Switch Edit Details Allowed SQL Console Update Data Type On Click Actions, find Allowed SQL Console Update Data, delete all operation types in the text box, and click OK. 
Allowed SQL Console Update Structure Operate Type On Click Actions, find SQL Console Allowed Type, delete all operation types in the text box, and click OK. 
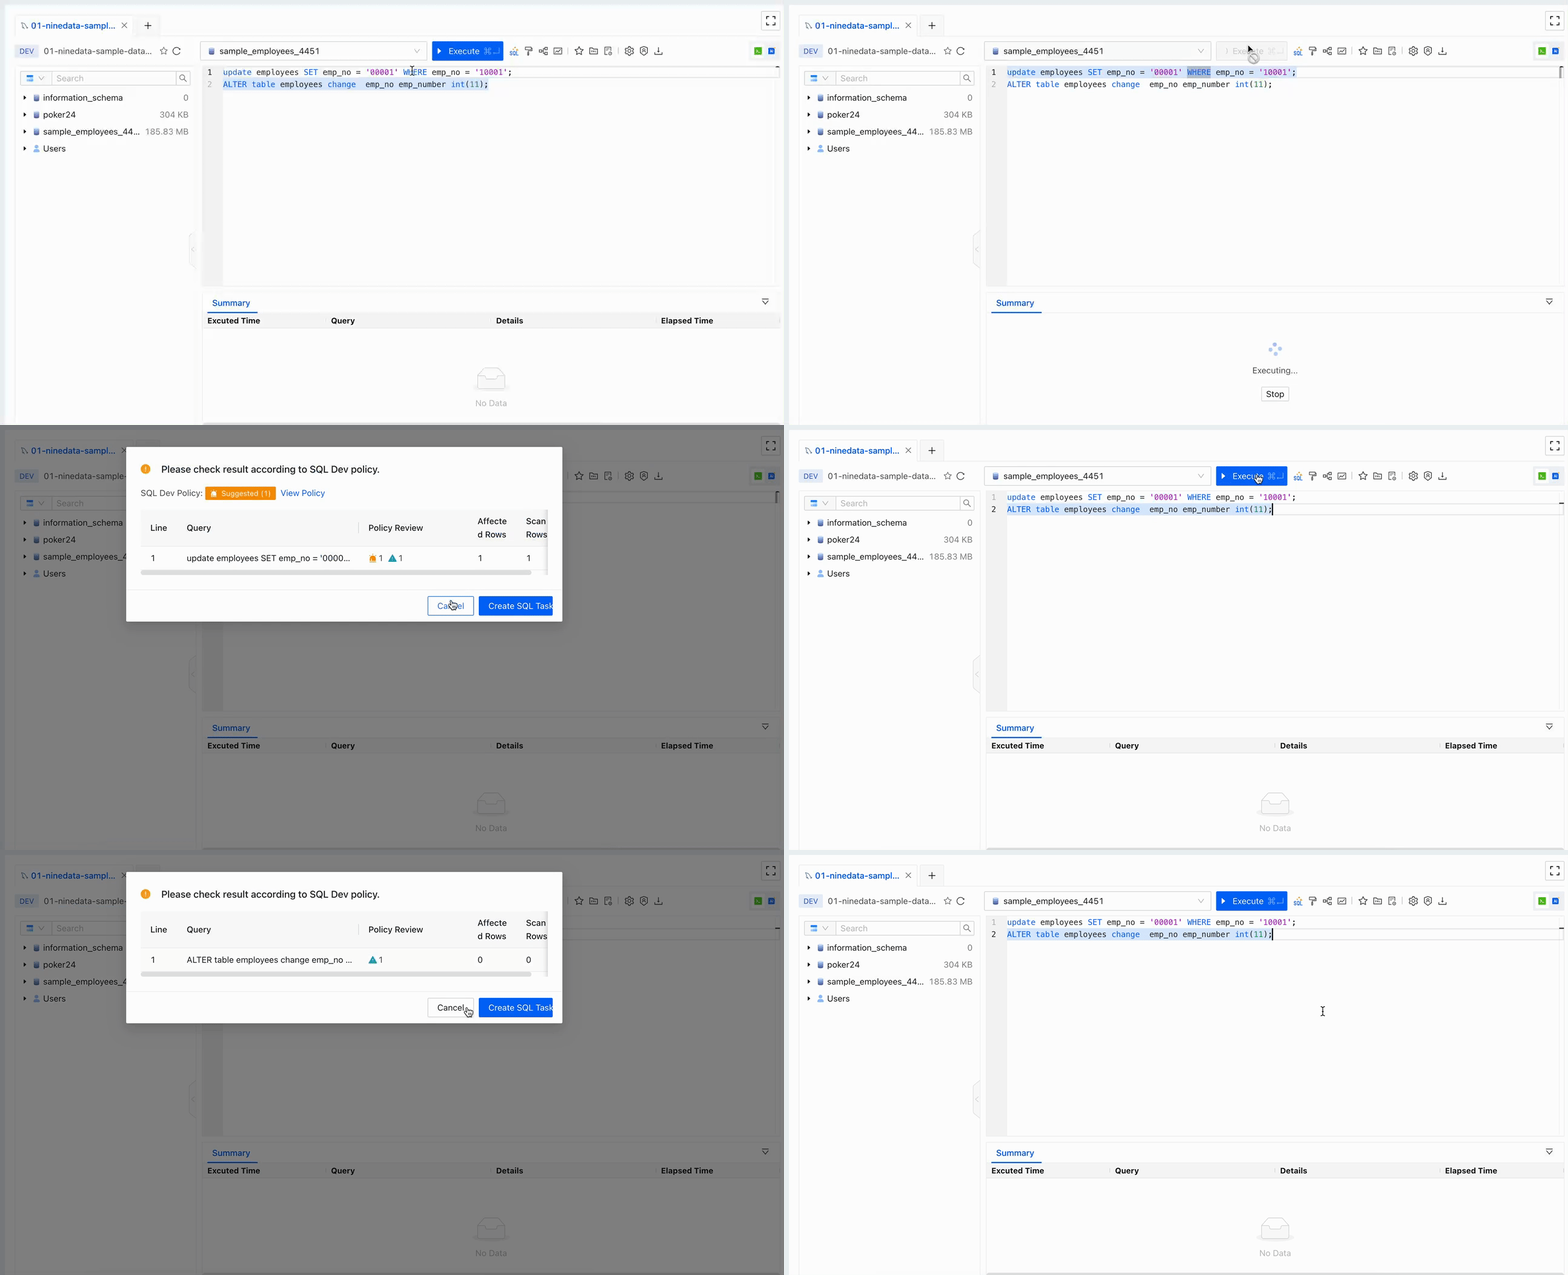
Open SQL Console from DevOps > SQL Console, and then try to change data. The change statement is intercepted and cannot be executed directly. You must submit an SQL task to perform the change.
Release changes through SQL tasks
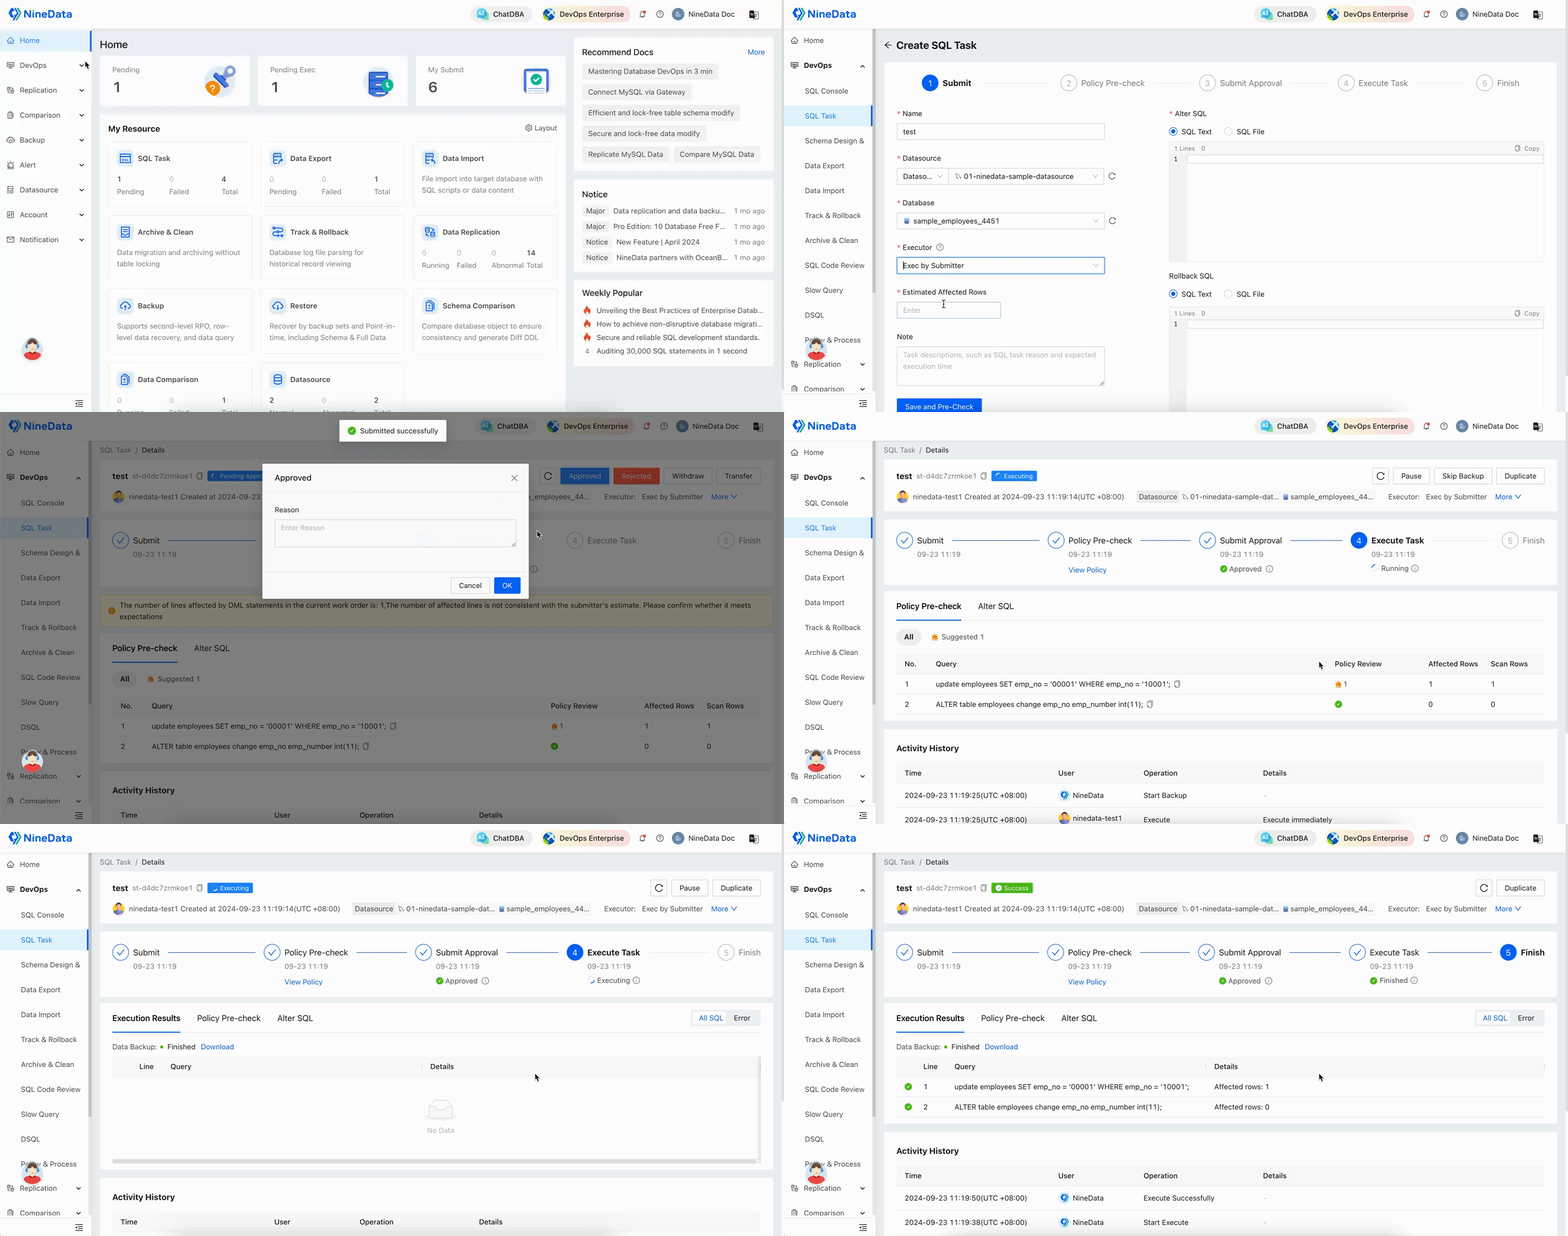
From the left sidebar, go to DevOps > SQL Task.
On the SQL Task page, click Create SQL Task.
On the Create SQL Task page, configure the SQL task.
Parameter Description Name Enter a SQL task name that identifies the purpose of the change. Up to 64 characters are supported. Datasource The data source that contains the target database. Database The database where NineData runs the SQL change. Executor The person who executes the SQL statement after the current SQL task is approved.
Note: The options in the Executor list depend on these conditions:- If the current data source is configured with development specifications, the list is based on the SQL Task Executor Config rule in the current specification. This rule is located on the SQL Task & Console tab. To configure development specifications, see Edit Specifications.
- If the current data source is not configured with development specifications, the list shows users who have the SQL Task - Exec permission for the current data source. For authorization details, see Configure User Permissions.
Note (Optional) Add context for the SQL task, such as the change reason, expected execution time, or pending risks. Alter SQL Enter the SQL statement or upload a SQL file. - SQL Text: Enter the SQL statement in the text box.
- SQL File: Click Upload File, select the SQL file, and upload it.
Note: After uploading, hover over the filename and choose (Preview File) or
  (Delete File) next to the filename.
Rollback SQL (Optional) Enter rollback SQL when your organization requires a rollback plan. NineData records it in the SQL task for compliance, but it does not affect the task lifecycle. Click Pre-Check. NineData prechecks the SQL for syntax errors and other issues that may prevent execution. If an issue is found, click View Details in the message to view the error details and update the SQL.
After Pre-Check passes, click Save and Pre-Check to enter the Policy Pre-check page.
tipNineData pre-audits the SQL statement based on the SQL Development Specifications associated with the current data source. The result can be one of these outcomes:
- Pre-audit passed: Depending on the approval process configuration, the task status changes to Pending or Approved. If approval submission is required, continue to the next step. If the task is already approved, the submission process is finished.
- Pre-audit failed: The task status changes to Pre-Check Failed. Click Check Again to run pre-audit again, or withdraw the task, edit it, and submit it again.
Click Submit Approval, select the workflow approvers, and then click OK.
tipThe number of approvers depends on the approval process configured for the data source.
The task status changes to Pending Approval. After approval, the designated Executor can execute the task. Before approval, these actions are available:
- Withdraw: Withdraw the SQL task.
- Transfer: Change the approver of the SQL task.
After execution completes, return to SQL Console to verify that the changes were released successfully.
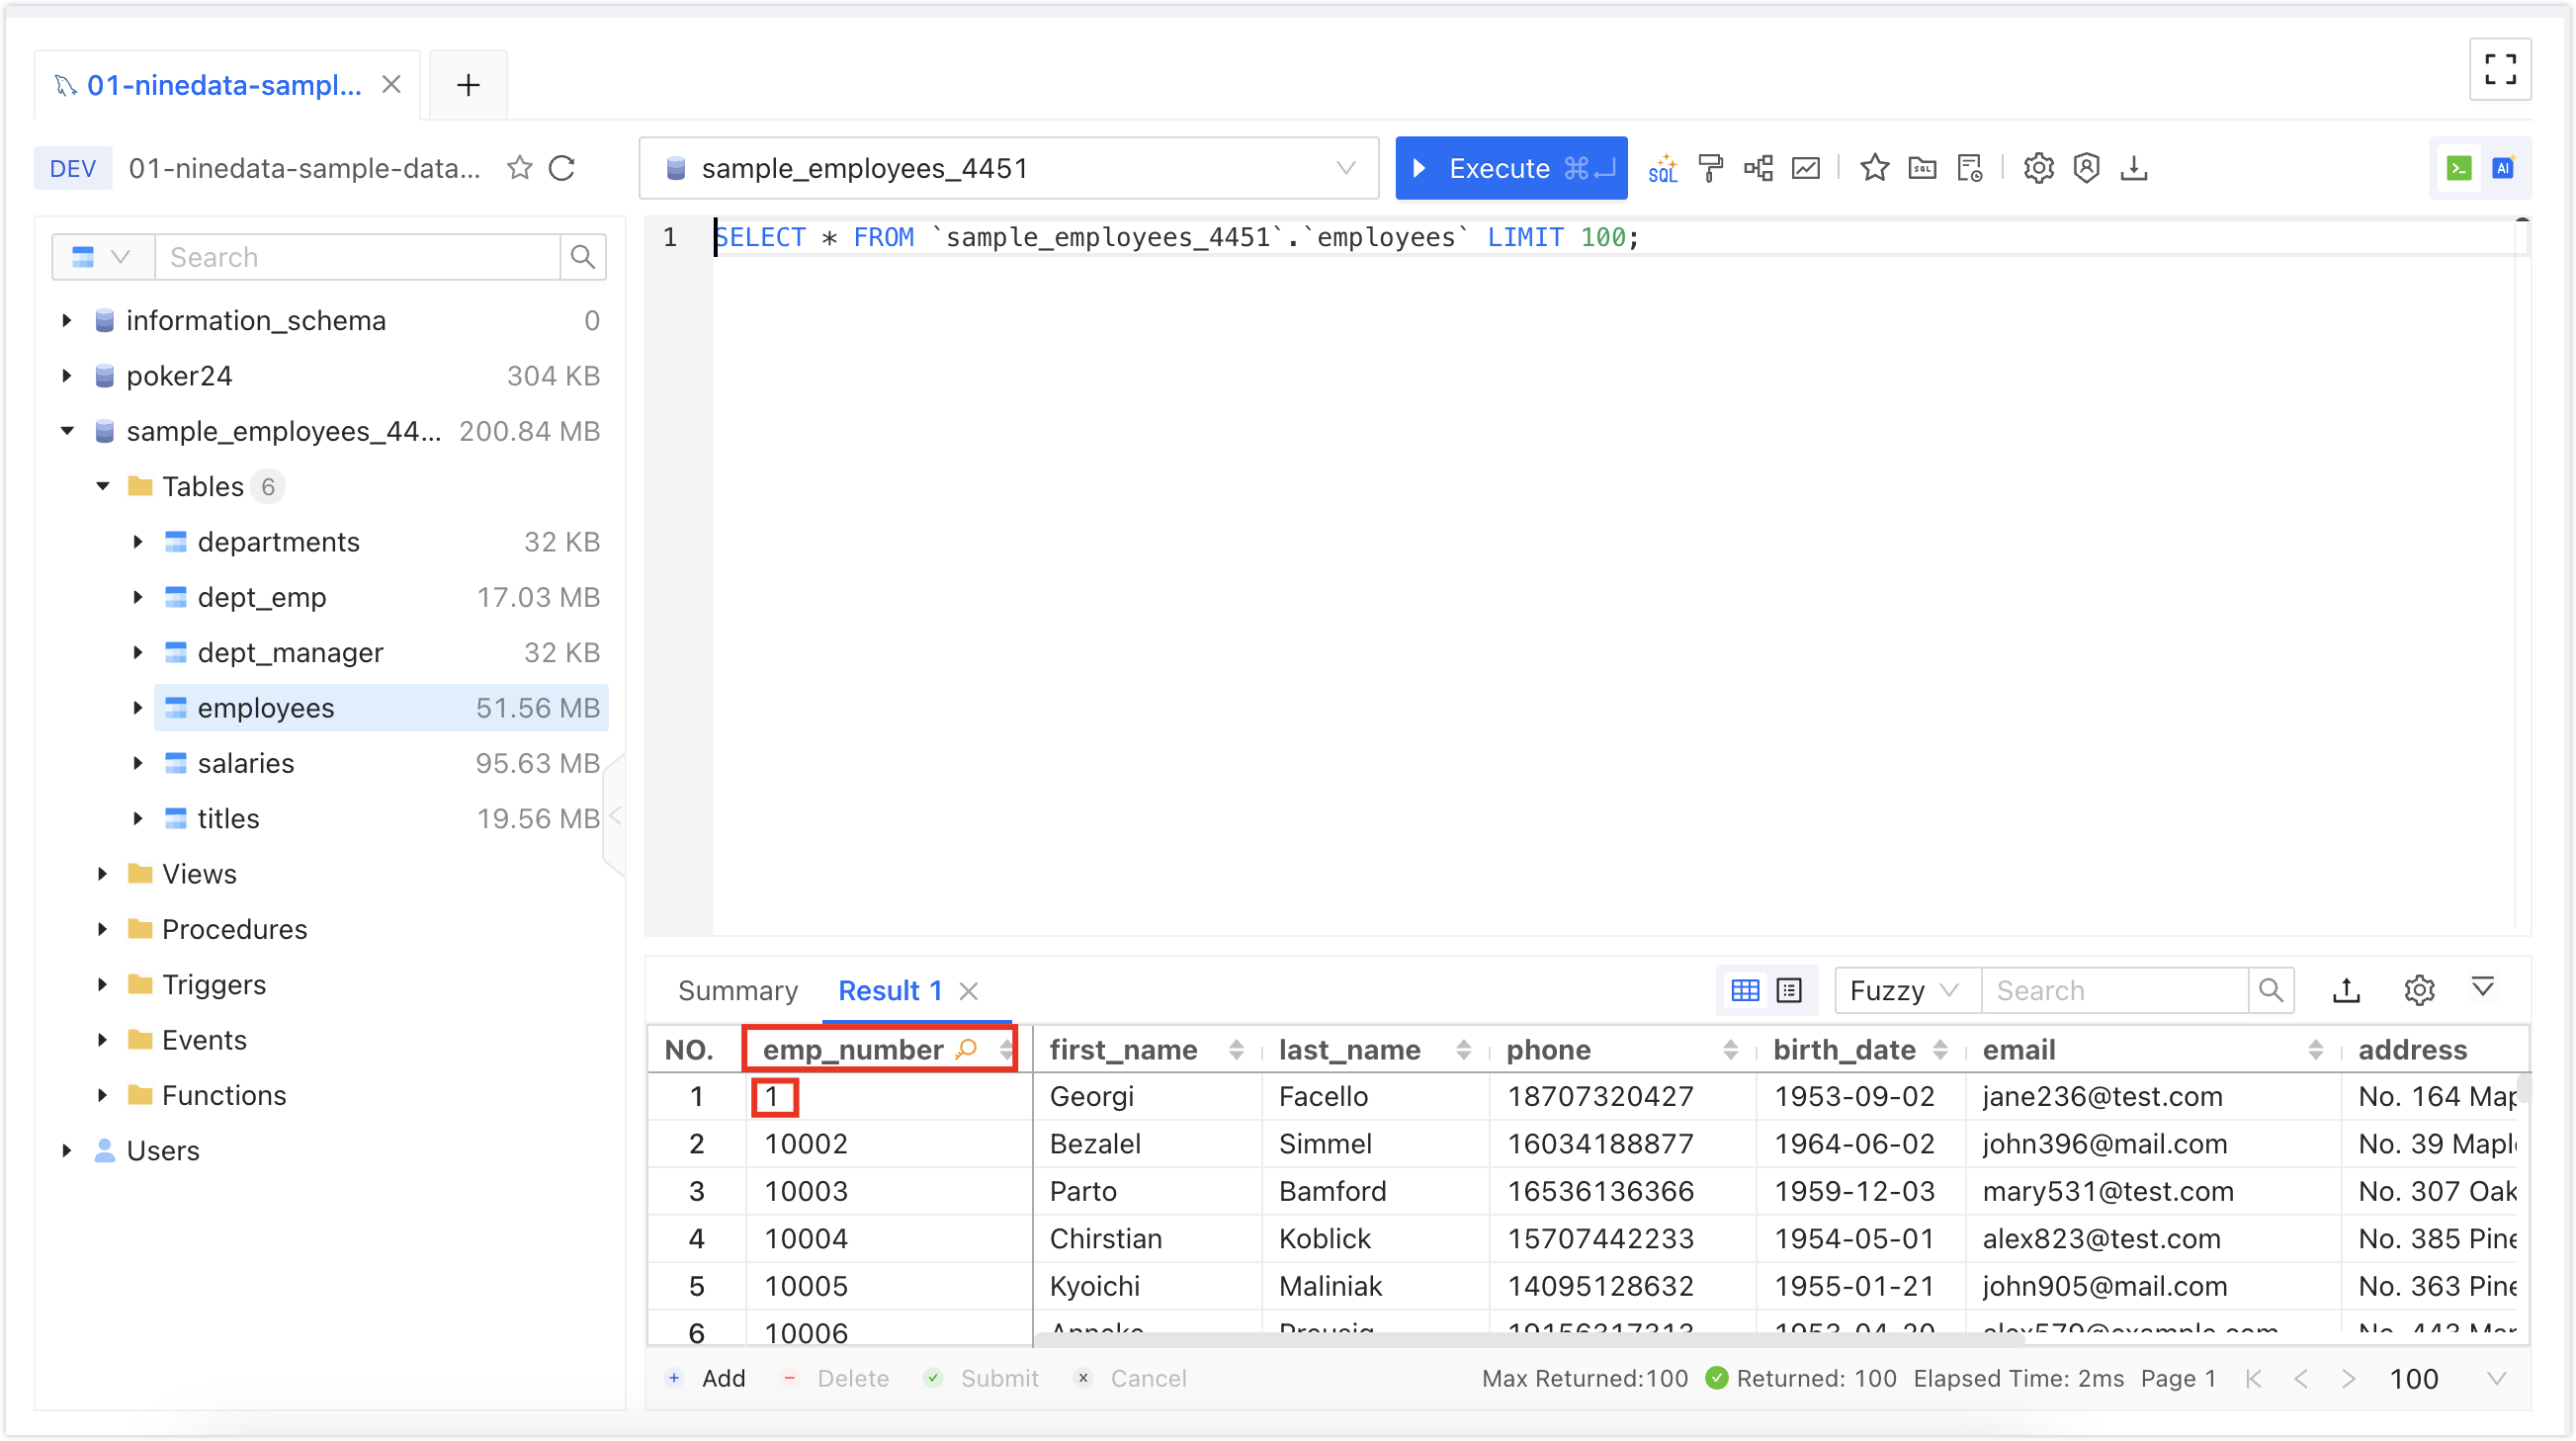
Result
At the end of this guide, your organization has invited members, connected at least one data source, assigned access permissions, and established a controlled path for SQL changes.
Next steps
- Create SQL development specifications for production data sources.
- Configure approval processes for high-risk environments.
- Use SQL tasks instead of direct SQL Console changes for production releases.