Kafka to MySQL Replication
Use this workflow to move Kafka topic data into MySQL in NineData. Choose the start offset and map Kafka message fields to MySQL table columns.
Overview
Kafka provides high-throughput, low-latency message delivery. Replicating Kafka data to MySQL helps persist streaming data for storage, analysis, and query workloads.
Before you begin
- Add both data sources to NineData. For details, see Add Data Source.
- The source data source is Kafka 0.10 or later.
- The target data source is MySQL or a MySQL-compatible database, such as MySQL, MariaDB, PolarDB MySQL, TDSQL-C, or GaussDB MySQL.
- Prepare the corresponding databases, tables, and columns in the target MySQL based on the field names in the Kafka JSON objects.
Procedure
Sign in to the NineData Console.
Go to Replication > Data Replication.
On the Replication page, click Create Replication.
On the Source & Target tab, set the following fields, and then click Next.
Parameter Description Name Enter a task name that is easy to recognize later. Up to 64 characters are supported. Source Select the Kafka data source that contains the data to replicate. Target Select the target MySQL data source. Kafka Topic Select the Kafka topic to copy. Message Format Choose the format used to copy data to MySQL. Currently, only Canal-JSON is supported. Replication Started - Earliest (Copy Earliest Message from Topic): Start from the earliest message in the Kafka topic and copy messages to MySQL in order.
- Latest (Copy Latest Message from Topic after Starting): Ignore existing Kafka topic data and copy only messages generated after the task starts.
- Customer Offset (Start From Customer Offset): Use a custom message position in the Kafka topic, that is, the Offset number. NineData starts copying messages from that Offset in order.
Target Table Exists Data - Pre-Check Error and Stop Task: Stop the task if the precheck finds data in the target table.
- Ignore existing target data and append to it.: Ignore the detected data in the target table during precheck and append other data.
- Clear target existing data before write: Delete the detected data in the target table during precheck and rewrite it.
On the Objects tab, set the following fields, and then click Next.
Parameter Description Replicate Objects Select where Kafka data is stored in MySQL. Choose All Objects to include all MySQL databases, or choose Customized Object, select the required locations from the Source Object list, and click > to add them to the Target Object list. On the Mapping tab, map Kafka message key-value pairs to columns in each MySQL table. If a Kafka message meets the configured conditions, NineData writes it to the mapped MySQL location. For more information, see Appendix.
tipWhen Message Format is Canal-JSON, configure the mapping of the $.database and $.table fields for each MySQL database and table. For example, if you configure $.database as
sample_employees_210and $.table asdepartments, all Kafka messages that match these values are copied to the corresponding target MySQL table.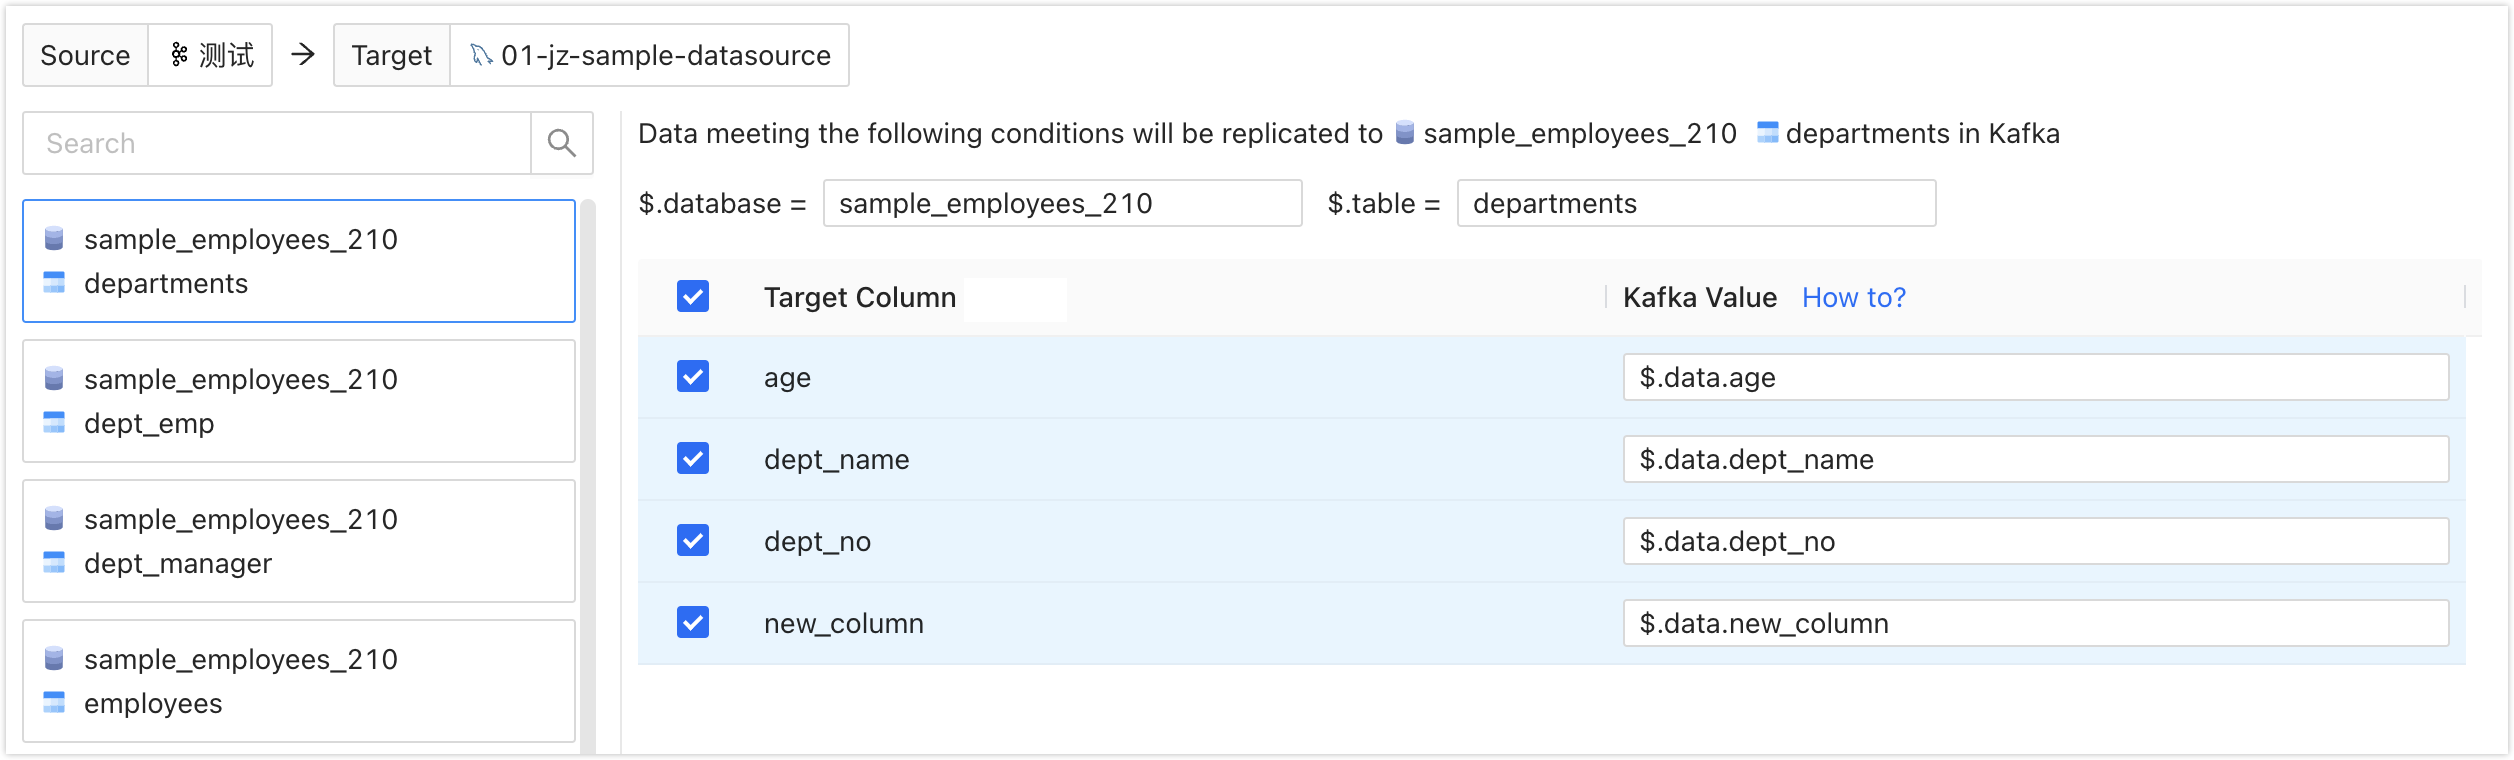
On the Pre-check tab, wait for NineData to finish the precheck. After the precheck passes, click Launch.
tip{/* Optional compare task:
Select Enable data consistency comparison to compare target data with source data after the synchronization task finishes. The start time of Enable data consistency comparison depends on the following:
Full: Start after full replication finishes.
Full + Incremental, Incremental: Start when incremental data first matches the source data source and Delay is 0 seconds. Click View Details to view the synchronization delay on the Details page.
 */}
*/}If the precheck fails, click Details to the right of the failed item, fix the issue, and click Check Again until the precheck passes.
For items whose Result is Warning, fix the issue or ignore the warning when appropriate.
On the Launch page, after Launch Successfully appears, the replication task starts running. Use these actions to review the task:
- Click View Details to view the status of each replication phase.
- Click Back to list to return to the Replication task list.
Result
Sign in to the NineData Console.
Go to Replication > Data Replication.
On the Replication page, click the ID of the target replication task to open the Details page. Use the following areas to monitor the task.

Number Feature Description 1 Sync Delay Shows the replication lag between the source and target data sources. 0seconds means the target is caught up with the source.2 Configure Alerts Configure alerts to notify selected contacts when the task fails. For more information, see Introduction to operational monitoring. 3 More - Pause: Pause a task whose status is Running.
- Terminate: Terminate a task that is unfinished or still listening for incremental changes. A terminated task cannot be restarted. Proceed with caution.
- Delete: Delete the task. Deleted tasks cannot be recovered. Proceed with caution.
4 Incremental Copy Shows incremental copy metrics. - Click Log to view incremental copy logs.
- Click the
 icon to view the latest information.
5 Modify Object Shows change records for the synchronization object. - Click Modify Objects to configure the synchronization object .
- Click the icon to view the latest information.
6 More Shows detailed information about the current replication task, including the current Kafka Topic, Message Format, Started, and other settings.
Appendix: JSON_PATH definition
Kafka to MySQL replication works by extracting data from Kafka JSON objects and storing it in the corresponding MySQL databases and tables. JSON_PATH is a path expression used to locate specific elements in a JSON object. This section defines JSON_PATH.
JSON_PATH consists of two main parts: Scope and pathExpression.
- Scope: Represented by the dollar sign ($), it signifies the root of the JSON.
- pathExpression: Used to match the path of specific elements in the JSON object. It consists of one or more pathLegs, which can be member, arrayLocation, or doubleAsterisk. Multiple pathLegs represent multiple levels.
- member: Matches the key in the JSON object. The format is
.<Key Name>or.*, where the former looks for the specified key name in the JSON object, and the latter represents all keys in the JSON object. - arrayLocation: Matches array elements in the JSON object. The format is
[<non-negative integer>]or[*], where the former locates array elements based on the specified non-negative integer, and the latter represents all array elements in the JSON object. - doubleAsterisk: Matches keys or array positions at any level. The format is
.**.
- member: Matches the key in the JSON object. The format is
Examples:
$.data: Matches the JSON object with the name data.$.data.order_id: Matches the key named order_id under the data JSON object.$[1]: Matches the array element with index 1 in the JSON object.$[*]: Matches all array elements in the JSON object.$.**: Matches any key or array position at any level in the JSON object.