Managing Doris Data Source through NineData SQL Console
This article explains how to use the SQL Console in NineData to manage Doris data sources.
Background Information
NineData is a cloud service that integrates Database DevOps, data replication, data backup, and data comparison modules. It supports enterprise data management in hybrid cloud (self-built database + cloud database) and multi-cloud (business architecture composed of multiple different cloud vendor databases) architectures, significantly reducing the difficulty and cost of data operation and maintenance for enterprises.
NineData's SQL Console allows you to manage Doris databases more easily. With NineData, you can easily view, edit, and manage Doris data. You can also create, delete, and modify Doris databases.

Prerequisites
You have registered a NineData platform account. For more information, please refer to Registering a NineData Account.
Under DevOps Enterprise (organization mode), you must have read-only, DML, or DDL permissions for the target data source.
tipRead-only permissions only support viewing databases and querying data operations.
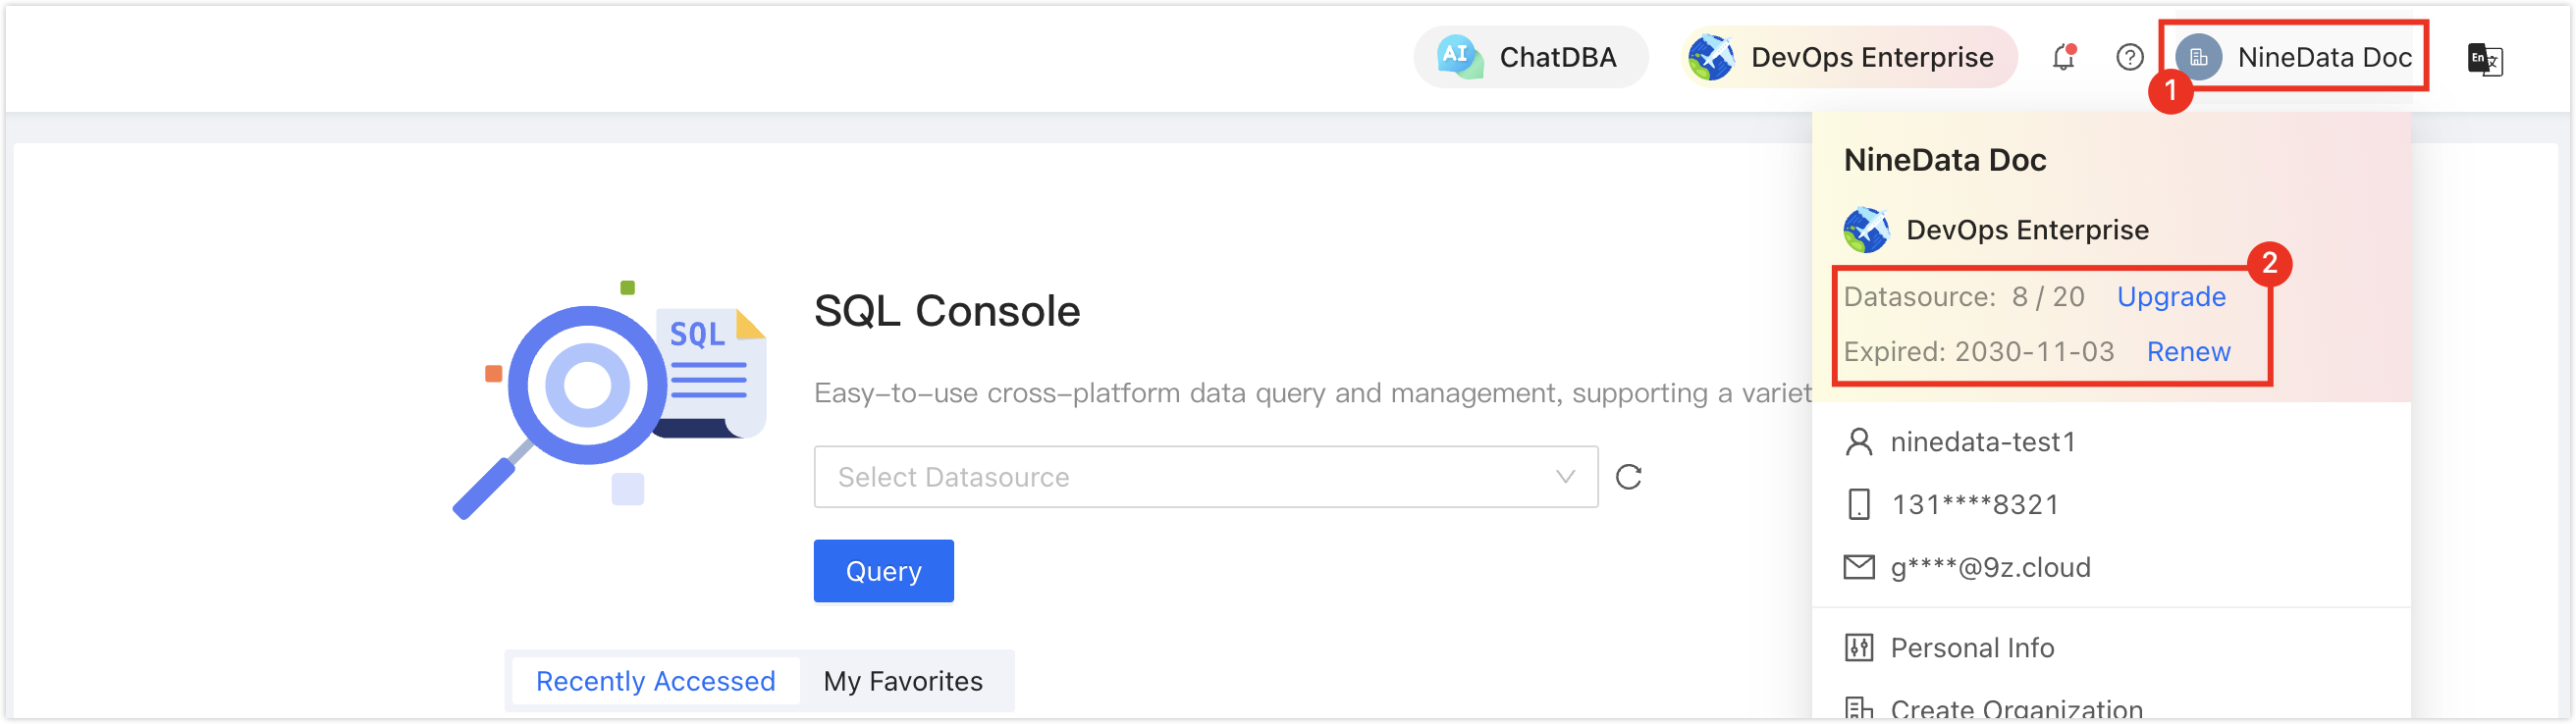
In the commercial versions (DevOps Pro, DevOps Enterprise), please ensure that your monthly/yearly subscription is not expired, as it may result in the inability to use the Database DevOps service. You can quickly check the remaining quota and expiration date at the top right corner of the NineData console page.
Features
NineData's SQL Console provides several convenient features to help you manage your data sources.
| Feature | Description |
|---|---|
| AI Intelligence | NineData provides AI services that support the following functions:
|
| AI Functions |
|
| Execute SQL Statements |
|
| Generate Creation Scripts | Generate creation scripts for existing objects such as databases and tables in the data source, which can be used to replicate the same structure in other data sources. |
| SQL Intelligent Suggestions | While entering SQL statements in the SQL Console, the system automatically provides suggestions for keywords, functions, table and column names, and other common objects based on the semantics you enter. It also provides convenient features such as SQL templates (semantic structures) and syntax help. |
| Save SQL | View SQL | For frequently used SQL statements, you can save them in NineData. The saved SQL statements can also be viewed. Since the SQL statements are saved in the cloud, they are not limited by the browser or host, allowing you to view and use the saved SQL statements anytime, anywhere. |
| Workspace Recovery | In scenarios such as unexpected browser exits or sudden crashes, you only need to log in to the NineData console and open the SQL Console again. The previously opened data source and executed SQL commands will be automatically loaded. Since the page state is saved in the cloud, it is not limited by the browser or host, allowing you to restore your workspace anytime, anywhere. |
| Execution History | History records all the SQL statements executed by the current account in the NineData console. It also supports quick retrieval based on data sources, execution time, SQL keywords, etc. You can also quickly copy and execute SQL statements from the execution history in the SQL Console. |
| SQL Standard Check (Enterprise Edition) | In DevOps Enterprise (organization modeOrganization mode supports assigning different roles and resource management permissions to each user in the organization, suitable for collaborative development by multiple users within the same organization. It improves overall production efficiency while ensuring data security.), the system checks every SQL statement executed in the SQL Console based on the SQL development standards configured by Administrator. If a SQL statement does not comply with the standards, it will be intercepted by the system to ensure database security. After interception, according to the approval process configured by Administrator, users can modify the SQL statement according to the standards and resubmit it, or directly submit a SQL task. |
Step 1: Adding a Doris Data Source
Log in to the NineData Console.
On the left navigation pane, click Datasource > Datasource.
- Click Datasource tab, and click Create Datasource on the page. In the popup window for selecting the data source type, choose Database> Doris, and configure the parameters based on the table below on the Create Datasource page.tip
If you make a mistake during the operation, you can click the
 icon at the top of the Create Datasource page to make a new selection.
Click to expand table details
Parameter Description Name Enter the name of the input data source. Please use a meaningful name for easy future lookup and management. Connection Choose the access method for the data source. Supports three methods: IP Address, Gateway, and SSH Tunnel. - IP Address: Access the data source via public IP address.
- Gateway: Secure and efficient intranet access method provided by NineData. The host of the data source needs to be connected. Refer to add gateway for the connection method.
- SSH Tunnel : Access the data source via SSH tunnel.
Configuration options for IP Address Host: Enter the public connection address and port number of the data source. Configuration options for Gateway Gateway: Choose the NineData gateway installed on the host where the data source resides.
Host: Can be set as localhost (data source is on the local machine) or the intranet IP of the data source's host.Configuration options for SSH Tunnel - SSH Host: Enter the public IP or domain name of the target data source's server, along with the corresponding port number (default port for SSH service is 22).
- SSH Authentication Method: Choose the SSH authentication method.
- Password: Connect using SSH Username (server login name) and Password (server login password).
- Key (recommended): Connect using SSH Username and Key File.
- SSH Username: Enter the login username of the target data source's server.
- Key File: Upload the private key file by clicking Upload. This is the key file without an extension. If you haven't created it yet, refer to generate SSH Tunnel key file.
- Password: Enter the passphrase set during key file generation. Leave it blank if no passphrase was set during key generation.
Note: After configuring SSH, you need to click the Connection Test on the right. Two outcomes are possible: - Connection Successfully prompt: Indicates the successful establishment of the SSH Tunnel.
- Error message prompt: Indicates connection failure. Troubleshoot the issue based on the error message and retry.
DB Account Data source username. DB Password Data source password. Access Region Choose the region closest to the location of your data source to effectively reduce network latency. Environment Select the actual business purpose of this data source as the environmental identifier. Default options include PROD and DEV, and you can also create custom environments.
Note: In organization mode, database environments can also be applied to permission policy management. For example, the default Prod Admin role only supports accessing data sources in the PROD environment and cannot access data sources in other environments. For more information, see manage roles.Encryption Choose whether to use SSL encryption for accessing the data source (default: on). If the data source requires SSL encryption, you must enable this option, otherwise the connection will fail.
Click the switch on the right to toggle encryption on or off. Click on the left of Encryption to expand detailed configuration.- SSL Options: Choose from two options:
- If Available: Automatically detect the SSL status of the server. If the server has SSL enabled, connect using SSL; otherwise, use a non-SSL connection.
- Require: Always use SSL to connect to the data source. If the server does not support this method or cannot establish an SSL connection for other reasons, the connection will fail.
- SSL Cipher: Specify the SSL-Cipher encryption algorithm.
- Verify Server Certificate (SSL CA): If the Doris server uses a self-signed CA certificate, upload the root certificate of that CA here.
- Verify Server Identity (SSL Identify): Check this to verify the name and IP address of the server to ensure that the connection is made to the genuine Doris server and avoid Man-in-the-Middle attacks.
- Authenticate Client: If the Doris server requires the client to provide a certificate, upload the client's certificate and key here. The Doris server will verify the uploaded information to ensure the security of the connection.
After completing all the configurations, click the Create Datasource button, and the data source will be added once the connection test succeeds. Otherwise, please recheck the connection settings until the connection test succeeds.
Step 2: Using the SQL Console
Log in to the NineData Console.
In the left navigation pane, click DevOps > SQL Console.
tipIf you have previously logged in to a data source and did not close it, you will be automatically redirected to the data source page.
Click on the text box below SQL Console, and a list of available data sources will pop up. Click on the desired data source and click Query to enter the SQL Console.
tipIf you have multiple data sources, you can enter keywords (partial or complete) in the box to perform an exact or fuzzy search. The searchable fields include:
- Data source name
- IP address
Once the SQL Console is open, you can perform data management operations on the data source. The following image shows an example:
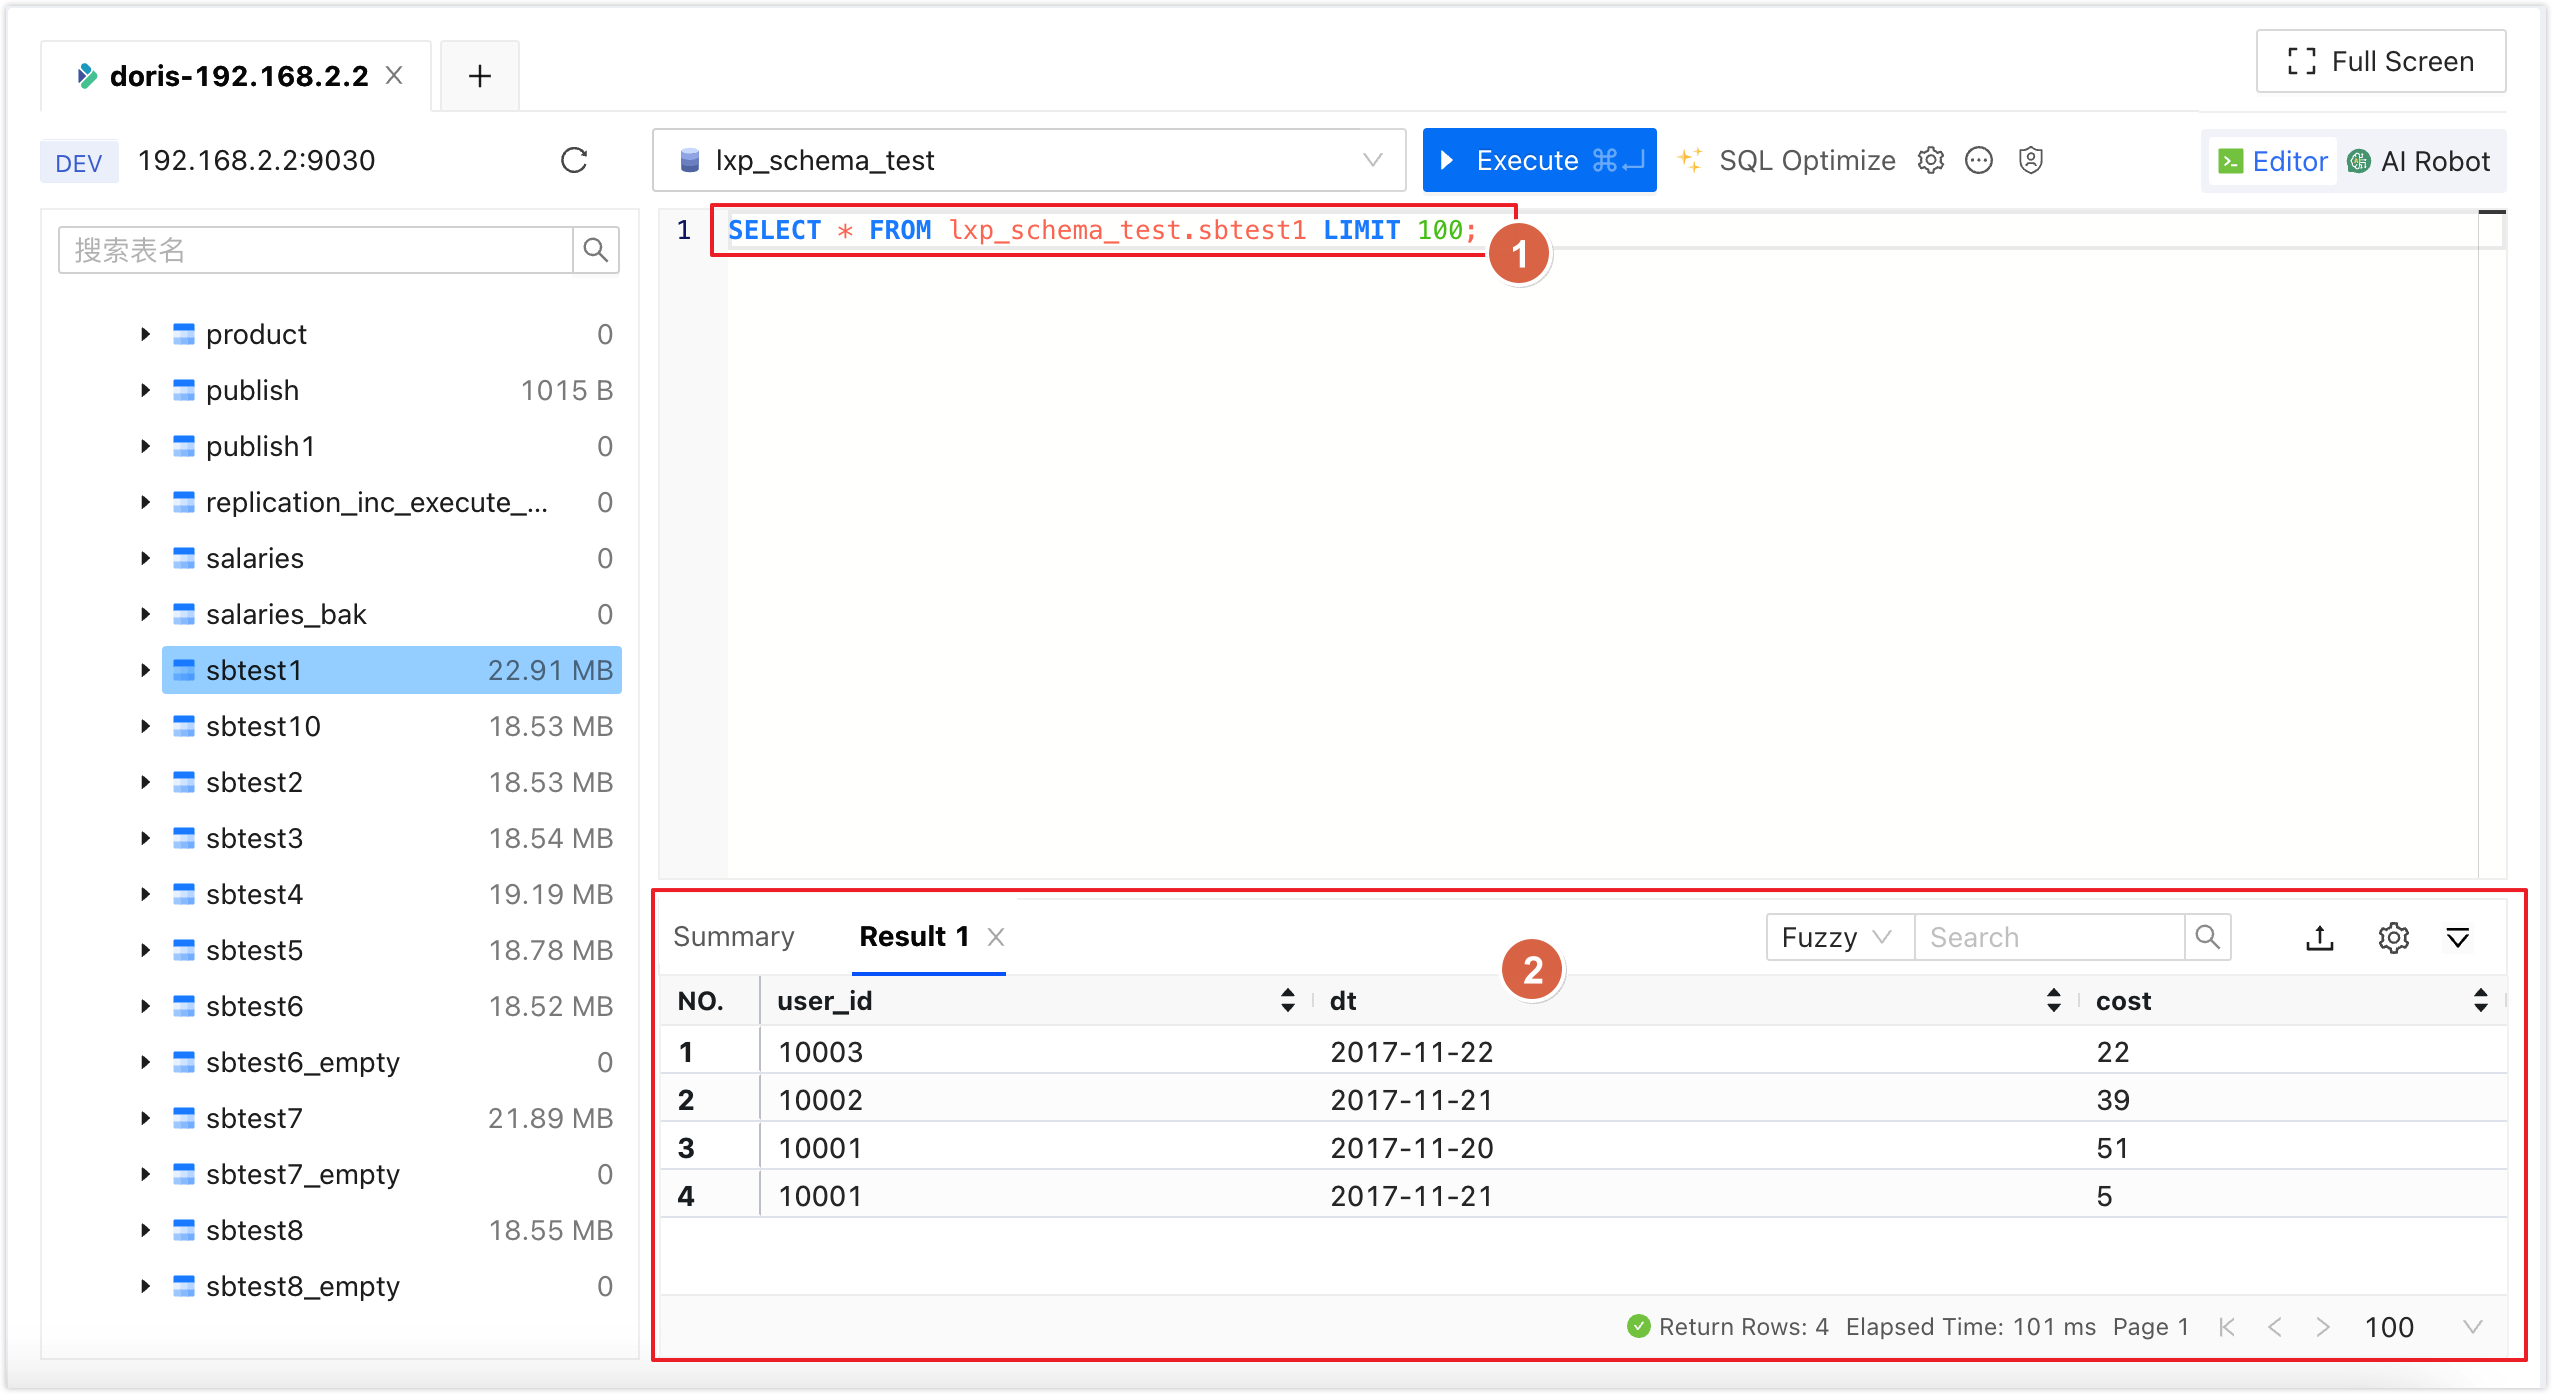
For detailed instructions on how to use the SQL Console, please refer to the SQL Console Interface Introduction section.
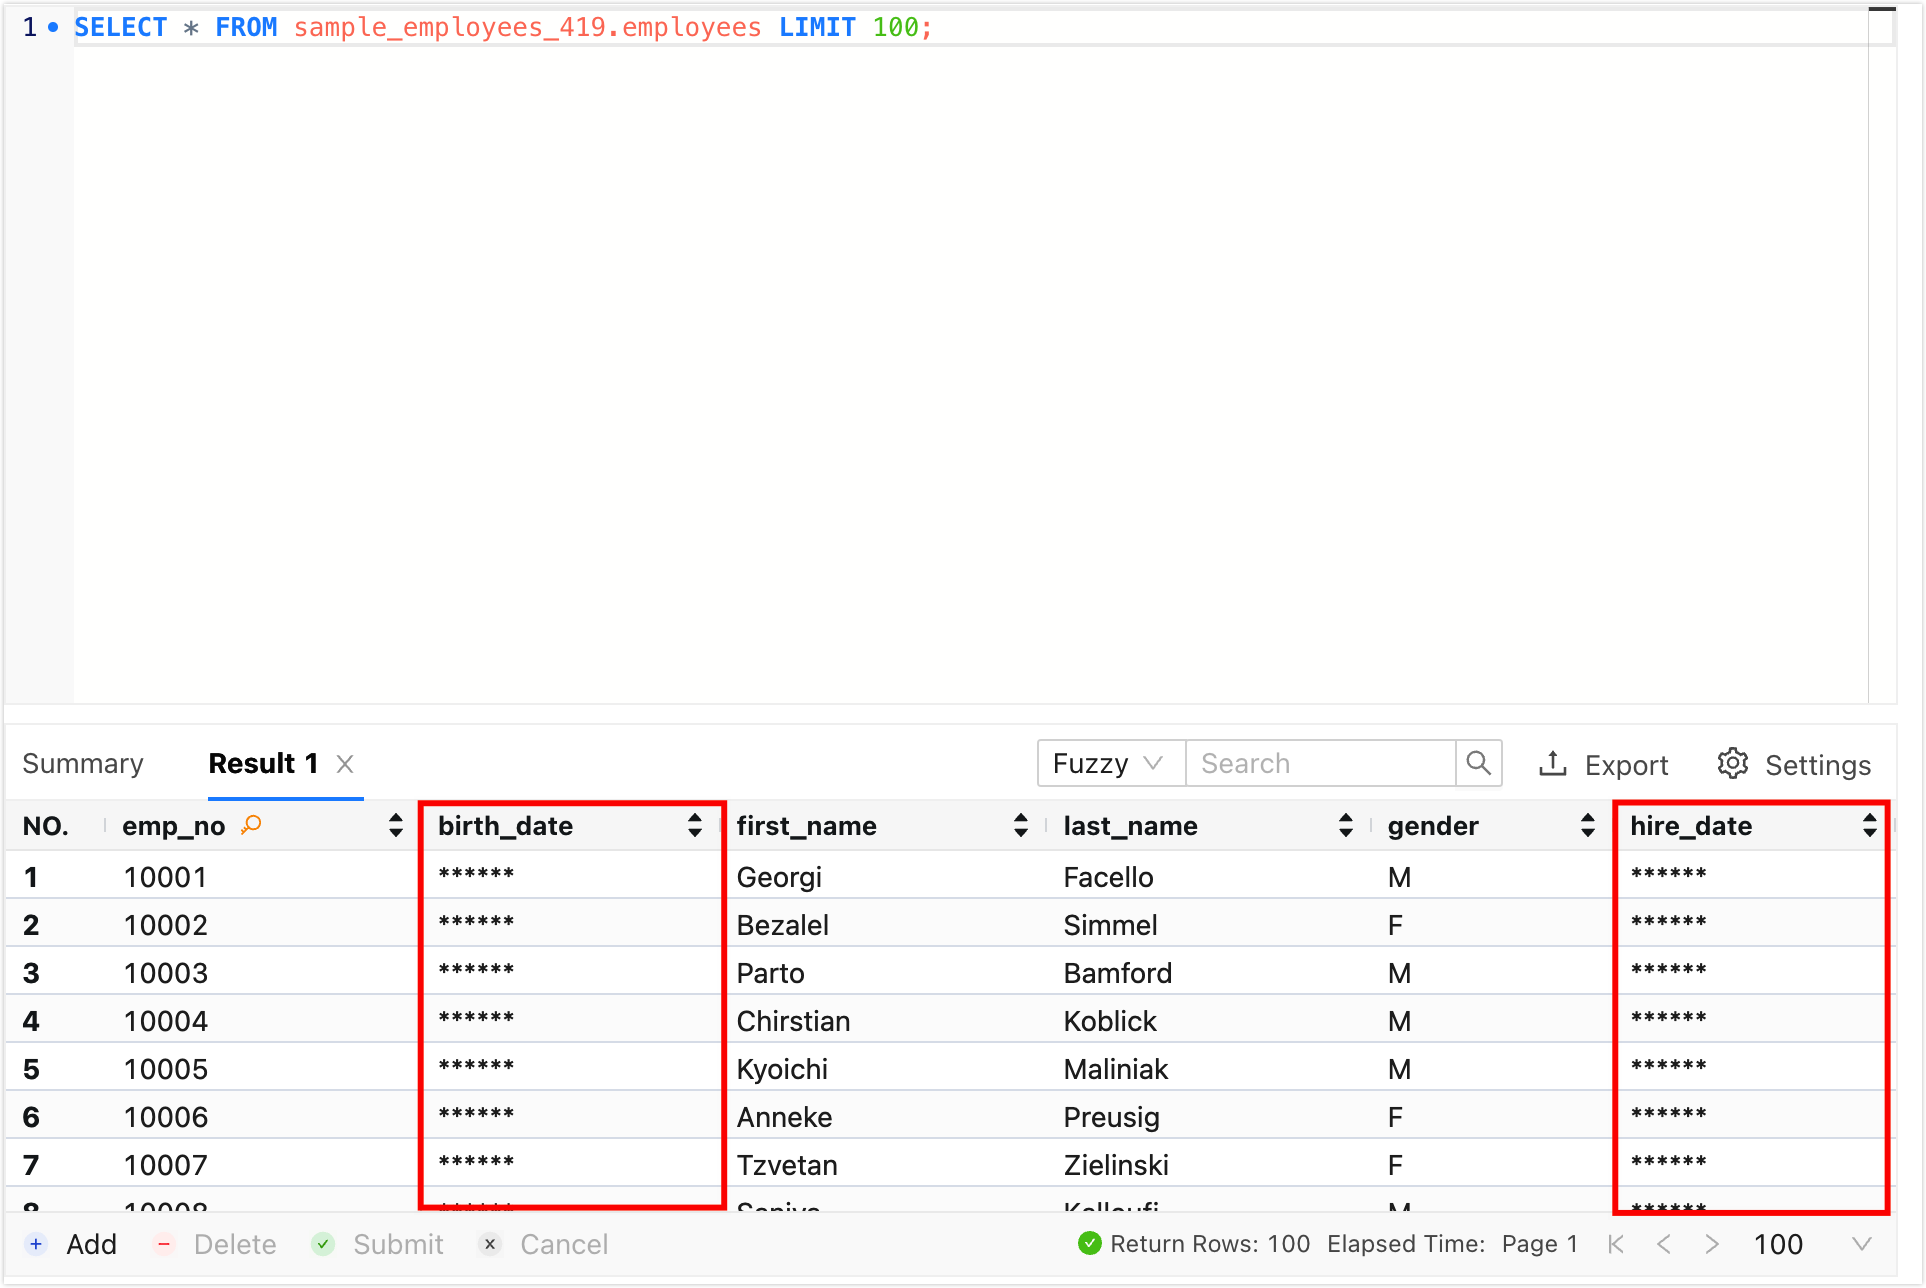
tipIn DevOps Enterprise (Organization Mode), if sensitive columns are configured in the target data source, you will not be able to view the complete content of the sensitive columns. To view them, please apply for sensitive column access permission first.
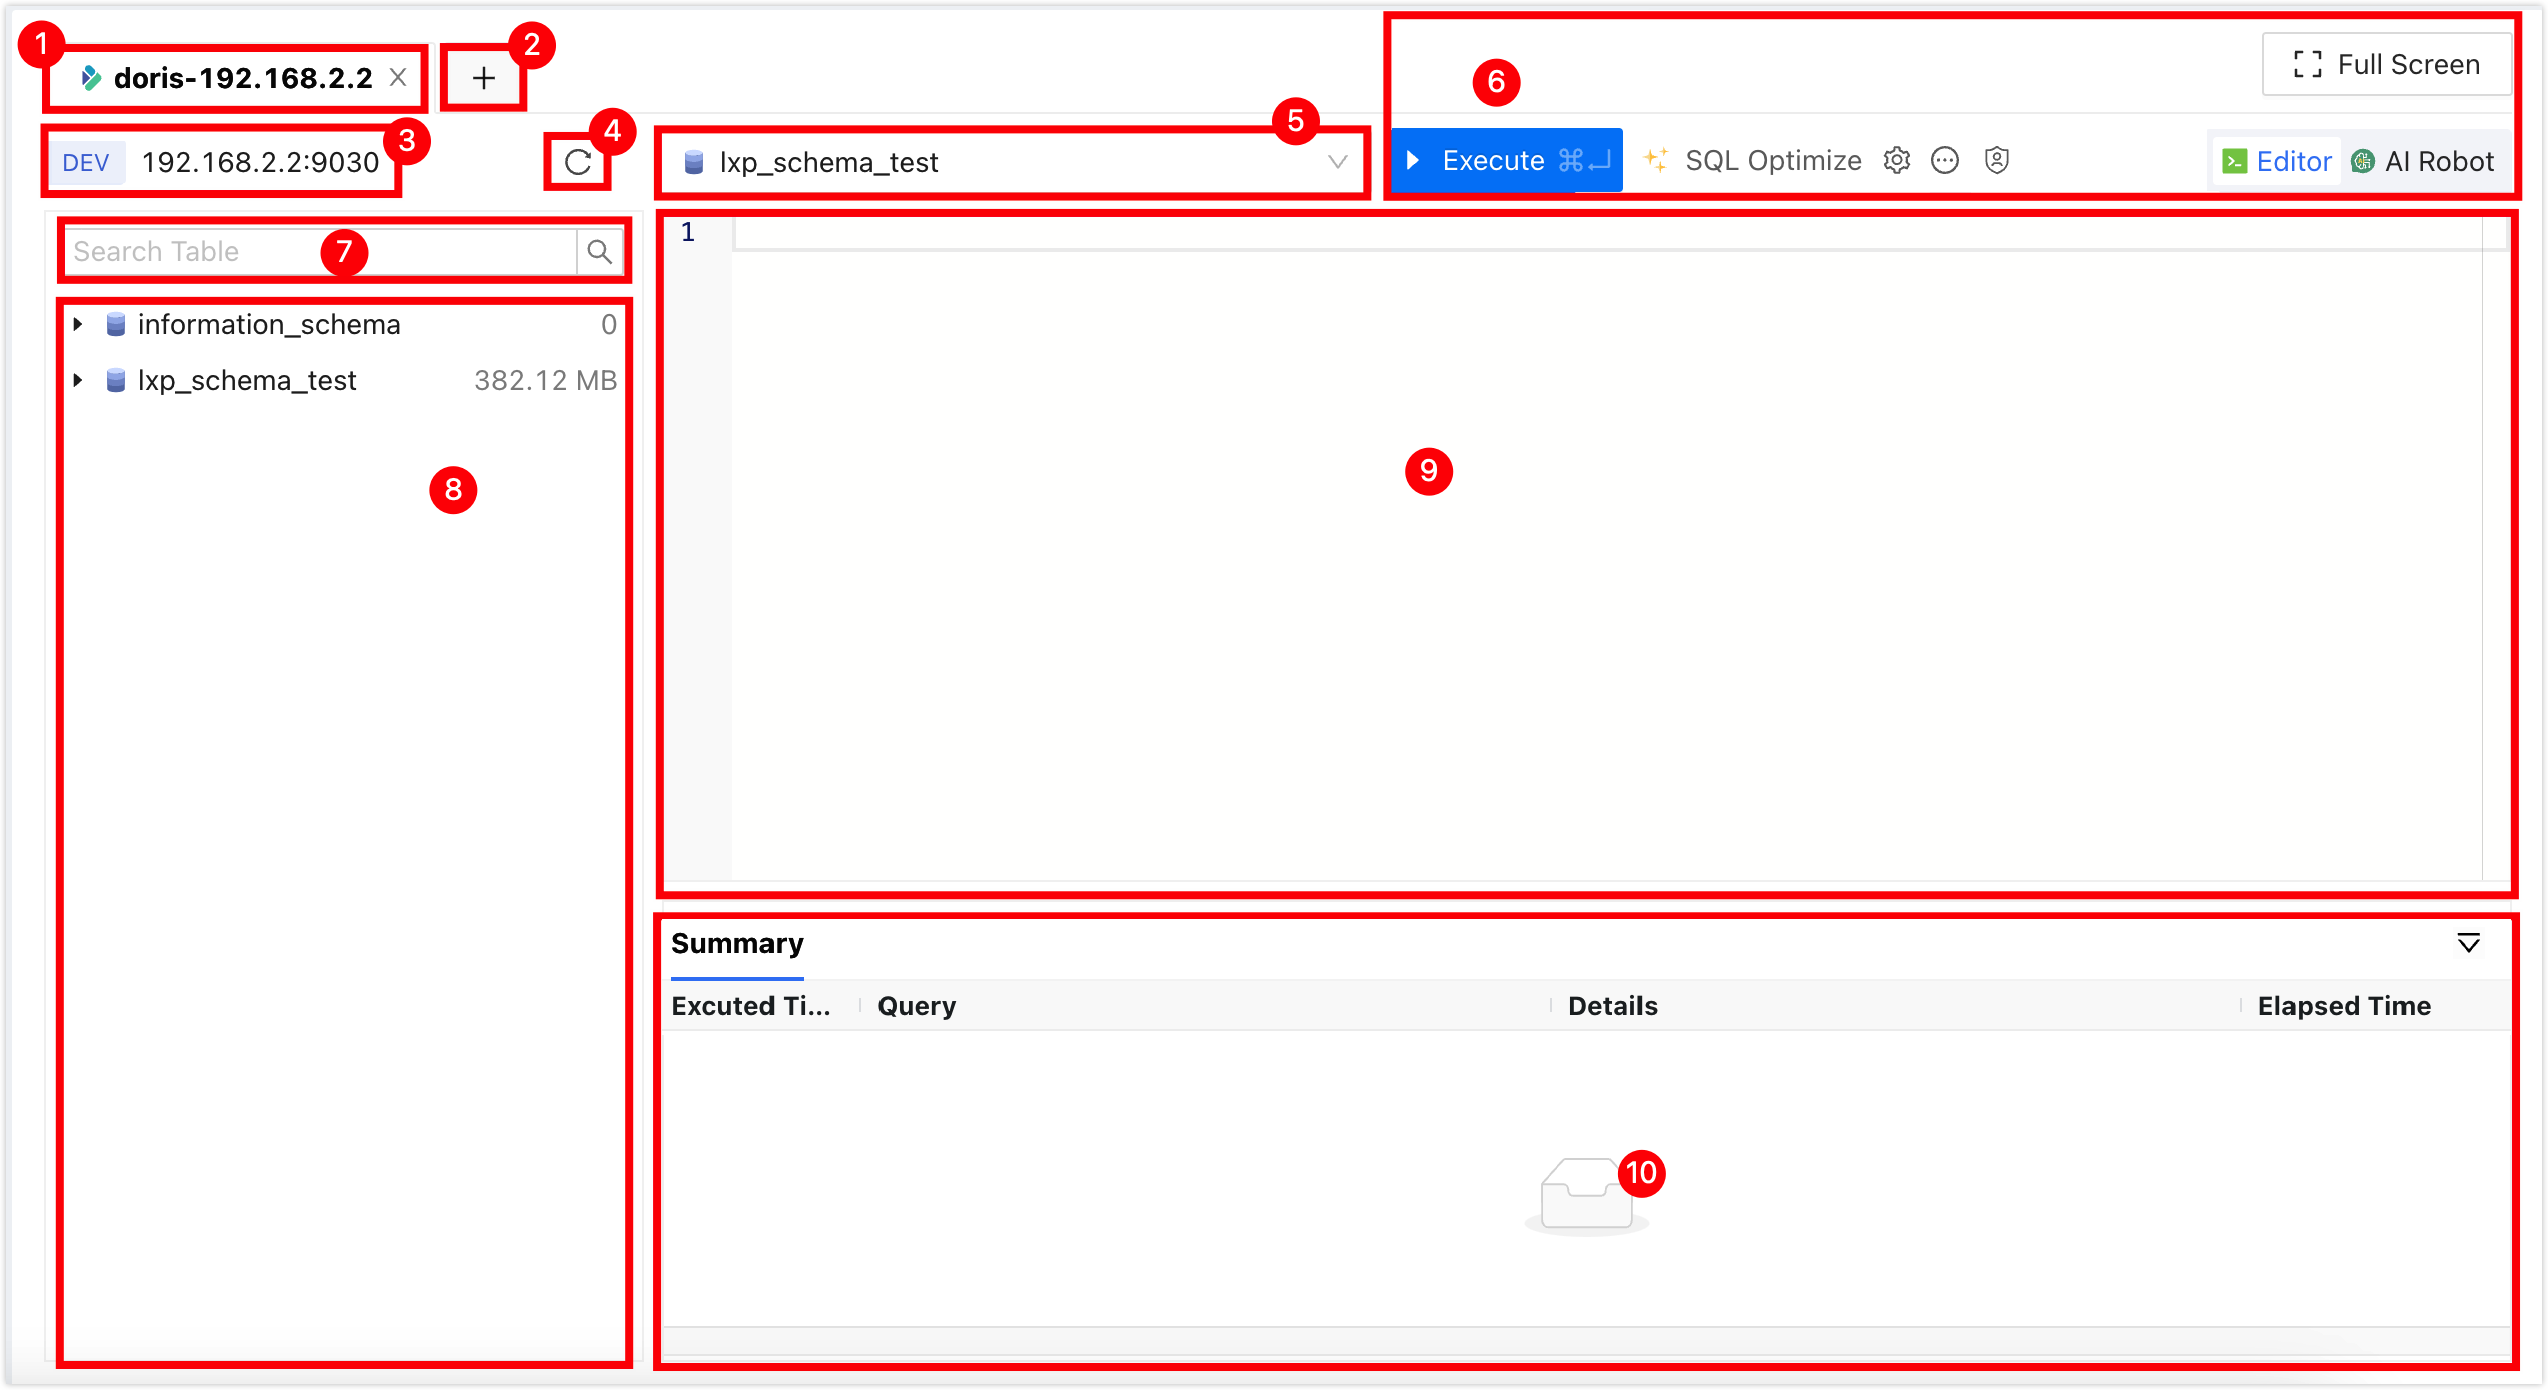
Appendix: Introduction to the SQL Console Interface
| Number | Feature | Description |
|---|---|---|
| 1 | SQL Tab | Represents the currently open SQL Console for a data source. Multiple SQL Consoles can be switched by clicking on the tabs, and clicking the X on the right of the tab will close the SQL Console. Right-clicking on the tab supports the following actions:
|
| 2 | Open Data Source | Select and open a new SQL Console for a data source. |
| 3 | Data Source Information | Displays the data source information for the current SQL Console, including environment, IP address, and port number. Right-click menu:
|
| 4 | Refresh | Refresh the data in the current data source. |
| 5 | Database Name | Select the target database to perform SQL operations. |
| 6 | Function Buttons |
|
| 7 | Search Table Name | Quickly search for a target data table by entering the table name. |
| 8 | Database List | Displays all databases and data tables in the current data source.
|
| 9 | SQL Editor | Supports the following features:
|
| 10 | Execution Information, Result Set | Displays the execution information and result set of the SQL.
|