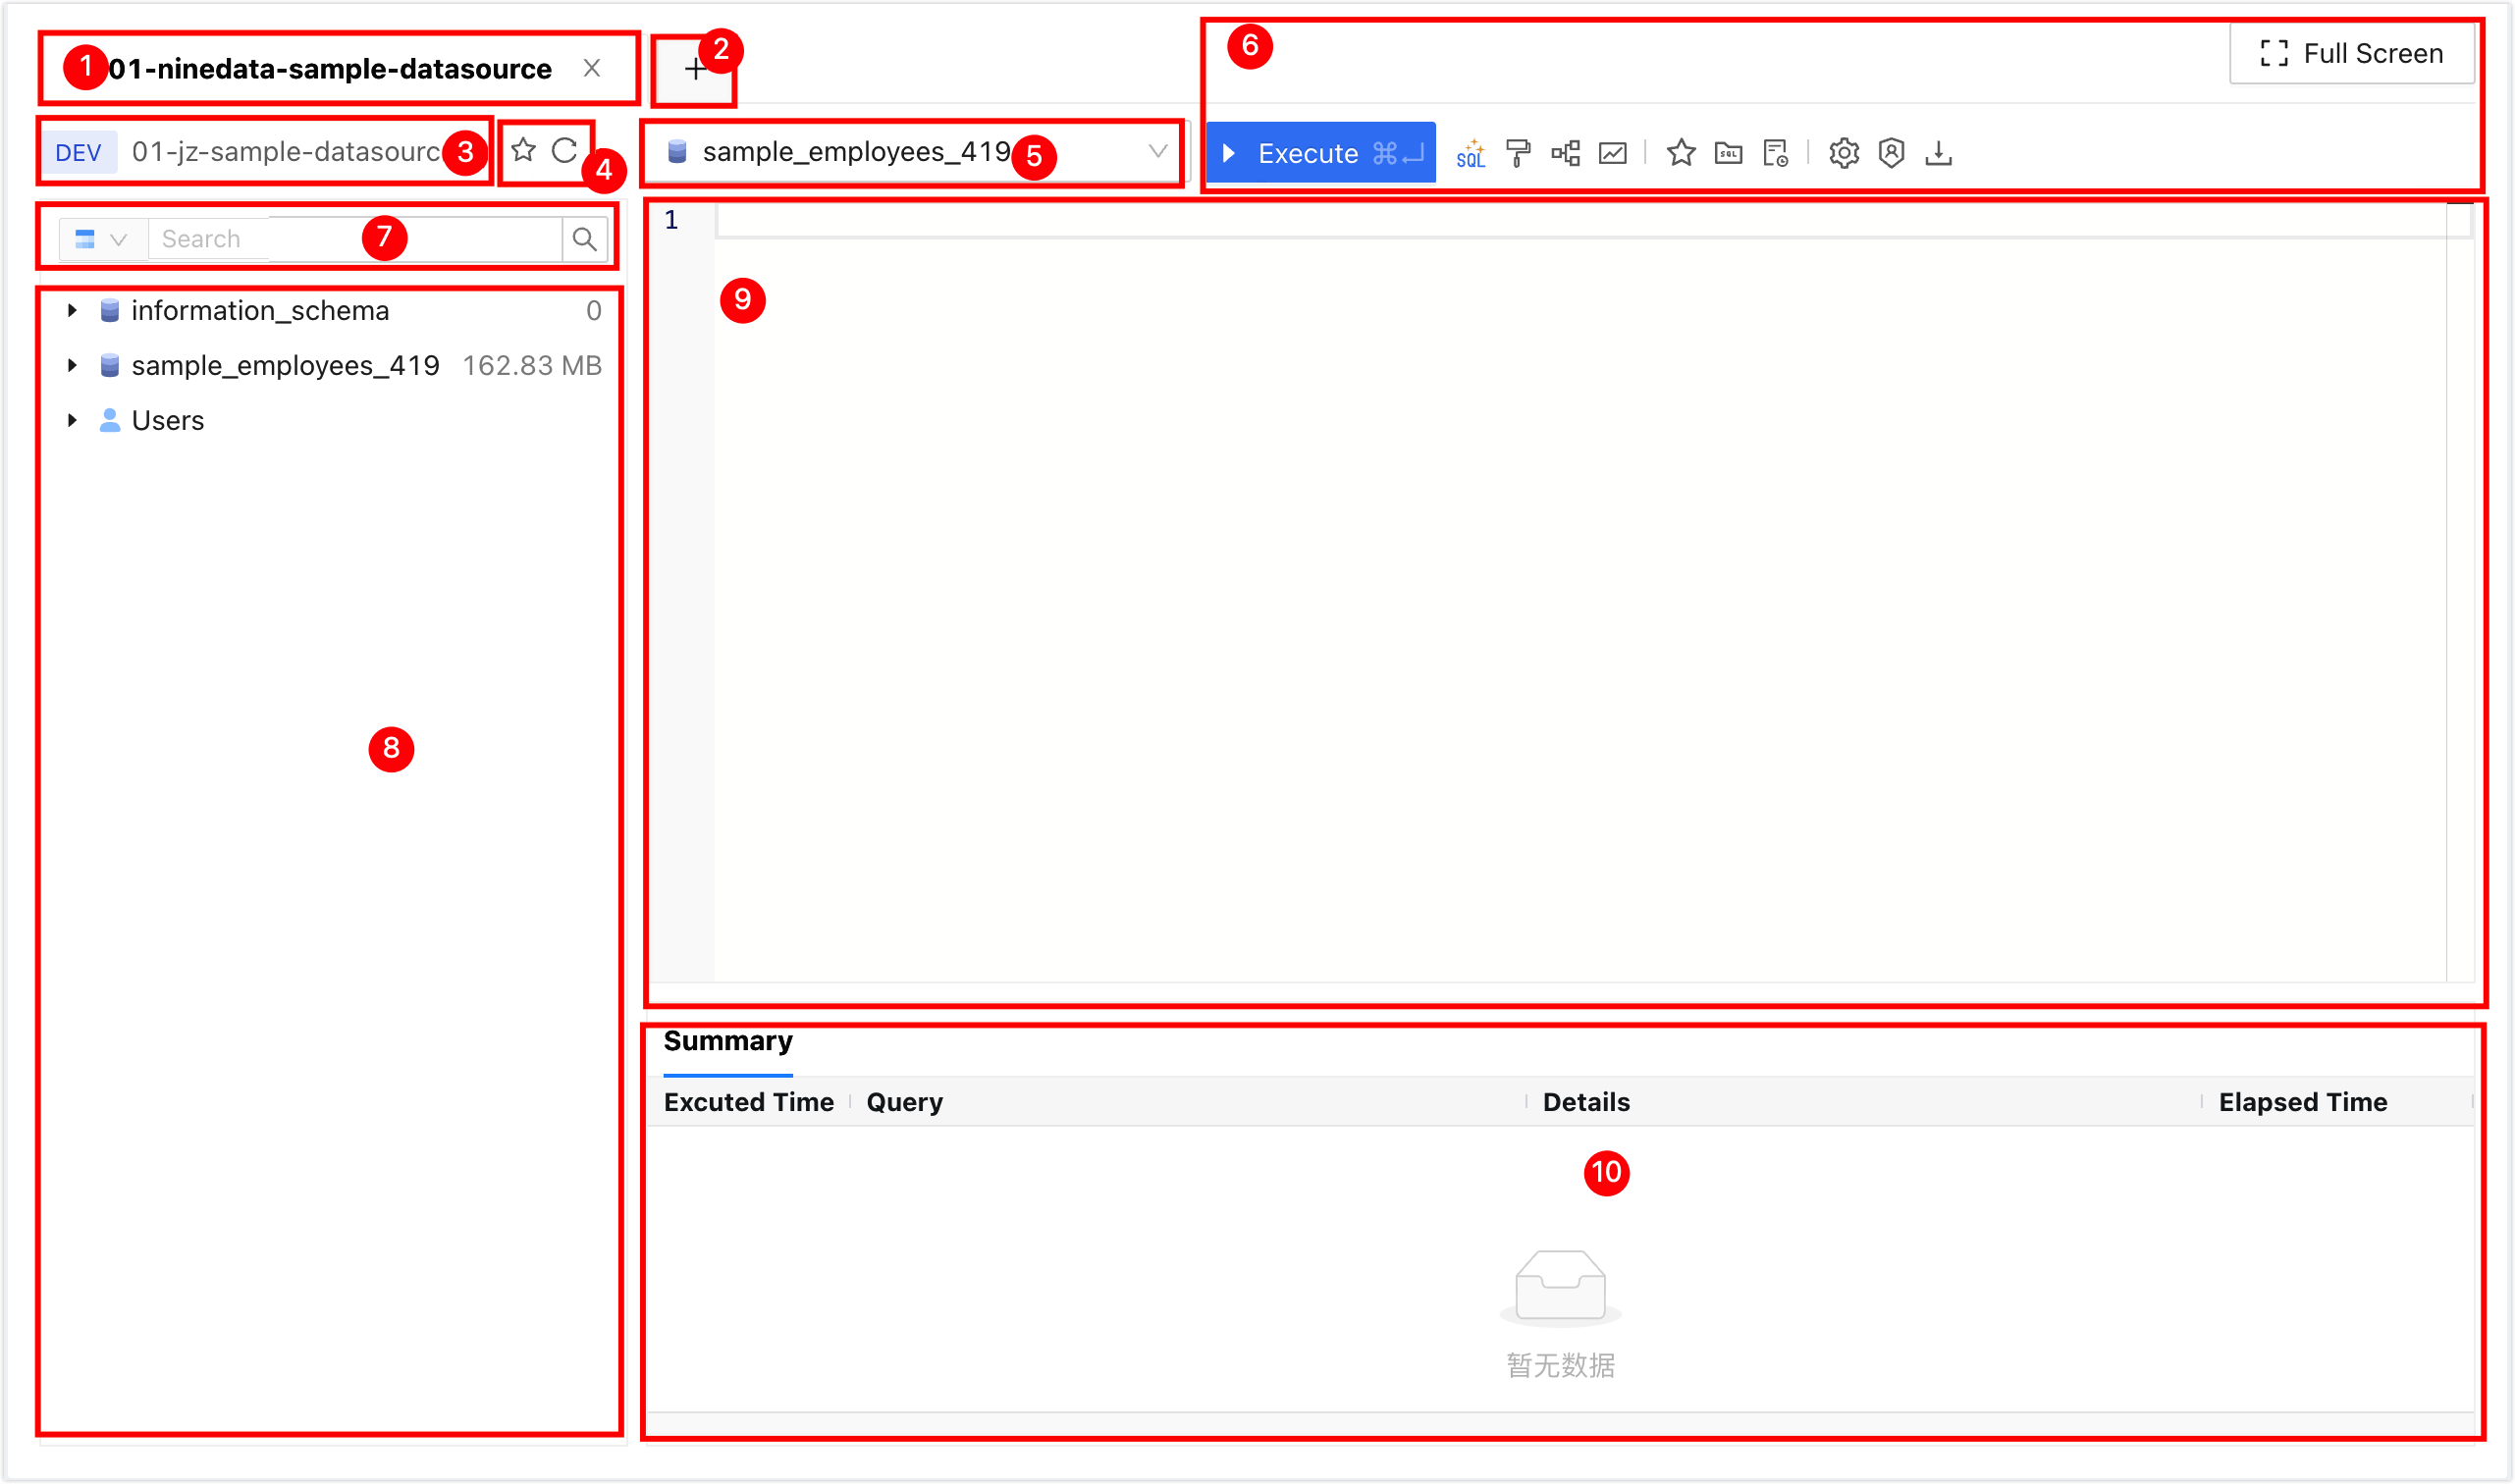
| 1 | SQL console tab | Indicates the currently open SQL window for the data source. Multiple SQL windows can be switched by clicking on their tabs. Click the X on the right side of a tab to close the corresponding SQL window. Double-click a tab to rename it, and drag a tab to adjust its position. The context menu supports the following operations:- : Open the current data source details window.
- : Rename the current tab.
- : Open a SQL Console for the current data source.
- : Open a new data source SQL Console.
- : Close the current tab.
- : Close all other SQL Consoles except the current one.
- : Close all SQL Consoles to the left of the current SQL Console.
- : Close all SQL Consoles to the right of the current SQL Console.
- : Close all SQL Consoles.
|
| 2 | Open data source | Select and open the new data source SQL console. |
| 3 | Data source information | Display the data source information of the current SQL console, including the environment, IP address and port number. |
| 4 | Favorite|Refresh | - Favorite: Clicking the favorite icon adds the current data source to , allowing for quick selection in a new SQL Console after addition.
- Refresh: Refresh the data in the current data source.
|
| 5 | Database name | Check the target database to perform the SQL operation. The effect is equivalent to the USEstatement. |
| 6 | Function |  : Execute the selected SQL statement. : Execute the selected SQL statement. : AI intelligently analyzes the SQL statement on the cursor line and provides optimization suggestions. : AI intelligently analyzes the SQL statement on the cursor line and provides optimization suggestions. : : Adjust the structure of the selected SQL statement to enhance readability. : : Adjust the structure of the selected SQL statement to enhance readability. : : View the execution plan of the selected SQL statement. : : View the execution plan of the selected SQL statement. : : Save all SQL statements in the current SQL Console to the SQL list for easy access next time. : : Save all SQL statements in the current SQL Console to the SQL list for easy access next time. : : View saved SQL statements. You can insert the target SQL into the current SQL Console. Additionally, you can or the target SQL. : : View saved SQL statements. You can insert the target SQL into the current SQL Console. Additionally, you can or the target SQL. : : View the execution history of SQL on the target data source. You can choose to filter out the execution history of a certain time period or search the execution history by keywords (SQL statement, database name, error message). : : View the execution history of SQL on the target data source. You can choose to filter out the execution history of a certain time period or search the execution history by keywords (SQL statement, database name, error message). : : - (MySQL only): Enable this feature to ensure that the current SQL Console maintains a continuous connection with the data source without establishing a new connection. It is suitable for scenarios that require session persistence, such as passing parameters or storing intermediate results in a series of queries.
- : Choose or .
- (default): The new result set will overwrite the previous execution result.
- : Generate a new tab to display the new result set.
- : Change the theme of the SQL Console, choose between and .
- : Drag the slider to adjust the font size of SQL statements in the SQL Console. The default values are as follows:
 : (MySQL, ClickHouse, SQL Server, PostgreSQL, Oracle, OceanBase Oracle): Display information about all active connections on the current database server and the queries being executed by these connections. also supports automatic refresh functionality, with options to automatically refresh every 5, 10, 20, or 30 seconds. : (MySQL, ClickHouse, SQL Server, PostgreSQL, Oracle, OceanBase Oracle): Display information about all active connections on the current database server and the queries being executed by these connections. also supports automatic refresh functionality, with options to automatically refresh every 5, 10, 20, or 30 seconds. : | Only can operate. After enabling this mode, all SQL executed in the SQL Console will not be subject to standardization or approval flows and can be executed directly. : | Only can operate. After enabling this mode, all SQL executed in the SQL Console will not be subject to standardization or approval flows and can be executed directly. : Generate a test dataset in the current data source (only supported in test data sources). : Generate a test dataset in the current data source (only supported in test data sources). : Display the SQL Console in full screen (browser size). After going full screen, click : Display the SQL Console in full screen (browser size). After going full screen, click  to restore the original SQL Console size. to restore the original SQL Console size.
|
| 7 | Search | Search for the object name, select the object on the left, and then search for the corresponding object name on the right. This supports databases, tables, columns, views, functions, stored procedures, triggers, and events. Currently, object search supports MySQL, PostgreSQL, Oracle, DAMENG. For other data sources, you can input the table name to quickly locate the target data table. |
| 8 | Database list | Display all databases and tables in the current data source. The supported functionalities vary depending on the type of data source:MySQL|OceanBase|PolarDB MySQL|AnalyticDB MySQL|TDSQL-C MySQL|GaussDB for MySQL|Aurora MySQL|GaiaDB|GaiaDB-X|GreatSQL- : Right-click any database, click , enter the , , and in the pop-up dialog box, click to visually create a database.
- : Right-click the target table, click to convert the current table's DDL statement into DDL statements for various database types using AI.
- : Right-click the target table, click to convert the current table structure into code for various programming languages using AI.
- : Right-click the target stored procedure or function, click > Programming Language to convert the current stored procedure or function into code for the target programming language using AI. Supported languages: Java, Python, C#, C++, Golang, Rust, NodeJS.
- (MySQL only): Right-click on the target database, table, or column, and click to add comments to the target table and fields. For more information, please refer to Chat2SQL.
- : Right-click the target database or any table in the database, click to visually create a data table. For more information, see Designing MySQL Table Structures.
- : Right-click the target table, click to edit the structure of the target table. For more information, see Designing MySQL Table Structures.
- Create Non-Table Objects: Right-click on the target database, select > Non-Table Object Name to visually create non-table objects. Supported non-table objects include views, stored procedures, triggers, events, and functions. For more information, see Creating Non-Table Objects in MySQL Visually.
- Manage Non-Table Objects: Right-click on the name of the non-table object under the target database to execute operations such as create, edit, rename, copy, and delete for non-table objects. Supported non-table objects include views, stored procedures, triggers, events, and functions.
- : Right-click the target database or table, click to export the data table in various formats.
- : Right-click the target database or table, click to import data into the target database table using various methods.
- : Right-click the at the bottom of the database list, click to view all user information in the current data source.
Oracle|OceanBase Oracle |DaMeng- : Right-click the target table, click to convert the current table's DDL statement into DDL statements for various database types using AI.
- : Right-click the target table, click to convert the current table structure into code for various programming languages using AI.
- : Right-click the target function, click > Programming Language to convert the current stored procedure or function into code for the target programming language using AI. Supported languages: Java, Python, C#, C++, Golang, Rust, NodeJS.
SQL Server- : Right-click the target table, click to convert the current table's DDL statement into DDL statements for various database types using AI.
- : Right-click the target table, click to convert the current table structure into code for various programming languages using AI.
- : Right-click the target stored procedure or function, click > Programming Language to convert the current stored procedure or function into code for the target programming language using AI. Supported languages: Java, Python, C#, C++, Golang, Rust, NodeJS.
ClickHousePostgreSQL|Greenplum|Klustron|DWS|openGauss|GaussDB| Vastbase- : Right-click any database, click , and enter the required parameters in the pop-up dialog box, then click to visually create a database.
- : Right-click the target database or any schema, click to visually create a schema.
- : Right-click on any schema, click to visually edit a schema.
- (PostgreSQL, Vastbase): Right-click on the target database, table, or column, and click to add comments to the target table and fields. For more information, please refer to Chat2SQL.
- (PostgreSQL, Greenplum, Vastbase): Right-click the target library, Schema, or any table in the library, click , you can visually create a data table. For more information, please see Designing PostgreSQL Table Structure.
- (PostgreSQL, Vastbase): Right-click the target table, click , you can edit the structure of the target table. For more information, please see Designing PostgreSQL Table Structure.
- : Right-click Login/Group Roles or the target role, click , enter the required parameters in the pop-up dialog box, then click to visually create a role.
- : Right-click the target role, click to visually edit the role.
TiDB- : Right-click any database, click , in the popped-up dialog box, enter , , and the corresponding , click , to visually create the database.
- : Right-click the target database or any table in the database, click , to visually create the table.
- : Right-click the target table, click , to edit the structure of the target table.
Lindorm- : Right-click the target database or table, click to export the data table in various formats.
- : Right-click the target database or table, click to import data into the target database table using various methods.
Common Functions- or : Right-click on the target database or Schema, click on or to open the or page. Here you can view details of the target database (PostgreSQL, KingBase, Klustron, GBase is currently not supported).
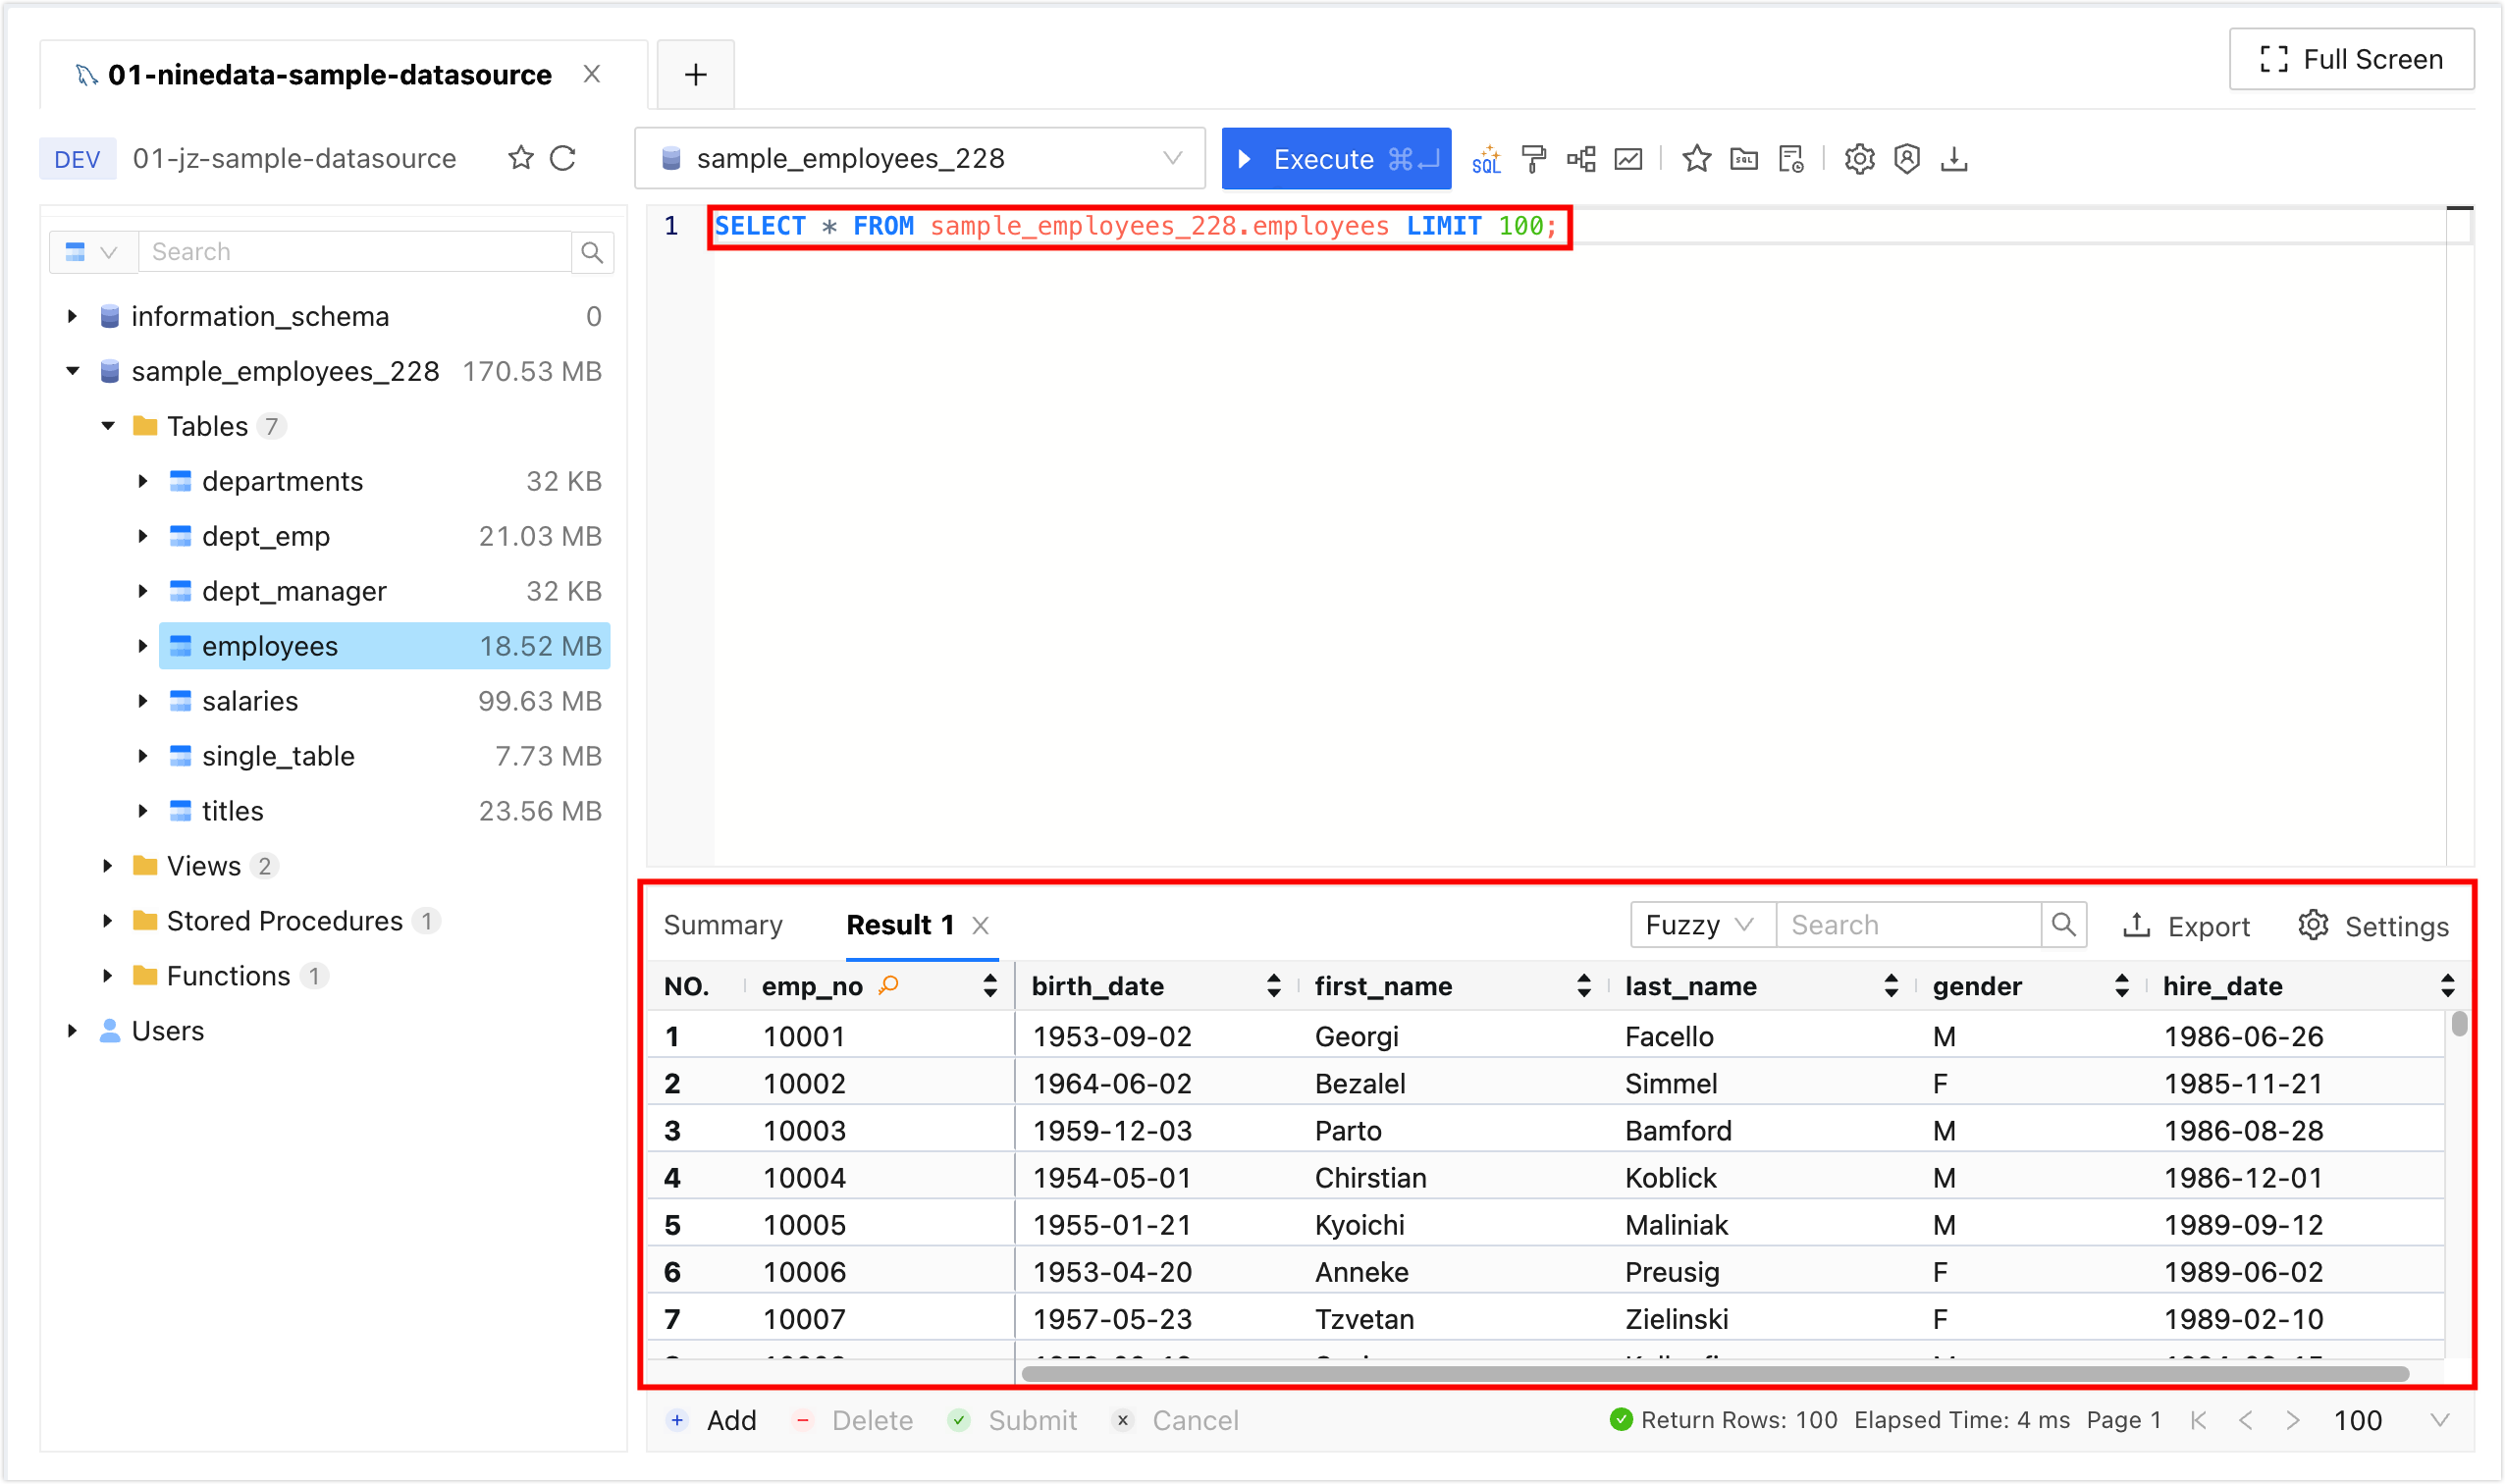
- : Right-click the target table, click to automatically query the data in the table. By default, it returns 100 rows.
- : Right-click the target table, click to open the page. You can view all the , , and of the target table (GBase is currently not supported).
- : Right-click the target view, click to automatically query the data in the view. By default, it returns 100 rows.
- : Right-click the target object, click to generate the SQL statement for creating the object (not supported for some object types depending on the data source).
- : Open a SQL Console for the current data source.
- : Right-click any object, click to refresh the database list.
- View Object Details: Hover the mouse over the target table name, column name, or index name to display the corresponding detailed information.
|
| 9 | SQL editor | The following features are supported:- SQL Execution: Supports single statement or batch execution.
- Chat2SQL (MySQL, PostgreSQL, Vastbase): Type / in the editor to enable Chat2SQL mode. With concise natural language input, you can quickly convert it into SQL statements. For more information, refer to Chat2SQL.
- Interrupt Execution: Click to interrupt the execution of SQL during execution.
- Syntax Highlighting: Different syntax elements are displayed in different colors to improve code readability.
- SQL IntelliSense: Automatically pops up suggestions based on the semantics you enter while typing commands.
- View SQL Syntax Help: After entering an SQL keyword, select the keyword and right-click > to view the corresponding help information.
- SQL Templates: Provides common templates for CREATE, SELECT, INSERT, UPDATE, DELETE statements, etc. You only need to enter the preceding command to select the corresponding template. For example: entering CREATE allows you to choose CREATE TABLE, CREATE VIEW, etc. templates.
- Right-click Menu:
- : Execute the SQL statement at the cursor position.
- : Adjust the structure of the selected SQL statement to enhance readability.
- : AI intelligently analyzes the SQL statement on the cursor line and provides optimization suggestions.
- : View the execution plan of the selected SQL statement.
- : Save all SQL statements in the current SQL Console to the SQL list for easy access next time.
- : View saved SQL statements. You can insert the target SQL into the current SQL Console. Additionally, you can or the target SQL.
- : View the execution history of SQL on the target data source. You can choose to filter out the execution history of a certain time period or search the execution history by keywords (SQL statement, database name, error message).
- : Display information about all active connections on the current database server and the queries being executed by these connections. also supports automatic refresh functionality, with options to automatically refresh every 5, 10, 20, or 30 seconds.
- General Operations: Including , , , and .
- : Select the SQL statement at the cursor position.
- : AI analyzes the currently selected content to provide information such as the semantics of the target SQL syntax, the definition of the target table's table structure, and an overall explanation of the SQL statement logic.
|
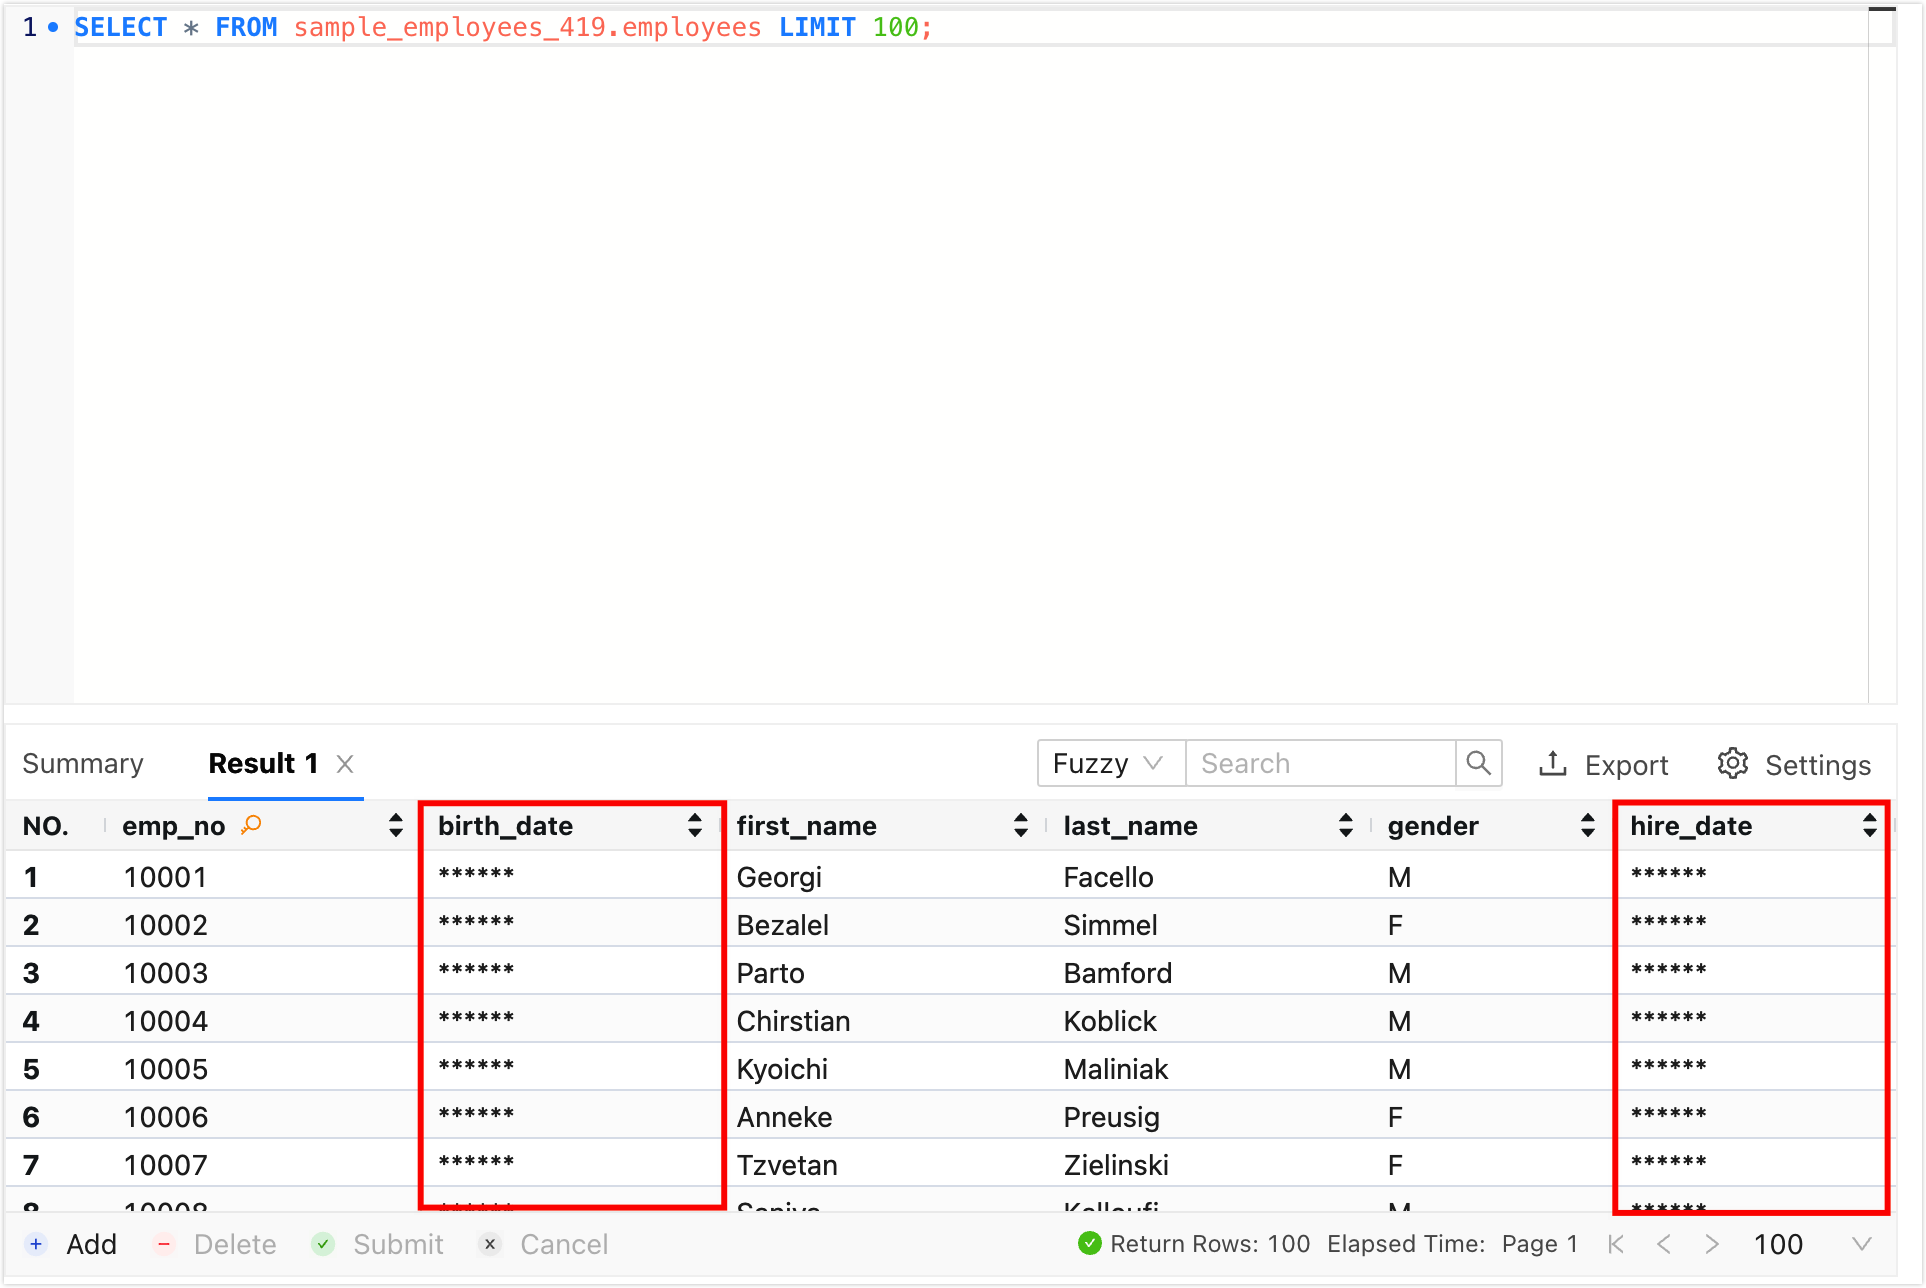
| 10 | Execution information and result set | Display execution information and result set for SQL query.- Execution Information: Includes execution time, executed SQL statement, execution status, execution duration, and other details.
- Result Set: Displays the returned results of the SQL query. You can perform the following actions:
Edit Result Set (Conditions: Single table query, includes primary key column or unique key column)- Click , , or modify data directly: You can visually perform insert, delete, and update operations on the database.
- : Right-click on the target cell, select , and edit all fields in the row of the cell.
- : Right-click on the target cell, select , and upload a file to fill the current cell.
- : Right-click on the target cell, select , and paste copied row information over the current row.
- : Right-click on the target cell, select , and overwrite the current cell with the information from the clipboard.
- : Right-click on the target cell, select , and set the current cell to NULL (only available if the field is not set as NOT NULL).
- : Right-click on the target cell, select , and set the cell to an empty value.
- : Right-click on the target cell, select , and delete the row containing the current cell.
Common Actions- Click
 : Display the result set in column mode. : Display the result set in column mode. - Click
 : Display the result set in row mode. : Display the result set in row mode. - Click
 > : Supports exporting data tables in various formats, with the export range being either the current page or all data (up to 10,000 entries). > : Supports exporting data tables in various formats, with the export range being either the current page or all data (up to 10,000 entries). - Click
 > : Supports quickly creating data export tasks in the current window. The default export scope is the current result set, eliminating the need to switch to the module. > : Supports quickly creating data export tasks in the current window. The default export scope is the current result set, eliminating the need to switch to the module. - Click
 : Scrolls the result set to the bottom of the page. Clicking : Scrolls the result set to the bottom of the page. Clicking  restores the view. restores the view. - Click
 : Allows operations like locking, hiding, and showing columns in the result set. : Allows operations like locking, hiding, and showing columns in the result set. - Result set search: Supports and .
- Click the small arrow on the right side of column names to sort the result set.
- : Right-click on the target cell, select , and copy the entire row of the cell.
- : Right-click on the target cell, select , and copy the entire column of the cell.
- : Right-click on the target cell, select , and copy the current cell.
- : Right-click on the target cell, select , and choose to copy the row data in multiple formats.
- : Right-click on any cell, select , and export the current result set in various formats, exporting the current page or all data (up to 10000 rows).
- View SQL Statement Corresponding to Result Set: Hover over the tab of the target result set to display the SQL statement corresponding to that result set.
- View Field Details: Hover the mouse over the target field to display its name, data type, length, and comment information.
- Single-Column Search: Click the
 icon to the right of the target column name, then enter a keyword in the pop-up text box to filter and search within that column. icon to the right of the target column name, then enter a keyword in the pop-up text box to filter and search within that column.
|


 For details on how to use the SQL console, please refer to the SQL console interface introduction .tip
