SQL Console (MongoDB)
This article introduces how to use the SQL Console to manage a MongoDB database.
Background Information
MongoDB is an open-source NoSQL database management system that stores data in the form of documents. It features scalability, high performance, high availability, and support for multiple programming languages. MongoDB has become a very popular NoSQL database, providing convenience for enterprises to store and process large amounts of unstructured data.
NineData's SQL Console functionality supports the management of MongoDB data sources. Through the SQL Console, you can easily manage enterprise data in a visual way, significantly reducing the operational threshold. Additionally, the SQL Console provides a range of enterprise-level capabilities, including team collaboration, permission control, audit logs, single sign-on (SSO), SQL development standards, approval processes, and more, enhancing team collaboration efficiency and data management standardization.
Feature Overview
NineData's SQL Console (MongoDB) offers several convenient features to help you easily manage your data sources.
| Feature | Description |
|---|---|
| Visual Management | Supports performing CRUD (Create, Read, Update, Delete) operations on MongoDB databases in a visual way. |
| Editor | Provides a command-line mode supporting powerful MongoDB commands and options to meet various needs. |
| Workspace Recovery | In scenarios like accidental browser exits or sudden crashes, you can simply log back into the NineData console, open the SQL Console, and the previously opened data sources and executed commands will be automatically loaded. Since the page state is saved in the cloud, it's not restricted by the browser or host, allowing you to recover your workspace anytime, anywhere. |
| Execution History | records all commands executed by the current account in the NineData console, supporting quick retrieval based on data source, execution time, command keywords, and more. You can also quickly copy and re-execute commands from the execution history. |
| SQL Standards Checking | In organizational modeOrganizational mode supports assigning different roles and resource management permissions to each user in the organization. It is suitable for collaborative development with multiple users within the same organization, ensuring data security and improving overall productivity., based on the SQL development standards configured by , the system will check every command executed in the SQL Console. If a command does not comply with the standards, the system will intercept it to ensure database security. |
Use Cases
NineData's SQL Console (MongoDB) is suitable for the following use cases:
- Developers: During development, developers can use the SQL Console to manage and edit data in MongoDB databases for faster and more efficient application development.
- Database Administrators: Assist database administrators in managing MongoDB databases more easily, such as adding, editing, and deleting data.
- Operations Personnel: Help operations personnel quickly monitor and analyze the performance and running status of MongoDB databases to promptly detect and resolve issues.
Prerequisites
The target database to be managed has been added to NineData. For instructions on how to add, refer to Managing Data Sources.
The data source must be MongoDB version 3.2 or higher.
In the organizational mode (), you must have read-only, DML, or DDL permissions for the target data source.
tipRead-only permission supports query operations only.
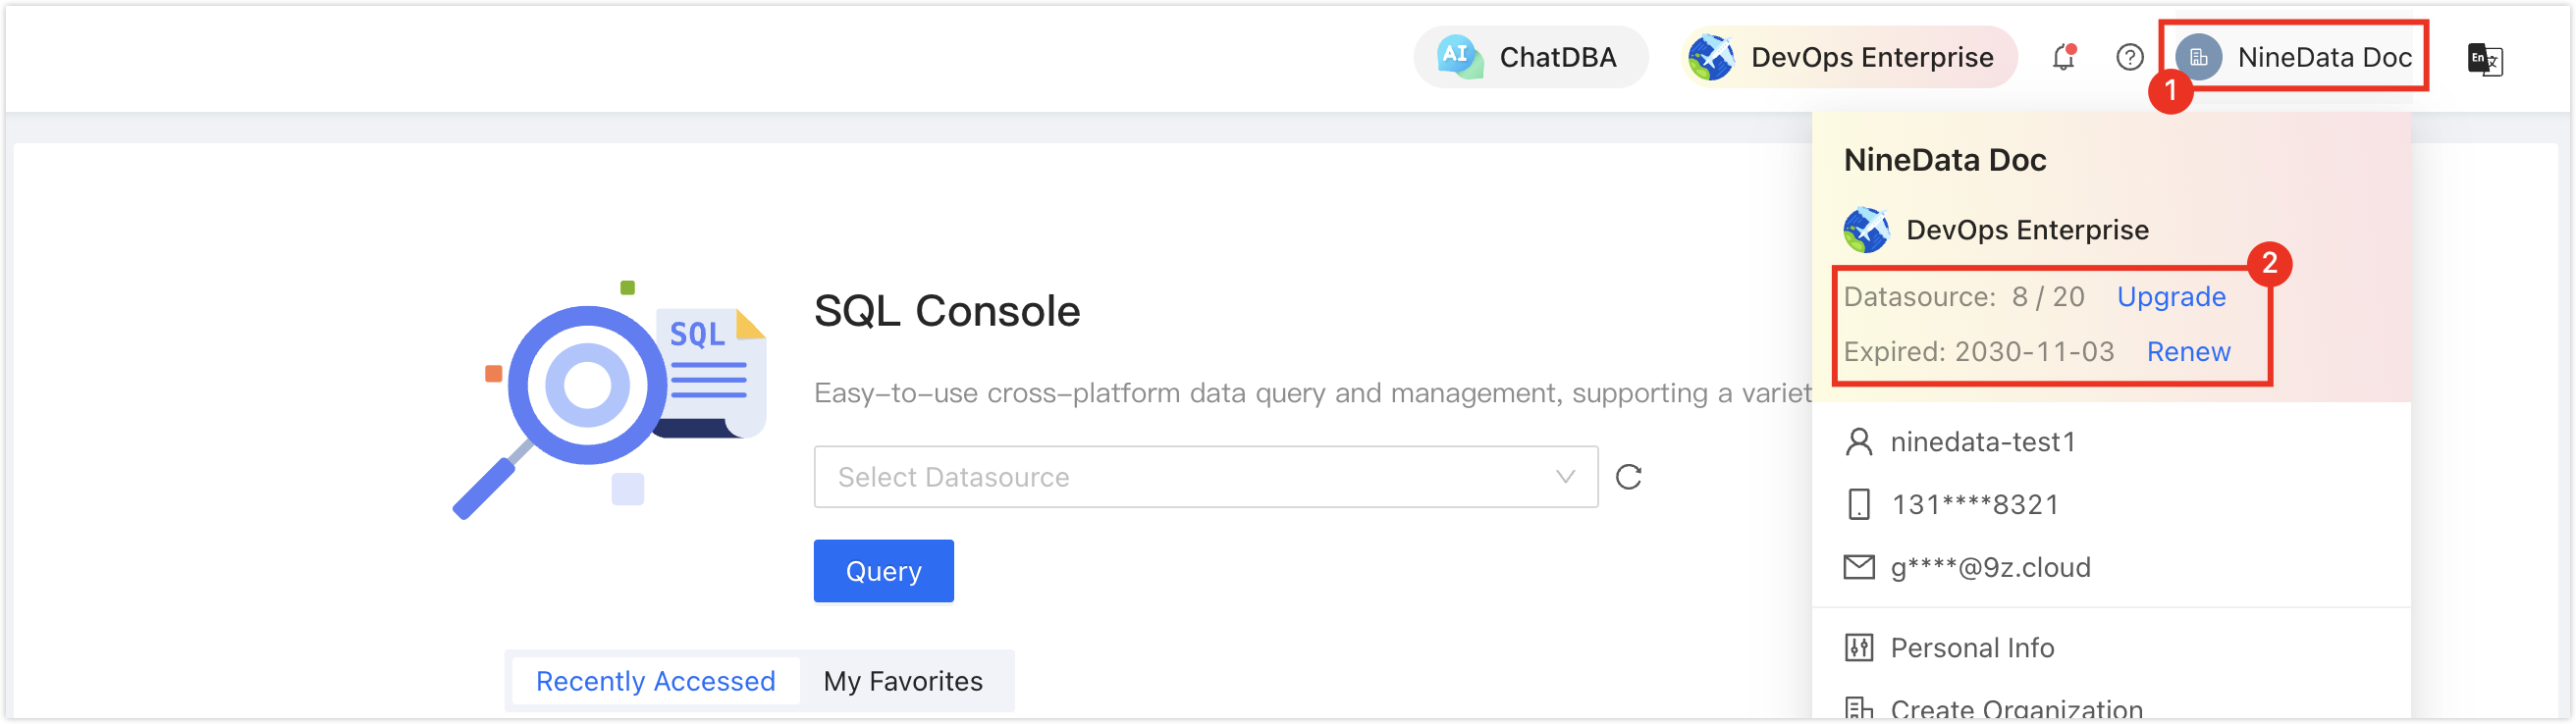
In the commercial versions (, ), please ensure that your monthly/yearly subscription is not expired, as it may result in the inability to use the Database DevOpsservice. You can quickly check the remaining quota and expiration date at the top right corner of the NineData console page.
Operating Steps
Log in to the NineData Console.
Click and then in the left navigation bar.
tipIf you have previously logged in to a data source and haven't closed it, you will be automatically directed to that data source page.
Click below , and a pop-up will display your added data sources. Click the target data source and then click to go to the SQL Console.
tipIf you haven't created Data Source before, a blank page will be displayed. In this case, please click on on the page.If you have multiple data sources, you can enter keywords in the box to perform precise or fuzzy searches. The supported search fields include:
- Data source name
- IP address
After opening the SQL Console, you can perform SQL development operations on the data source. For detailed usage of the SQL Console, please refer to the Interface Explanation.
Interface Explanation
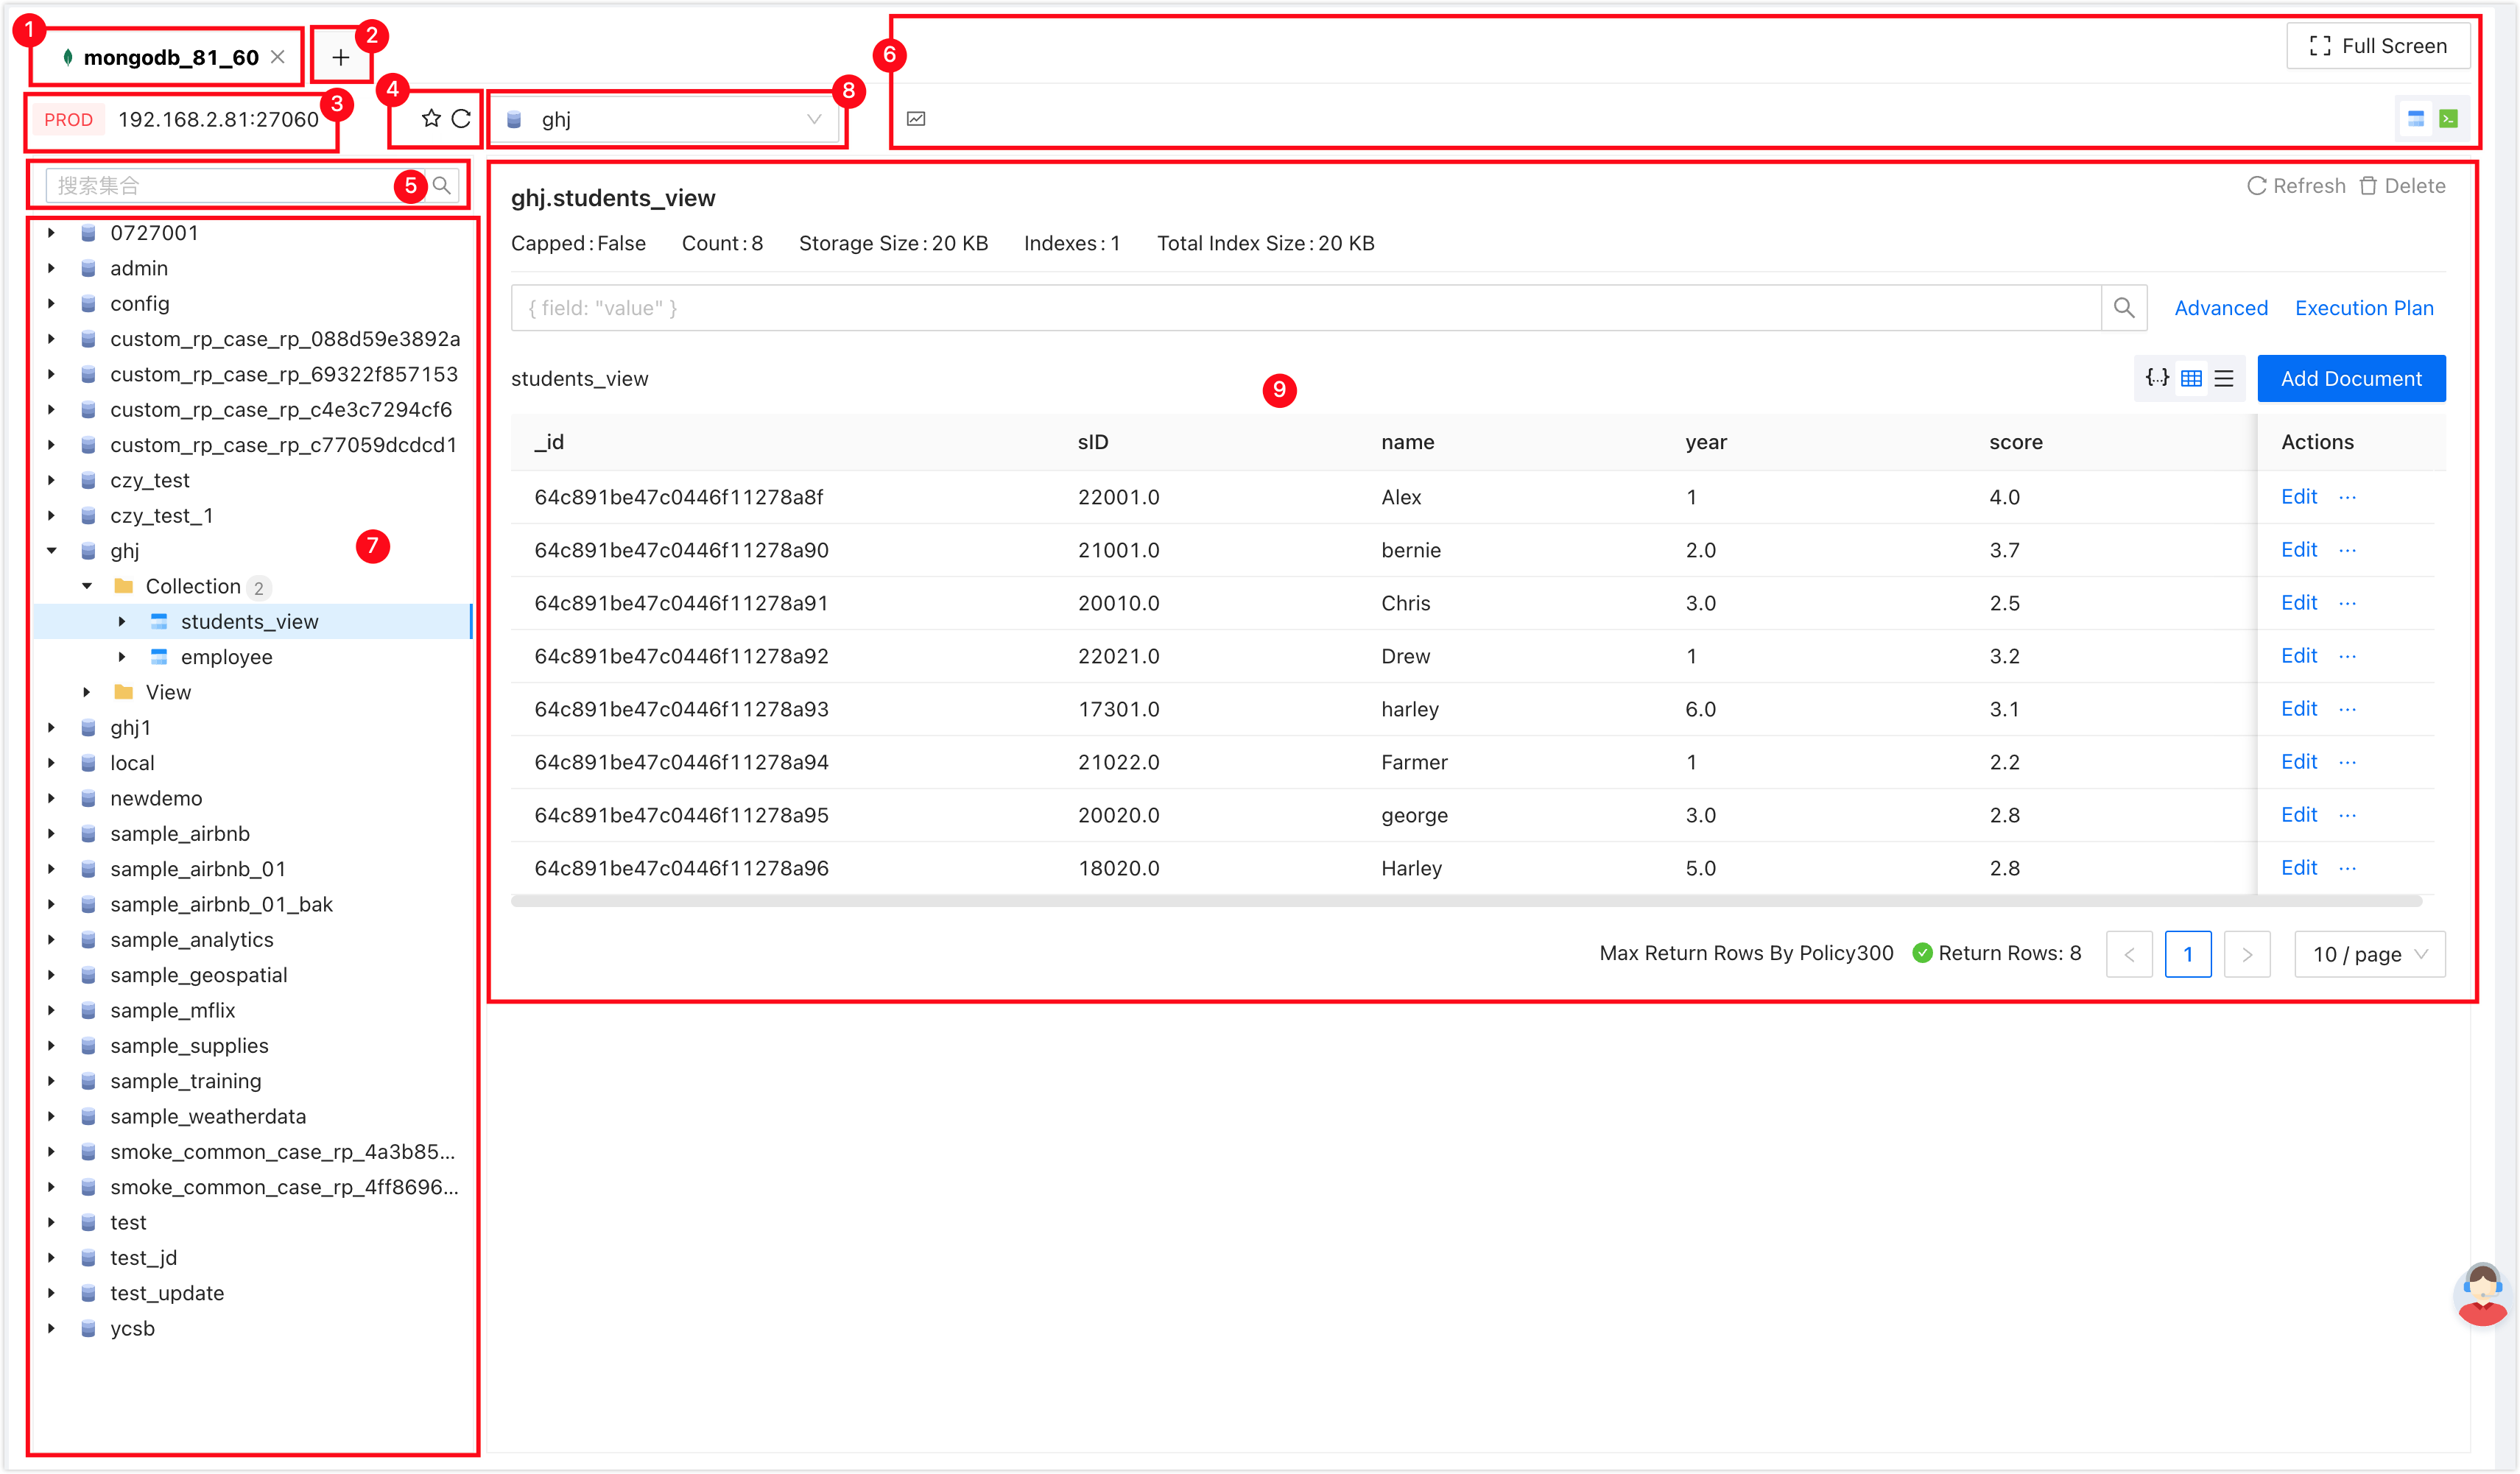
| Number | Function | Description |
|---|---|---|
| 1 | SQL Console Tab | Represents the currently open data source SQL Console. Multiple SQL Consoles can be switched by clicking the tabs. Click the X on the right of a tab to close the SQL Console. Right-click menu supports the following actions:
|
| 2 | Open Data Source | Choose and open a new data source SQL Console. |
| 3 | Data Source Information | Displays the data source information of the current SQL Console, including environment, IP address, and port. Click the info icon on the right to view details of the current data source. Right-click menu:
|
| 4 | Favorite|Refresh |
|
| 5 | Search | Enter the collection name to quickly find the target collection. Supports searching by the complete collection name for precise search or by a partial collection name with an asterisk (*) for fuzzy search. |
| 6 | Function Buttons |
|
| 7 | Database List | Displays all databases, collections, indexes, and other information in the current data source in a tree-like structure. Hover over the info icon next to a target database, collection, index, or view to display detailed information.Common Right-Click Menu
Database Right-Click Menu
Collection Right-Click Menu
Index Right-Click Menu
View Right-Click Menu
|
| 8 | Select Database | Visually select the target database to operate on. |
| 9 | View/Edit Data | Click on a collection in the left-side database list to display all documents in that collection here. Here, you can perform the following actions:
|
- Command Line Editor
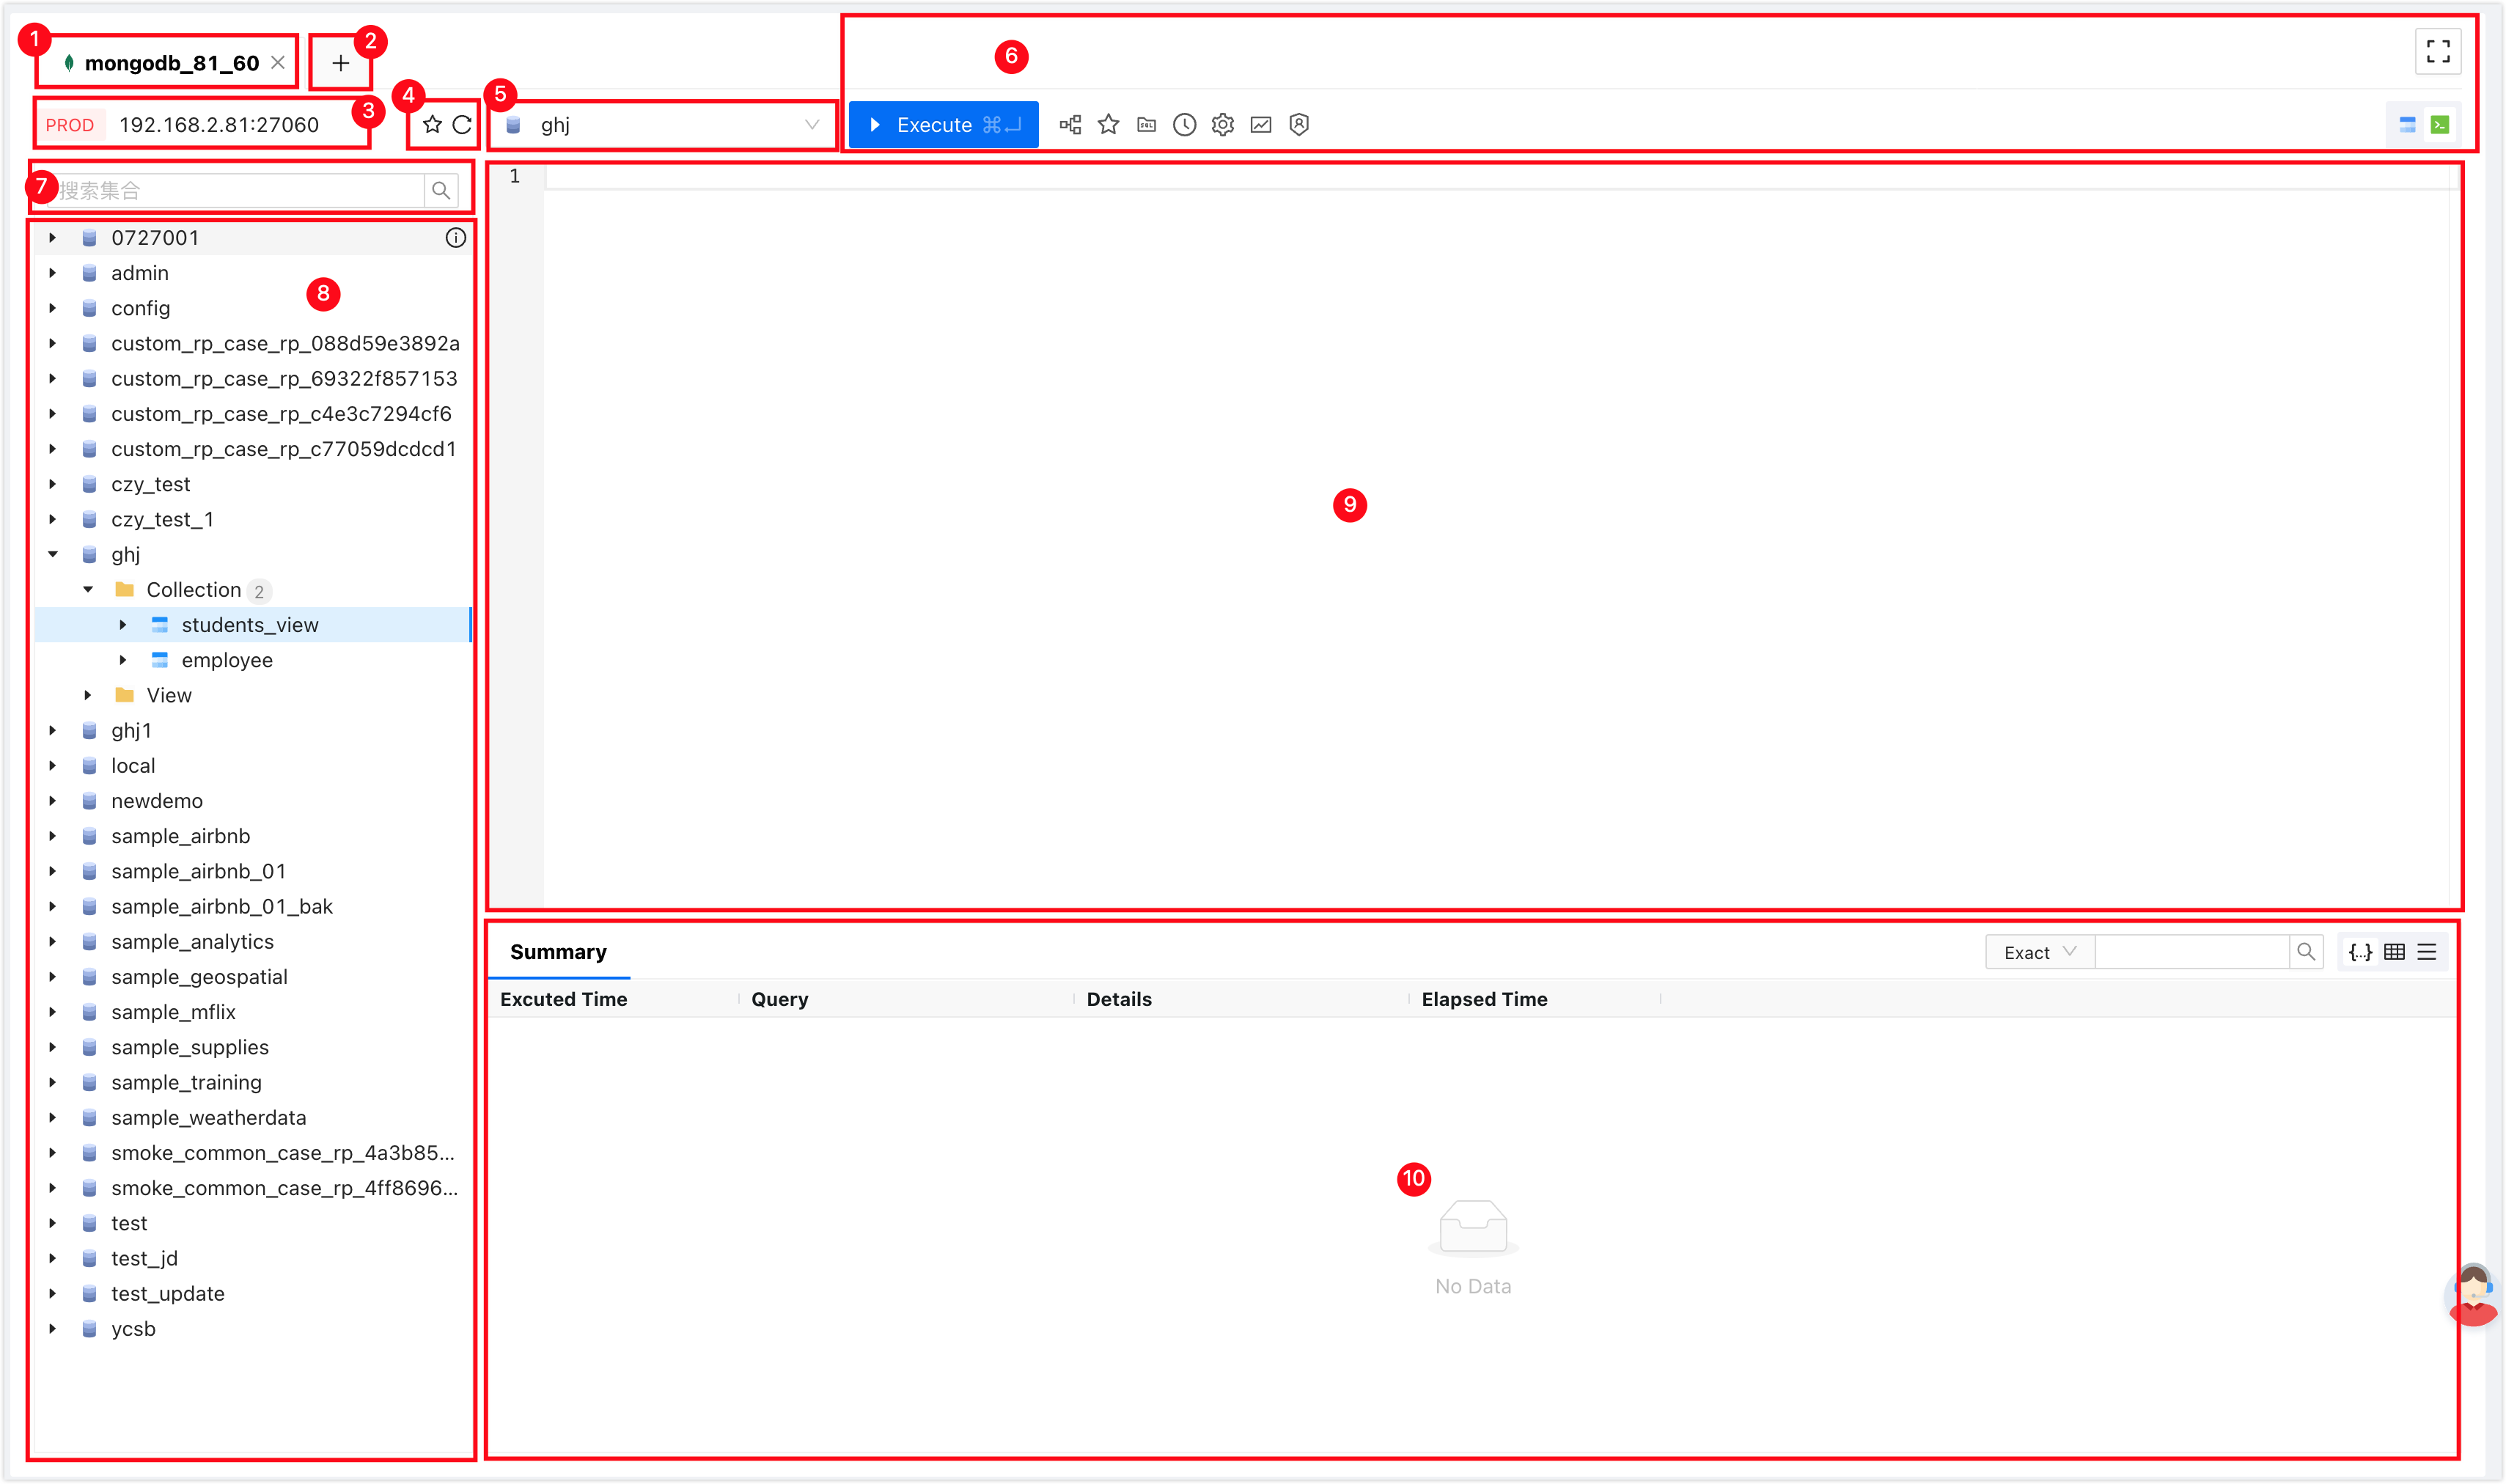
| Number | Function | Description |
|---|---|---|
| 1 | SQL Console Tab | Represents the currently open data source SQL Console. Multiple SQL Consoles can be switched by clicking the tabs. Click the X on the right of a tab to close the SQL Console. Right-click menu supports the following actions:
|
| 2 | Open Data Source | Choose and open a new data source SQL Console. |
| 3 | Data Source Information | Displays the data source information of the current SQL Console, including environment, IP address, and port. Click the info icon ( Right-click menu:
|
| 4 | Favorite|Refresh |
|
| 5 | Select Database | Visually select the target database to operate on. |
| 6 | Function Buttons |
|
| 7 | Search | Enter the collection name to quickly find the target collection. Supports searching by the complete collection name for precise search or by a partial collection name with an asterisk (*) for fuzzy search. |
| 8 | Database List | Displays all databases, collections, indexes, and other information in the current data source in a tree-like structure. Hover over the info icon (Common Right-Click Menu
Database Right-Click Menu
Collection Right-Click Menu
Index Right-Click Menu
View Right-Click Menu
|
| 9 | Command Line Window | The window for executing MongoDB commands. The command line window supports the following features:
|
| 10 | Execution Information, Result Set | Displays the execution information of the command and the result set.
|
Advanced Search Instructions
The SQL Console (MongoDB) supports performing advanced searches on target collections with the following parameters:
- Project: Perform projection on search results, allowing you to output only the desired fields or calculated results. Through Project, you can rename, add new fields, delete fields, and customize the structure of the output results. For example,
{name:1}means to display only thenamefield in the search results. For more information, refer to Aggregation Pipeline Optimization. - Sort: Sort the search results. It allows sorting in ascending or descending order based on specified fields. Multiple sort fields can be specified, and indexes can be used to improve sorting performance. For example,
{age:1}means sorting the search results by age in ascending order, and{age:-1}means sorting by age in descending order. For more information, refer to Aggregation Pipeline Optimization. - Collation: Specify the sorting rules for search results to differentiate between case, multilingual sorting, specific sorting rules, etc. This allows finer control over the sorting results of strings. For example,
{locale:"en"}means the search results will be sorted according to English sorting rules. For more information, refer to Collation. - Skip: Skip a specified number of documents and return the remaining documents, achieving pagination or skipping unwanted documents. For example, entering the integer 10 will skip the first 10 search results and start displaying from the 11th result.
- Limit: Limit the number of returned documents. For example, entering the integer 10 will only return 10 search results.
Document Editing Instructions
Through the SQL Console (MongoDB), you can visually edit documents in various modes:
 Table Mode: Click the in the column on the right of the target document to directly edit the values of the corresponding fields. You can also click the
  icon on the right of the target field to edit the value in the Value text box and click . After editing, click at the bottom of the page to complete the changes.
 List Mode: Click the in the column on the right of the target document. Then, click the icon on the right of the Value column of the document, edit in the Value text box, supporting changes to field names and values, and add new fields. Then, click . After editing, click at the bottom of the page to complete the changes.
 JSON Mode: Edit directly in the JSON string. You can change field names and values and add new fields. After editing, click at the bottom of the page to complete the changes.
Creating an Index
In the database list on the left side of the SQL Console, find the target collection, right-click on the collection, and click .
Configure according to the table below:
Parameter Description Enter the name of the index. Please follow naming conventions for index names. Field Select the field(s) to index. Click Add to add a row and index multiple fields. Type Select the index type. Supported types are: - Ascending Index: Sort the indexed field in ascending order.
- Descending Index: Sort the indexed field in descending order.
- Hashed Index: Hash the values of the indexed field and index by the hash value. This index is useful for quick searches in evenly distributed data but does not support range queries.
- Text Index: Used for full-text searches on text data. Supports keyword searches and sorting on text fields.
- 2dsphere Index: Used for storing geospatial data (longitude, latitude). Supports geospatial queries and indexing, such as distance calculation and range queries.
- 2d Index: Used for storing geospatial data on a plane (x, y coordinates). Supports queries and indexing on the plane's geospatial data.
- GeoHaystack Index: Used to optimize nearby geospatial location queries. Suitable for scenarios with a large amount of geospatial location data.
Additional Configurations Choose additional index configurations: - Background (selected by default): Specify whether to create the index in the background. For large collections, not selecting this option may block the instance.
- Unique: Specify whether the index requires unique values. Selecting this option ensures that the values of the indexed field are unique in the collection.
- Sparse: Specify whether to create a sparse index. When selected, the index is created only for documents that contain the target field; documents without this field are ignored. Using a sparse index can save index storage space.
- Expire after: Used to create an index with a TTL (Time to Live). This option allows you to specify an automatic deletion time for documents in the collection, in seconds.
Preview Visualize the index creation actions into actual MongoDB commands, making the entire index creation process more intuitive. Click .
Appendix: List of Commands Supported by MongoDB Command Line Editor
- Collection
- Database
- Query Plan Cache
- Bulk Write Operation
- User Management
- Role Management
- Replication
- Sharding
- Constructors
| Method | Syntax |
|---|---|
| aggregate() | db.<collection name>.aggregate() |
| bulkWrite() | db.<collection name>.bulkWrite() |
| compactStructuredEncryptionData() | db.<collection name>.compactStructuredEncryptionData() |
| countDocuments() | db.<collection name>.countDocuments() |
| createIndex() | db.<collection name>.createIndex() |
| createIndexes() | db.<collection name>.createIndexes() |
| dataSize() | db.<collection name>.dataSize() |
| deleteOne() | db.<collection name>.deleteOne() |
| deleteMany() | db.<collection name>.deleteMany() |
| distinct() | db.<collection name>.distinct() |
| drop() | db.<collection name>.drop() |
| dropIndex() | db.<collection name>.dropIndex() |
| dropIndexes() | db.<collection name>.dropIndexes() |
| estimatedDocumentCount() | db.<collection name>.estimatedDocumentCount() |
| explain() | db.<collection name>.explain() |
| find() | db.<collection name>.find() |
| findAndModify() | db.<collection name>.findAndModify() |
| findOne() | db.<collection name>.findOne() |
| findOneAndDelete() | db.<collection name>.findOneAndDelete() |
| findOneAndReplace() | db.<collection name>.findOneAndReplace() |
| findOneAndUpdate() | db.<collection name>.findOneAndUpdate() |
| getIndexes() | db.<collection name>.getIndexes() |
| getShardDistribution() | db.<collection name>.getShardDistribution() |
| getShardVersion() | db.<collection name>.getShardVersion() |
| hideIndex() | db.<collection name>.hideIndex() |
| insertOne() | db.<collection name>.insertOne() |
| insertMany() | db.<collection name>.insertMany() |
| isCapped() | db.<collection name>.isCapped() |
| latencyStats() | db.<collection name>.latencyStats() |
| mapReduce() | db.<collection name>.mapReduce() |
| reIndex() | db.<collection name>.reIndex() |
| remove() | db.<collection name>.remove() |
| renameCollection() | db.<collection name>.renameCollection() |
| replaceOne() | db.<collection name>.replaceOne() |
| stats() | db.<collection name>.stats() |
| storageSize() | db.<collection name>.storageSize() |
| totalIndexSize() | db.<collection name>.totalIndexSize() |
| totalSize() | db.<collection name>.totalSize() |
| unhideIndex() | db.<collection name>.unhideIndex() |
| updateOne() | db.<collection name>.updateOne() |
| updateMany() | db.<collection name>.updateMany() |
| validate() | db.<collection name>.validate() |
| Method | Syntax |
|---|---|
| adminCommand() | db.adminCommand() |
| aggregate() | db.aggregate() |
| commandHelp() | db.commandHelp() |
| createCollection() | db.createCollection() |
| createView() | db.createView() |
| currentOp() | db.currentOp() |
| dropDatabase() | db.dropDatabase() |
| fsyncLock() | db.fsyncLock() |
| fsyncUnlock() | db.fsyncUnlock() |
| getCollection() | db.getCollection() |
| getCollectionInfos() | db.getCollectionInfos() |
| getCollectionNames() | db.getCollectionNames() |
| getLogComponents() | db.getLogComponents() |
| getMongo() | db.getMongo() |
| getName() | db.getName() |
| getProfilingStatus() | db.getProfilingStatus() |
| getReplicationInfo() | db.getReplicationInfo() |
| getSiblingDB() | db.getSiblingDB() |
| hello() | db.hello() |
| help() | db.help() |
| hostInfo() | db.hostInfo() |
| killOp() | db.killOp() |
| listCommands() | db.listCommands() |
| logout() | db.logout() |
| printCollectionStats() | db.printCollectionStats() |
| printReplicationInfo() | db.printReplicationInfo() |
| printSecondaryReplicationInfo() | db.printSecondaryReplicationInfo() |
| printShardingStatus() | db.printShardingStatus() |
| printSlaveReplicationInfo() | db.printSlaveReplicationInfo() |
| resetError() | db.resetError() |
| rotateCertificates() | db.rotateCertificates() |
| runCommand() | db.runCommand() |
| serverBuildInfo() | db.serverBuildInfo() |
| serverCmdLineOpts() | db.serverCmdLineOpts() |
| serverStatus() | db.serverStatus() |
| setLogLevel() | db.setLogLevel() |
| setProfilingLevel() | db.setProfilingLevel() |
| shutdownServer() | db.shutdownServer() |
| stats() | db.stats() |
| version() | db.version() |
| Method | Syntax |
|---|---|
| getPlanCache() | db.<collection name>.getPlanCache() |
| PlanCache.clear() | PlanCache.clear() |
| PlanCache.clearPlansByQuery() | PlanCache.clearPlansByQuery() |
| PlanCache.help() | PlanCache.help() |
| PlanCache.list() | PlanCache.list() |
| Method | Syntax |
|---|---|
| initializeOrderedBulkOp() | db.<collection name>.initializeOrderedBulkOp() |
| initializeUnorderedBulkOp() | db.<collection name>.initializeUnorderedBulkOp() |
| Bulk() | Bulk() |
| Bulk.execute() | Bulk.execute() |
| Bulk.find() | Bulk.find() |
| Bulk.find.arrayFilters() | Bulk.find.arrayFilters() |
| Bulk.find.collation() | Bulk.find.collation() |
| Bulk.find.delete() | Bulk.find.delete() |
| Bulk.find.deleteOne() | Bulk.find.deleteOne() |
| Bulk.find.hint() | Bulk.find.hint() |
| Bulk.find.remove() | Bulk.find.remove() |
| Bulk.find.removeOne() | Bulk.find.removeOne() |
| Bulk.find.replaceOne() | Bulk.find.replaceOne() |
| Bulk.find.updateOne() | Bulk.find.updateOne() |
| Bulk.find.update() | Bulk.find.update() |
| Bulk.find.upsert() | Bulk.find.upsert() |
| Bulk.getOperations() | Bulk.getOperations() |
| Bulk.insert() | Bulk.insert() |
| Bulk.toJSON() | Bulk.toJSON() |
| Bulk.toString() | Bulk.toString() |
| Method | Syntax |
|---|---|
| auth() | db.auth() |
| changeUserPassword() | db.changeUserPassword() |
| createUser() | db.createUser() |
| dropUser() | db.dropUser() |
| dropAllUsers() | db.dropAllUsers() |
| getUser() | db.getUser() |
| getUsers() | db.getUsers() |
| grantRolesToUser() | db.grantRolesToUser() |
| removeUser() | db.removeUser() |
| revokeRolesFromUser() | db.revokeRolesFromUser() |
| updateUser() | db.updateUser() |
| passwordPrompt() | passwordPrompt() |
| Method | Syntax |
|---|---|
| createRole() | db.createRole() |
| dropRole() | db.dropRole() |
| dropAllRoles() | db.dropAllRoles() |
| getRole() | db.getRole() |
| getRoles() | db.getRoles() |
| grantPrivilegesToRole() | db.grantPrivilegesToRole() |
| revokePrivilegesFromRole() | db.revokePrivilegesFromRole() |
| grantRolesToRole() | db.grantRolesToRole() |
| revokeRolesFromRole() | db.revokeRolesFromRole() |
| updateRole() | db.updateRole() |
| Method | Syntax |
|---|---|
| rs.add() | rs.add() |
| rs.addArb() | rs.addArb() |
| rs.conf() | rs.conf() |
| rs.freeze() | rs.freeze() |
| rs.help() | rs.help() |
| rs.initiate() | rs.initiate() |
| rs.printReplicationInfo() | rs.printReplicationInfo() |
| rs.printSecondaryReplicationInfo() | rs.printSecondaryReplicationInfo() |
| rs.printSlaveReplicationInfo() | rs.printSlaveReplicationInfo() |
| rs.reconfig() | rs.reconfig() |
| rs.remove() | rs.remove() |
| rs.status() | rs.status() |
| rs.stepDown() | rs.stepDown() |
| rs.syncFrom() | rs.syncFrom() |
| Method | Syntax |
|---|---|
| sh.abortReshardCollection() | sh.abortReshardCollection() |
| sh.addShard() | sh.addShard() |
| sh.addShardTag() | sh.addShardTag() |
| sh.addShardToZone() | sh.addShardToZone() |
| sh.addTagRange() | sh.addTagRange() |
| sh.balancerCollectionStatus() | sh.balancerCollectionStatus() |
| sh.commitReshardCollection() | sh.commitReshardCollection() |
| sh.disableBalancing() | sh.disableBalancing() |
| sh.enableBalancing() | sh.enableBalancing() |
| sh.disableAutoSplit() | sh.disableAutoSplit() |
| sh.enableAutoSplit() | sh.enableAutoSplit() |
| sh.enableSharding() | sh.enableSharding() |
| sh.getBalancerState() | sh.getBalancerState() |
| sh.removeTagRange() | sh.removeTagRange() |
| sh.removeRangeFromZone() | sh.removeRangeFromZone() |
| sh.help() | sh.help() |
| sh.isBalancerRunning() | sh.isBalancerRunning() |
| sh.moveChunk() | sh.moveChunk() |
| sh.removeShardTag() | sh.removeShardTag() |
| sh.removeShardFromZone() | sh.removeShardFromZone() |
| sh.reshardCollection() | sh.reshardCollection() |
| sh.setBalancerState() | sh.setBalancerState() |
| sh.shardCollection() | sh.shardCollection() |
| sh.splitAt() | sh.splitAt() |
| sh.splitFind() | sh.splitFind() |
| sh.startBalancer() | sh.startBalancer() |
| sh.status() | sh.status() |
| sh.stopBalancer() | sh.stopBalancer() |
| sh.waitForBalancer() | sh.waitForBalancer() |
| sh.waitForBalancerOff() | sh.waitForBalancerOff() |
| sh.waitForPingChange() | sh.waitForPingChange() |
| sh.updateZoneKeyRange() | sh.updateZoneKeyRange() |
| convertShardKeyToHashed() | convertShardKeyToHashed() |
| Method | Syntax |
|---|---|
| BinData() | BinData() |
| BulkWriteResult() | BulkWriteResult() |
| Date() | Date() |
| ObjectId() | ObjectId() |
| ObjectId.getTimestamp() | ObjectId.getTimestamp() |
| ObjectId.toString() | ObjectId.toString() |
| ObjectId.valueOf() | ObjectId.valueOf() |
| UUID() | UUID() |
| WriteResult() | WriteResult() |
| WriteResult.hasWriteError() | WriteResult.hasWriteError() |
| WriteResult.hasWriteConcernError() | WriteResult.hasWriteConcernError() |