Integrate OpenLDAP with NineData SSO
This guide is for teams that manage employee accounts in OpenLDAP. It shows how to connect OpenLDAP to NineData SSO so users can authenticate once and sign in to NineData through Keycloak and phpLDAPadmin.
Overview
OpenLDAP is an open-source LDAP server for storing and managing user accounts and identity data. Many enterprises run several application systems at the same time, and each system usually has its own login and permission model. When OpenLDAP is connected to SSO, users sign in once and then access the connected systems without repeating login and account management.
Before you begin
- You have already created or joined an organization, and the organization has subscribed to DevOps Enterprise. Please ensure that your annual or monthly subscription is still active. For more information, please refer to Manage Organizations.
- Your current account has been switched to the target organization. For more information, please refer to Switching to an Organization.
- You have root access to the LDAP server. Use
sudo suto switch to the root account before you start.
Environment
This guide walks through the setup from scratch. If a tool is already installed, skip the corresponding step. The example environment is:
System version: CentOS Linux release 7.9.2009
tipTo view the current system version, run
cat /etc/*releasein the command line.Docker version: 24.0.0
Docker Compose version: 2.17.3
OpenLDAP version: 2.4.57
phpLDAPadmin version: 1.2.5
Keycloak version: 9.0.0
Procedure
Step 1: Install Docker and Docker Compose
This guide uses Docker and Docker Compose to run OpenLDAP, phpLDAPadmin, and Keycloak.
Use the yum commands below on RPM-based Linux distributions such as CentOS or Red Hat Enterprise Linux (RHEL).
Click to expand process description
- Install Docker
- Install Docker Compose
Open a terminal and run the following command to uninstall any existing Docker packages:
sudo yum remove docker docker-client docker-client-latest docker-common docker-latest docker-latest-logrotate docker-logrotate docker-engineInstall
yum-utils:sudo yum install -y yum-utilsAdd the Docker stable repository:
sudo yum-config-manager --add-repo https://download.docker.com/linux/centos/docker-ce.repoInstall Docker:
sudo yum install docker-ce docker-ce-cli containerd.ioStart Docker:
sudo systemctl start dockerVerify that Docker is installed:
sudo docker run hello-worldtipIf the following output appears, Docker is installed successfully:
Hello from Docker! This message shows that your installation appears to be working correctly. ...
Open a terminal and run the following command to download the Docker Compose binary to
/usr/local/bin/docker-compose.curl -SL https://github.com/docker/compose/releases/download/v2.17.3/docker-compose-linux-x86_64 -o /usr/local/bin/docker-composeAdd execute permission to the
docker-composefile.sudo chmod u+x /usr/local/bin/docker-composeCreate a symbolic link so
docker-composecan be run from any directory.sudo ln -s /usr/local/bin/docker-compose /usr/bin/docker-composeVerify that Docker Compose is installed:
docker-composetipIf the following output appears, Docker Compose is installed successfully:
Usage: docker compose [OPTIONS] COMMAND ...
Step 2: Install OpenLDAP
If OpenLDAP is already installed, skip this section.
Click to expand process description
Open a terminal, create and edit
docker-compose.ymlin any directory, and paste this configuration into it. The comments explain each parameter.version: '3'
services:
openldap:
image: osixia/openldap # Use the osixia/openldap image to start the OpenLDAP service.
container_name: openldap # The container name of OpenLDAP, which can be customized.
environment: # Configure environment variables.
- LDAP_ORGANISATION=Ninedata # The organization name of OpenLDAP. Change NineData to your organization name.
- LDAP_DOMAIN=ninedata.com # The domain name of OpenLDAP. Change it to your own OpenLDAP domain name.
- LDAP_ADMIN_PASSWORD=your_password # The administrator password of the OpenLDAP service.
ports: # Configure the service port of OpenLDAP.
- "389:389" # The LDAP service port based on plain text transmission, the default is 389.
- "636:636" # The LDAP service port based on SSL/TLS encrypted transmission, the default is 636.
volumes: # Map the /var/lib/ldap and /etc/ldap/slapd.d directories to the local ./data/ldap and ./data/slapd.d directories so that data can be saved persistently.
- ./data/ldap:/var/lib/ldap
- ./data/slapd.d:/etc/ldap/slapd.dGo to the directory that contains
docker-compose.yml, then run the following command to pull the image and start OpenLDAP:docker-compose up -dAfter the command finishes, run
docker-compose psto check the OpenLDAP service status. If theSTATUScolumn showsUp, the service started successfully.
Step 3: Install phpLDAPadmin
phpLDAPadmin provides a web interface for browsing the LDAP directory tree, searching and editing entries, and managing users, groups, and other LDAP objects.
Open a terminal and run the following command to pull the phpLDAPadmin Docker image:
docker pull osixia/phpldapadminCreate and start the phpLDAPadmin Docker container:
docker run --name phpldapadmin-container -p 6443:443 --env PHPLDAPADMIN_LDAP_HOSTS=192.168.2.33 --detach osixia/phpldapadminParameter Description--name phpldapadmin-container: Container name. Replacephpldapadmin-containerwith a custom name if needed.-p 6443:443: Maps local port6443to container port443. Replace6443with another local port if needed.--env PHPLDAPADMIN_LDAP_HOSTS=192.168.2.33: LDAP host address. Replace192.168.2.33with your LDAP server address.--detach: Runs the container in the background.osixia/phpldapadmin: Docker image name.
Open the phpLDAPadmin URL, such as
https://192.168.2.33:6443. Select login, enter Login DN and Password, and click Authenticate to sign in to OpenLDAP.IP address: Use the actual
PHPLDAPADMIN_LDAP_HOSTSvalue from the previous step.Port: Use the actual
-pvalue from the previous step.Login DN: Use the LDAP login DN, such as
cn=admin,dc=ninedata,dc=com. Thecn=admin,dc=ninedata, anddc=comvalues are defined indocker-compose.ymlin Step 2.Password: Use the OpenLDAP administrator password from Step 2.
tip- The browser may block the first visit because this example uses a self-signed certificate. In Chrome, click Advanced, then click Continue to 192.168.2.33 (unsafe). Browser prompts vary.
- If the browser cannot open the page or shows
ERR_INVALID_HTTP_RESPONSE, make sure the URL uses HTTPS instead of HTTP.
Because this example starts with a fresh OpenLDAP installation, there is no data yet. The next steps add an organization and a user through phpLDAPadmin.
- Create Organizational Unit (ou)
- Create User in Organization (cn)
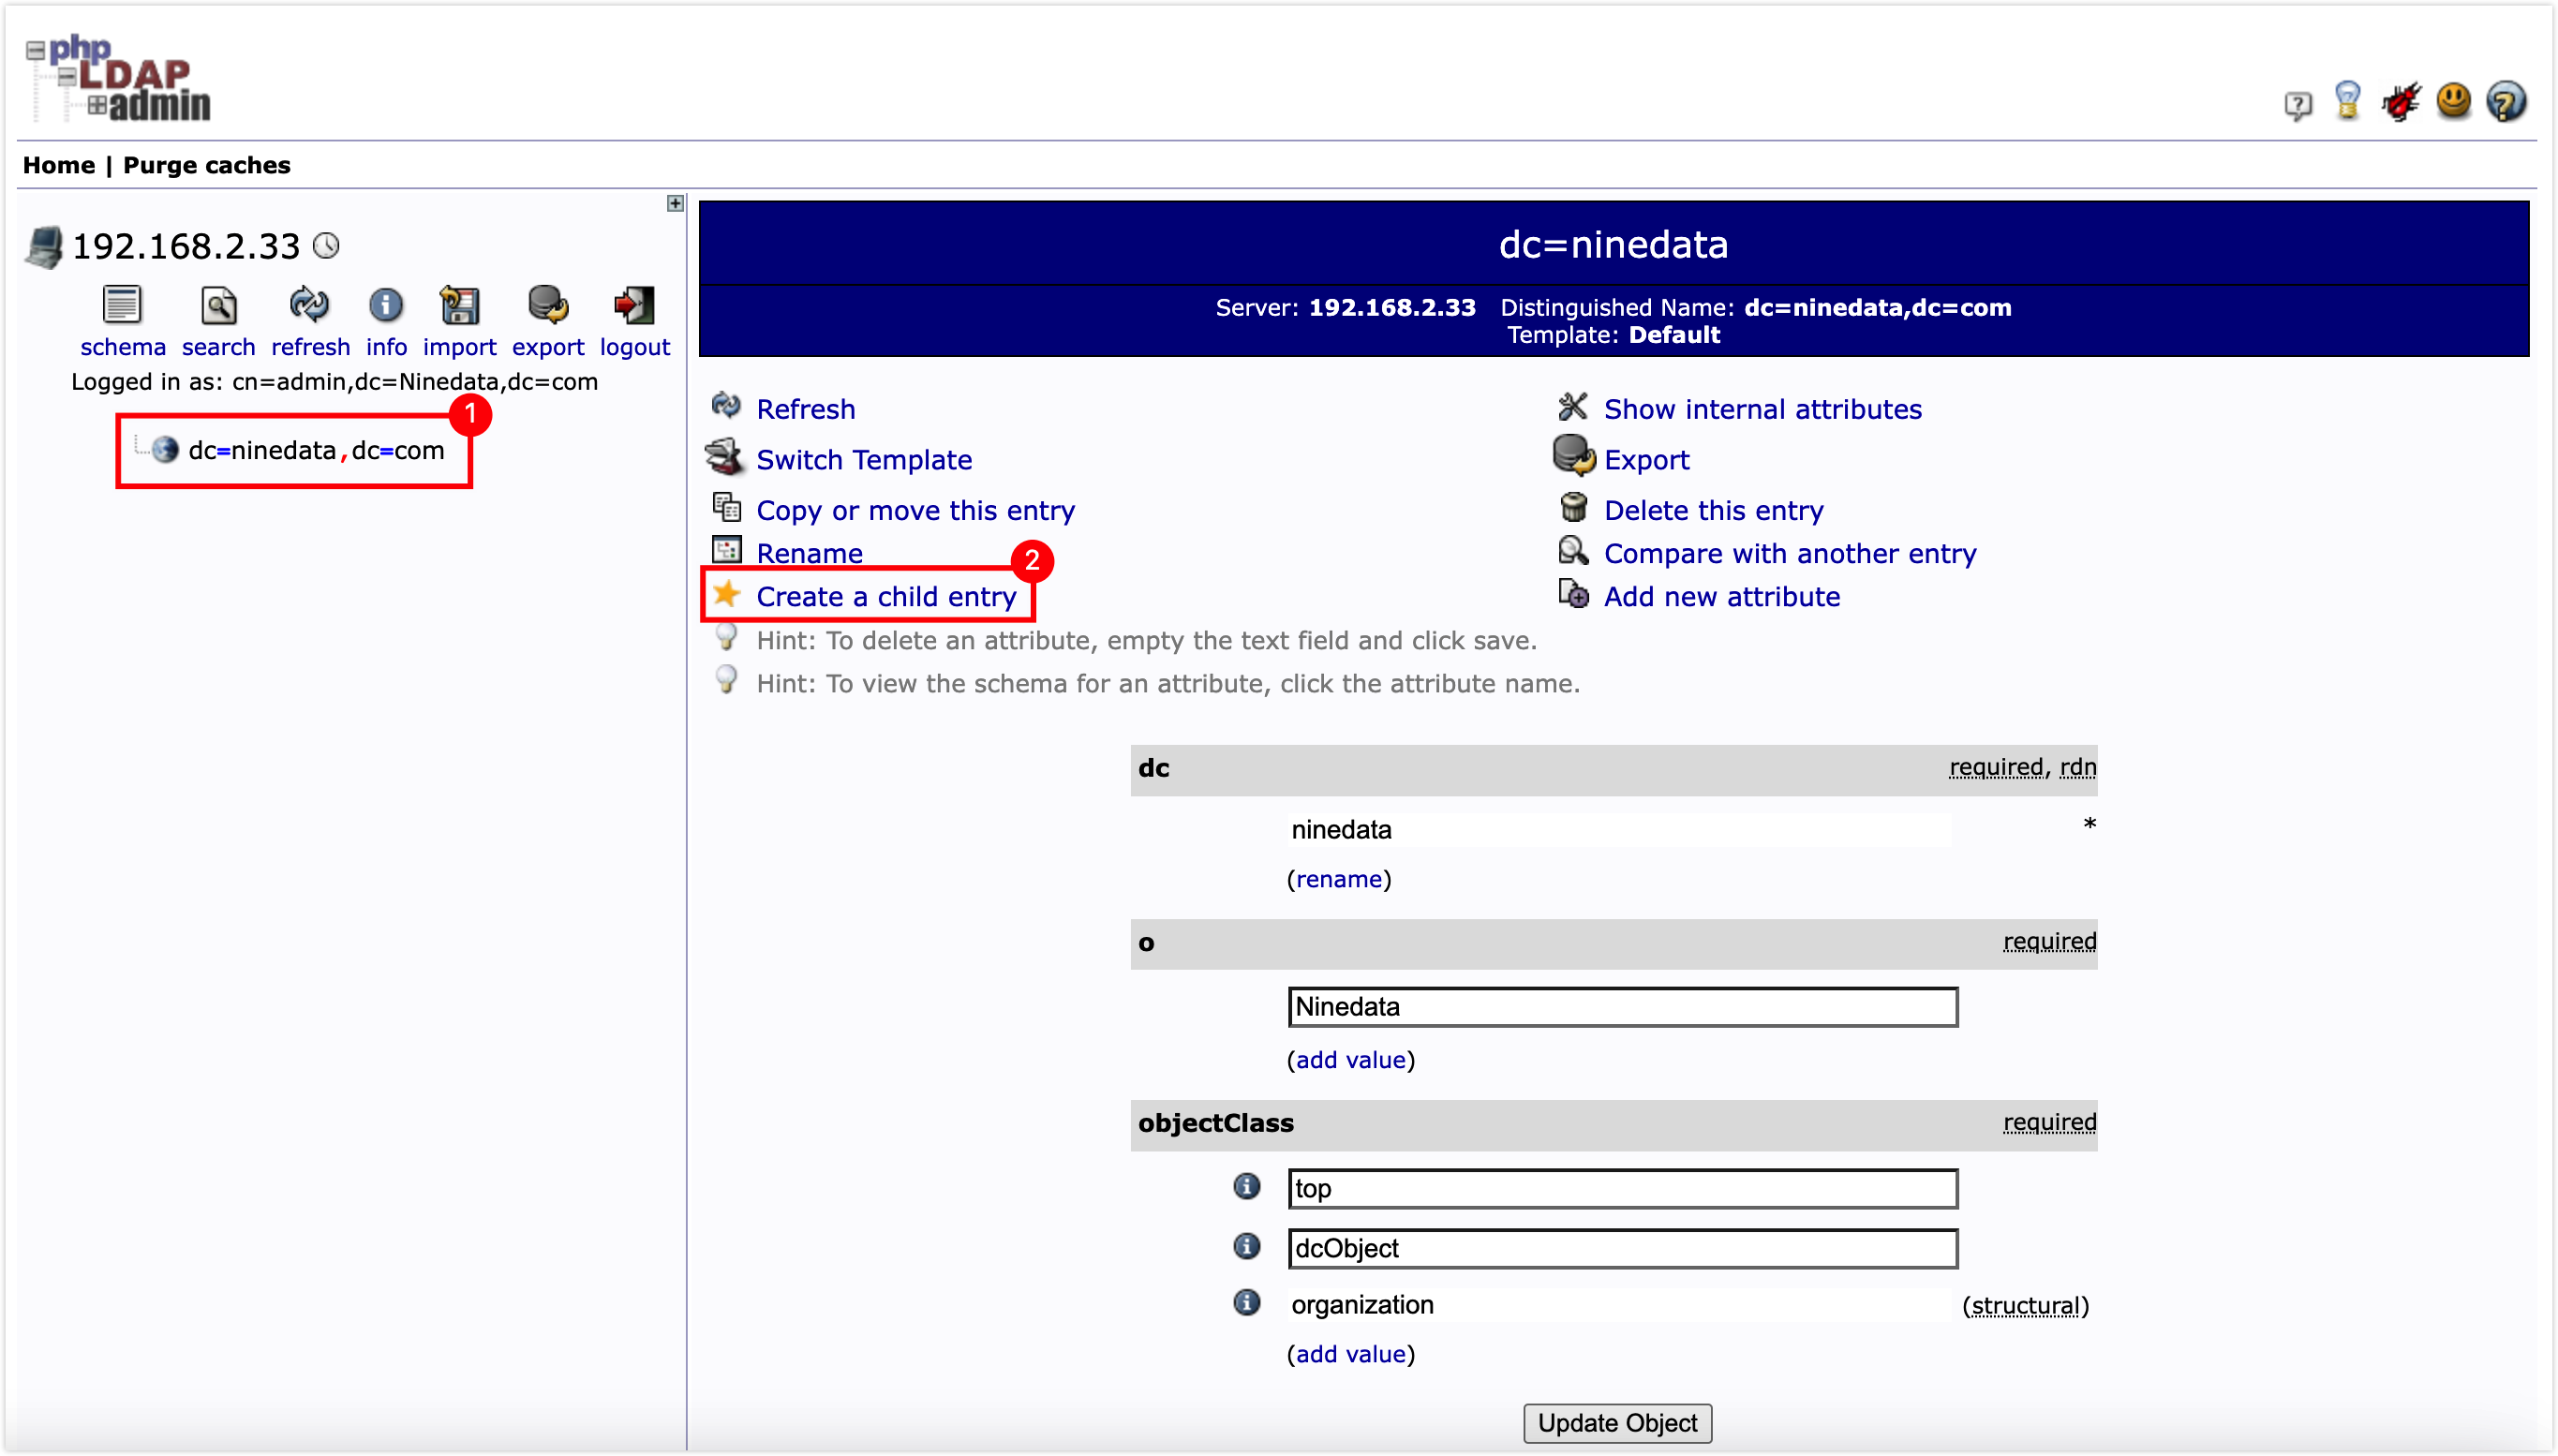
Select the domain name from the phpLDAPadmin sidebar, then click Create a child entry.
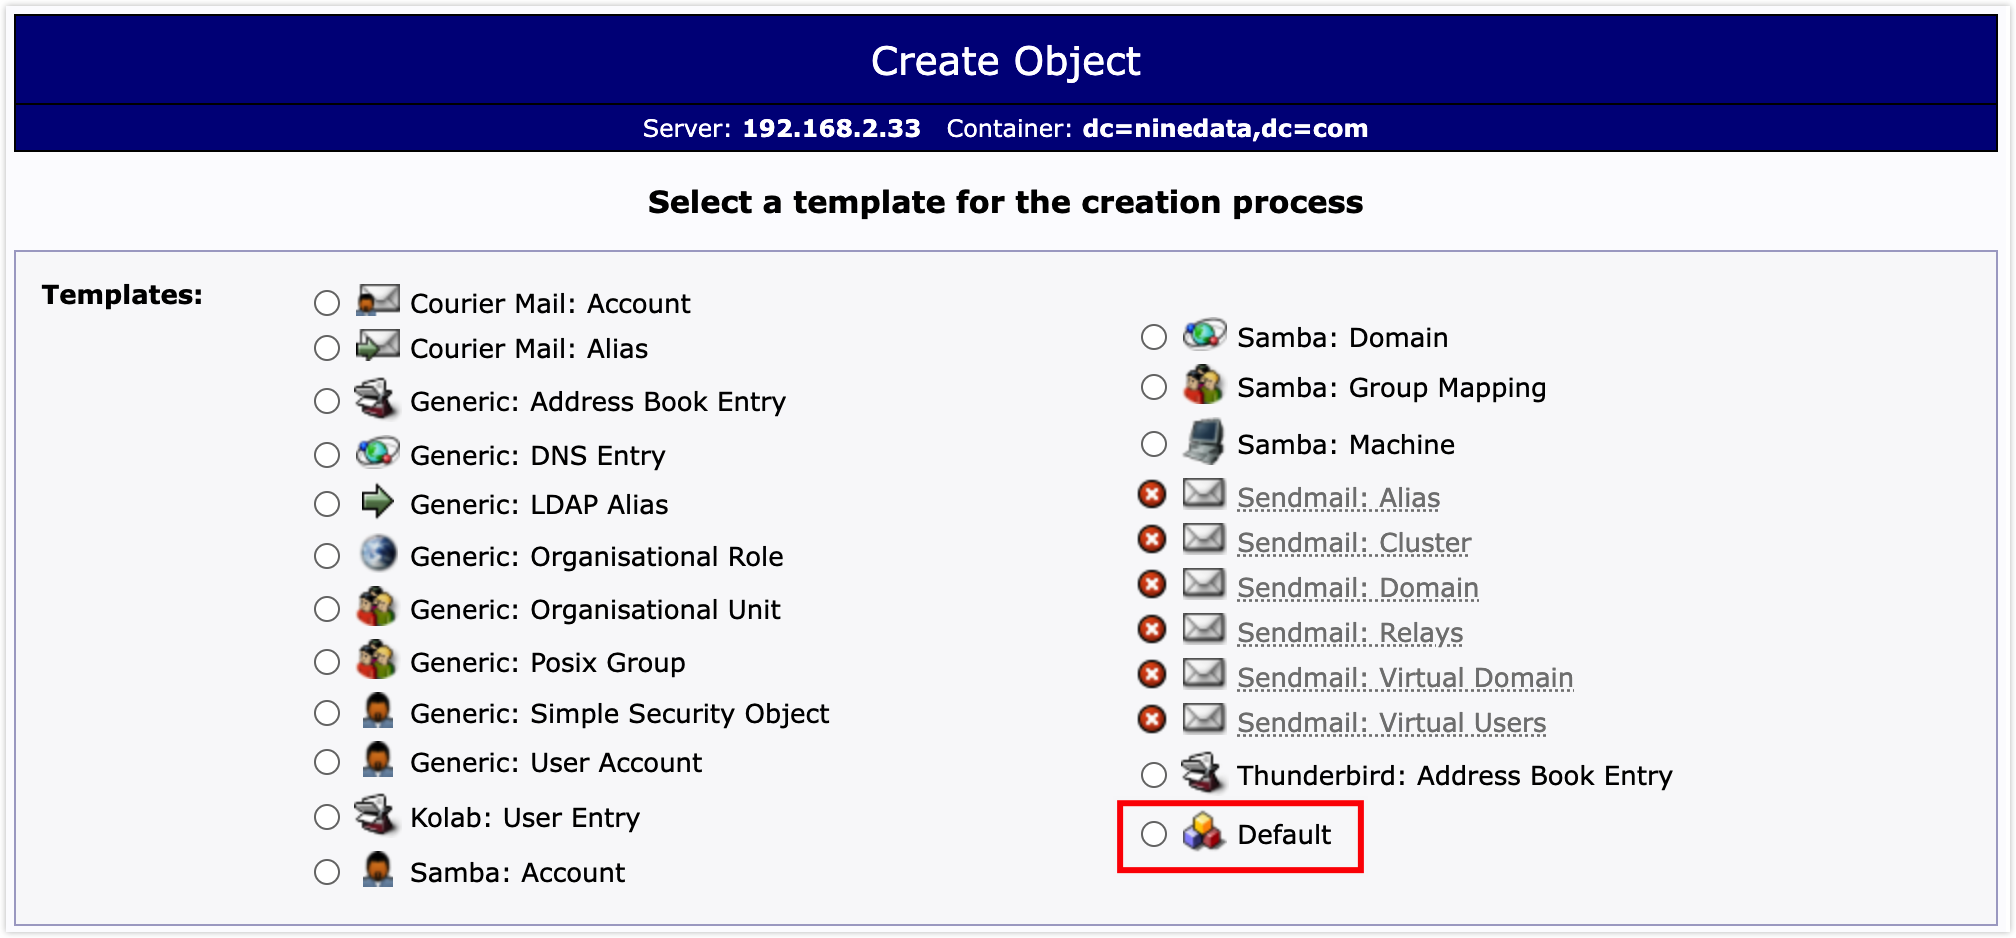
On the template page, click Default.
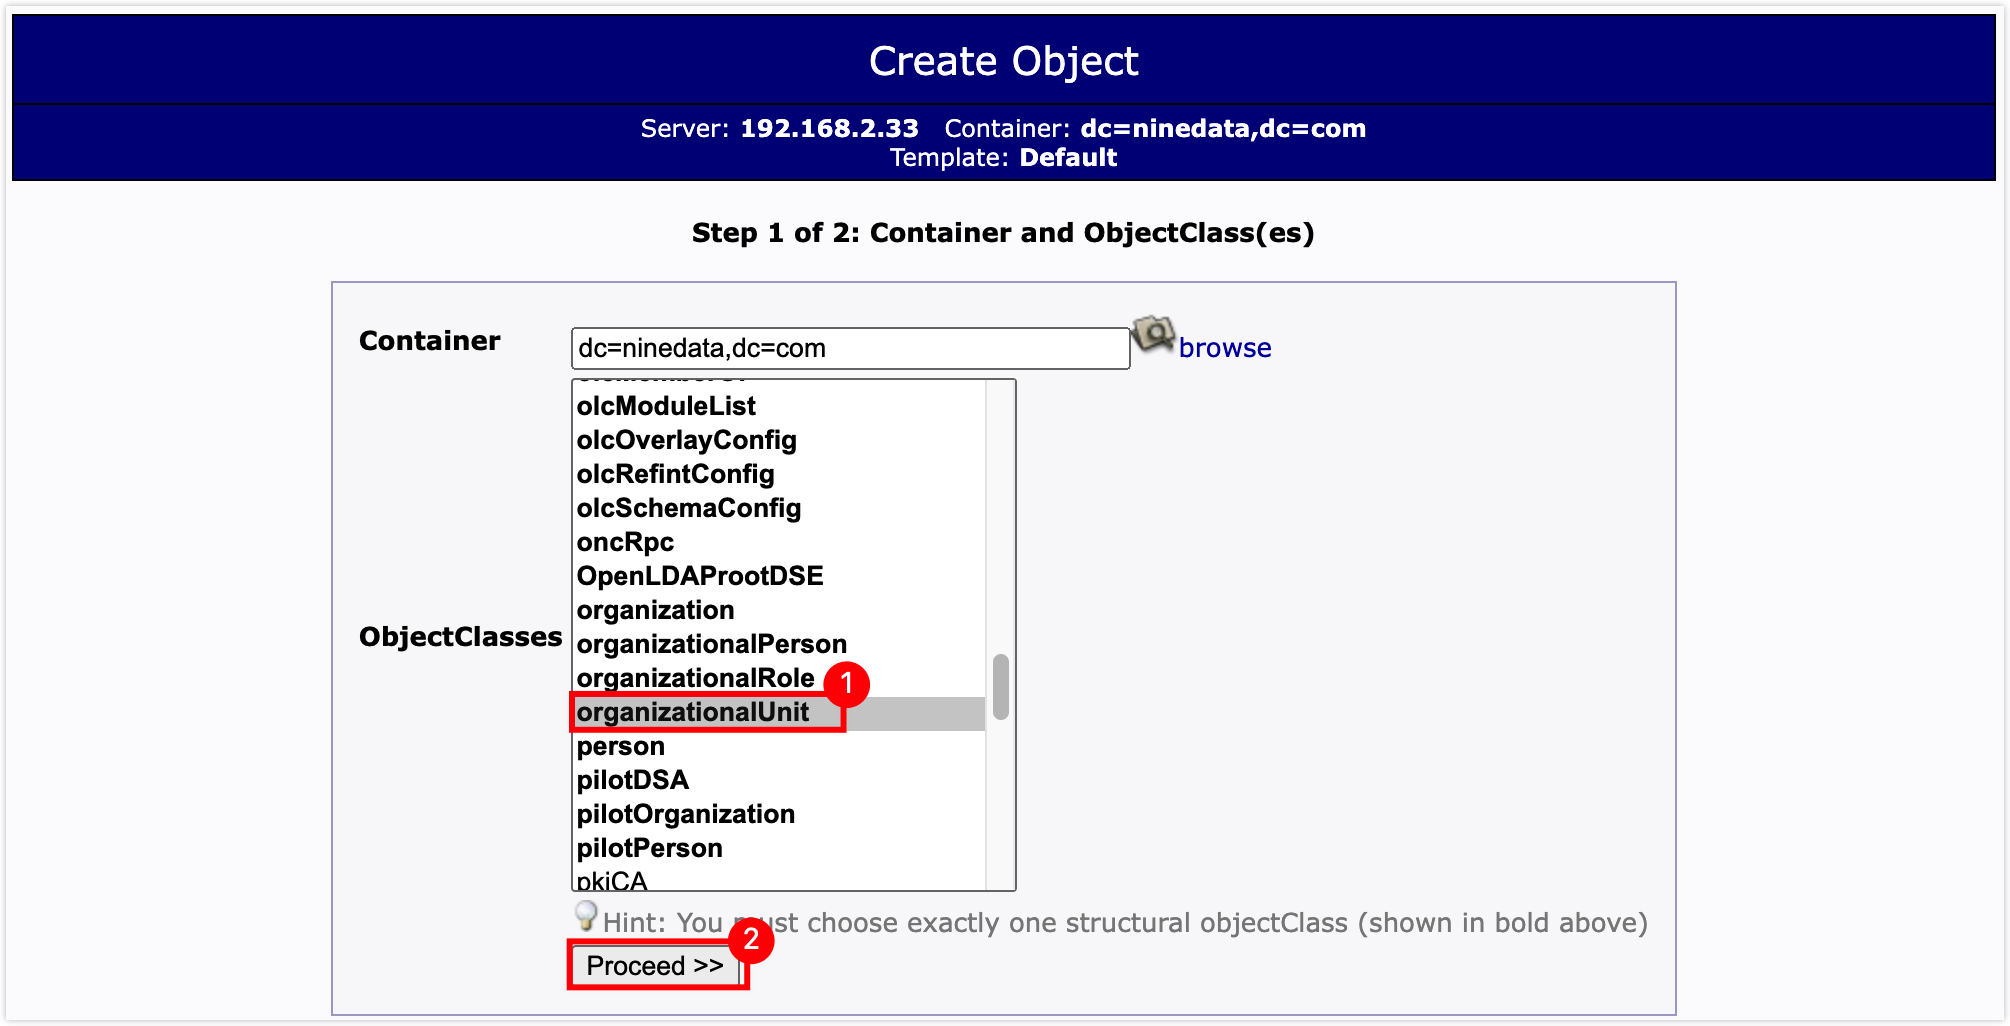
In ObjectClasses, select organizationalUnit, then click Proceed >>.
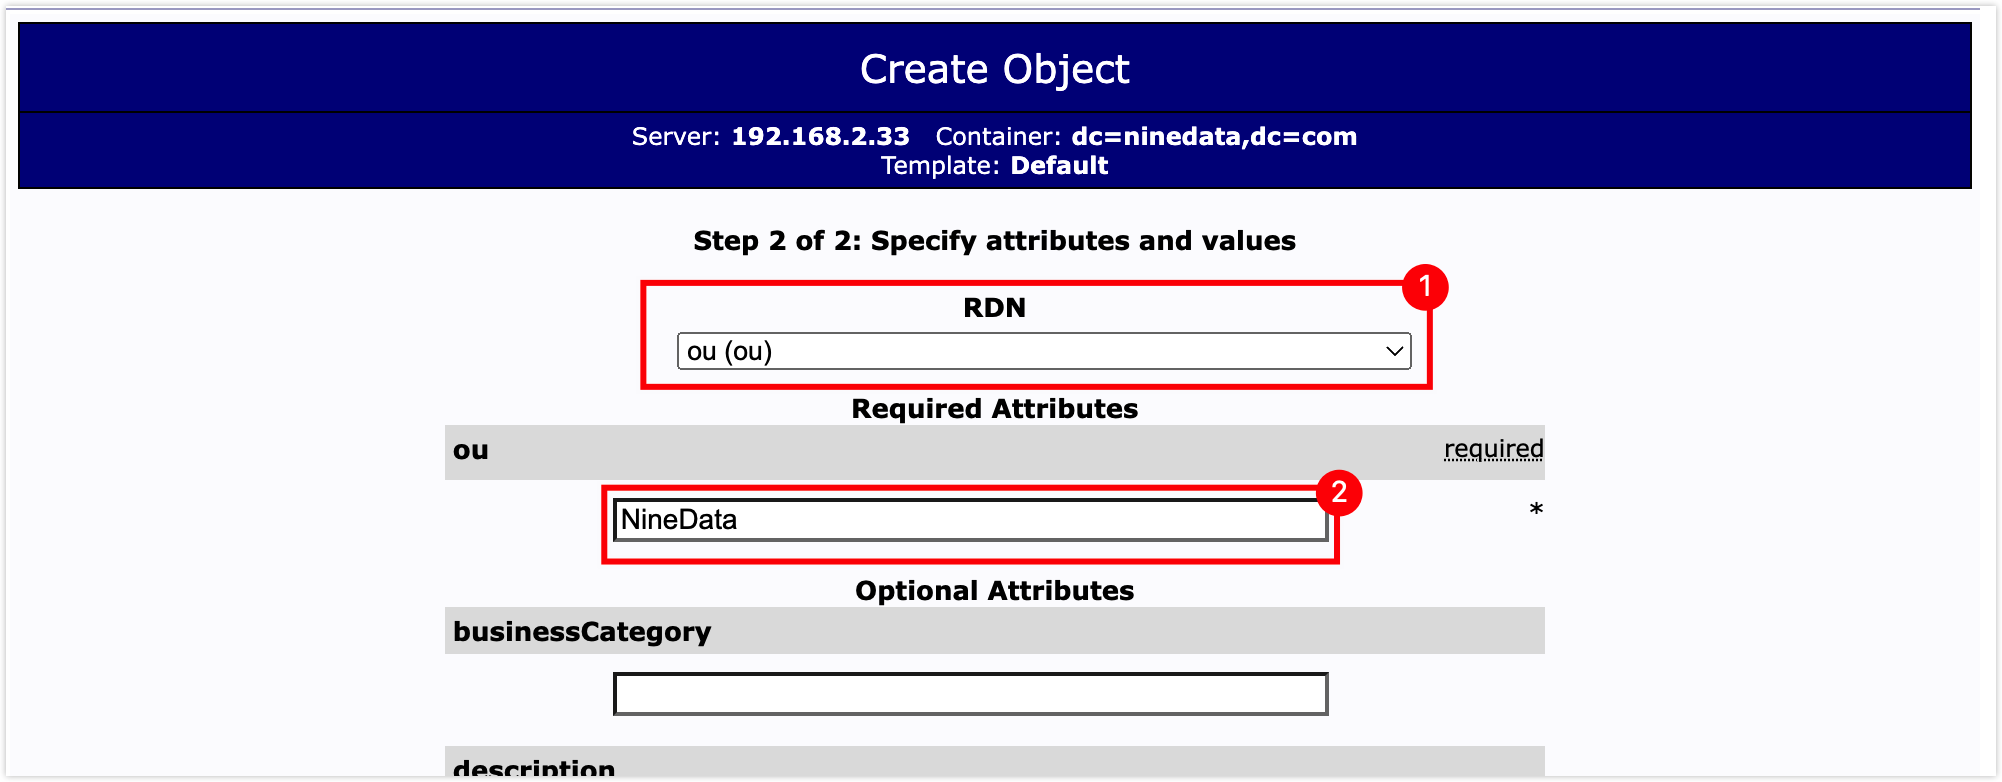
In the attribute configuration window, set RDN to ou (ou), enter the organizational unit name in ou, then scroll down and click Create Object.
 tip
tipAdd other organizational unit attributes if needed.
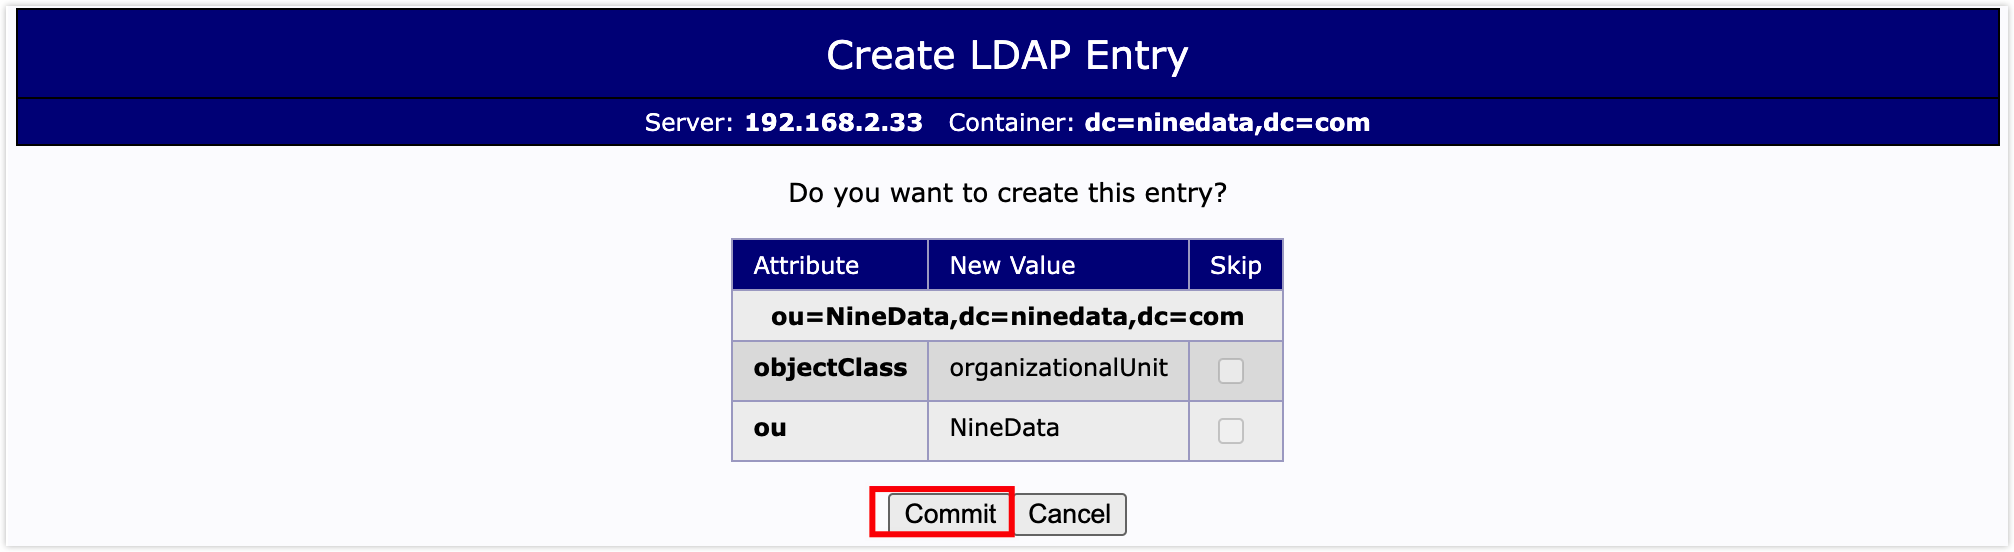
On the confirmation page, click Commit.
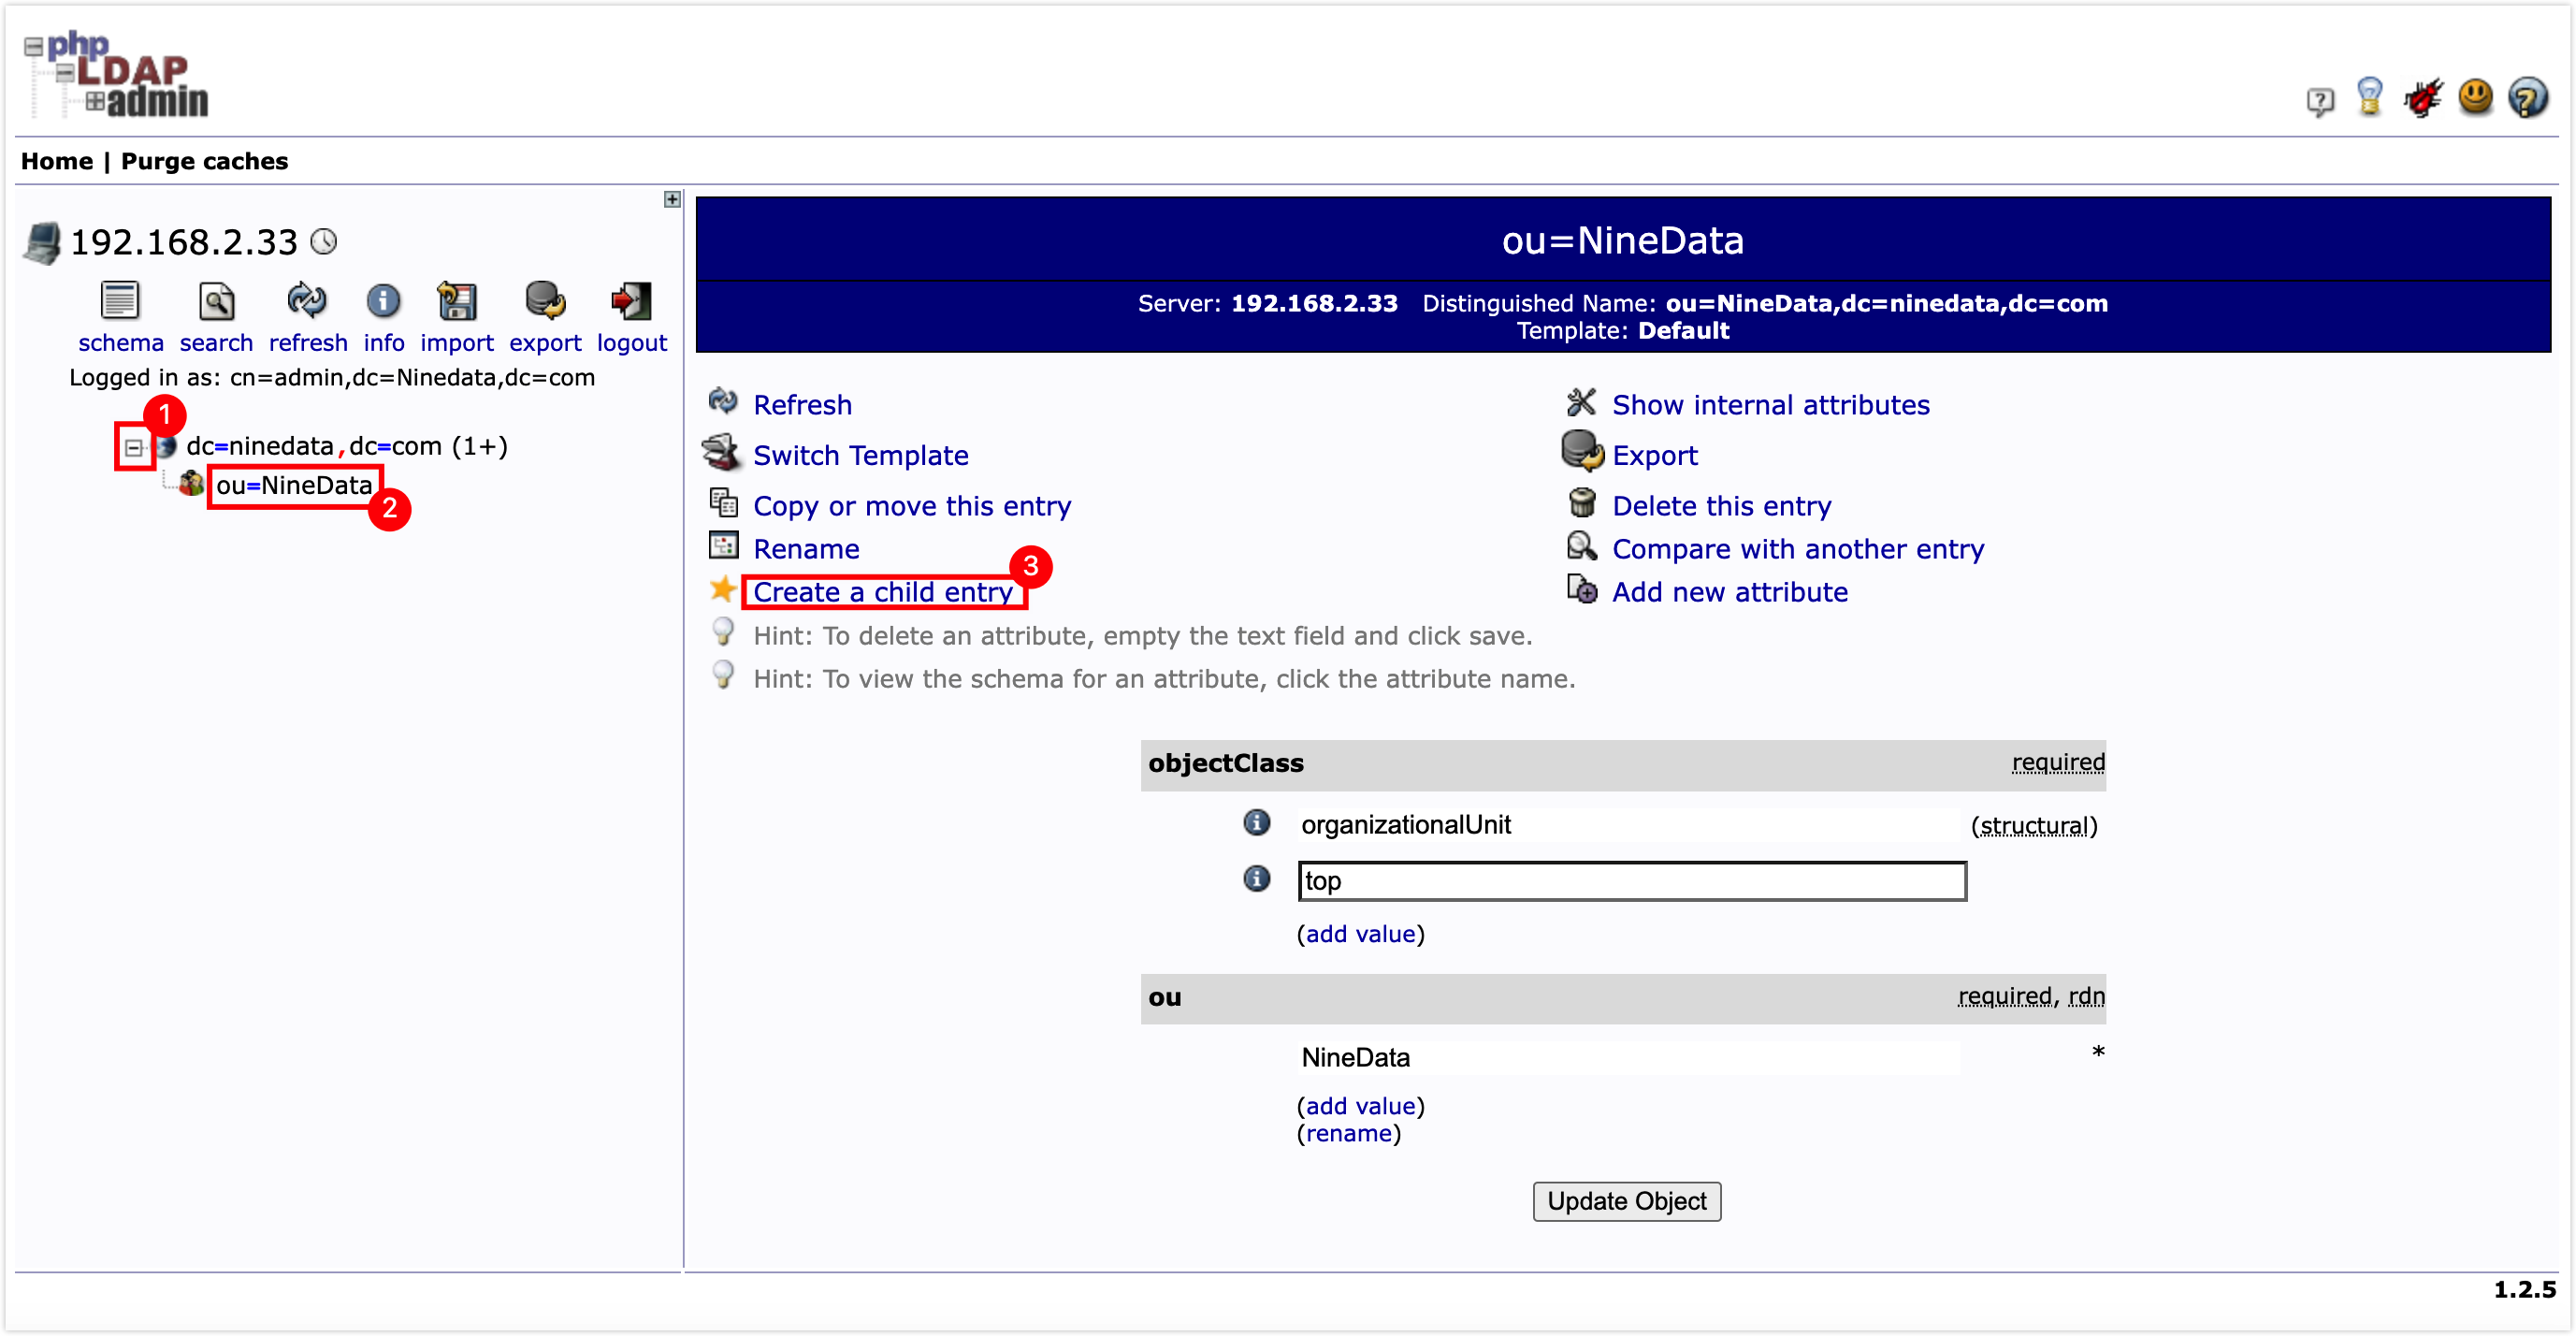
Select the organizational unit under the domain name from the phpLDAPadmin sidebar, then click Create a child entry.
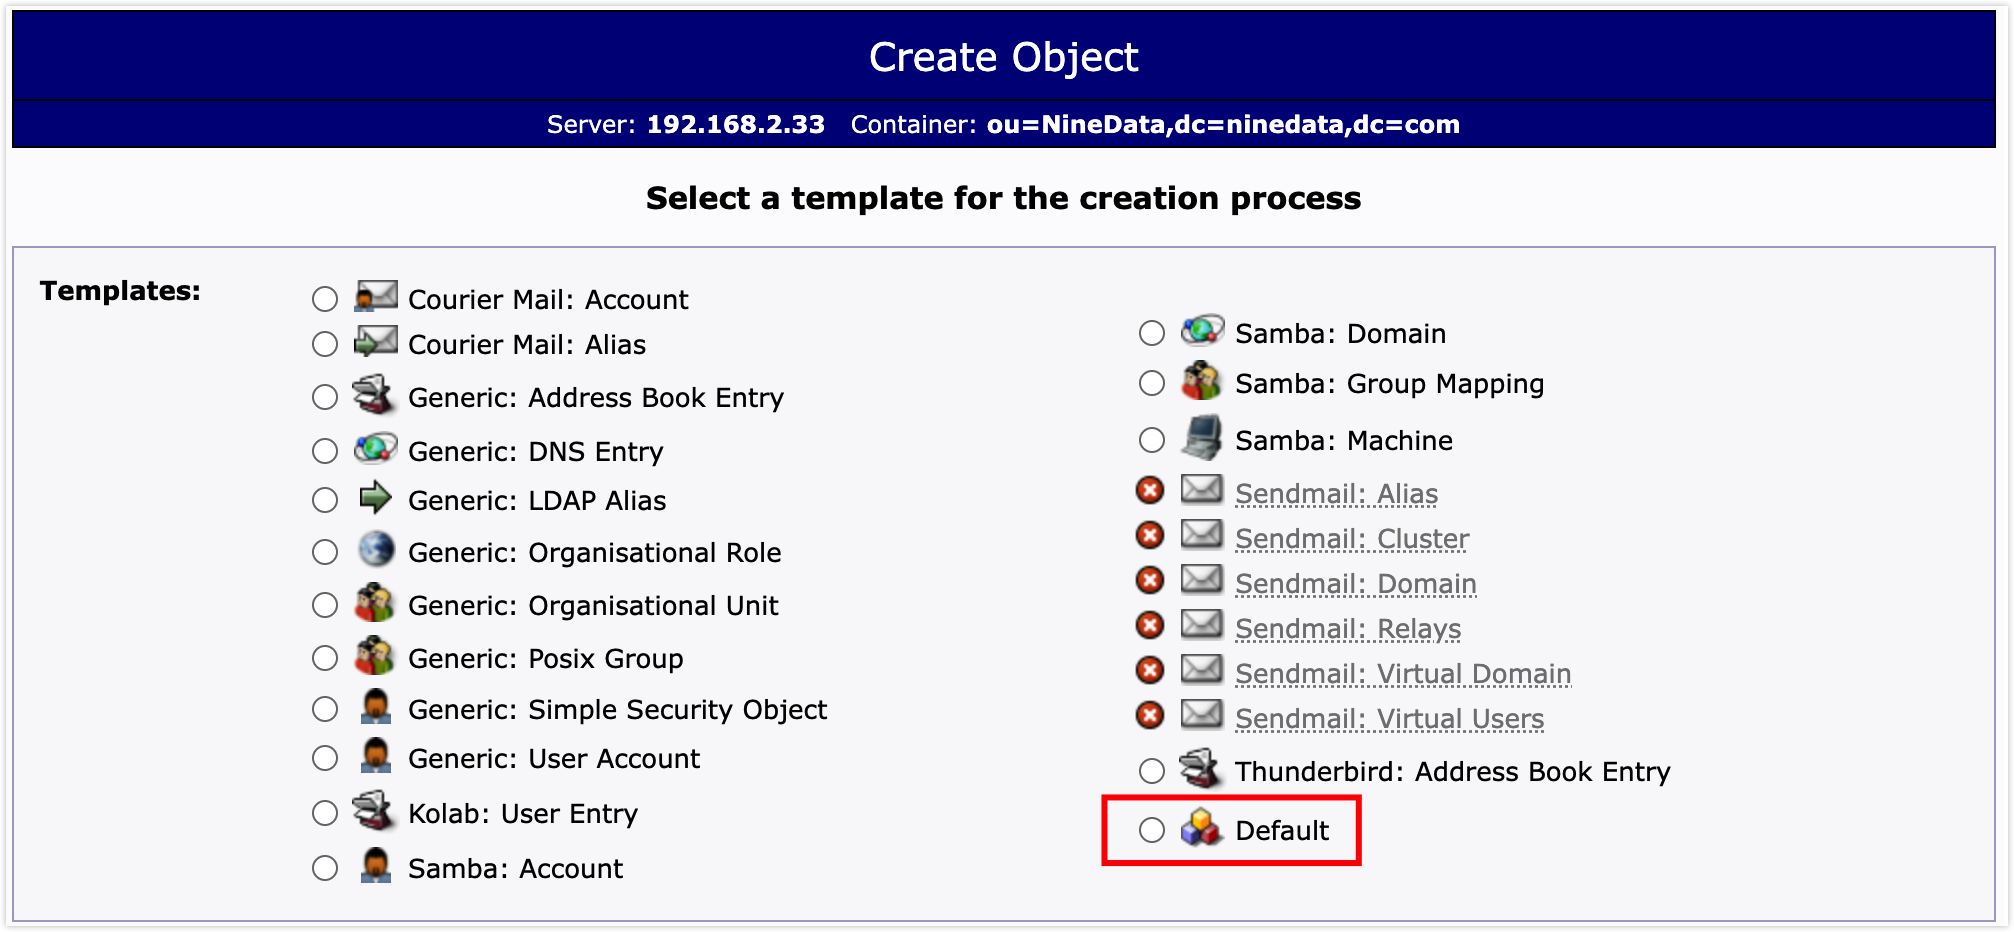
On the template page, click Default.
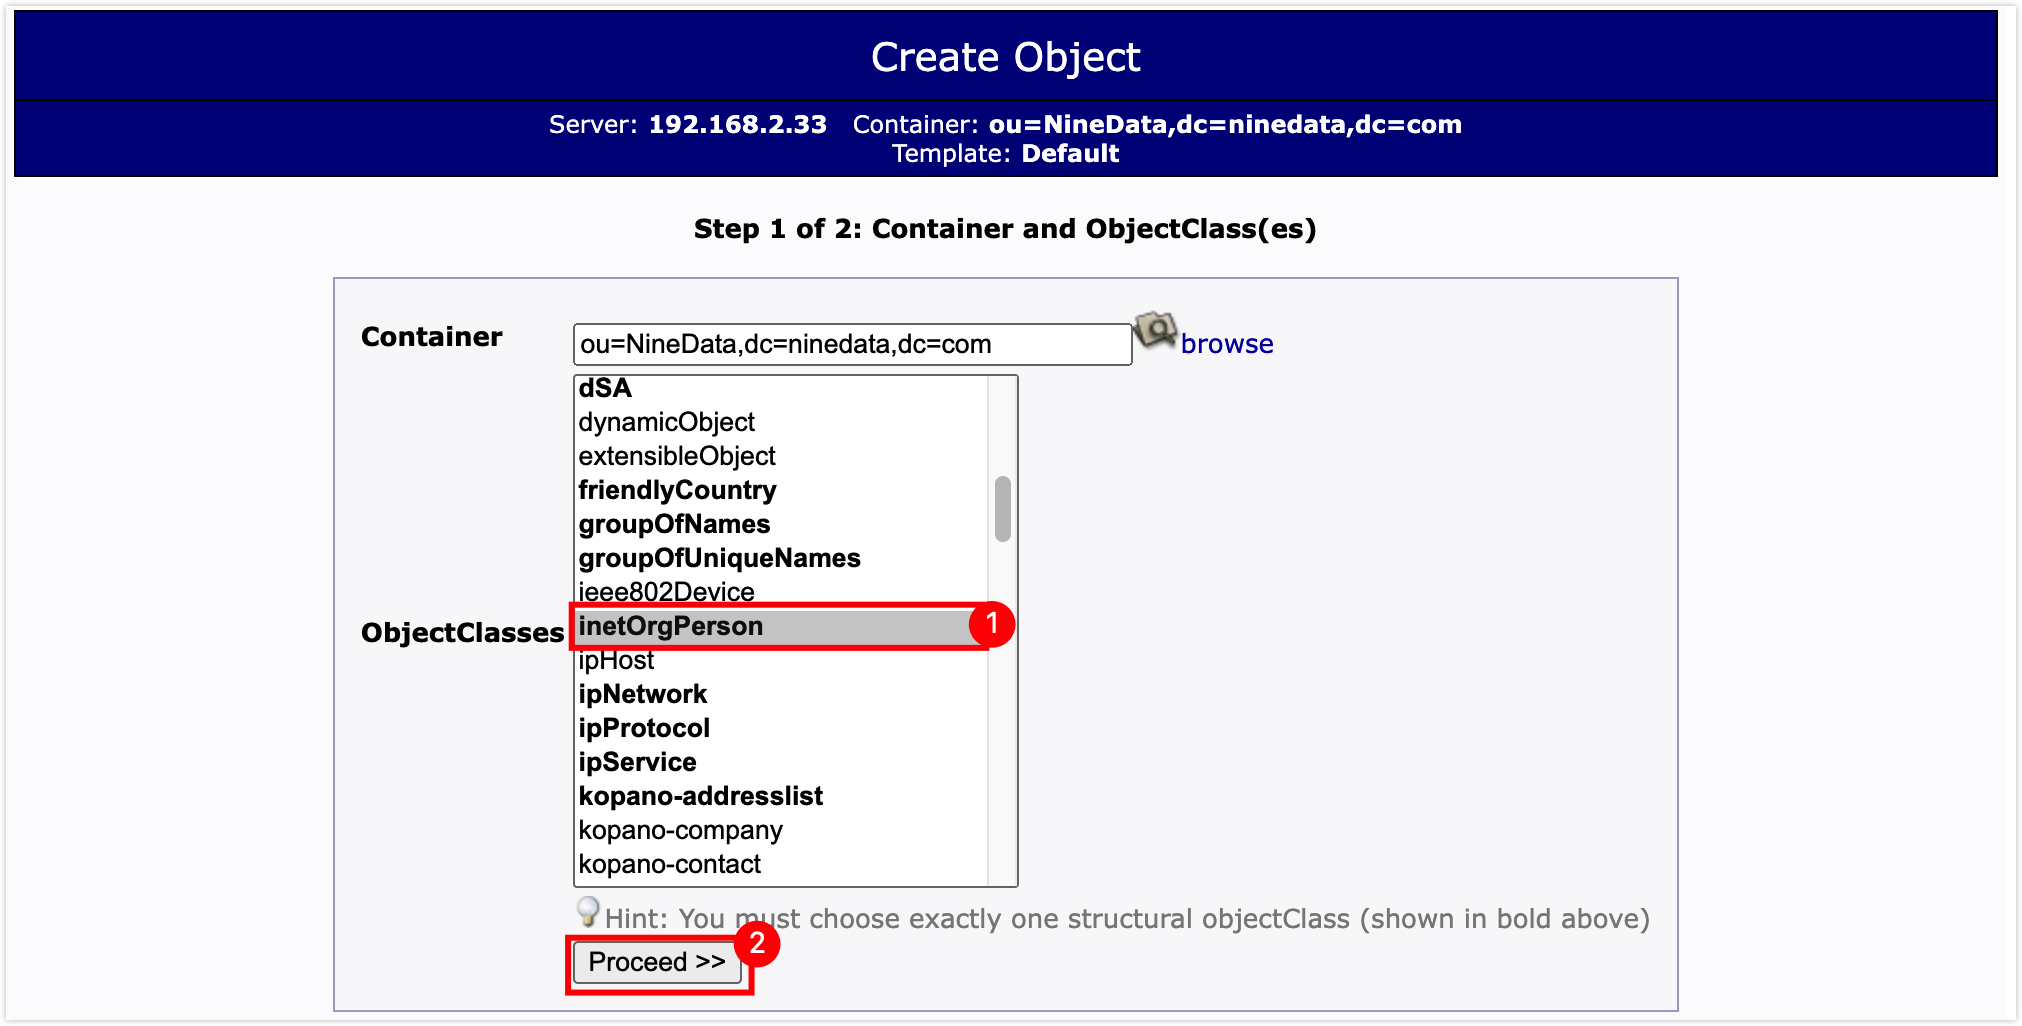
In ObjectClasses, select inetOrgPerson, then click Proceed >>.
In the attribute configuration window, set RDN to cn (cn). Enter the user's common name in cn, surname in sn, and password in Password, then scroll down and click Create Object.
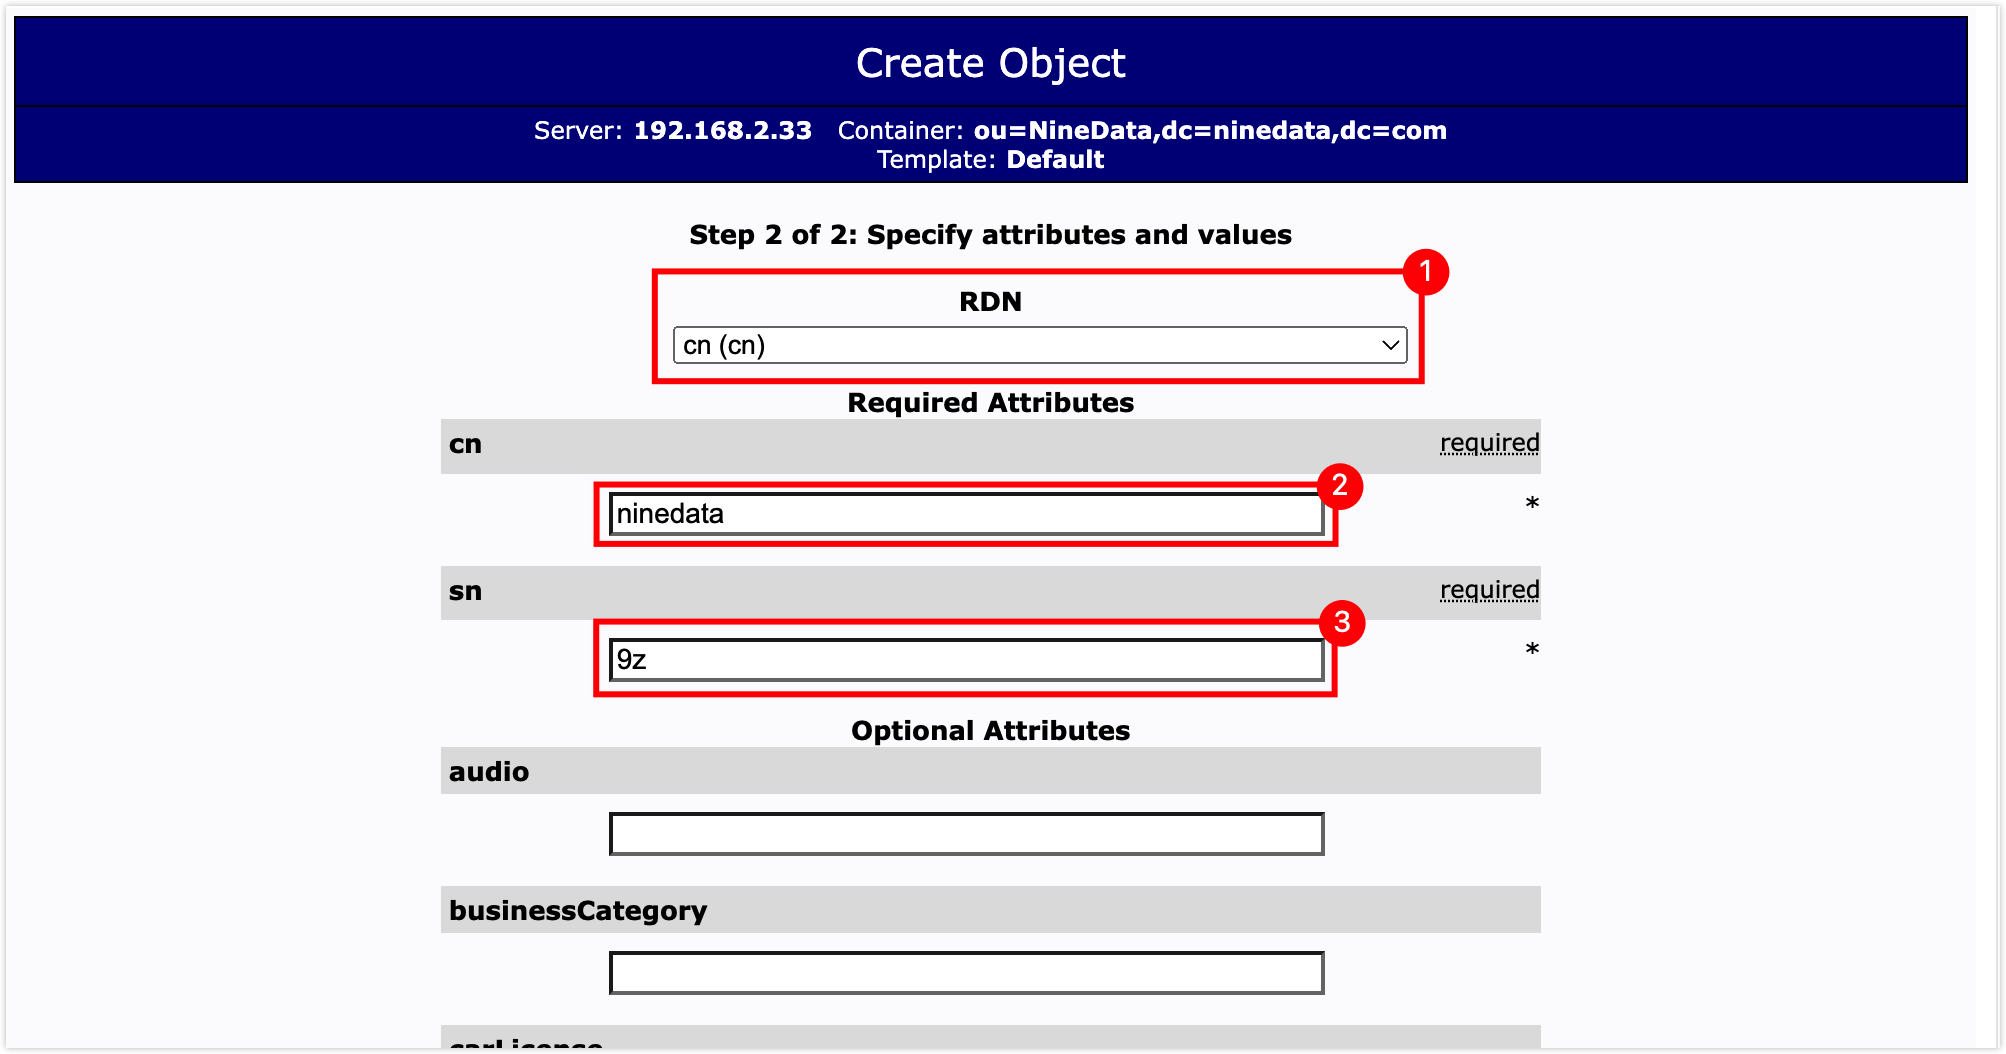
 tip
tipAdd other user attributes if needed.
On the confirmation page, click Commit to complete the user creation.
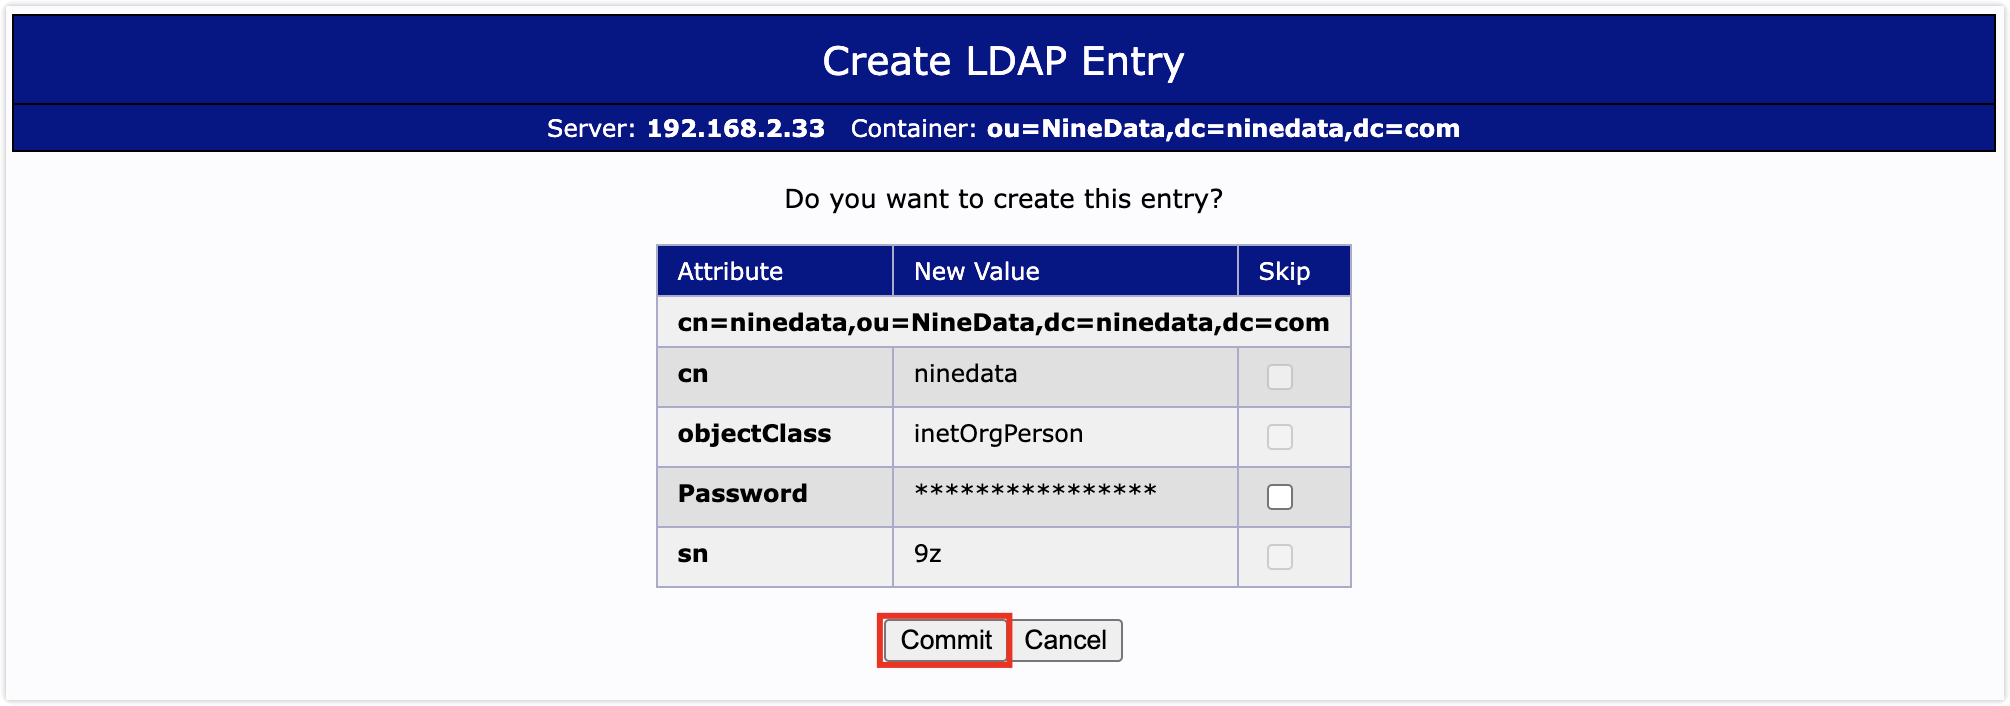
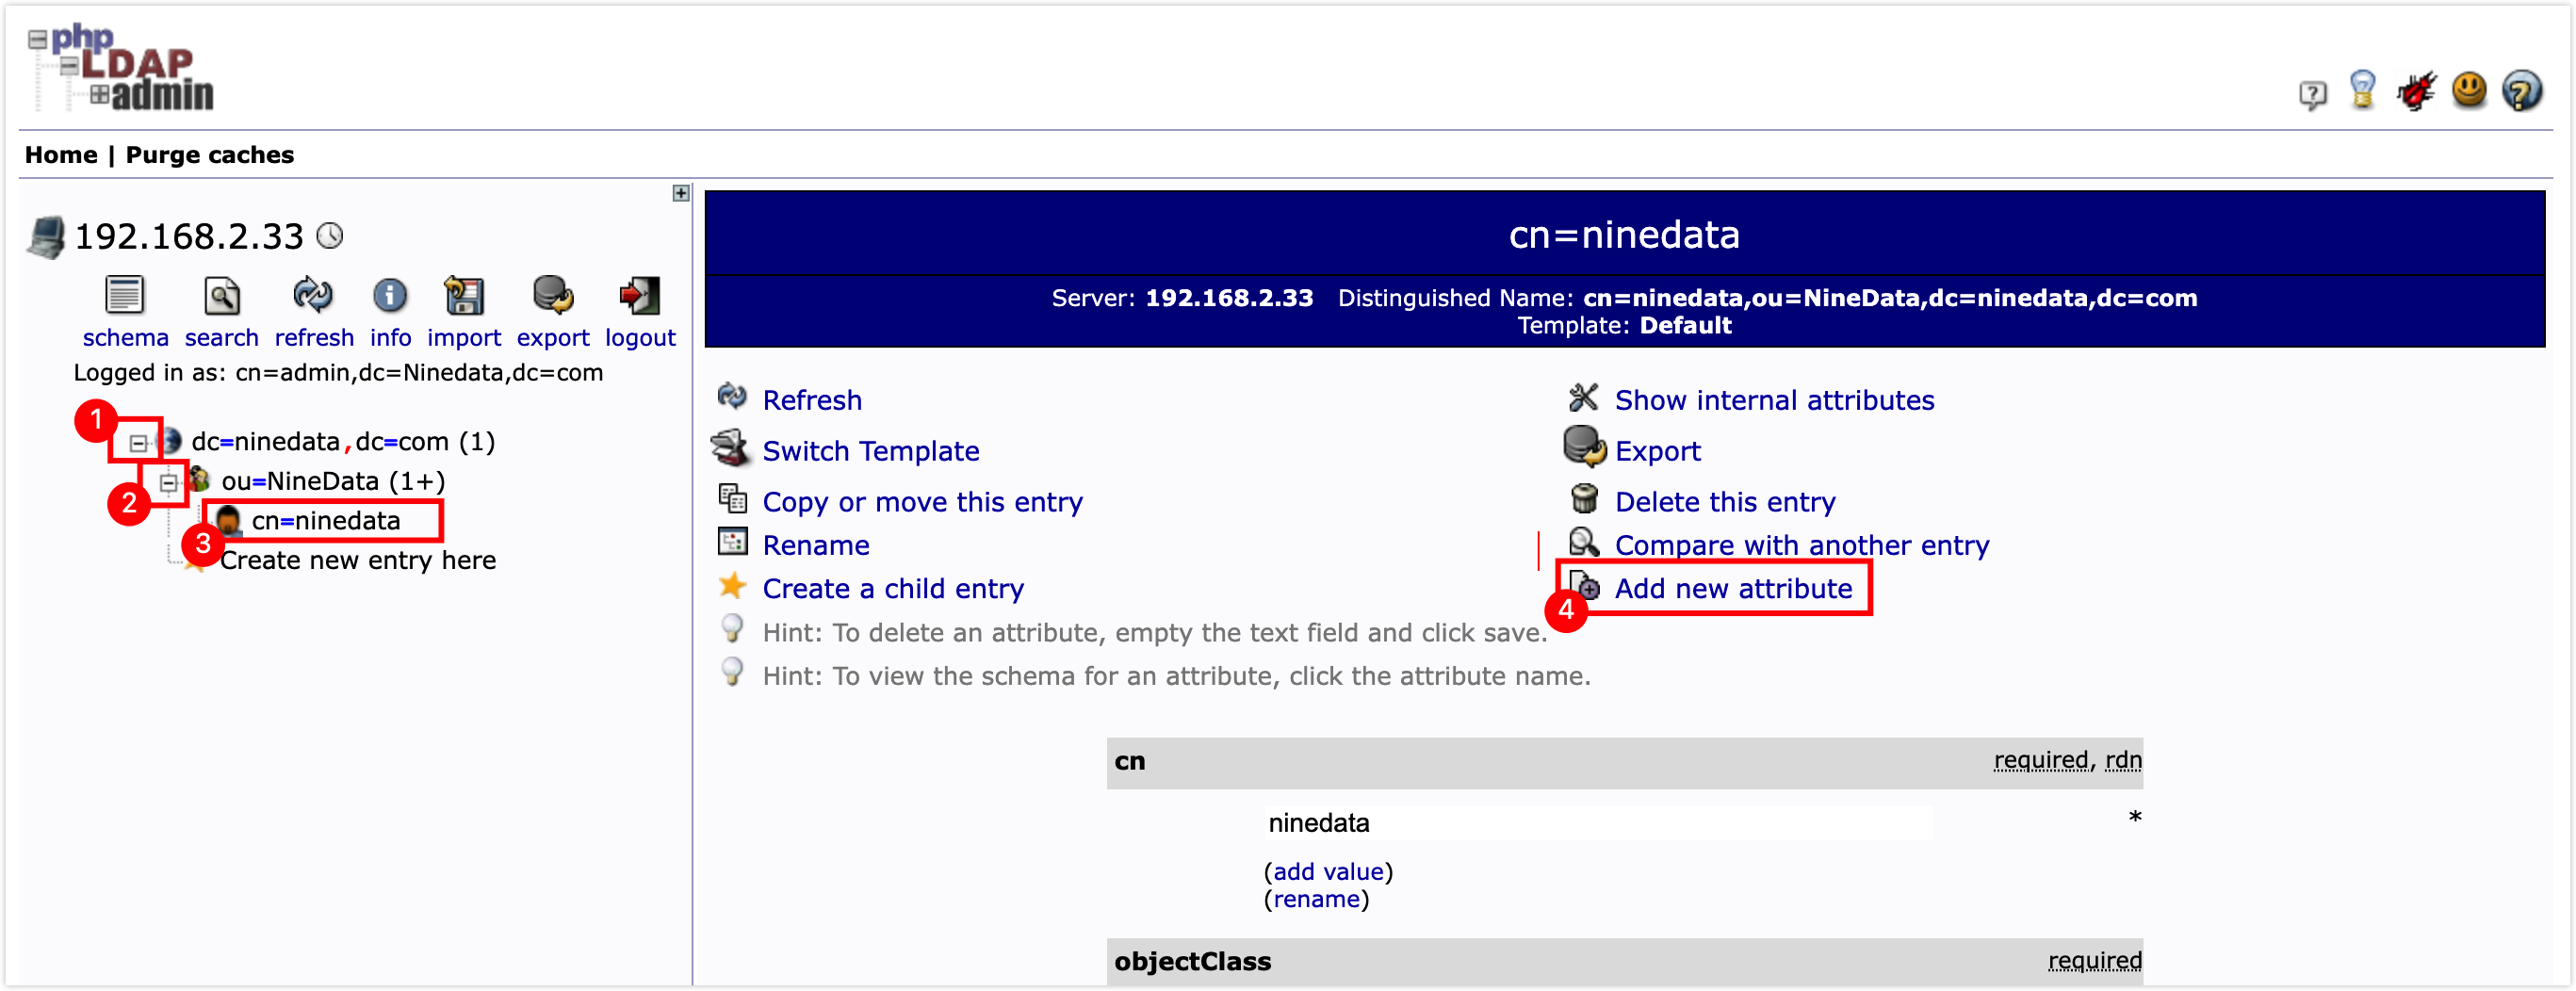
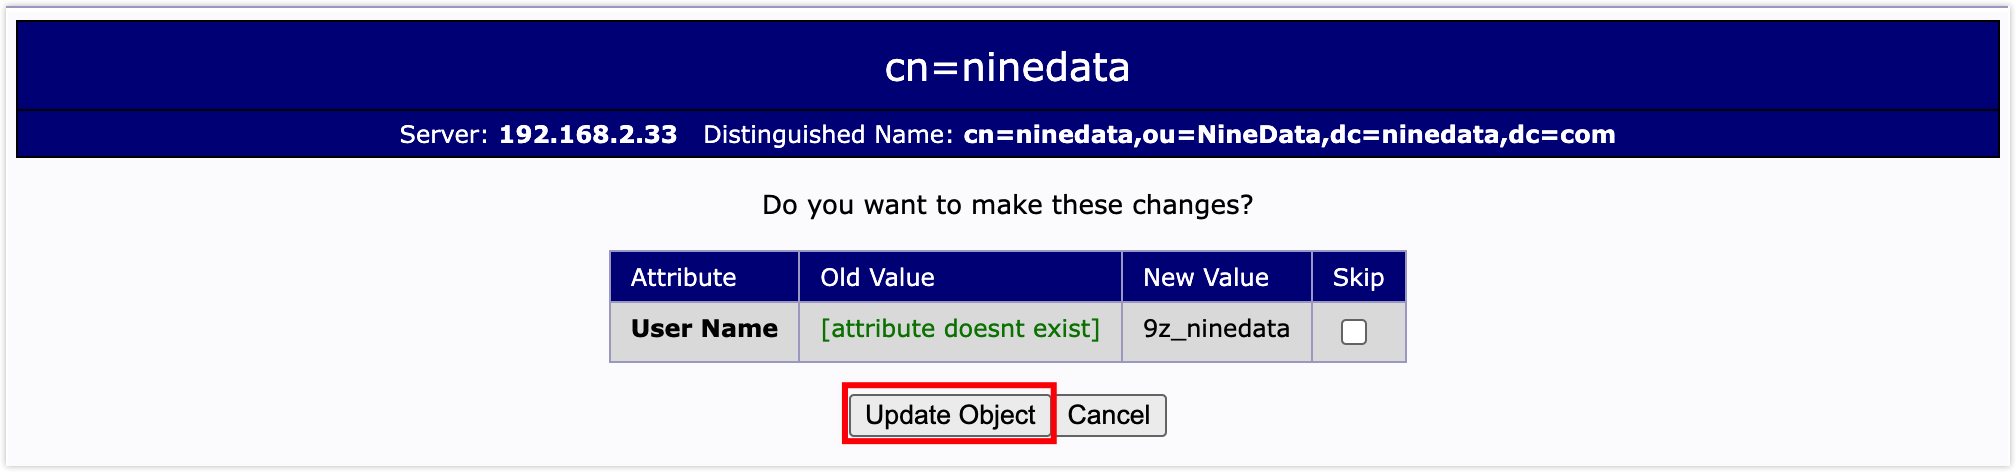
Add the User Name attribute as the unique login identifier. Select the new user in phpLDAPadmin and click Add new attribute.
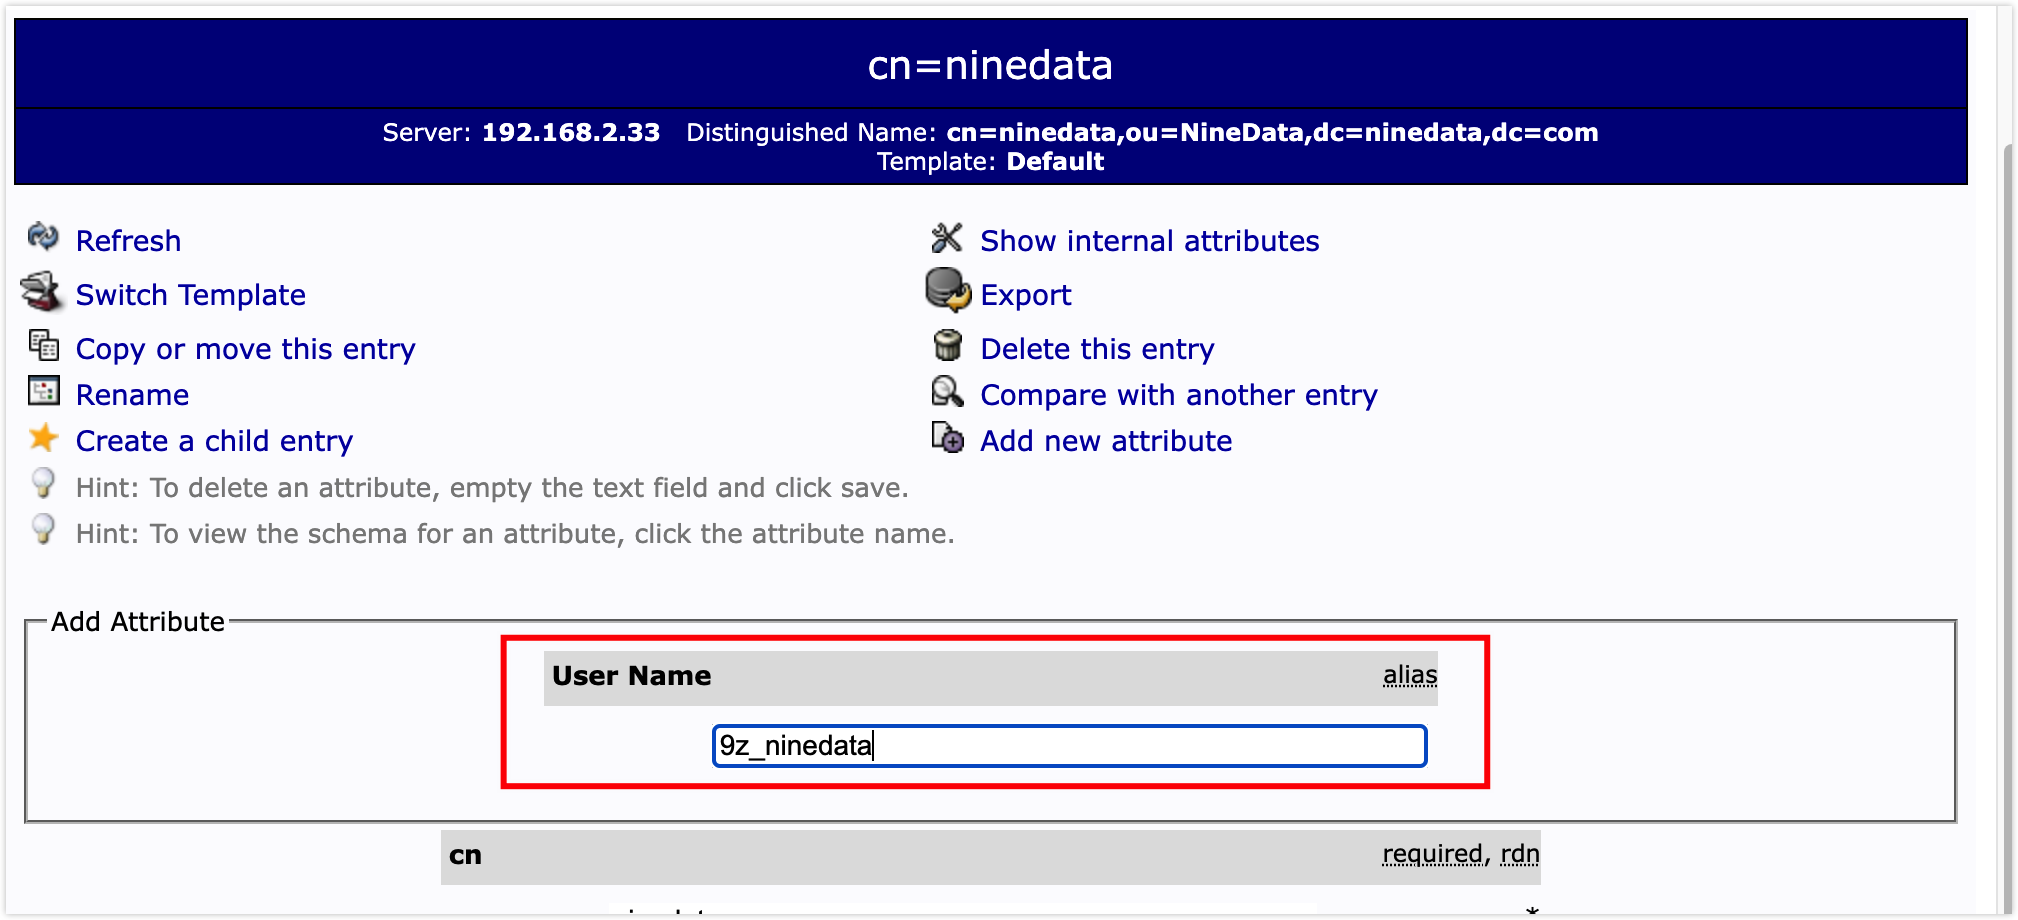
In the attribute configuration window, set RDN to User Name, enter the user's unique identifier under the added User Name attribute, then scroll down and click Update Object.
On the confirmation page, click Update Object to add the user attribute.
Step 4: Install Keycloak and synchronize user data from OpenLDAP
Keycloak is an open-source identity and access management solution that provides authentication, authorization, and single sign-on (SSO). This section shows how to synchronize OpenLDAP users into Keycloak for SSO access.
Open a terminal and run the following command to pull the Keycloak image.
docker pull jboss/keycloak:9.0.0Create and start the Keycloak container.
docker run --name keycloak-container -p 8443:8443 --env KEYCLOAK_USER=admin --env KEYCLOAK_PASSWORD=admin --detach jboss/keycloak:9.0.0Parameter Description--name keycloak-container: Container name. Replacekeycloak-containerwith a custom name if needed.-p 8443:8443: Maps local port8443to container port8443. Replace the local port if needed.--env KEYCLOAK_USER=admin: Keycloak administrator account. Replaceadminwith a custom account if needed.--env KEYCLOAK_PASSWORD=admin: Keycloak administrator password. Replaceadminwith a custom password if needed.--detach: Runs the container in the background.jboss/keycloak:9.0.0: Docker image name.
Open the Keycloak URL in your browser. In this example, use
https://192.168.2.33:8443. Click Administration Console to open the login page.IP address: Use the host address where Keycloak is installed.
Port: Use the
-pvalue from the previous step.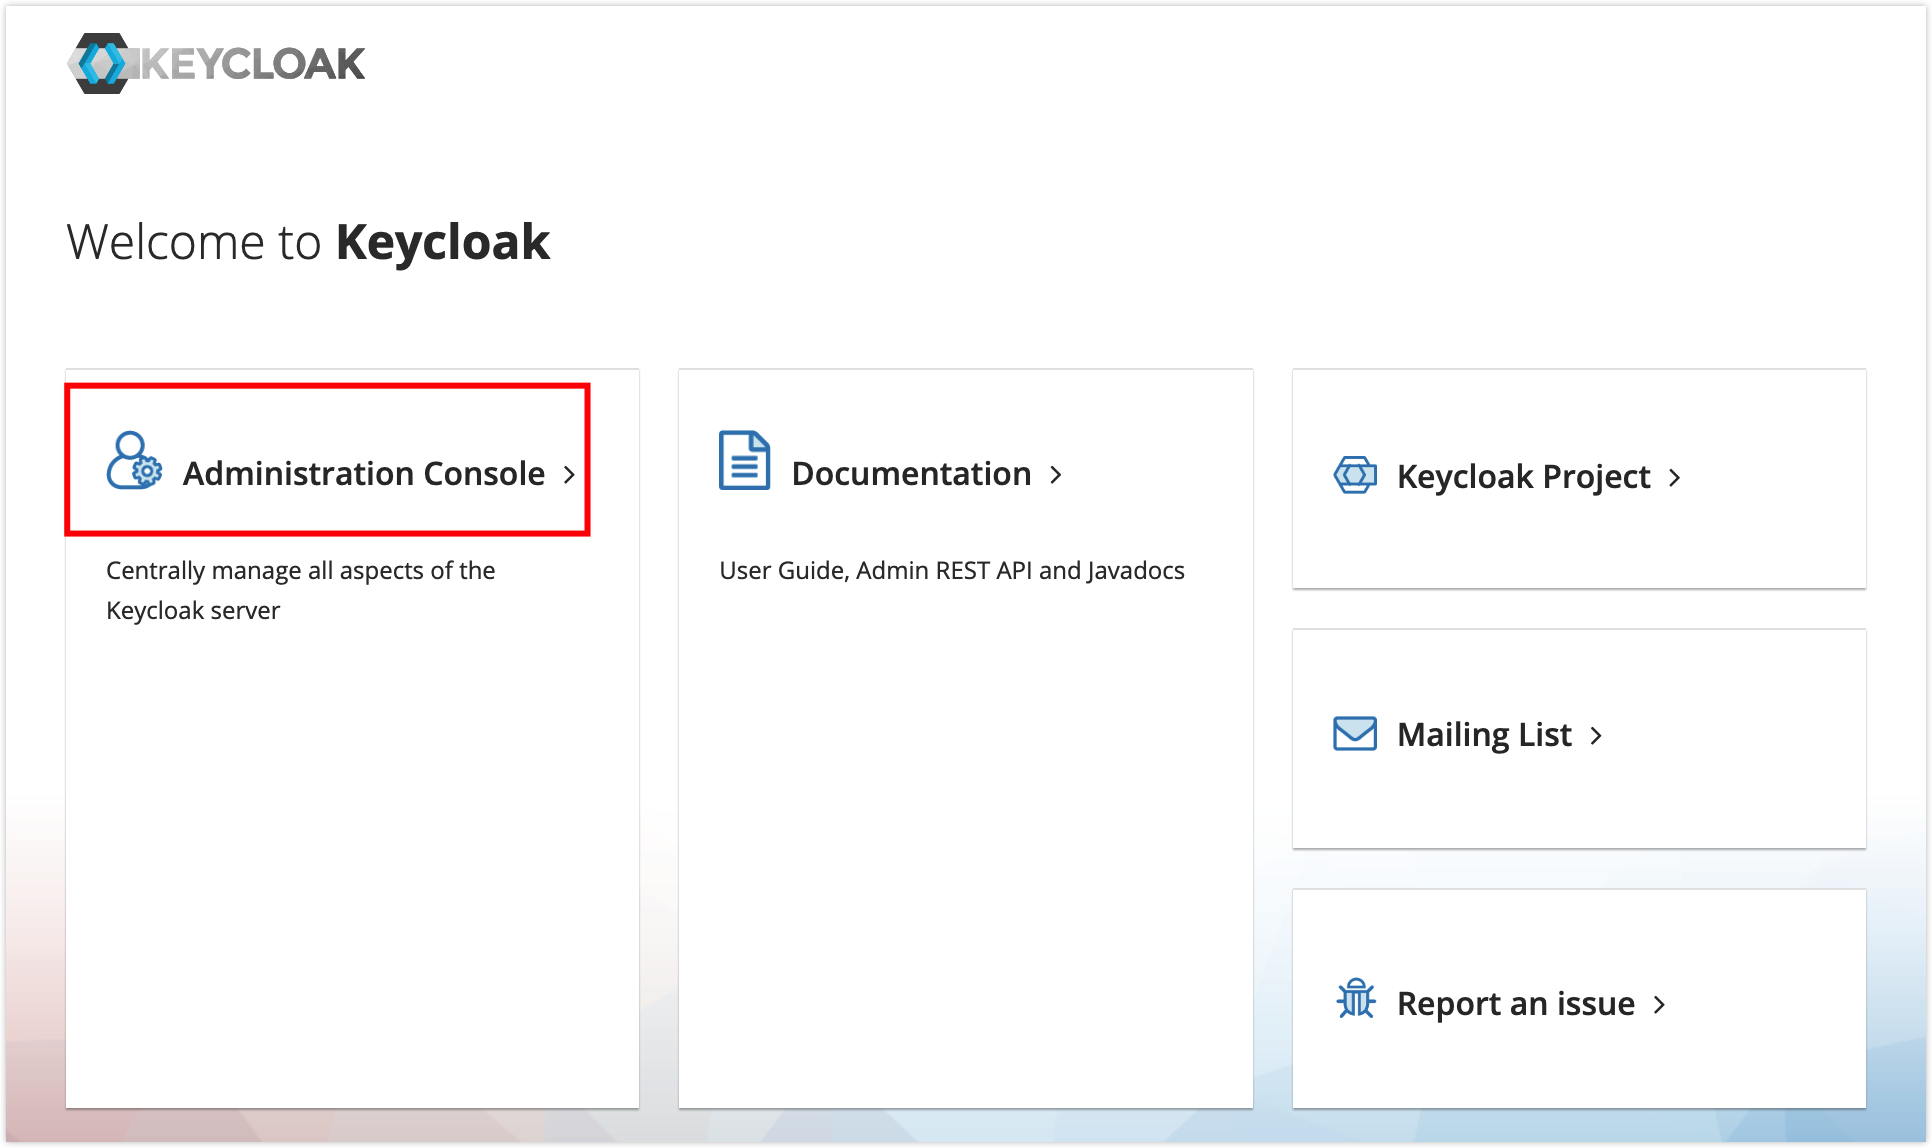
tip- The browser may block the first visit because this example uses a self-signed certificate. In Chrome, click Advanced, then click Continue to 192.168.2.33 (unsafe). Browser prompts vary.
- If the browser cannot open the page or shows
ERR_INVALID_HTTP_RESPONSE, make sure the URL uses HTTPS instead of HTTP.
On the login page, enter the login account and password, and click Log In.
- Login account: Use the
KEYCLOAK_USERvalue from the previous step. In this example, the account isadmin. - Password: Use the
KEYCLOAK_PASSWORDvalue from the previous step. In this example, the password isadmin.
- Login account: Use the
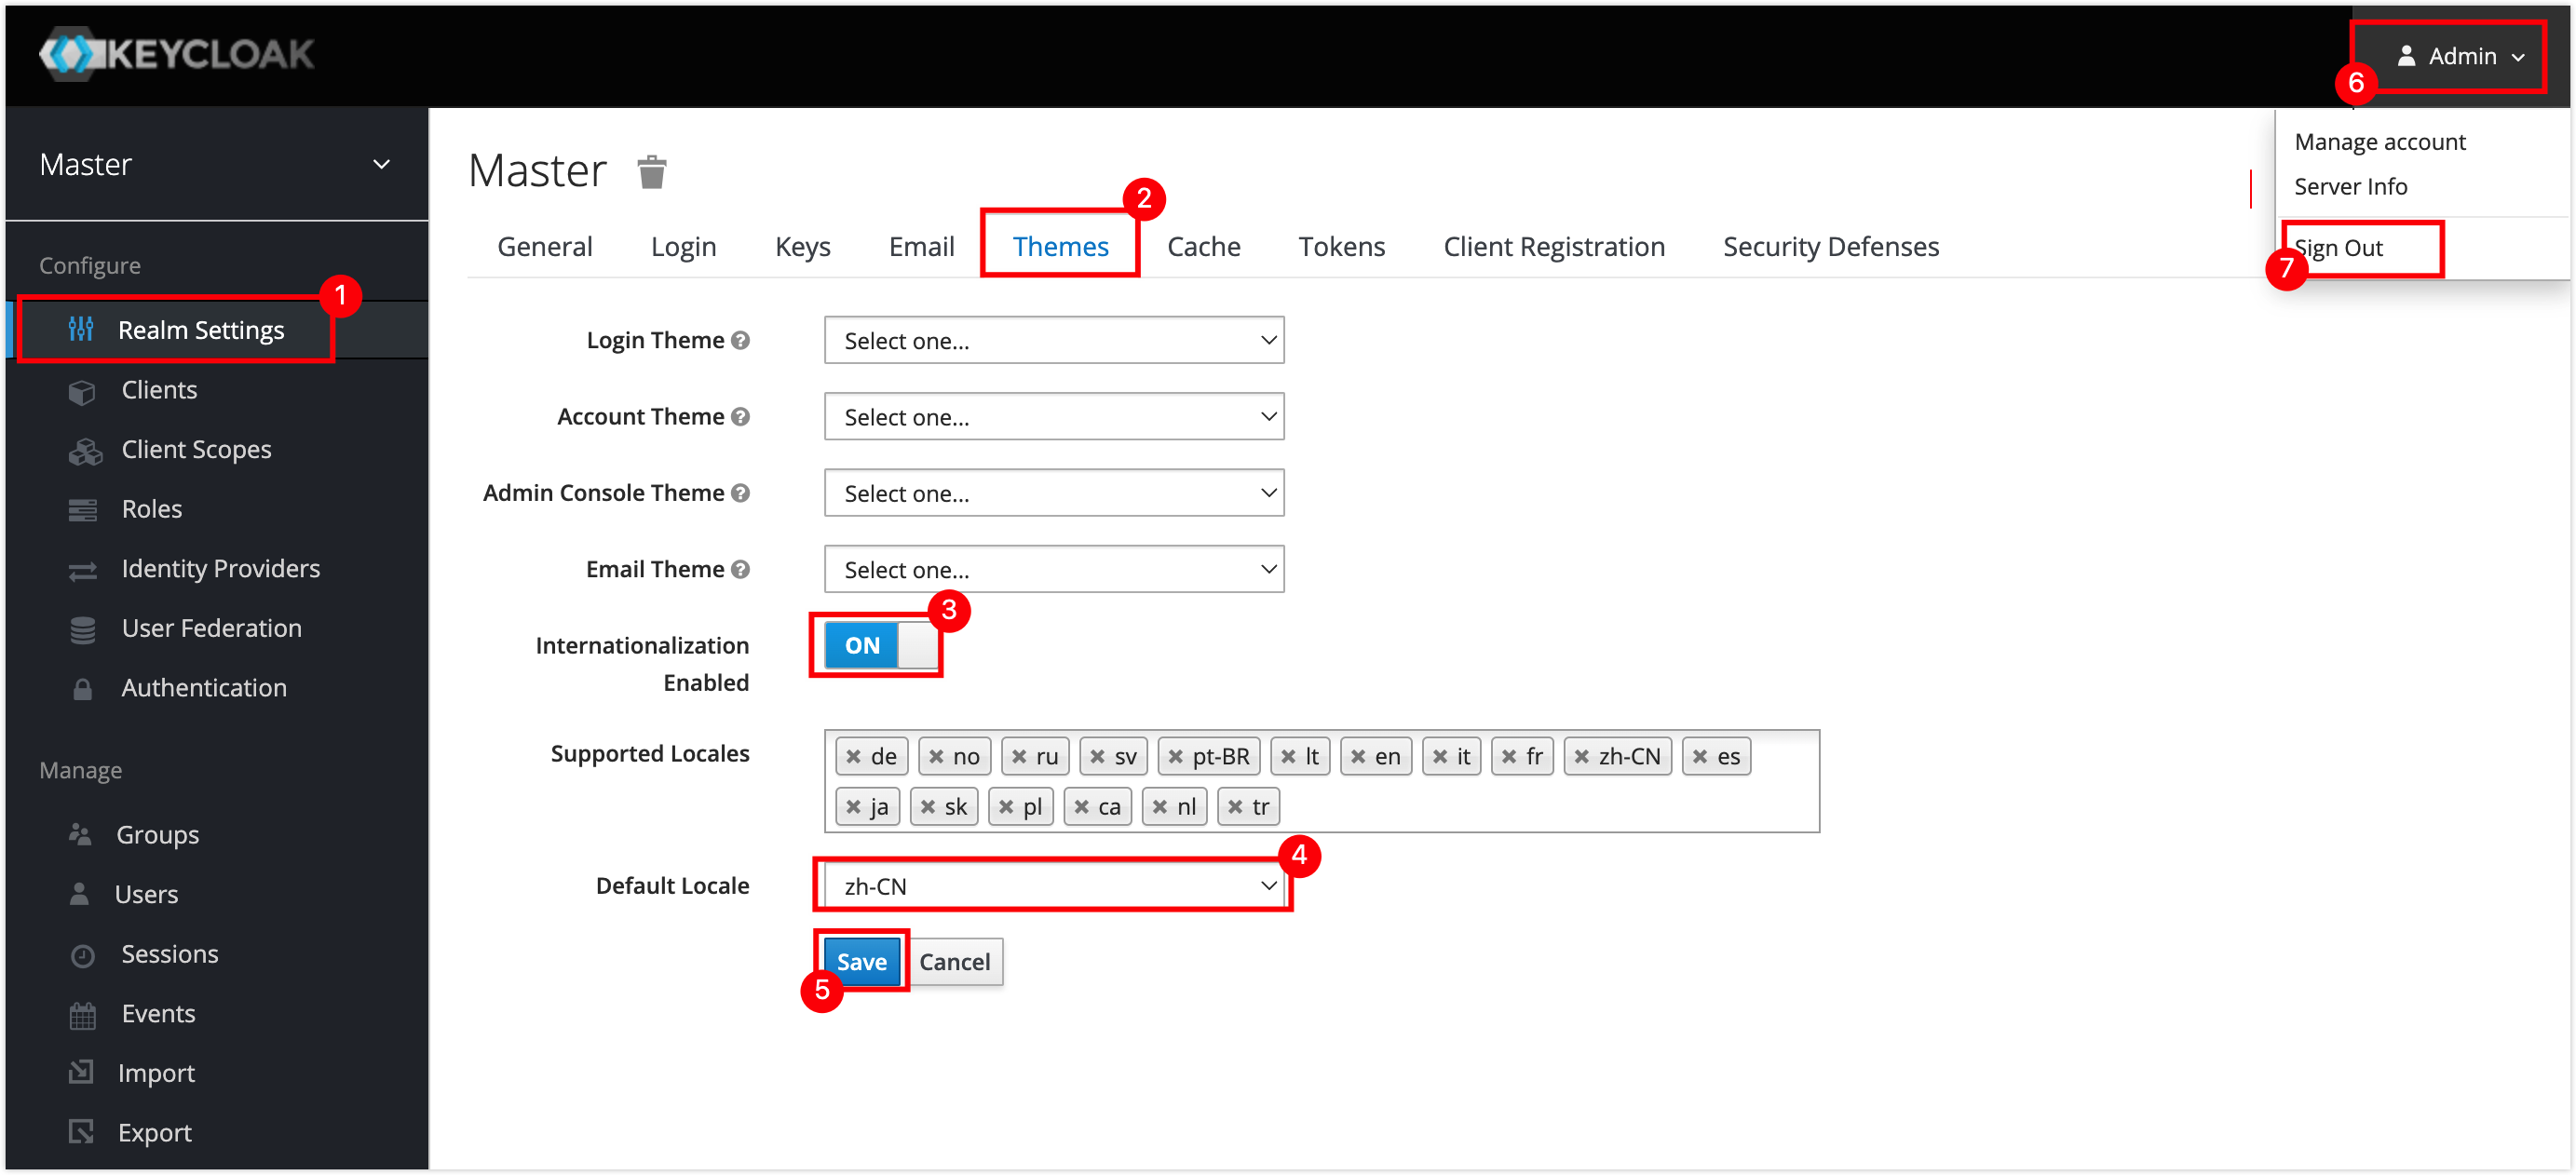
(Optional) Enable the Chinese interface.
Open Realm Settings, then open the Themes tab. Update the theme settings and sign out to apply the change.
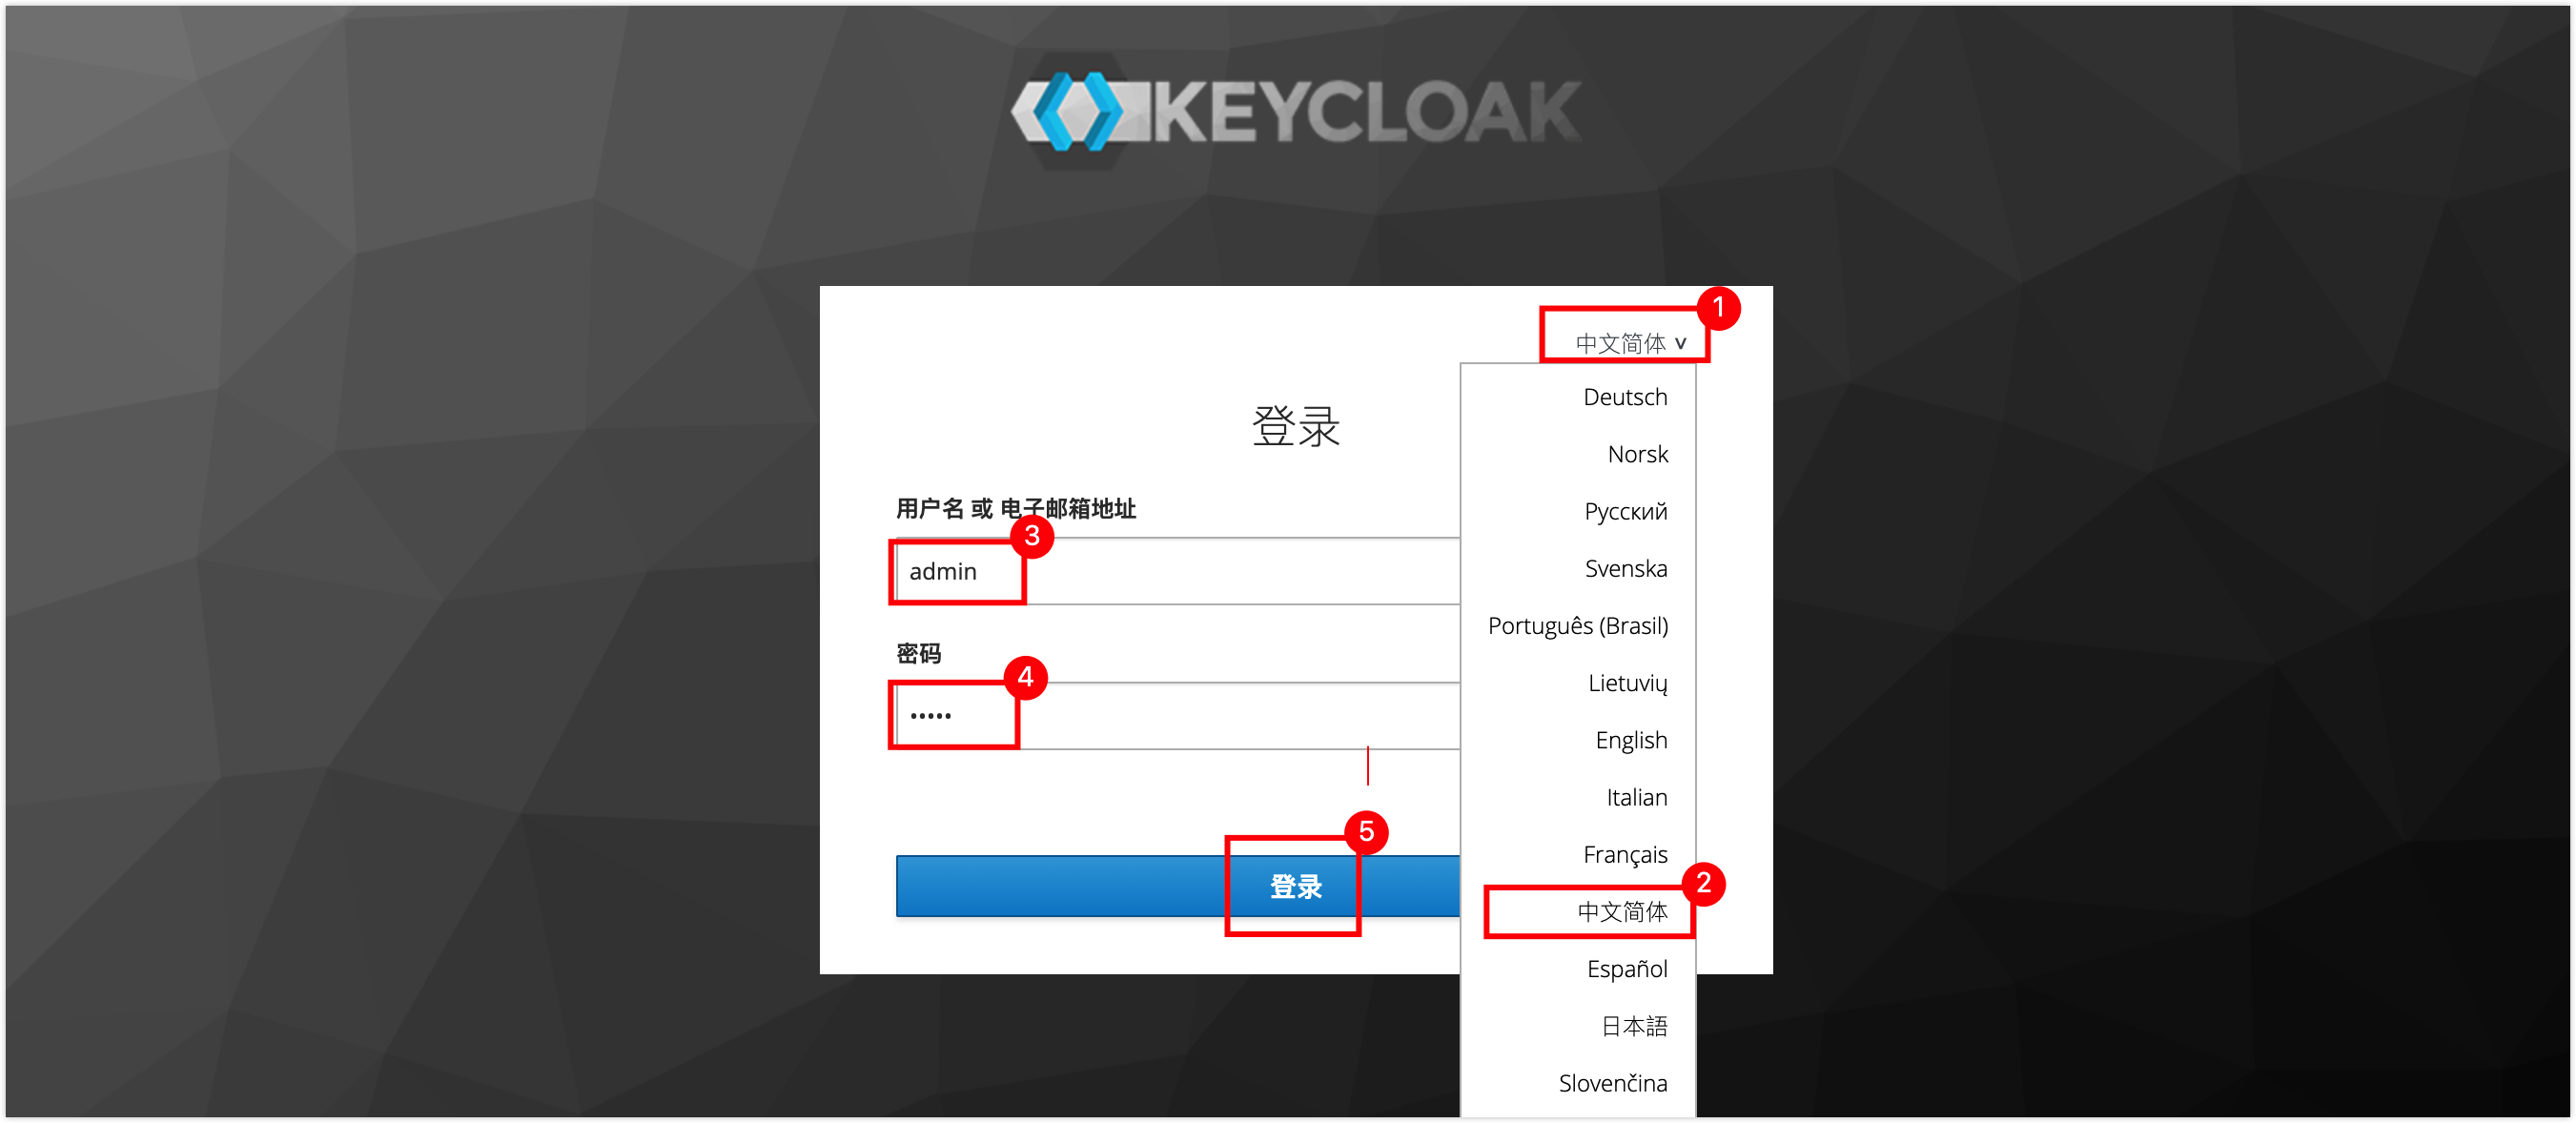
Switch the language once, then sign back in to Keycloak.
Open User Federation, then select ldap as the user database.
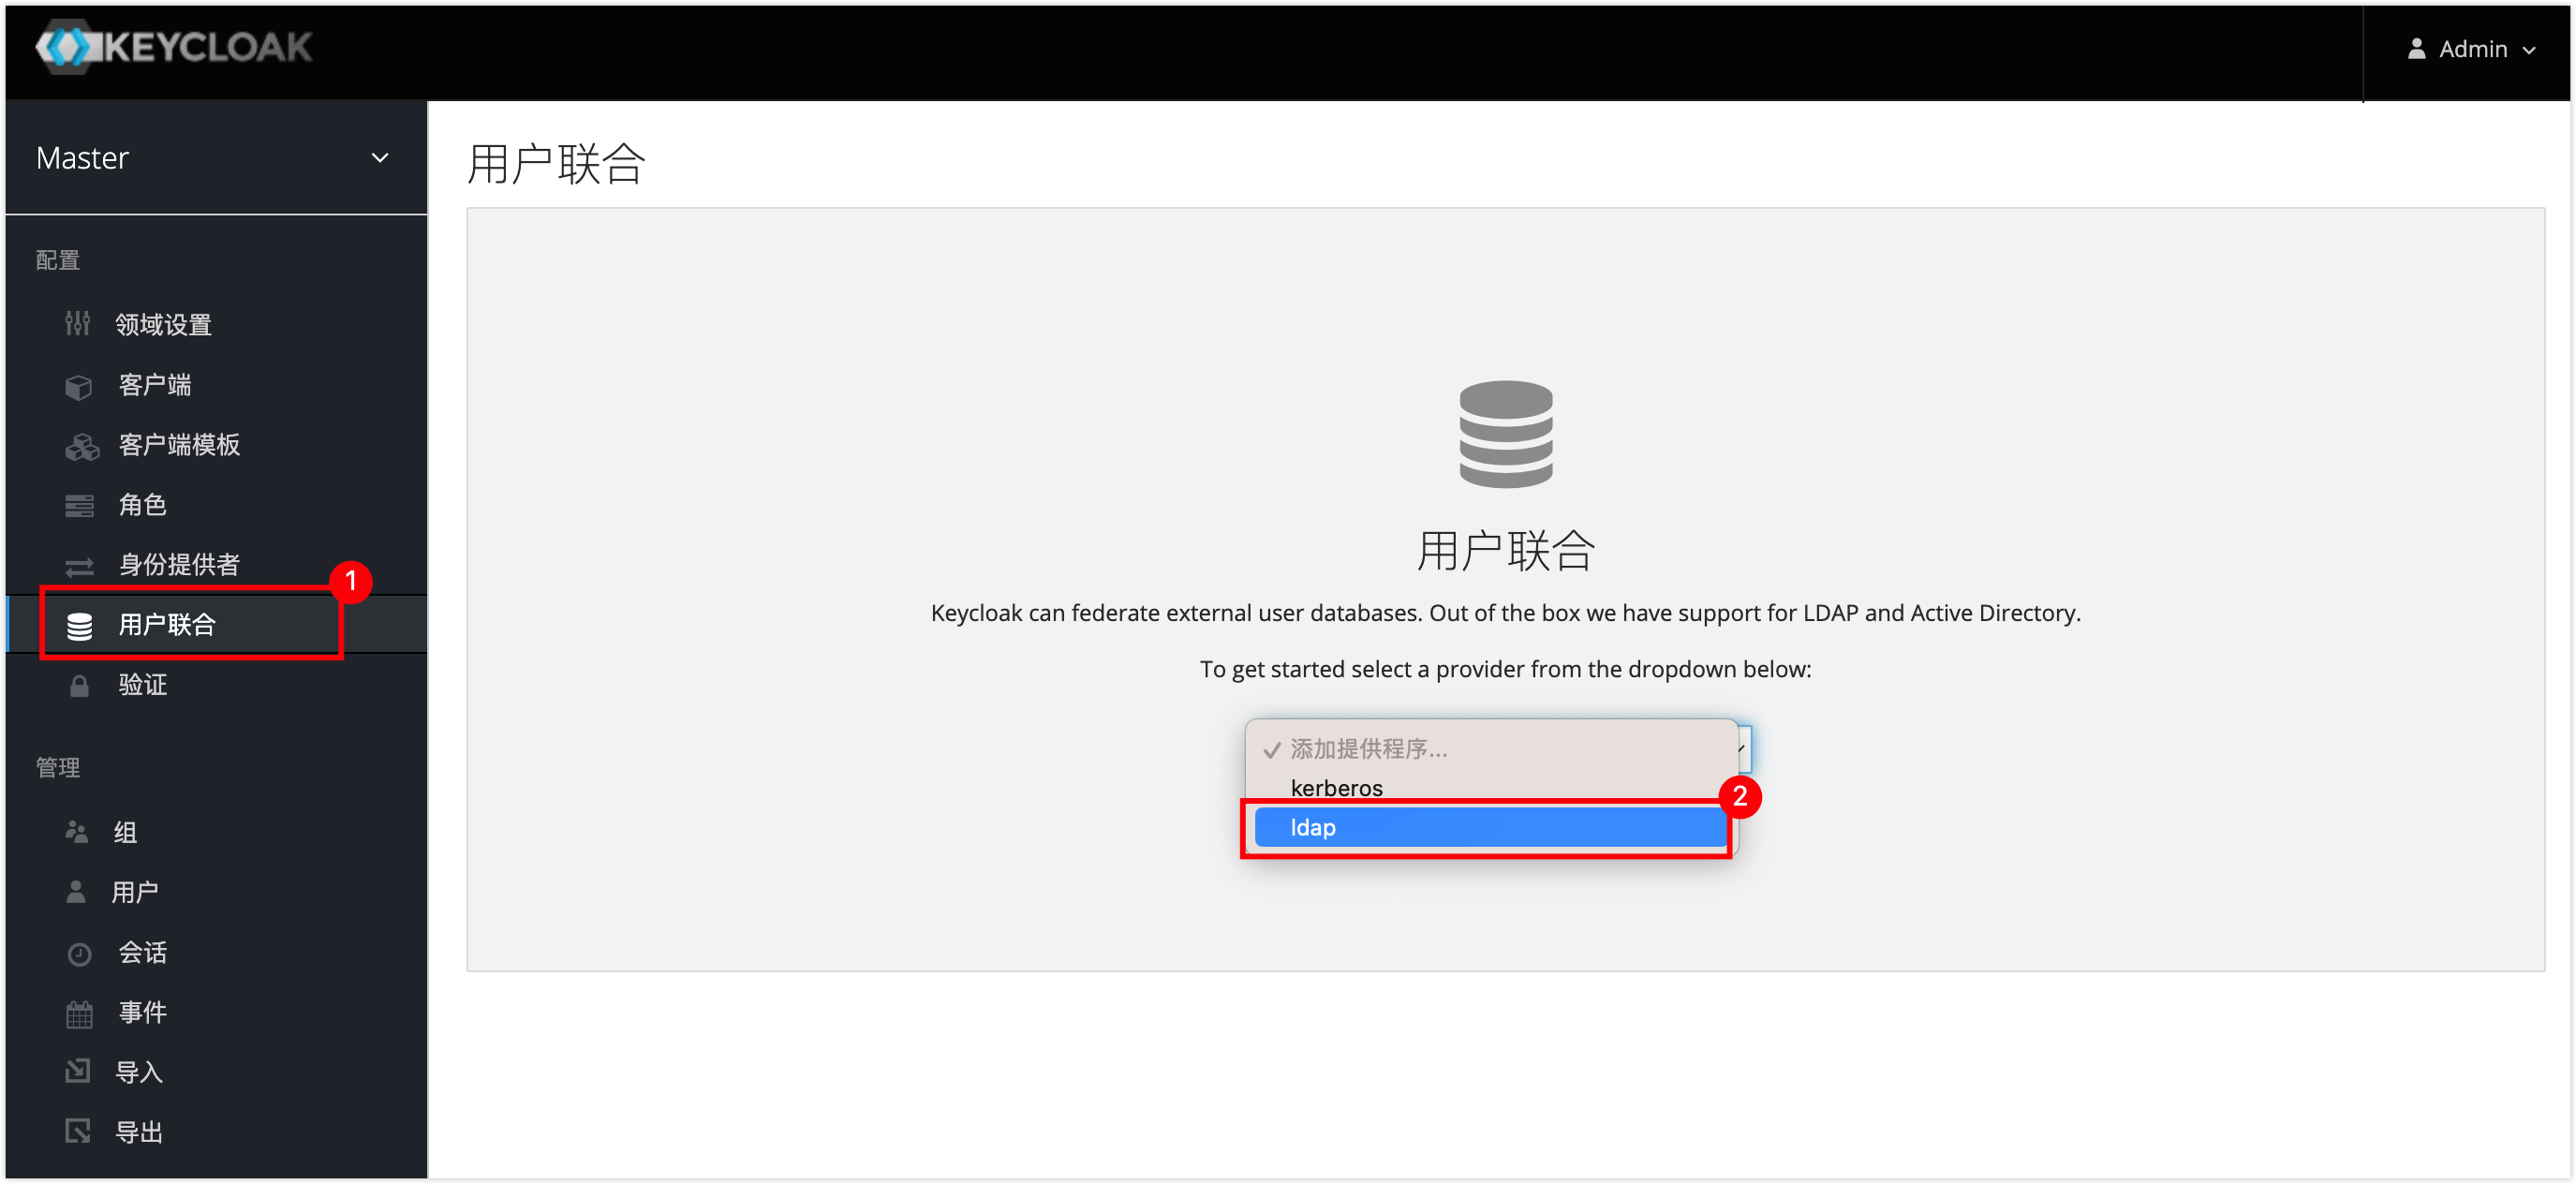
On the Add User Federation Provider page, configure the provider settings shown in the numbered screenshot.
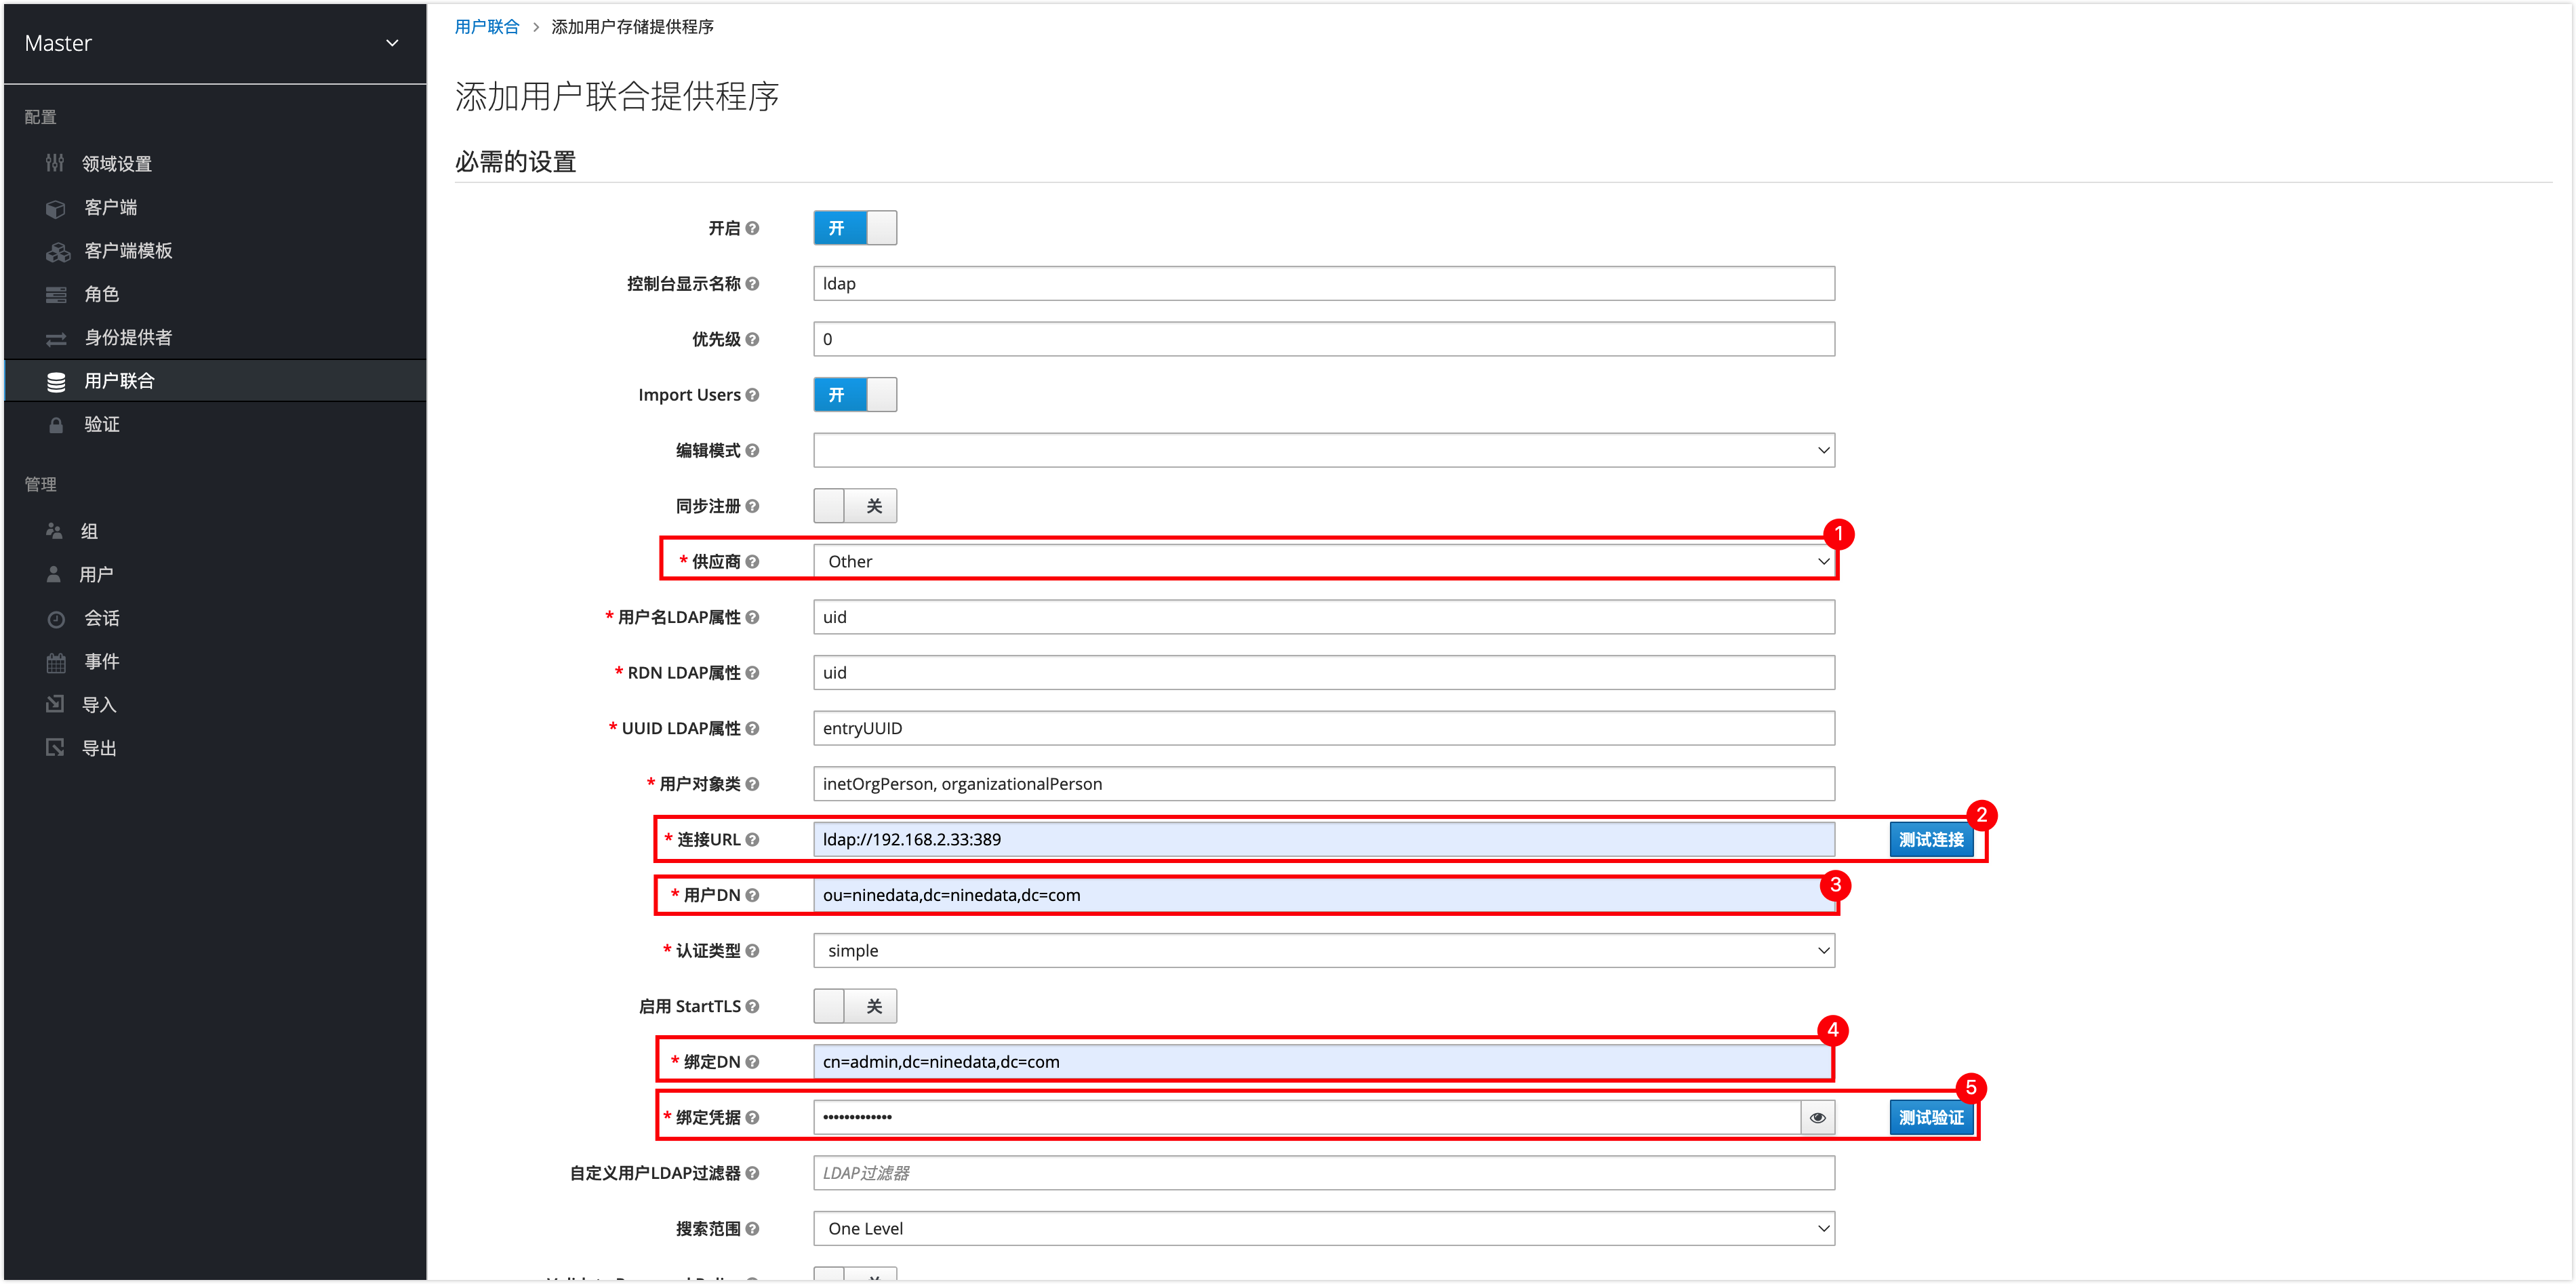

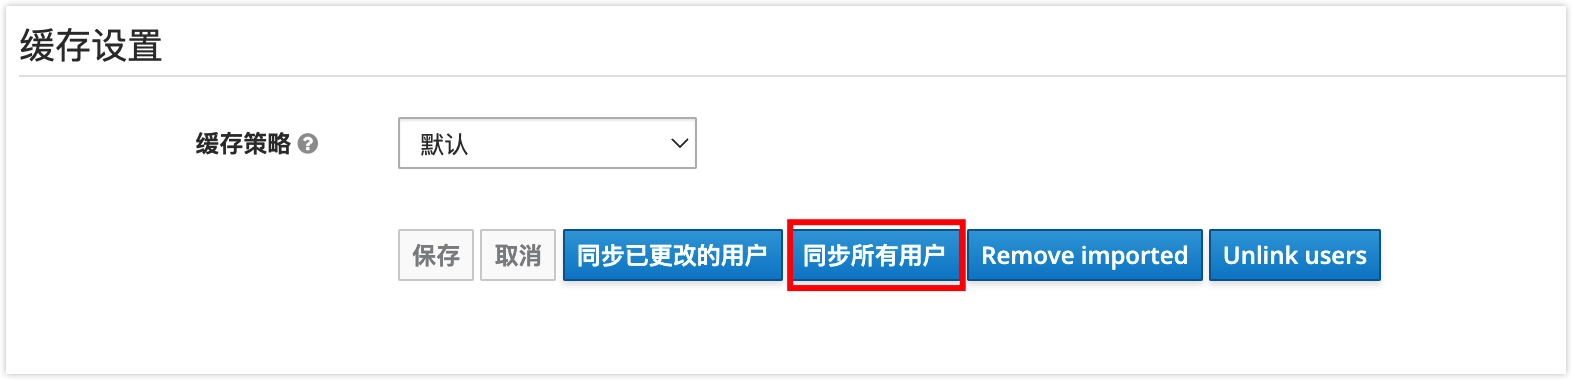
Number Description 1 Select ldap as the provider. 2 Enter the connection address of the OpenLDAP service, format: ldap://<OpenLDAP server IP>:<port>. Then click Test Connection to test the connectivity.3 Composed of the organization name and domain name, format: ou=<Organization Name>,dc=<Service Domain Name>,dc=<Service Domain Name>. Example:ou=ninedata,dc=ninedata,dc=com.4 Composed of the administrator username and domain name, format: cn=<Administrator Username>,dc=<Service Domain Name>,dc=<Service Domain Name>. Example:cn=admin,dc=ninedata,dc=com.5 Enter the administrator password for accessing OpenLDAP. 6 Enable Periodic Full Sync so OpenLDAP member additions, deletions, and updates are synchronized at regular intervals. 7 Save changes. After you click Save, the page shows Success! The provider has been created. Click Sync All Users to synchronize OpenLDAP users into Keycloak.
Open Realm Settings, right-click SAML Metadata, and save it as a
.xmlfile for later use.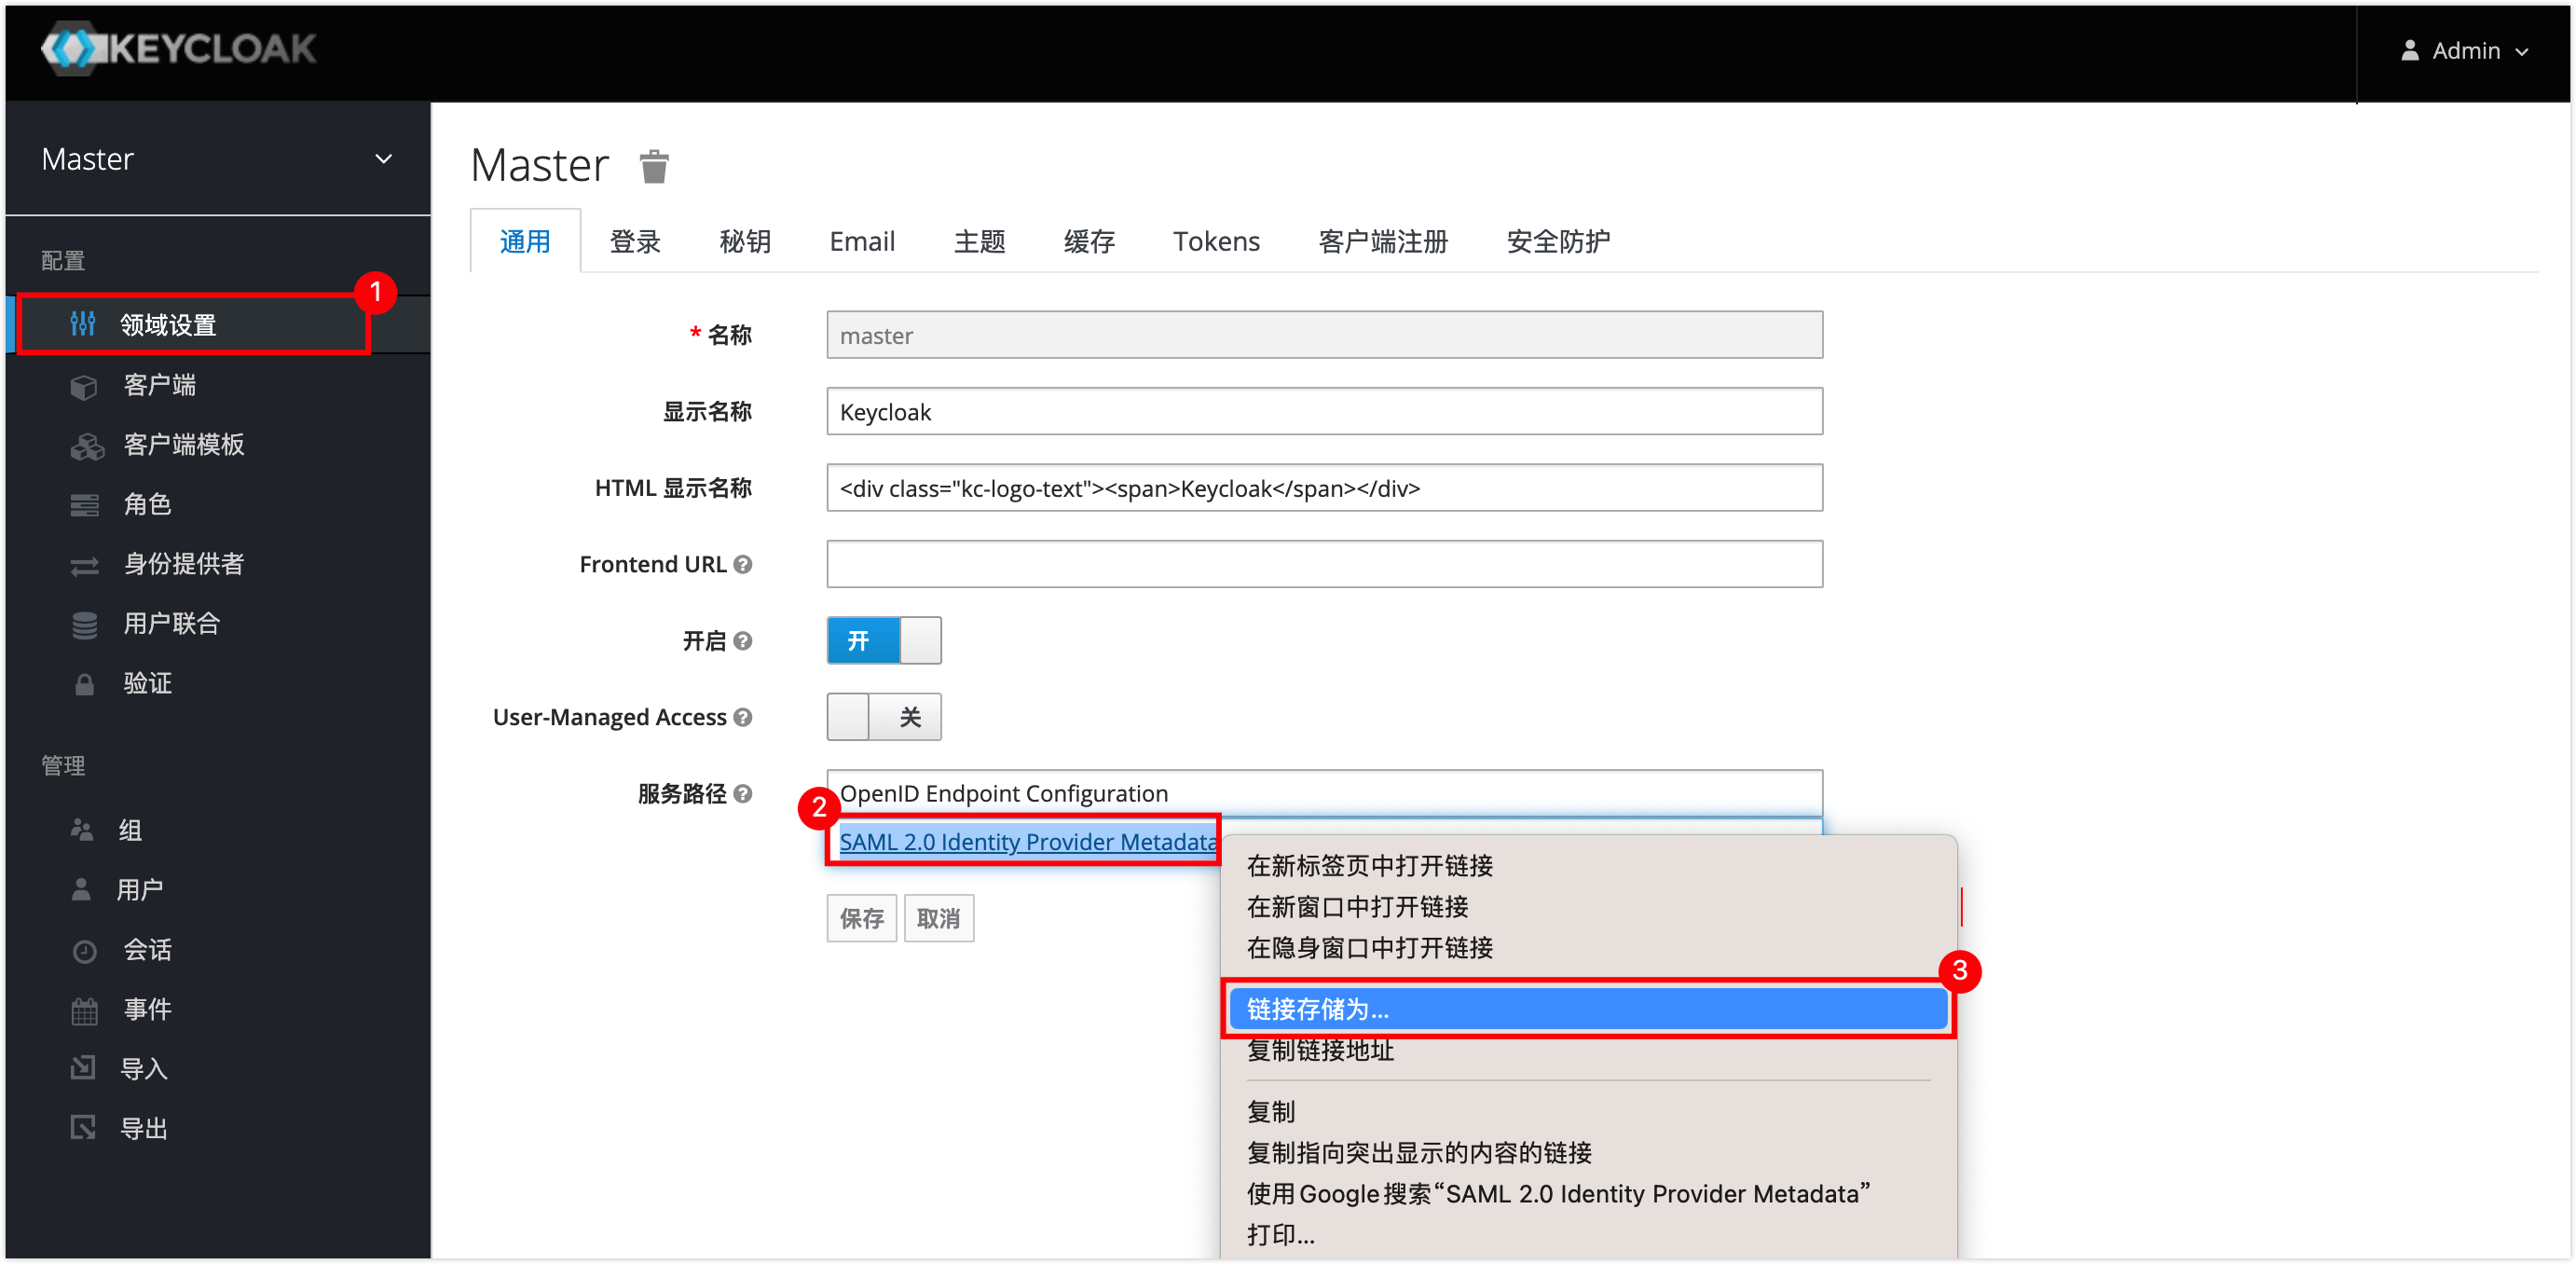
Step 5: Configure NineData SSO login
Before you begin
Your role must be "Administrator". For more information about roles, see Roles.
Procedure
Sign in to the NineData Console.
Open Account > **Organization**, and configure the numbered SSO settings in the screenshot.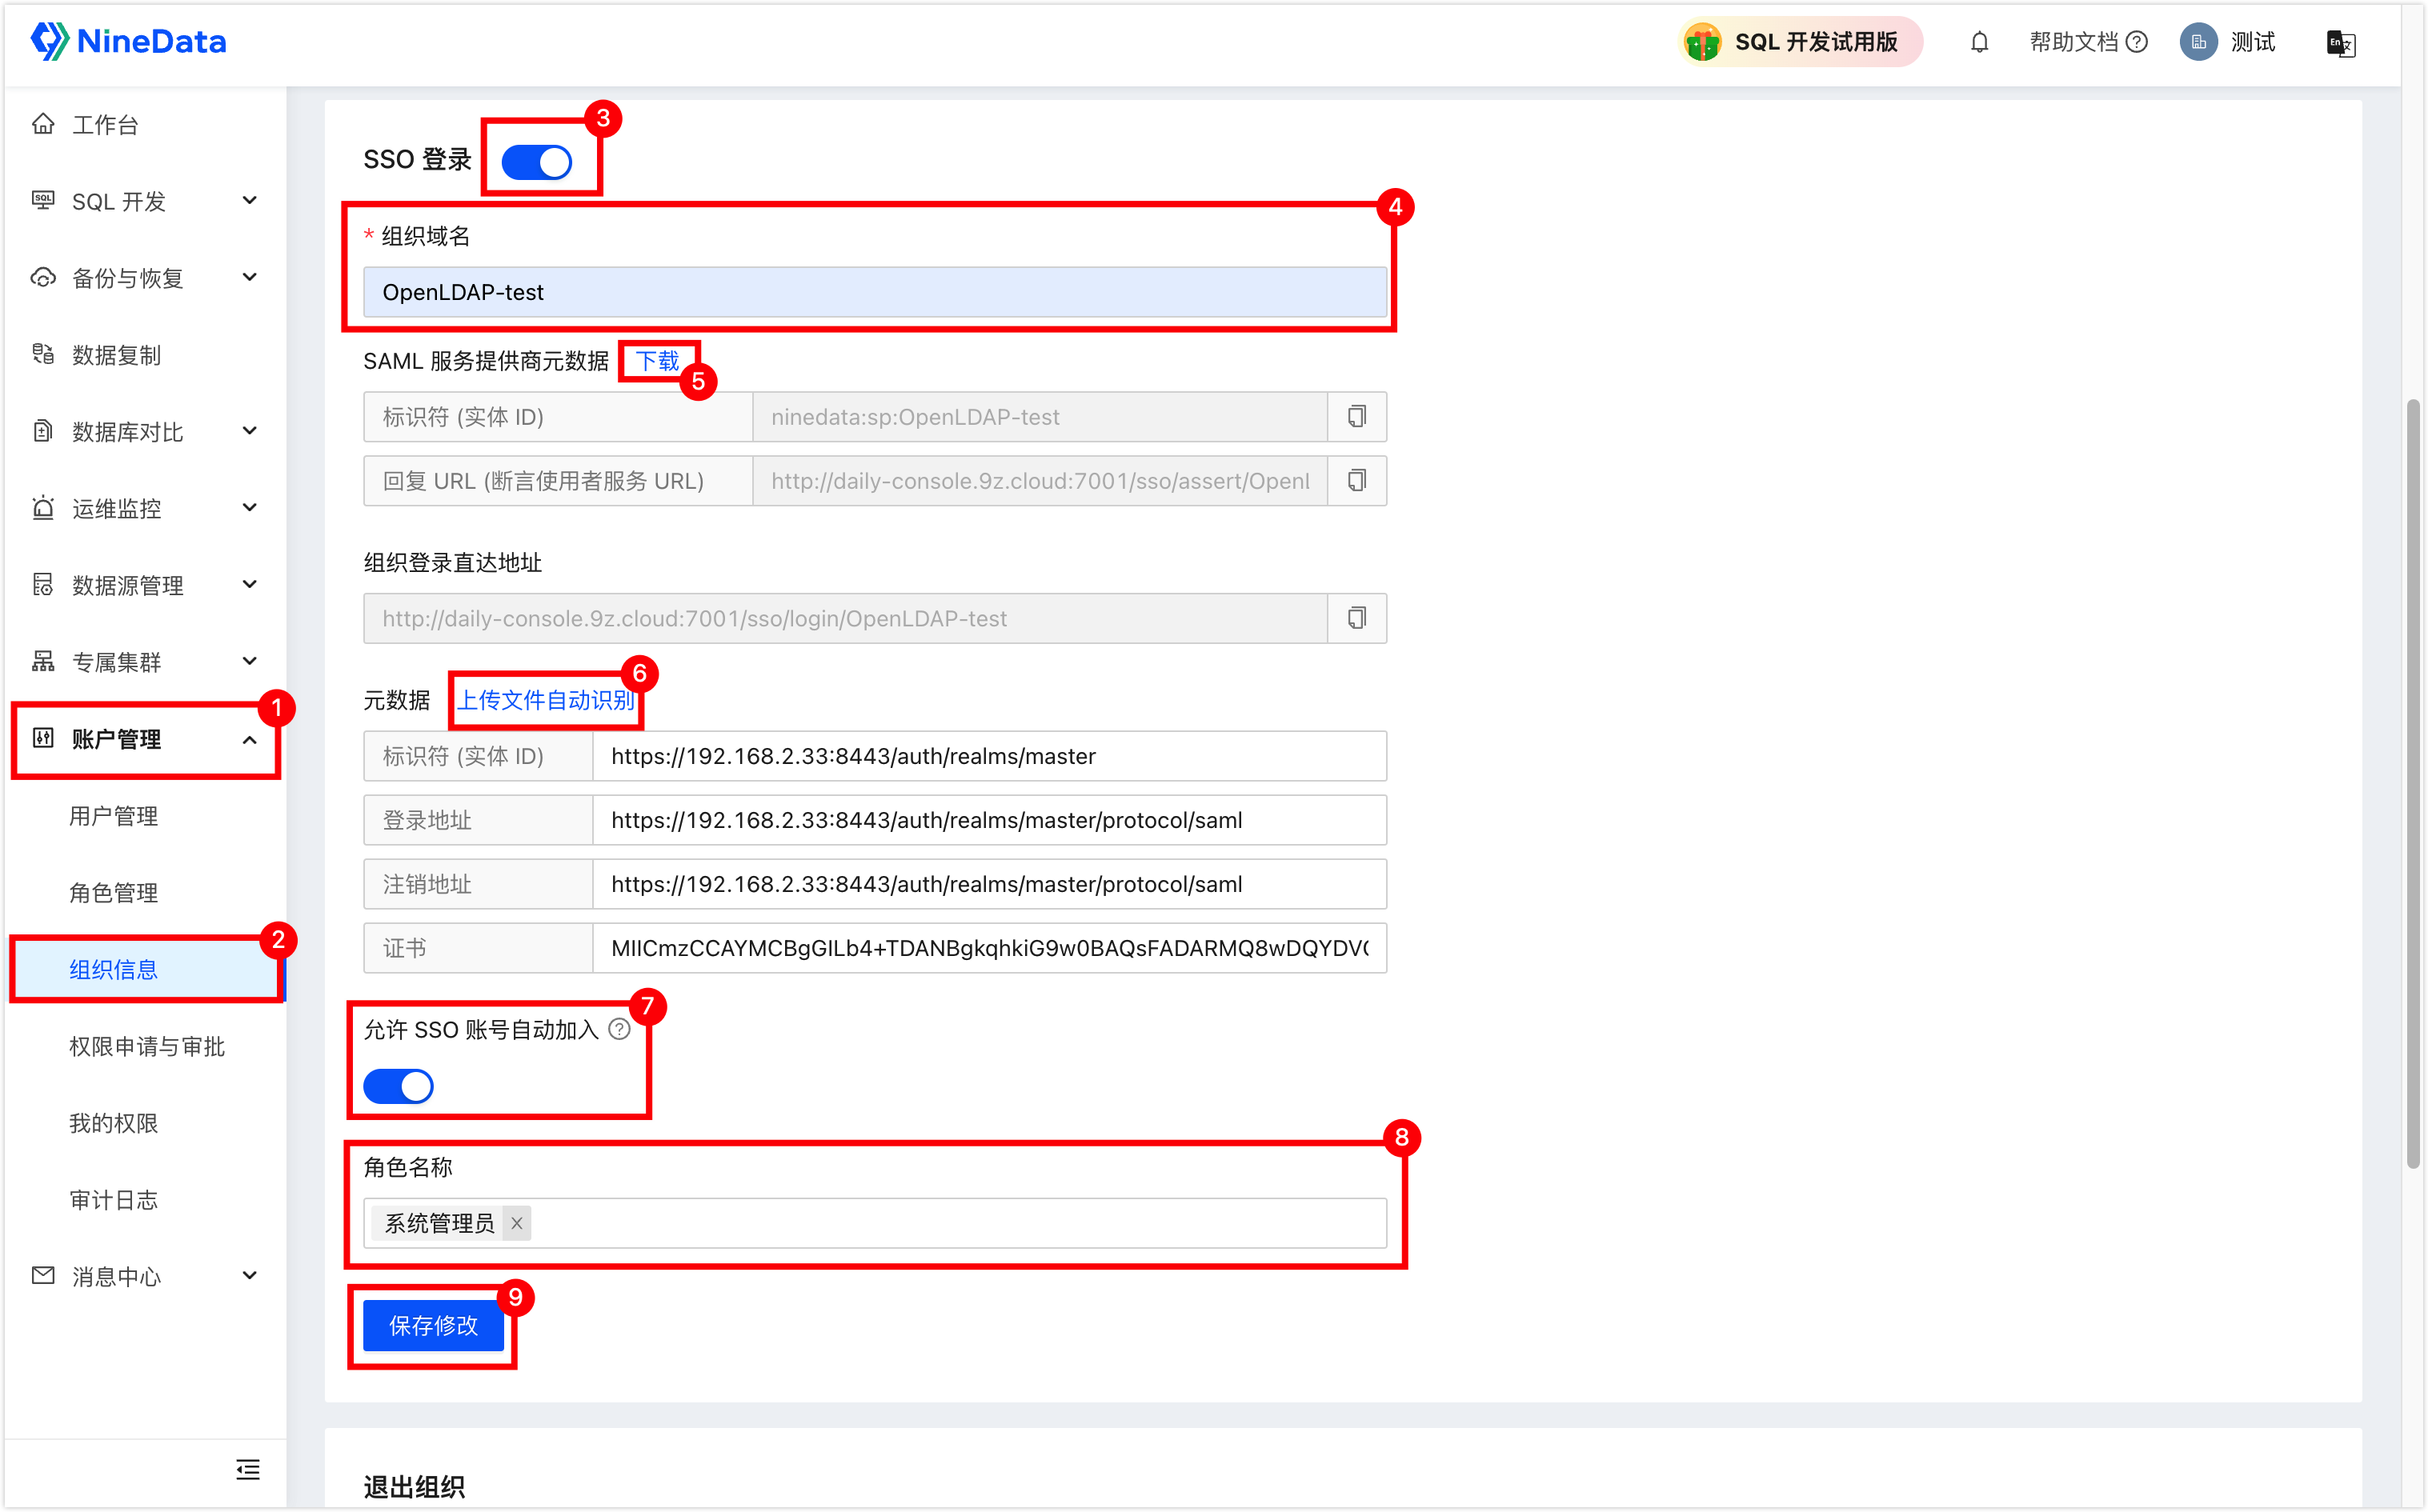
Number Description 3 Turn on the SSO login switch. 4 Enter the SSO organization name. After you enter the name, SAML Service Provider Metadata generates Identifier (Entity ID) and Reply URL (Assertion URL). 5 Download the metadata file for later use. 6 Click Upload File to Auto-recognition, select the SAML metadata downloaded from Keycloak, and let NineData parse and populate the metadata fields. 7 Turn on this option when NineData should add users during their first SSO sign-in. With this option enabled, skip manual SSO user creation in NineData. 8 Optional when Allow SSO Account Auto-join is turned on. Specify the default role for newly joined SSO users. Select one or more roles. 9 Save changes. Sign in to Keycloak with the administrator account. In this example, the account and password are
admin/admin. Open Clients, then click Create.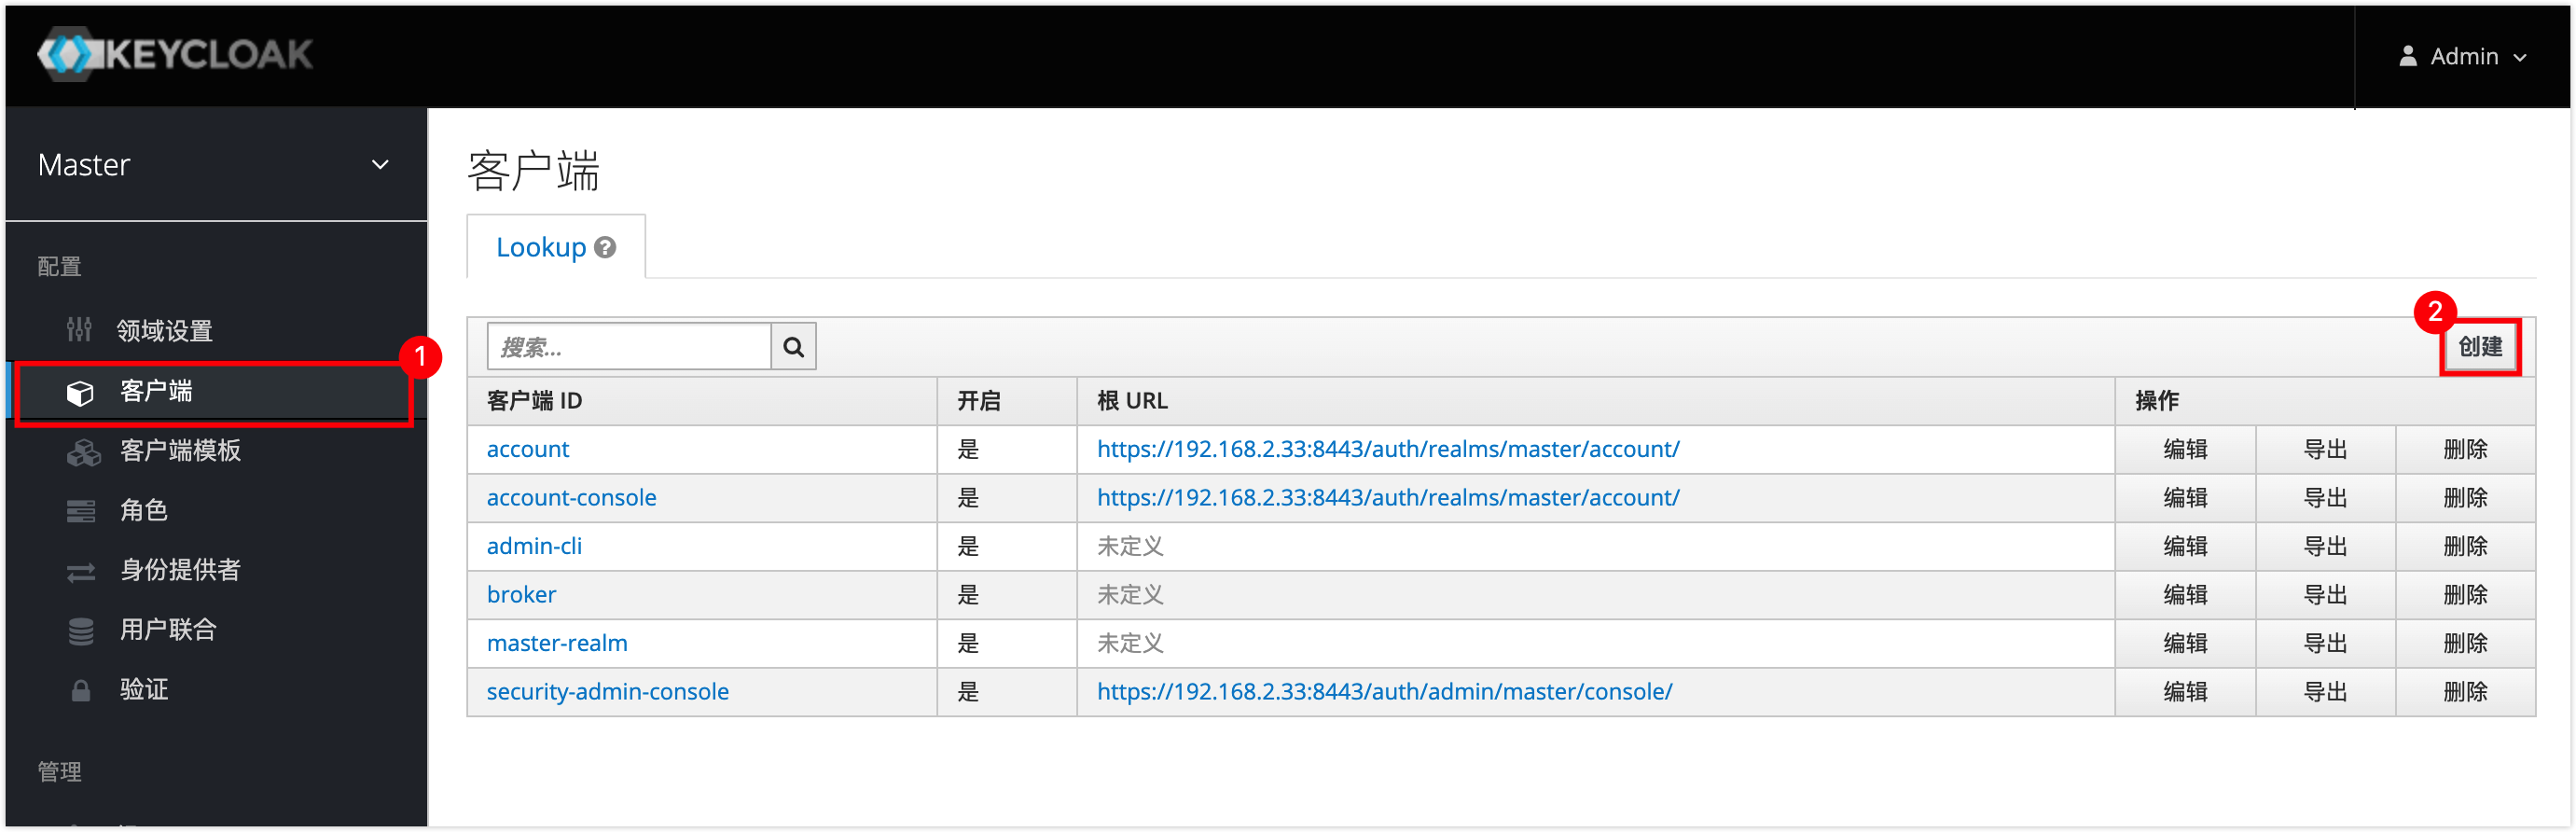
On the Add Client page, click Select File and import the
.xmlmetadata file downloaded from the NineData console (Step 1, Number 5). Click Save to open the client configuration page, turn off Require Client Signature, scroll down, and click Save.Open Account > Organization, copy Org Login URL, and share it with the user. The user can then sign in to NineData with their own Keycloak account.
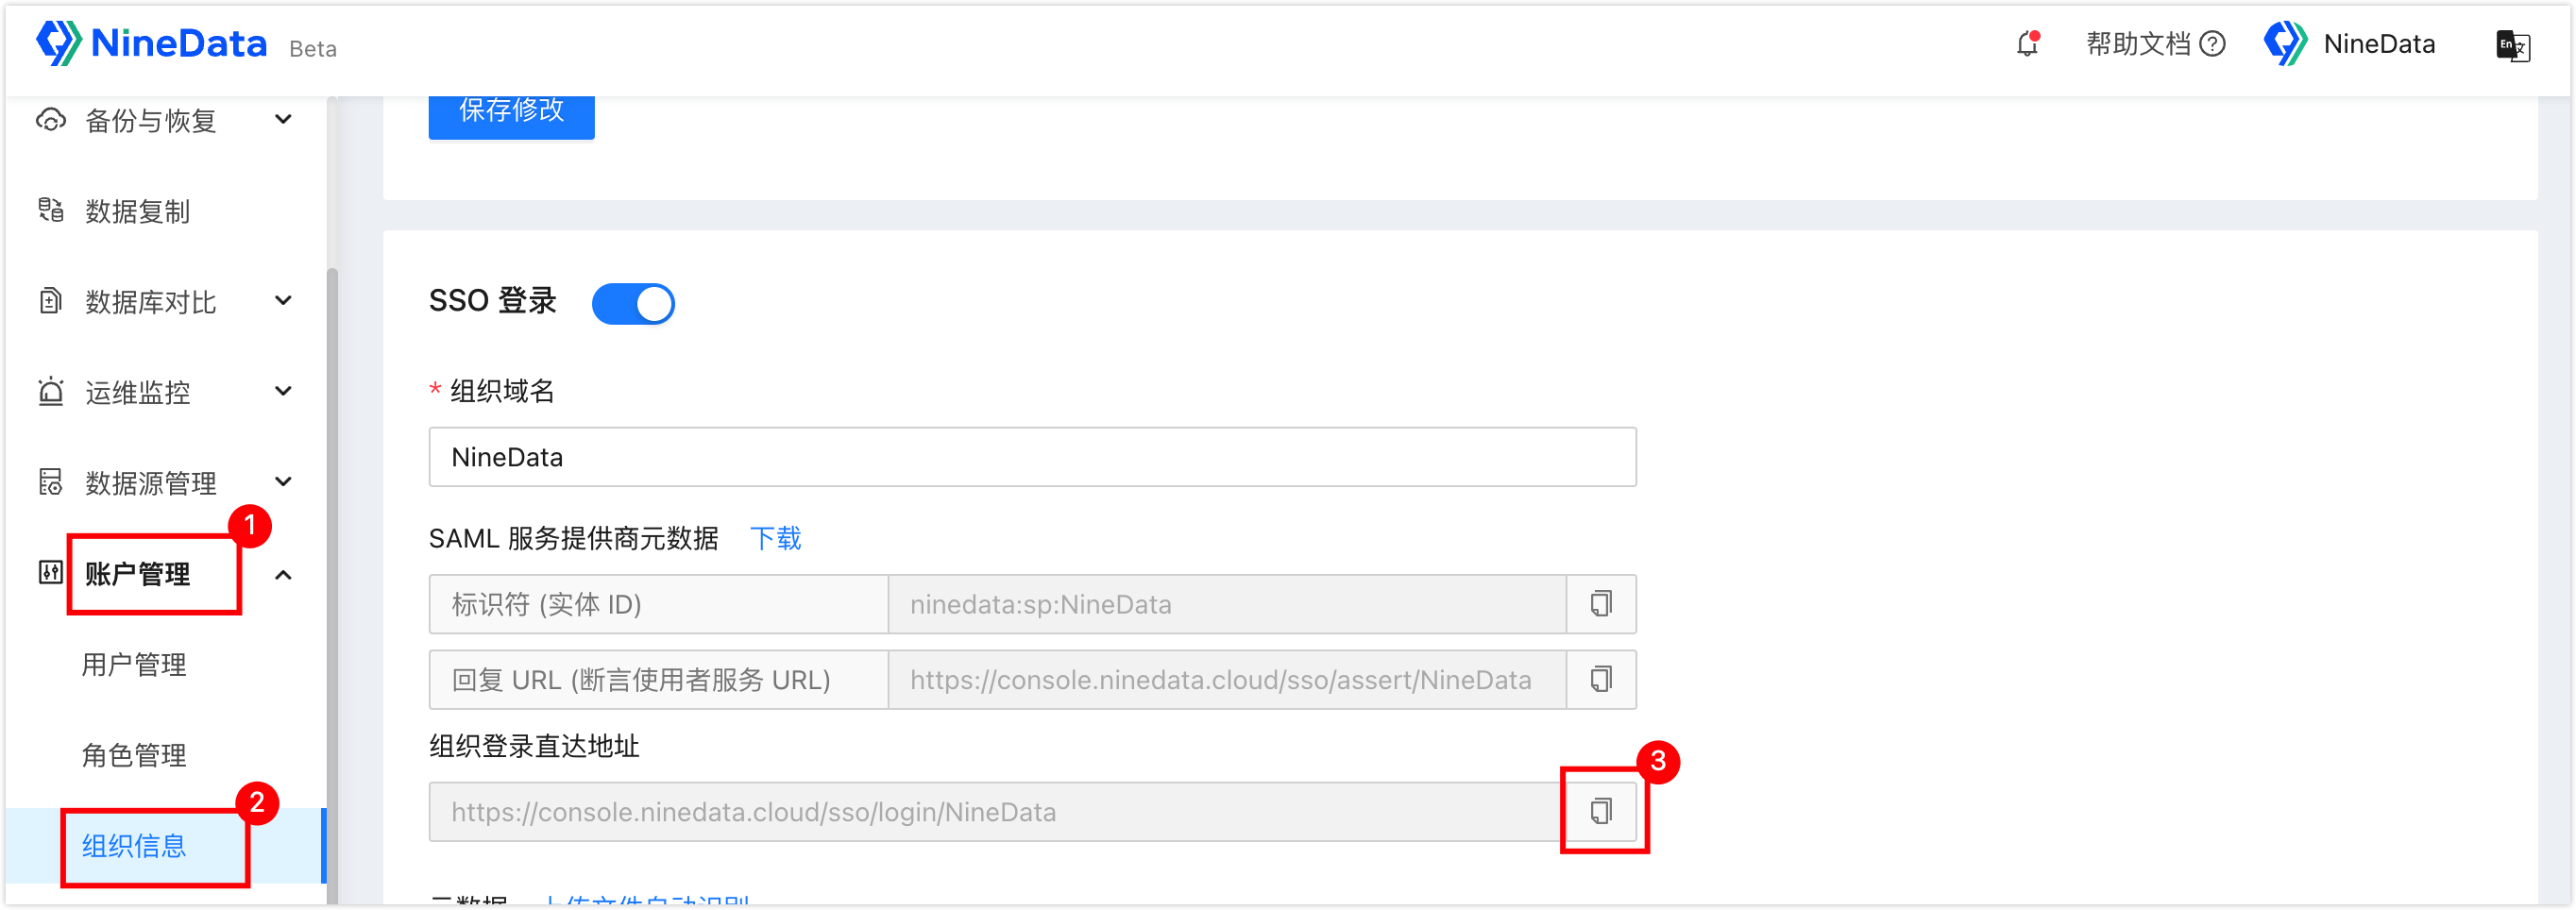
Step 6: Sign in to NineData through SSO
Before you begin
Users must have Org Login URL from the administrator.
Procedure
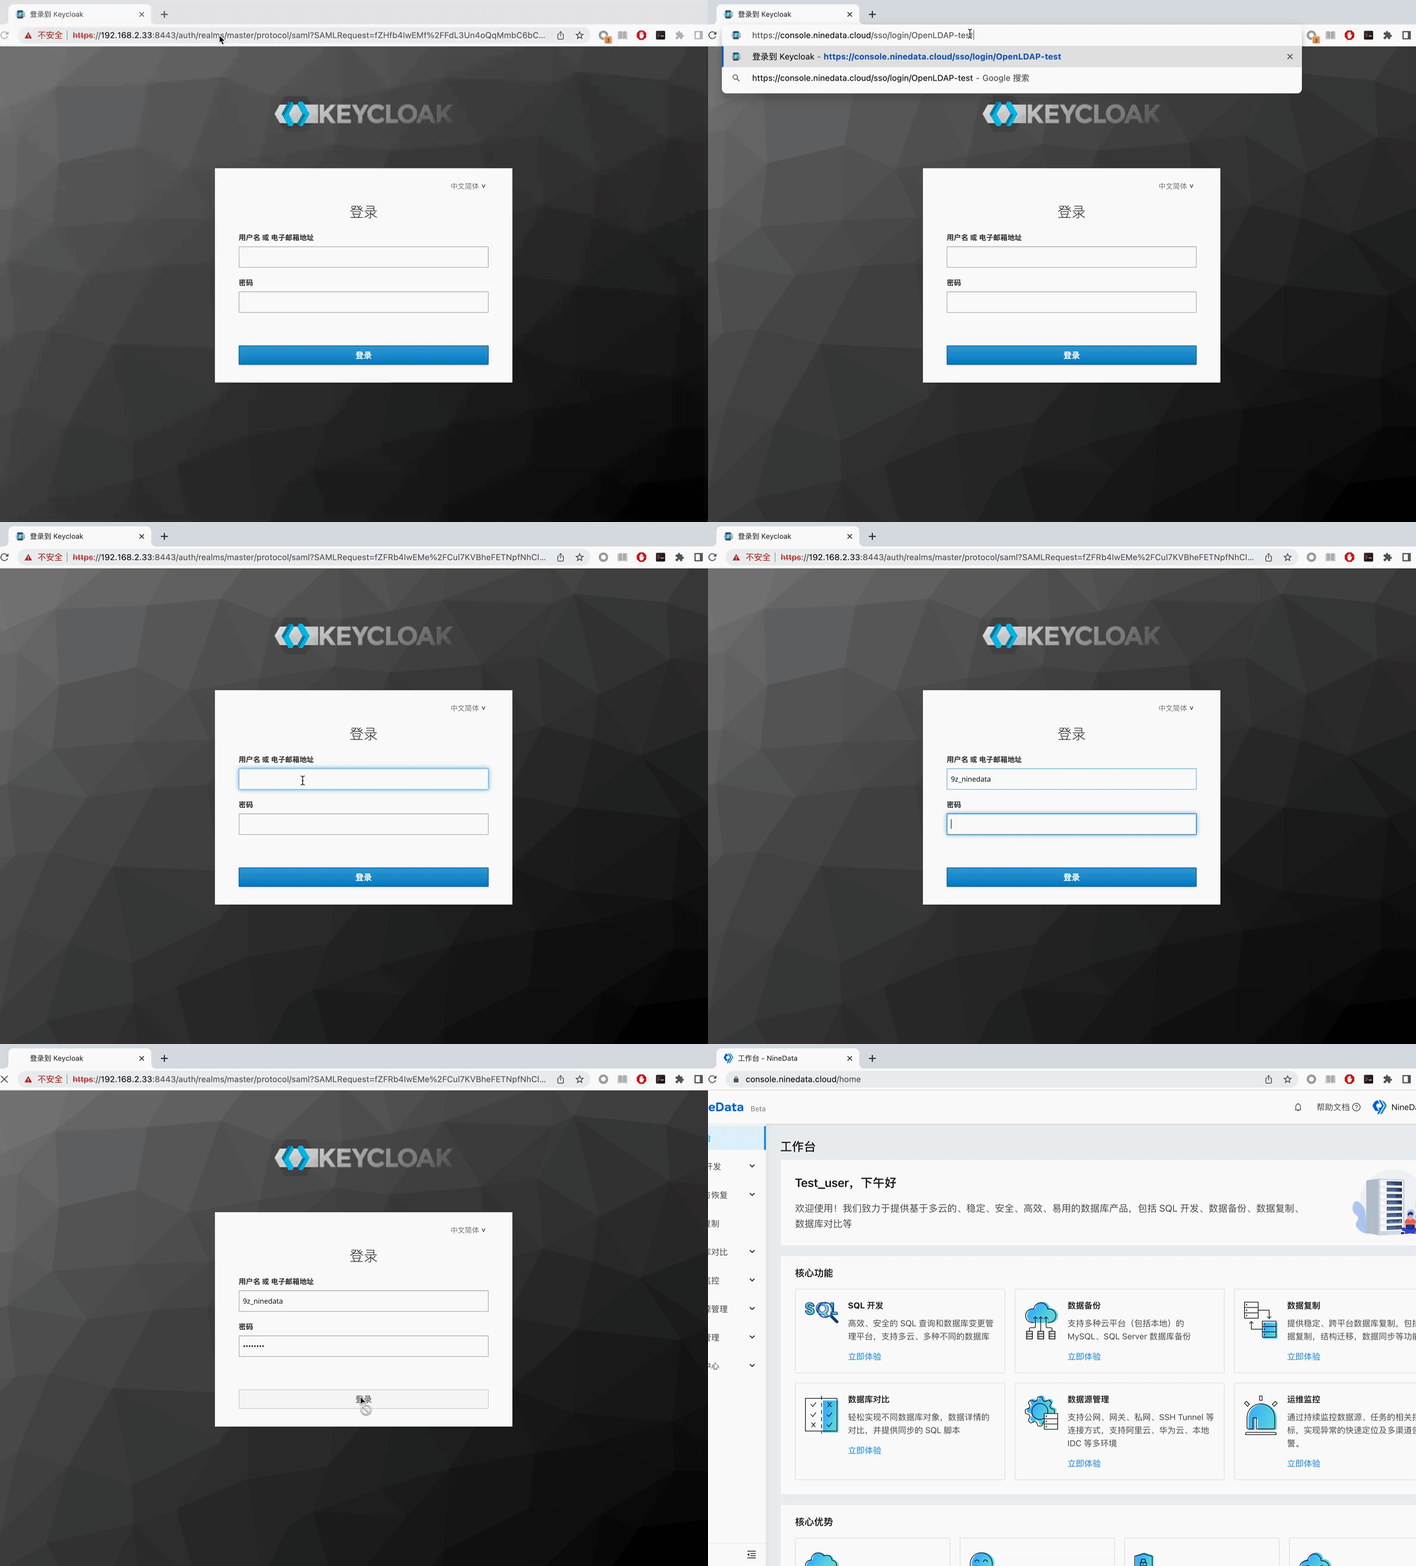
Open Org Login URL in a browser. The page redirects to the Keycloak login page.
Enter the username and password, then click Log In to open the NineData console.
 tip
tipThe username and password must match the OpenLDAP user created by the administrator. See Add Organization and Users.
New users must complete the profile prompts before they can continue.
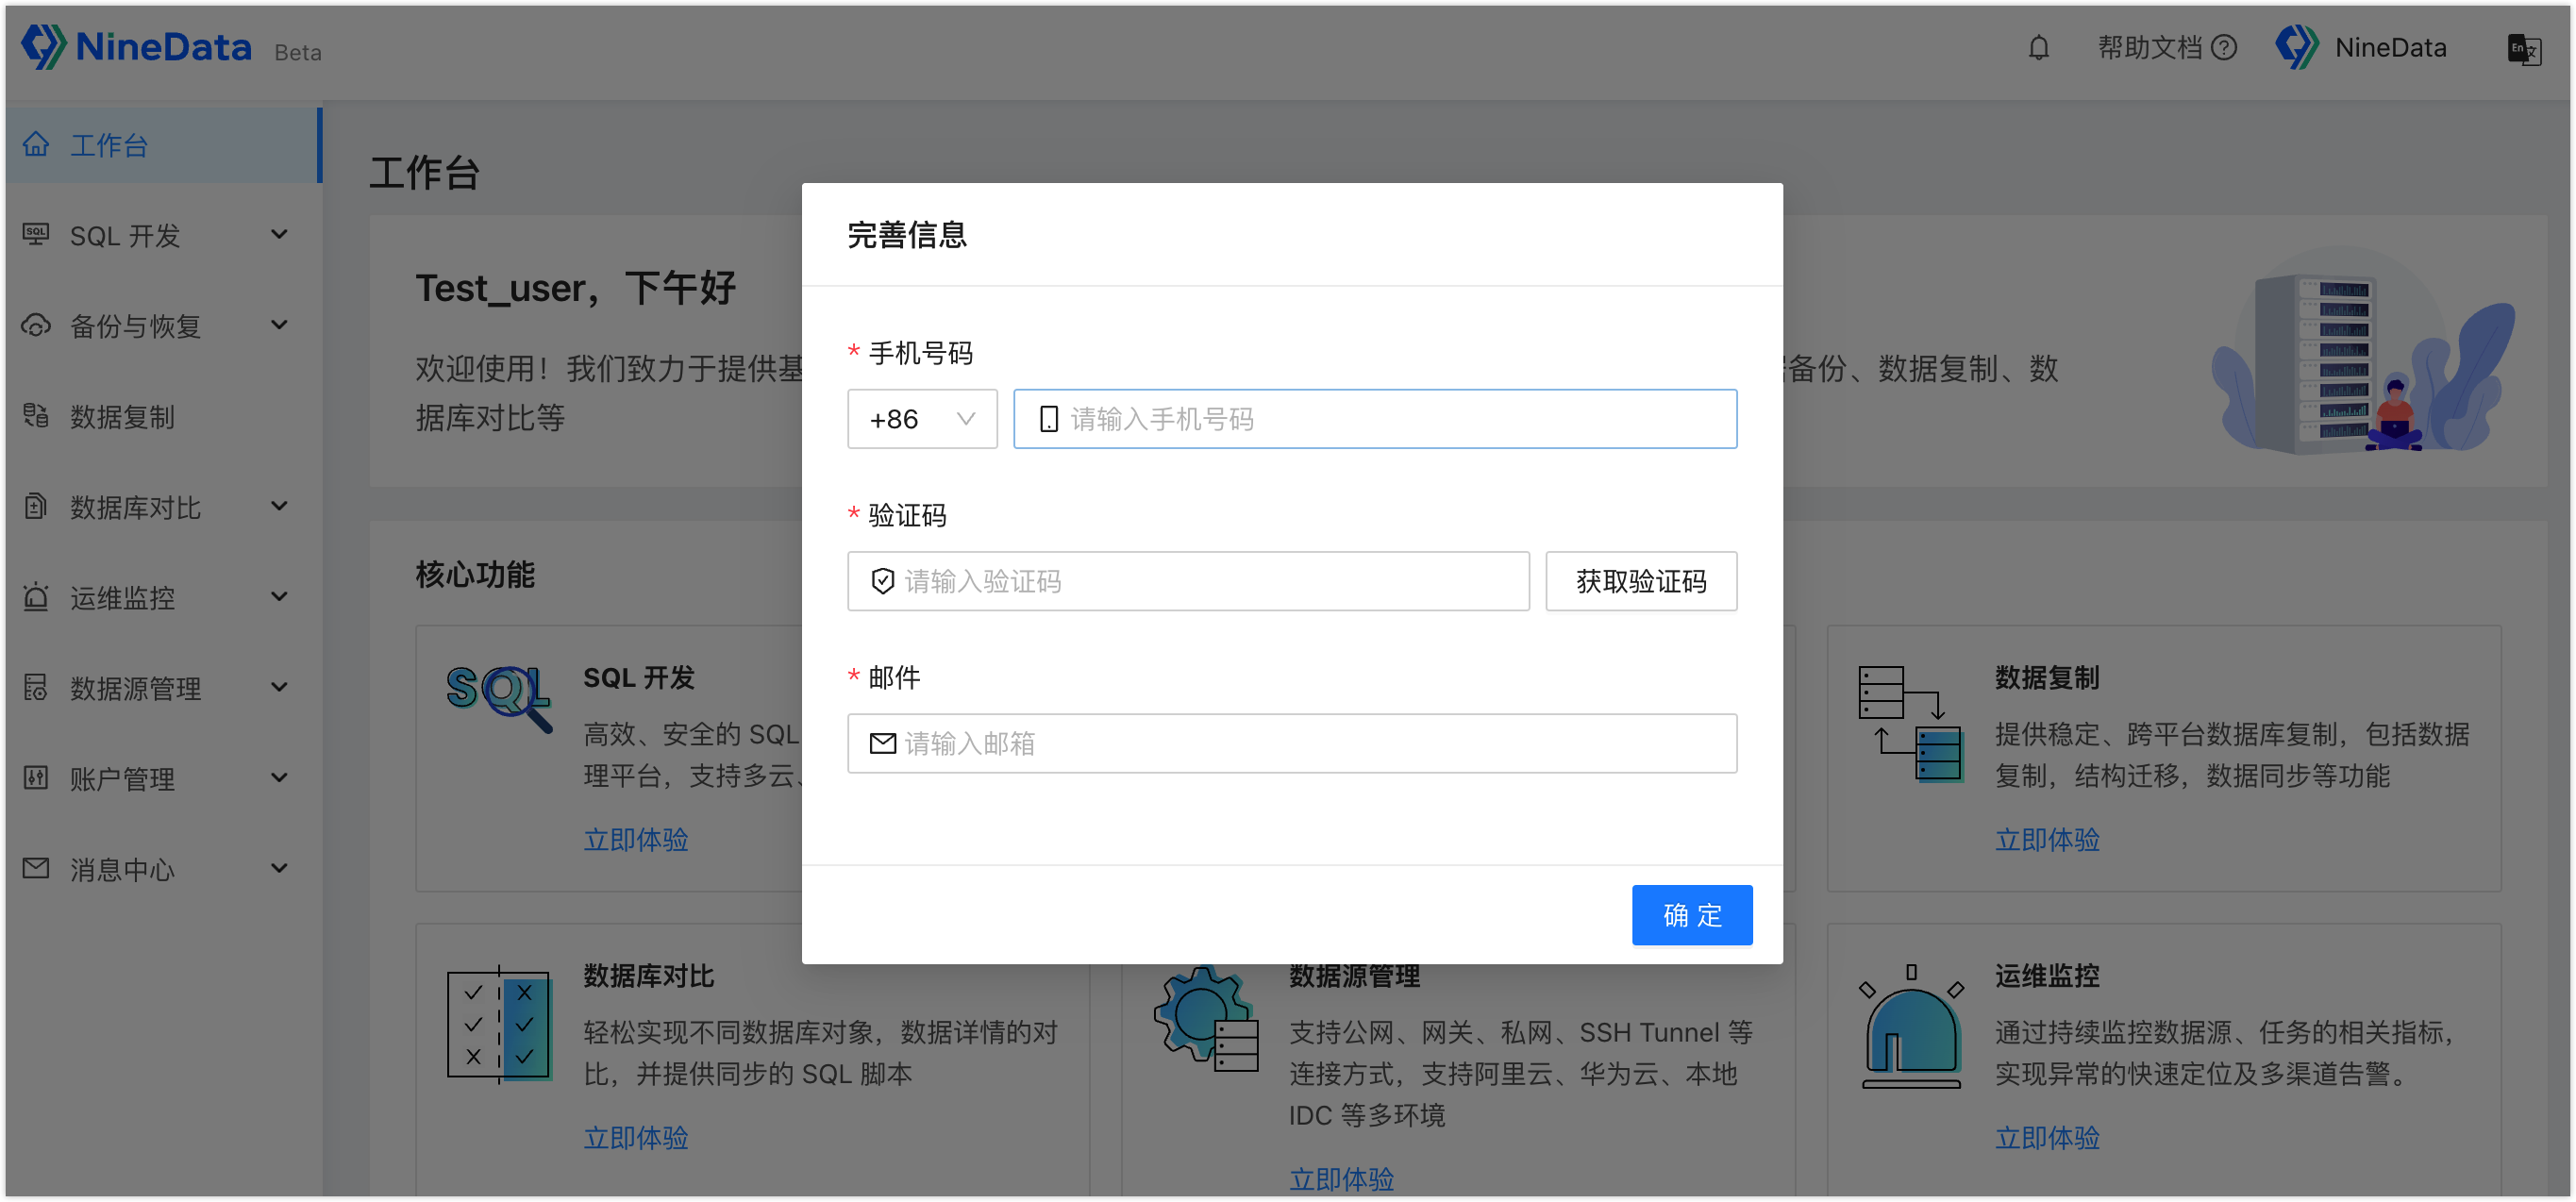
Result
Users who open the SSO organization URL are redirected to Keycloak, authenticate with their OpenLDAP username and password, and enter NineData. New users complete the profile prompts during their first sign-in.