Connect MySQL to NineData through an SSH tunnel on Windows
NineData supports multiple data source connection methods. This guide shows how to add a self-managed MySQL data source through an SSH tunnel on Windows.
Before you begin
The MySQL service has been installed and started on the server where the target data source is located.
Environment
This example uses the following environment to connect a self-managed data source through an SSH tunnel:
Data source server version: Windows 11 (10.0.22621.963)
SSH version: OpenSSH_for_windows_8.6p1
Data source: MySQL 8.0 self-managed data source
- Steps may differ slightly across Windows versions.
- OpenSSH is not included on Windows systems released before April 2018. Install it manually if required. Download the latest package from GitHub.
- For Linux, see Connect a self-managed MySQL data source through an SSH tunnel on Linux.
Procedure
Step 1: Add and start SSH service
The SSH service includes OpenSSH Authentication Agent and OpenSSH SSH Server. OpenSSH Authentication Agent is installed by default, so install OpenSSH SSH Server first.
Press Win+R, enter
fodhelper, and click OK to open the Optional Features window.Click View Features next to Add Optional Features, enter
SSHin the search box, select OpenSSH Server, and click Next.tipIf no results are found, OpenSSH Server may already be installed. Continue with the next step.
Click Install on the confirmation page, wait until the service is installed, and then restart the computer.
After restarting, press Win+R, enter
services.msc, and click OK to open the Services window.Find
OpenSSH Authentication AgentandOpenSSH SSH Serverin the service list, set both Startup Type values to Automatic, and start both services.Service setup stepsDouble-click the target service. In the Properties window on the General tab, open the Startup Type list and select Automatic.
In the Service Status area, click Start if the status is Stopped, then click OK. If the status is Running, click OK directly.
Press Win+R, enter
cmd, and click OK to open Command Prompt. Runnetstat -anand check if port22is listening. If the following line appears, the SSH service started successfully.TCP [::]:22 [::]:0 LISTENING
Step 2: Configure the sshd_config file
Open the
sshd_configfile in theC:\ProgramData\ssh\directory with a text editor (such as Notepad).tipThe
ProgramDatadirectory is hidden by default. In File Explorer, click View > Show > Hidden items to reveal the hidden directory.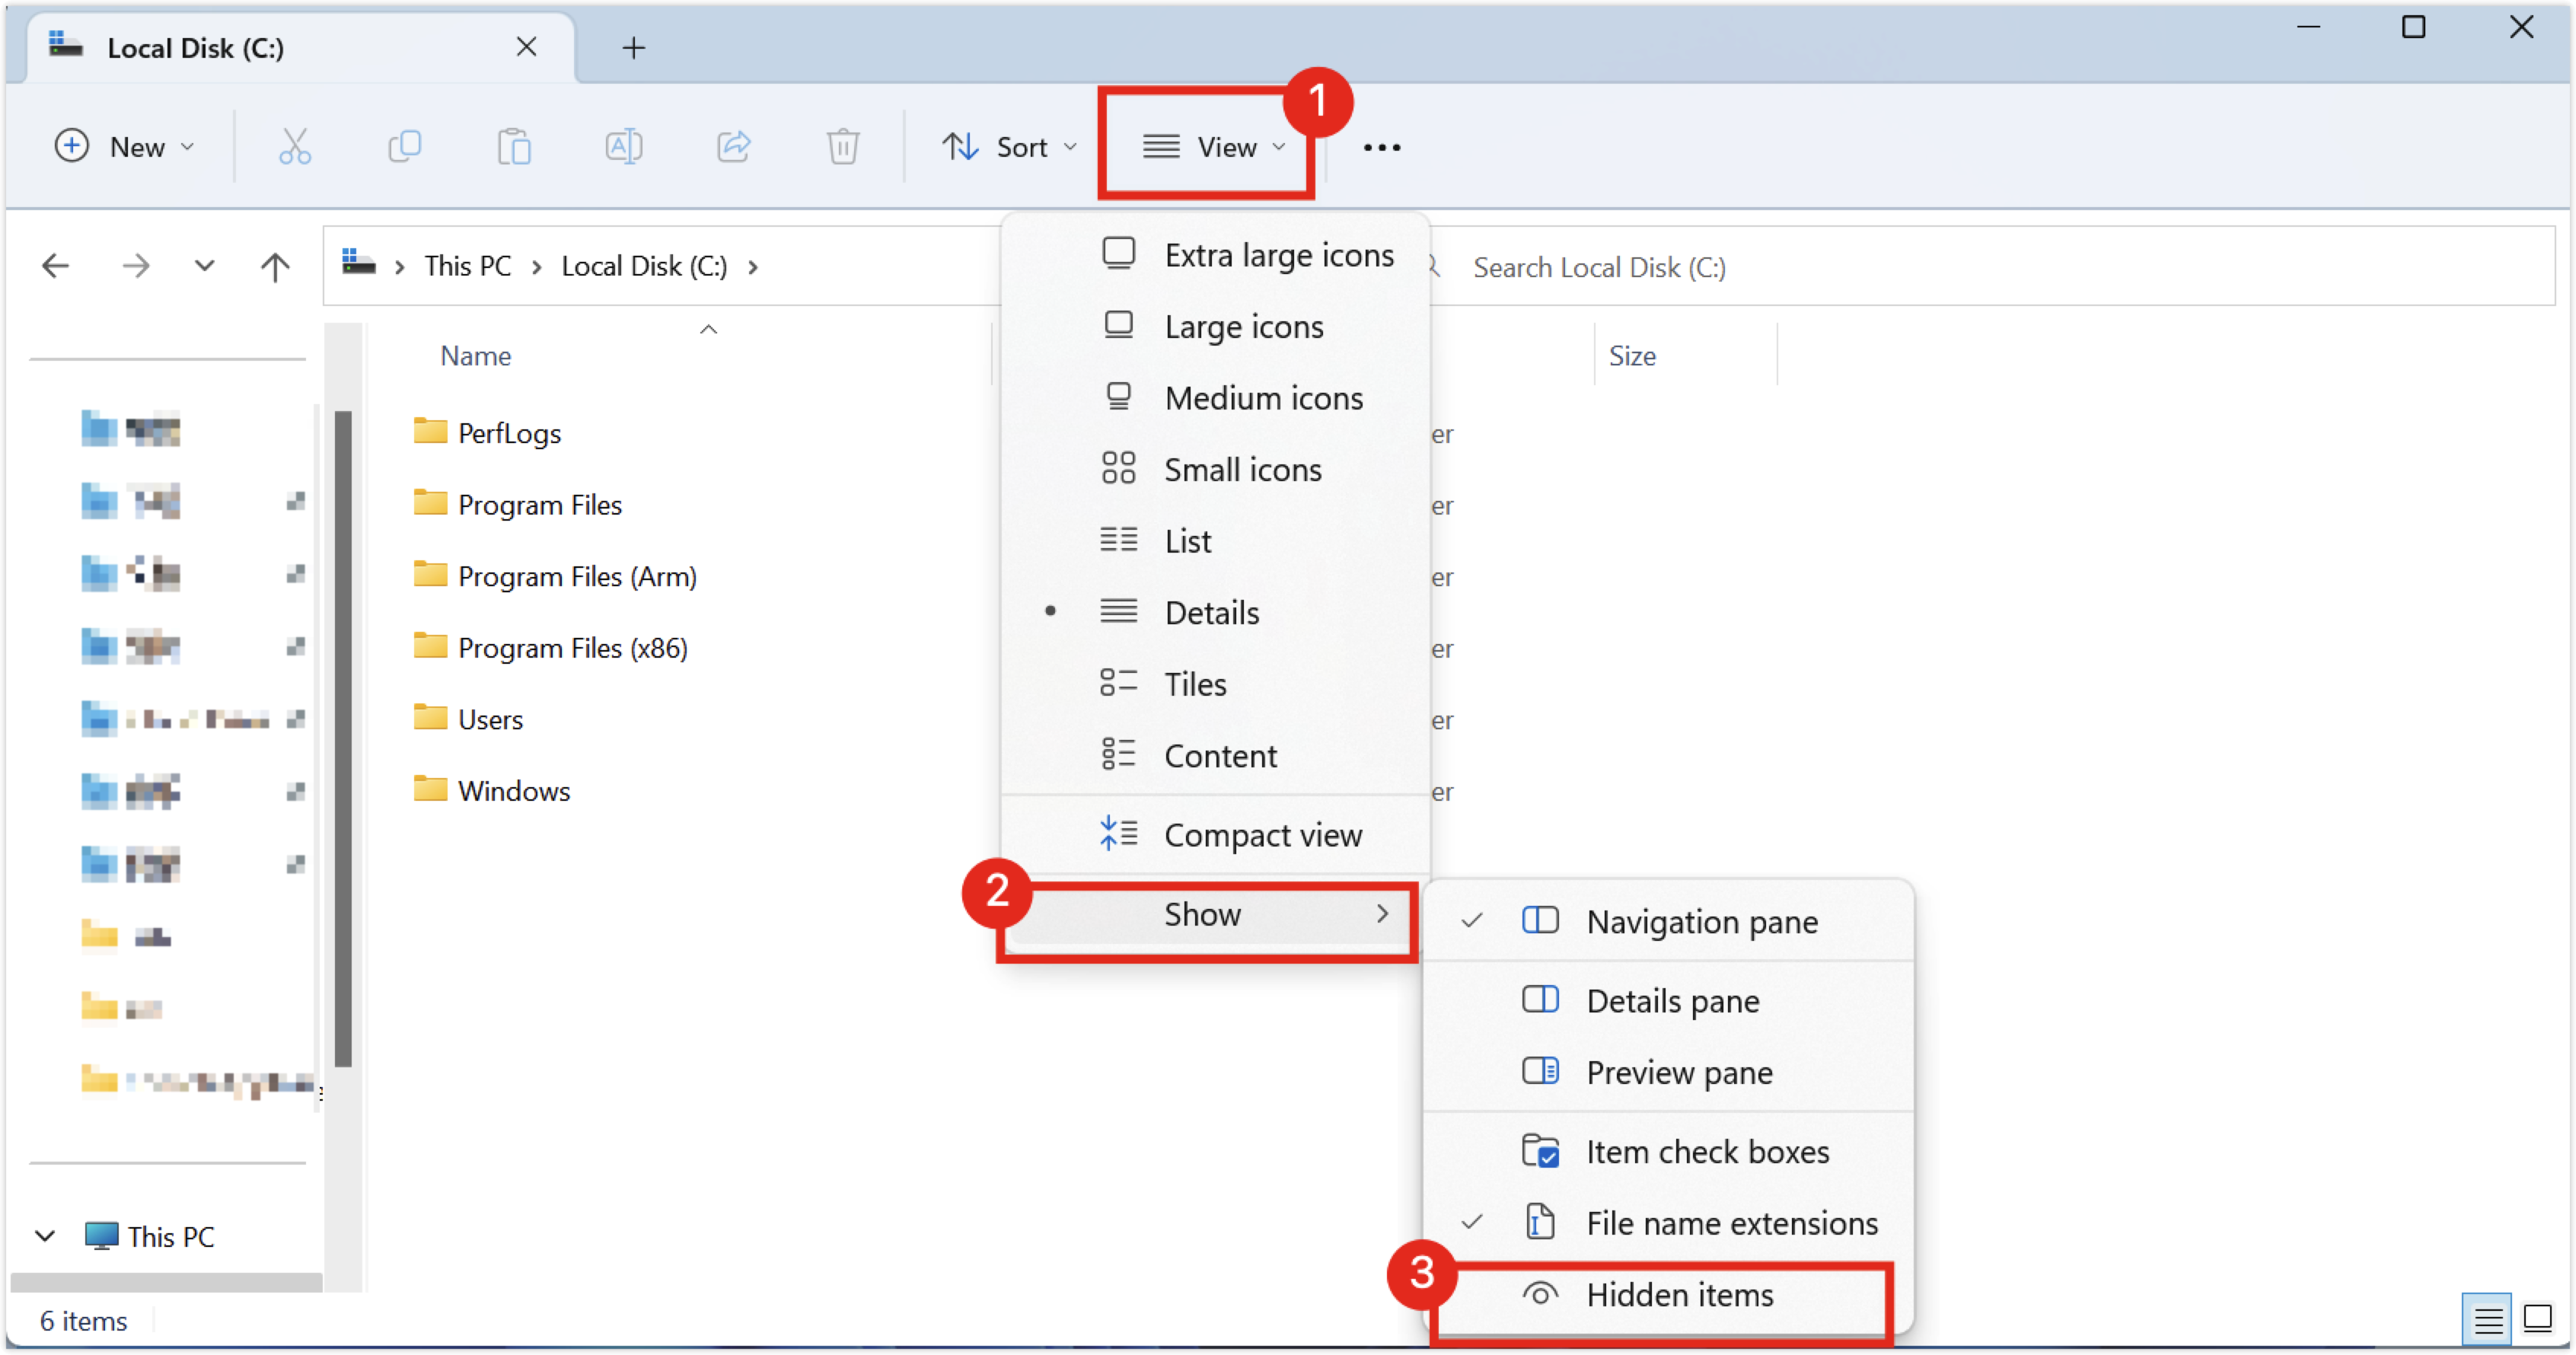
Update these settings:
Parameter Value Description AuthorizedKeysFile.ssh/authorized_keysThe directory that stores the key file.
Description: Make sure this parameter is not commented out.PubkeyAuthenticationyesEnables public key connections.
Description: Make sure this parameter is not commented out.Match Group administratorsAuthorizedKeysFile __PROGRAMDATA__/ssh/administrators_authorized_keysThe administrator user's public key file path.
Description: Comment out this parameter. Otherwise, authentication cannot complete. Because the parameter and value are on two lines, comment out both lines.Restart the SSH Server service.
tipRestart method:
- Press Win+R, enter
services.msc, and click OK. - Find
OpenSSH SSH Serverin the service list and double-click it. In the Properties window on the General tab, click Stop and then Start.
- Press Win+R, enter
Step 3: Generate the SSH tunnel key file and add the public key to the whitelist file
Press Win+R, enter
cmd, and click OK to open Command Prompt.Run
ssh-keygen -f your_key_nameto generate a key file. When OpenSSH promptsEnter passphrase (empty for no passphrase):, set a passphrase for the key file or press Enter to leave it blank.tipThis command generates the following two files:
<key file name>: Private key used to verify the login identity.<key file name>.pub: Public key stored on the server and matched with the private key during login.
Open the
<key file name>.pubfile with a text editor such as Notepad, copy the entire content, and paste it intoC:\Users\<your system login name>\.ssh\authorized_keys. If the file does not exist, create it manually in that directory and do not add a suffix.tip- Make sure the
authorized_keysfile is accessible only to SYSTEM, Administrators, and the current signed-in user. Otherwise the connection will fail. To check permissions:- Right-click the
authorized_keysfile inC:\Users\<your system login name>\.ssh\, then click Properties. - Open the Security tab and check the entries under Group or user names. Remove any extra entries manually.
- Right-click the
- To remove permission entries:
- Click Advanced on the Security tab, then click Disable inheritance. In the dialog, choose Convert the inherited permissions into explicit permissions on this object.
- Select the unnecessary entries in Permission Entries, click Remove, and make sure only SYSTEM, Administrators, and the current signed-in user remain. Click OK.
- Make sure the
Step 4: Add the data source in the NineData console
Sign in to the NineData Console.
In the left navigation pane, choose Datasource > Datasource.
On the Create Datasource page, configure these parameters.
Parameters Description Name Enter a meaningful data source name so the team can find and manage it later. Data source Location Select On-Premise/Other Cloud Environment PROD (Production) and DEV (Development) environments are provided by default, and customized environments are also available.
Note: In organizational mode, the database environment can also be used for permission policy management. For example, the production environment administrator role can access only data sources in the production environment and cannot access data sources in other environments. For more information, see Managing Roles.DB Type Select MySQL. Connection Select SSH Tunnel. SSH Host Enter the IP address or domain name of the server that hosts the target data source, plus the SSH port. The default SSH port is 22.SSH Authentication Method - Password: Connect with SSH Username and SSH Password.
- Key (recommended): Connect with SSH Username and Key File. For instructions, see Step 3: Generate the SSH tunnel key file and add the public key to the whitelist file.
SSH Username Enter the login username of the server where the target data source is located. SSH Password Displayed when SSH Authentication Method is Password. Enter the SSH password for the server that hosts the target data source.
Note: Click Connection Test. If Connection Succeeded appears, the SSH tunnel is reachable. If an error appears, check the username and password.Key File Displayed when SSH Authentication Method is Key. Click Upload and upload the private key file, which is the generated key file without the suffix. For instructions, see Step 3: Generate the SSH tunnel key file and add the public key to the whitelist file. Password Displayed when SSH Authentication Method is Key. Enter the passphrase that was set when the key file was generated. If no passphrase was set during key generation, leave this field blank.
Note: Click Connection Test. If Connection Succeeded appears, the SSH tunnel is reachable. If an error appears, troubleshoot based on the message and try again.Host Enter the data source host and port.
Note: Because NineData connects to the data source through the SSH tunnel,localhostor127.0.0.1usually works with the target data source port.DB Account Username for the data source. DB Password Enter the password for the database account.
Note: Click Connection Test. If Connection Succeeded appears, the data source connection is available. If an error appears, check the account and password.Access Region Select the region or location closest to the data source for better network performance. Encryption Enable SSL encryption when the data source requires encrypted connections. Leave the switch off when SSL is not required. Click > beside Encryption to expand detailed settings.
Note:- Options differ by data source type. Use the console as the source of truth.
- For MySQL SSL configuration, see Configure MySQL encrypted connections.
Click Create Data Source to create the data source.
Result
NineData creates the MySQL data source and stores the SSH tunnel configuration. After Connection Test succeeds, NineData can reach the target database through the SSH tunnel.
Next steps
- Use the data source in SQL Console, data replication, backup, comparison, or other supported NineData features.
- If the connection test fails, check the OpenSSH services,
sshd_config, key file permissions,authorized_keys, and the database host and port.