Creating Data Sources
NineData supports adding various types of data sources from different environments to the console for unified management. You can use database DevOps, backup and recovery, data replication, and database comparison features on the added data sources.
Feature Introduction
Currently supported cloud vendors: Alibaba Cloud, Tencent Cloud, Huawei Cloud, AWS, Mobile Cloud, Baidu Cloud
Currently supported data source types:
Category Data Source - Relational Databases: MySQL, SQL Server, PostgreSQL, Oracle, OceanBase for Oracle, OceanBase for MySQL, Db2, Dameng, KingbaseES for PostgreSQL, KingbaseES for Oracle, Klustron, openGauss, Sybase, TiDB, GreatSQL, GBase, Massive Database, GoldenDB
- NoSQL Databases: MongoDB, Redis, Milvus
- Data Warehouses: ClickHouse, Doris, SelectDB, Greenplum, StarRocks, SingleStore, Hive
- Other Data Sources: Elasticsearch, Kafka
RDS MySQL, PolarDB MySQL, AnalyticDB MySQL, RDS SQL Server, RDS PostgreSQL, AnalyticDB PostgreSQL, Cloud Database MongoDB, Cloud Database Redis, Cloud Database Clickhouse, Search and Analysis Service Elasticsearch, Cloud Message Queue Kafka, AnalyticDB PostgreSQL, DataHub, Lindorm Cloud Database MySQL, TDSQL-C MySQL, Cloud Database SQL Server, Cloud Database PostgreSQL, Cloud Database MongoDB, Cloud Database Redis, Elasticsearch Service, Message Queue CKafka, TDSQL MySQL, TDSQL PostgreSQL Cloud Database RDS for MySQL, Cloud Database GaussDB for MySQL, Cloud Database RDS for SQL Server, Cloud Database RDS for PostgreSQL, Document Database Service DDS, Cloud Database GaussDB for Redis, Cloud Search Service CSS, Distributed Message Service Kafka, Cloud Database Warehouse (DWS), Cloud Database GaussDB AWS RDS MySQL, Aurora MySQL, DocumentDB, MemoryDB for Redis, Redshift, ElastiCache RDS for MySQL, MongoDB, Redis Cloud Database RDS MySQL, DocDB for MongoDB, Cloud Database Redis, Cloud Native Database GaiaDB, Cloud Database GaiaDB-X, Cloud Vector Database VectorDB, PegaDB
Precautions
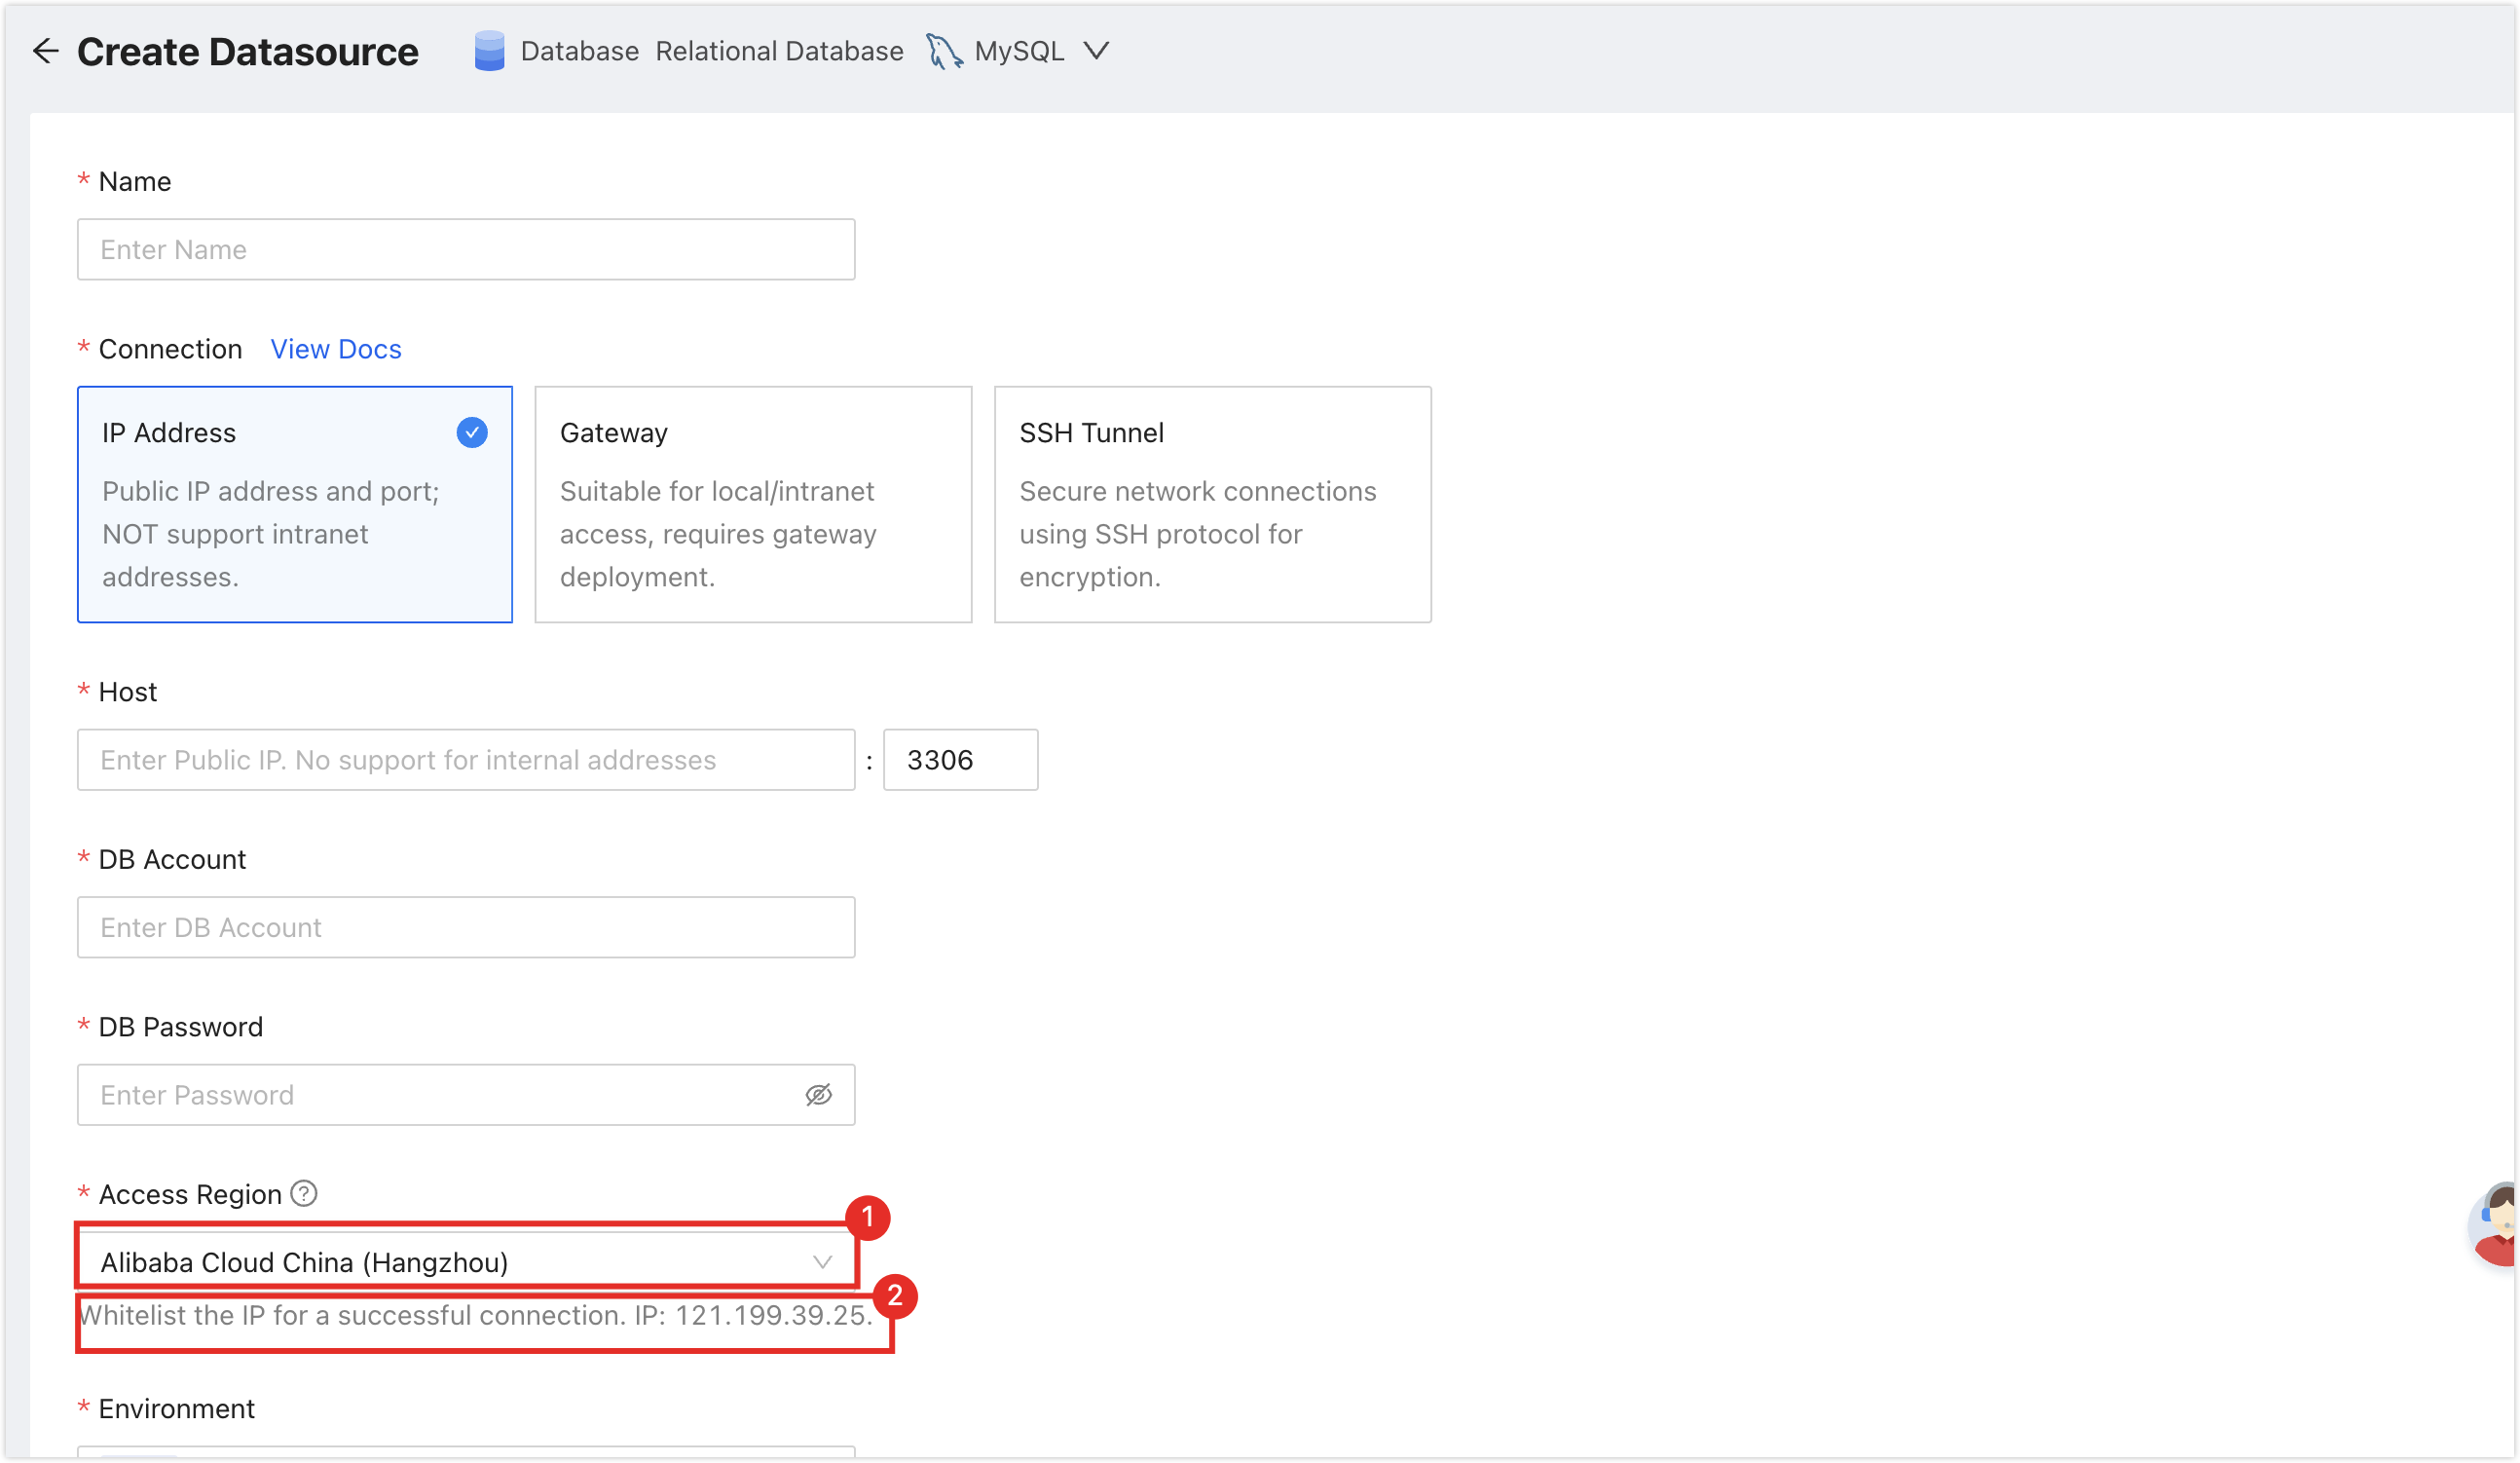
To ensure the service can connect smoothly, please first select on the page, and then add the NineData service IP address located in the position of the figure below to the whitelist of your server. How to add a whitelist in an IDC self-built database, please refer to Appendix II. How to add a whitelist in cloud vendor servers or databases, please refer to the official documents of each cloud vendor.
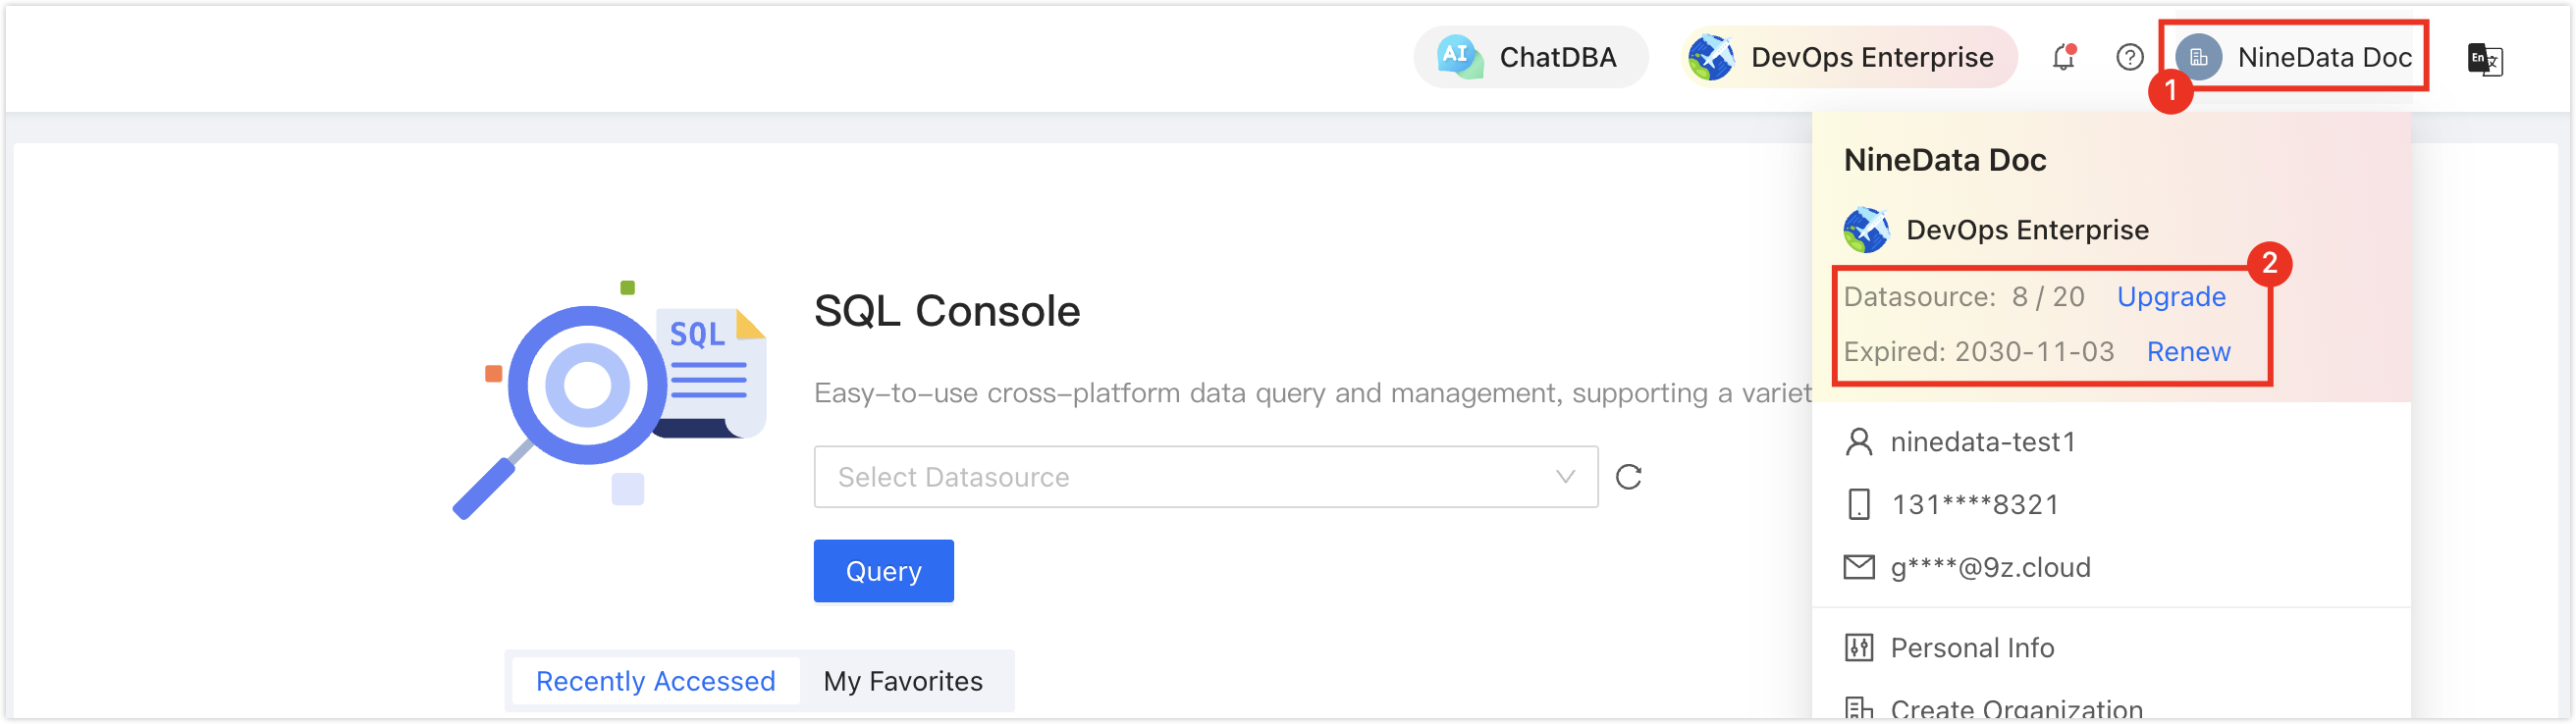
Please ensure that you still have free data source quotas, otherwise, you will not be able to enter data sources. You can quickly check the remaining quota in the upper right corner of the NineData console page.
Adding Self-built Data Sources
Please click on the hyperlinks of the target data sources in the table below to view detailed operation guides.
Adding Cloud Vendor Data Sources
Log in to the NineData Console.
On the left navigation pane, click > .
- Click tab, and click on the page. In the popup window for selecting the data source type, choose (Cloud Vendor Name) > (the type of data source to be added), and configure the parameters based on the table below on the page.tip
If you make a mistake during the operation, you can click the
 icon at the top of the page to make a new selection.
- Alibaba Cloud
- Tencent Cloud
- Huawei Cloud
- AWS
- E Cloud
- Baidu Cloud
Supported instance types:
- DataHub
| Parameter | Description |
|---|---|
| Enter the name of the data source. To facilitate subsequent search and management, please use meaningful names as much as possible. | |
Choose the access method of the data source.
| |
Choose the access method of Alibaba Cloud instances, which supports access in the form of or .
| |
| Required when the data source is MongoDB, specifying the authentication database for the current user. | |
| The username of the data source. | |
| The password of the data source. | |
| Only required when accessing the data source through the connection address. Choose the region closest to the location of your data source to effectively reduce network latency. | |
| Select based on the actual business purpose of the data source, as an environmental identifier for the data source. The default provides and environments, and also supports you to create a custom environment. Note: Under the organization mode, the database environment can also be applied to permission policy management. For example, the default role only supports access to data sources in the environment and cannot access data sources in other environments. For more information, please refer to Manage Roles. | |
| Whether to use SSL encryption to access the data source. If the data source enforces SSL encryption connection, this switch must be turned on, otherwise, the connection fails. Click the switch on the right to turn on or off encrypted transmission. Some data source types can click the > on the left side of to expand detailed configuration. Note: Different types of data sources support different options, please refer to the console. |
Supported instance types:
- TDSQL MySQL Edition
- TDSQL PostgreSQL Edition
- Elasticsearch Service
| Parameter | Description |
|---|---|
| Enter the name of the data source. To facilitate subsequent search and management, please use meaningful names as much as possible. | |
Choose the access method of the data source.
| |
Choose the access method of the cloud vendor instance, which supports access in the form of or .
| |
| Required when the data source is MongoDB, specifying the authentication database for the current user. | |
| The username of the data source. | |
| The password of the data source. | |
| Only required when accessing the data source through the connection address. Choose the region closest to the location of your data source to effectively reduce network latency. | |
| Select based on the actual business purpose of the data source, as an environmental identifier for the data source. The default provides and environments, and also supports you to create a custom environment. Note: Under the organization mode, the database environment can also be applied to permission policy management. For example, the default role only supports access to data sources in the environment and cannot access data sources in other environments. For more information, please refer to Manage Roles. | |
| Whether to use SSL encryption to access the data source. If the data source enforces SSL encryption connection, this switch must be turned on, otherwise, the connection fails. Click the switch on the right to turn on or off encrypted transmission. Some data source types can click the > on the left side of to expand detailed configuration. Note: Different types of data sources support different options, please refer to the console. |
Supported instance types:
| Parameter | Description |
|---|---|
| Enter the name of the data source. To facilitate subsequent search and management, please use meaningful names as much as possible. | |
Choose the access method of the data source.
| |
Choose the access method of Huawei Cloud instances, which supports access in the form of or .
| |
| Required when the data source is MongoDB, specifying the authentication database for the current user. | |
| The username of the data source. | |
| The password of the data source. | |
| Only required when accessing the data source through the connection address. Choose the region closest to the location of your data source to effectively reduce network latency. | |
| Select based on the actual business purpose of the data source, as an environmental identifier for the data source. The default provides and environments, and also supports you to create a custom environment. Note: Under the organization mode, the database environment can also be applied to permission policy management. For example, the default role only supports access to data sources in the environment and cannot access data sources in other environments. For more information, please refer to Manage Roles. | |
| Whether to use SSL encryption to access the data source. If the data source enforces SSL encryption connection, this switch must be turned on, otherwise, the connection fails. Click the switch on the right to turn on or off encrypted transmission. Some data source types can click the > on the left side of to expand detailed configuration. Note: Different types of data sources support different options, please refer to the console. |
Supported instance types:
- RDS MySQL
- Aurora MySQL
- DocumentDB
- MemoryDB for Redis
- Redshift
- ElastiCache
| Parameter | Description |
|---|---|
| Enter the name of the data source. To facilitate subsequent search and management, please use meaningful names as much as possible. | |
Choose the access method of the data source.
| |
Choose the access method of AWS instances, which supports access in the form of or .
| |
| Required when the data source is MongoDB or Redshift, specifying the authentication database for the current user. | |
| The username of the data source. | |
| The password of the data source. | |
| Only required when accessing the data source through the connection address. Choose the region closest to the location of your data source to effectively reduce network latency. | |
| Select based on the actual business purpose of the data source, as an environmental identifier for the data source. The default provides and environments, and also supports you to create a custom environment. Note: Under the organization mode, the database environment can also be applied to permission policy management. For example, the default role only supports access to data sources in the environment and cannot access data sources in other environments. For more information, please refer to Manage Roles. | |
| Whether to use SSL encryption to access the data source. If the data source enforces SSL encryption connection, this switch must be turned on, otherwise, the connection fails. Click the switch on the right to turn on or off encrypted transmission. Some data source types can click the > on the left side of to expand detailed configuration. Note: Different types of data sources support different options, please refer to the console. |
Supported database types include:
- RDS for MySQL
- MongoDB
- Redis
| Parameter | Description |
|---|---|
| Enter the name of the data source. Please use a meaningful name for easy lookup and management. | |
Choose the access mode for the data source.
| |
Choose the access mode for Mobile Cloud instances. Support accessing by or .
| |
| When the data source is MongoDB, it is necessary to input and specify the authentication database for the current user. | |
| Username of the data source. | |
| Password of the data source. | |
| Only select this when accessing the data source through the connection address. Choose the region closest to the location of your data source to reduce network latency effectively. | |
| Select the actual business purpose of this data source as the environmental identifier. Default options include and , and you can also create custom environments. Note: In organization mode, database environments can also be applied to permission policy management. For example, the default role only supports accessing data sources in the environment and cannot access data sources in other environments. For more information, see manage roles. | |
| Choose whether to access the data source using SSL encryption. If the data source requires an SSL encrypted connection, you must enable this switch; otherwise, the connection will fail. Click the switch on the right to enable or disable encrypted transmission. Some data source types allow you to click the > on the left of to expand detailed configuration. Note: Different data source types have different supported options. Please refer to the console for accurate information. |
Supported database types include:
- DocDB for MongoDB
| Parameter | Description |
|---|---|
| Enter the name of the data source. Please use a meaningful name for easy lookup and management. | |
Choose the access mode for the data source.
| |
Choose the access mode for Baidu Cloud instances. Support accessing by or .
| |
| When the data source is MongoDB, it is necessary to input and specify the authentication database for the current user. | |
| Username of the data source. | |
| Password of the data source. | |
| Only select this when accessing the data source through the connection address. Choose the region closest to the location of your data source to reduce network latency effectively. | |
| Select the actual business purpose of this data source as the environmental identifier. Default options include and , and you can also create custom environments. Note: In organization mode, database environments can also be applied to permission policy management. For example, the default role only supports accessing data sources in the environment and cannot access data sources in other environments. For more information, see manage roles. | |
| Choose whether to access the data source using SSL encryption. If the data source requires an SSL encrypted connection, you must enable this switch; otherwise, the connection will fail. Click the switch on the right to enable or disable encrypted transmission. Some data source types allow you to click the > on the left of to expand detailed configuration. Note: Different data source types have different supported options. Please refer to the console for accurate information. |
- After completing all the configurations, you can click on the right side of and select to test if the data source can be accessed successfully. If you see indicating a successful connection test, you can then proceed to click on to finalize the addition of the data source. If the connection test does not succeed, please review your connection settings and keep testing until the connection is successfully established.
Appendix 1: Creating an Environment
To meet the needs of different enterprises, in addition to providing default and environments, NineData also supports manually creating custom environments.
Log in to the NineData Console.
In the left navigation bar, click >.
Click on the tab. This shows all the environments currently under the user (personal mode) or organization (organization mode). Here you can or custom created environments.
Click on in the upper right corner of the page.
Complete the configuration according to the following table and click .
Parameter Description Enter the name of the environment, which can contain 1 to 16 characters. This name serves as the identifier of the environment and needs to have some distinguishing characteristics. Please try to use meaningful names. Choose the color of the environment label displayed in the console.
Appendix 2: Add NineData's IP address to the database allowlist (self-built database environment)
When adding a data source located at , the IP address of the NineData service must be added to the database allowlist to allow NineData to provide services.
- MySQL
- Oracle
- PostgreSQL
- MongoDB
- Kafka
- SQL Server
- ClickHouse
- Redis
- ElasticSearch
This section takes MySQL 8.0 as an example to introduce how to add IP allowlist.
New account: Log in to the database using the Root account, and create an account for NineData to access and authorize the corresponding permissions with the following command.
CREATE USER '<account name>'@'<NineData IP address>' IDENTIFIED BY '<access password>';
GRANT <privilege name> ON <database name>.* TO '<account name>'@'<NineData IP address>';
Existing account: Log in to the database using the Root account, and add NineData IP allowlist and grant corresponding permissions to the existing account with the following command.
GRANT <privilege name> ON <database name>.* TO '<account name>'@'<NineData IP address>' IDENTIFIED BY '<access password>';
When adding a MySQL data source, you need to use the account and corresponding password that have added NineData's IP address as mentioned above.
In this section, we provide the method to add an IP whitelist using Oracle 12 version as an example. This method is applicable to all versions of Oracle 10g and above.
Open the Oracle configuration file
sqlnet.orausing a text editor. This file is typically located in the/network/admin/directory within the Oracle installation directory. For example:/opt/oracle/product/OraHome/network/admin/sqlnet.ora. If you can't locate this file, you can search for it using the commandfind / -name sqlnet.ora 2>/dev/nullin the terminal.Modify the parameters
tcp.validnode_checking,tcp.invited_nodes, andtcp.excluded_nodeswithin thesqlnet.orafile as shown below:cssCopy code
tcp.validnode_checking = yes
tcp.invited_nodes = (127.0.0.1, <allowed IP addresses or address ranges>)
tcp.excluded_nodes = (<denied IP addresses or address ranges>)tip- If the above parameters are not present, you can add them directly.
- The
tcp.validnode_checkingparameter can take valuesyesorno, indicating whether the whitelist is enabled or disabled. Setting it tonowill render thetcp.invited_nodesandtcp.excluded_nodesconfigurations ineffective. - The
tcp.invited_nodesparameter must retain127.0.0.1to allow local connections to the database. - If the same IP address is listed in both
tcp.invited_nodesandtcp.excluded_nodes, the IP will still be allowed to access the database. - Multiple addresses or address ranges should be separated by commas (,).
Execute the command
lsnrctl reloadto reload thesqlnet.orafile and apply the configuration changes.tip- If the
sqlnet.oraconfiguration file was manually created this time, you need to executelsnrctl stopfirst, followed bylsnrctl startto restart the Oracle database. - If you receive an error that the
lsnrctlcommand does not exist, it might be because you are not currently in the Oracle account. You can execute the commandsu - oracleto switch to the Oracle account and then try again.
- If the
This section uses PostgreSQL version 10.9 as an example to explain how to add an IP allowlist.
Open the PostgreSQL configuration file
postgresql.conf, which is usually located at the following path:<PostgreSQL installation directory>/data/postgresql.conf.Find the
listen_addressesparameter, remove the preceding comment symbol (#), and set its value to'*'to allow connection requests from all IP addresses. Save and exit thepostgresql.conffile.Open the
pg_hba.confconfiguration file, which is usually located at the following path:<PostgreSQL installation directory>/data/pg_hba.conf.Find the line for
IPv4 local connectionsorIPv6 local connections, and add the IP address range that you want to allow access to below theADDRESScolumn. For example, if you want to allow access from the192.168.1.0 ~ 192.168.1.255address range, configure it as shown below:# TYPE DATABASE USER ADDRESS METHOD
# "local" is for Unix domain socket connections only
#local all all trust
# IPv4 local connections:
#host all all 127.0.0.1/32 trust
host all all 192.168.1.0/24 md5Save and exit the
pg_hba.confconfiguration file, then restart the PostgreSQL service for the changes to take effect.
This section uses MongoDB version 5.0 as an example to explain how to add an IP allowlist.
Connect to MongoDB using a user with root privileges and create or update an account for NineData access, based on your specific requirements.
Create an account: Use the following command to create an account for NineData access and grant the corresponding role permissions.
db.createUser{
  user: "<account name>",
  pwd: "<password>",
  roles: [
    { role: "<role name>", db: "<database name>" },
  ],
  authenticationRestrictions: [
     {
       clientSource: ["<NineData service IP address>"],
       serverAddress: ["<MongoDB server IP address>"]
     },
     ...
  ]
}
Existing account: Use the following command to add the NineData IP allowlist and grant the corresponding role permissions to an existing account.
db.updateUser(
   "<account name>",
   {
     roles : [
       { role: "<role name>", db: "<database name>" },
       ...
     ],
     pwd: "<password>",
     authenticationRestrictions: [
     {
       clientSource: ["<NineData service IP address>"],
       serverAddress: ["<MongoDB server IP address>"]
     },
        ...
     ]
)
Use the above account to add a MongoDB data source through the NineData console.
This section takes Kafka 3.3.2 as an example to introduce how to add IP allowlist.
Open the Kafka configuration file
server.properties, which is usually located in the following path:<Kafka installation directory>/config/server.properties.Find the
listenersparameter and set its value to the IP address and port number that are allowed to access Kafka. For example, if you want to allow NineData to access Kafka, you can set it to:listeners=PLAINTEXT://121.199.39.25:9092Save the changes and restart the Kafka service.
This section takes SQL Server 2022 as an example to introduce how to add IP allowlist.
Log in to the host where the SQL Server service is located, and open SQL Server Configuration Manager.
Select SQL Server Network Configuration in the left navigation bar, and select the SQL Server instance to be modified.
Double-click the TCP/IP protocol in the right window.
tipMake sure that the TCP/IP protocol is enabled.
Click the IP Addresses tab, and add the IP address that is allowed to access SQL Server. For example, if you want to allow the host with IP address
192.168.1.2to access SQL Server, simply enter192.168.1.2in the text box to the right of IP Address.Click OK and restart the SQL Server instance.
This section takes ClickHouse version 22.1 as an example to introduce how to add IP allowlist.
Open the ClickHouse configuration file
users.xmlwith a text editor, which is usually located in the following path:/etc/clickhouse-server/users.xml.Find the account that needs to be used to access NineData, for example,
<default>, and find the<networks>parameter below it, and enter NineData's IP into the<ip>tag.Example:
<users>
    <default>
        <networks>
            <ip>121.199.39.25</ip>
        </networks>
    </default>
</users>
Save the configuration file.
IP allowlist can be added to Redis for all versions using the following steps:
Open Redis configuration file
redis.confwith a text editor. The file is usually located in the following path:/etc/redis/redis.conf.Find the
bindparameter and set its value to the IP address(es) or address range(s) that need to be allowed access. Multiple IP addresses or address ranges can be separated by space or comma.Example:
bind 121.199.39.25Find the
protected-modeparameter and set its value tonoto allow external connections to access Redis.Example:
protected-mode noSave the configuration file.
This section provides an example of adding an IP allowlist for Elasticsearch version 7.17. This method applies to versions 5.x, 6.x, and 7.x of Elasticsearch.
Open the Elasticsearch configuration file
elasticsearch.ymlwith a text editor. This file is usually located in theconfigsubdirectory of the Elasticsearch installation directory.Find the
network.hostparameter and configure its value to the IP address(es) or address range(s) that needs to be allowed access. Multiple IP addresses or address ranges are separated by a comma.Example:
network.host: 121.199.39.25, 123.57.58.208Save the configuration file.
Appendix 3: Add multi-active tag to data sources
If the data source serves for multi-node replication tasks (data replication between three or more data sources), in order to prevent circular replication, multi-active flags are required for all data sources participating in the replication, The multi-active tag of each data source must be globally unique.
Log in to NineData Console.
In the navigation pane on the left, click Datasource>Datasource.
Click the target data source ID to open the Data Source Details page.
- In the data source details area (including data source name, ID, creator, creation time, etc.), click Show Details.
Find Multi-Active Tag, click the
 icon on the right side of it.
Enter the Multi-Active Tag, and click OK.
tip- Multi-active tag can contain 1~64 characters.
- The multi-active tag must be globally unique and cannot be duplicated with other multi-active tag.
Appendix 4: Create Tags
Tags are used for custom grouping in the slow query analysis feature of the Database DevOps module. By configuring tags for specific data sources, you can flexibly group and display slow queries on the dashboard based on business logic, departments, or other requirements. This helps you more precisely identify and address performance bottlenecks.
Log in to the NineData console.
In the left navigation bar, click > .
Click the tab and then click on the page.
In the pop-up dialog, enter the and click .
tip- The tag name must be globally unique.
- After creating the tag, you need to bind it to the target data source in the slow query analysis module. For more information, see Slow Query Analysis.
Common problem
| Issue | Possible Cause | Solution |
|---|---|---|
Error when adding a data source: http connections are not allowed from xxx.xxx.xxx.xxx:xxxxx. | NineData service's IP address is not whitelisted on your server. | Before adding a data source, make sure to add NineData's service address to your data source whitelist. For more information, please refer to the Precautions section in this article. |