对接飞书审批流程
NineData 平台与飞书审批系统深度集成,支持通过飞书发起、审批、撤销数据管理类任务流程,确保审计合规性与流程自动化。
前提条件
- 已创建或加入组织,并且该组织已开通数据库 DevOps 企业版,同时请确保您的包年包月订阅未过期。
- 当前账号已切换到目标组织。更多信息,请参见切换到组织。
- 已通过目标组织的企业管理员权限的账号登录飞书开放平台。
- 已通过系统管理员权限的账号登录 NineData 平台。
注意事项
字段兼容性:标准模板中的系统保留字段无法修改。
身份映射:需确保飞书账号对应的手机号或邮箱与 NineData 账号中保存的一致。
步骤一:创建并发布飞书应用
访问飞书开放平台。
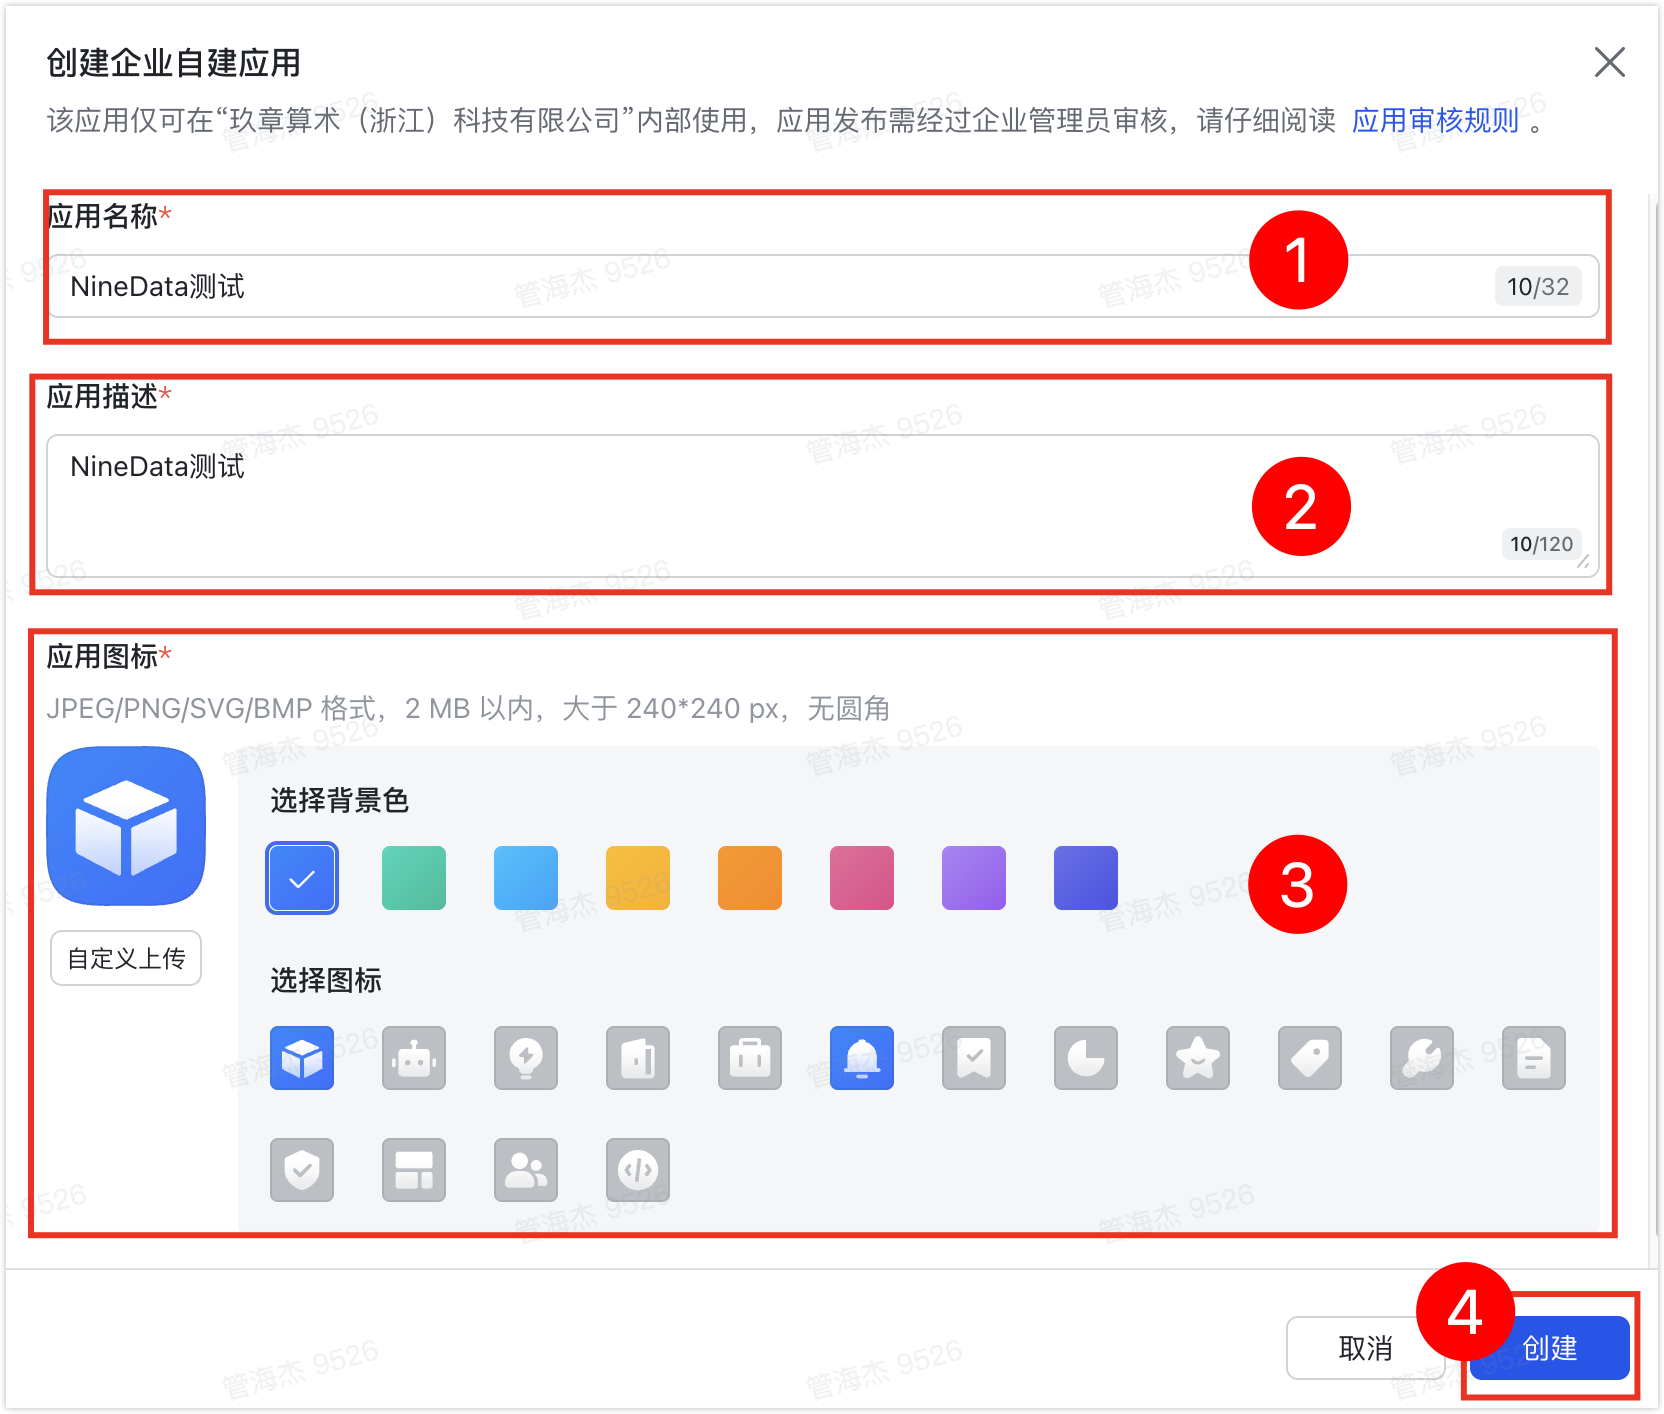
单击创建企业自建应用,输入应用名称和应用描述,选择合适的应用图标,单击创建。
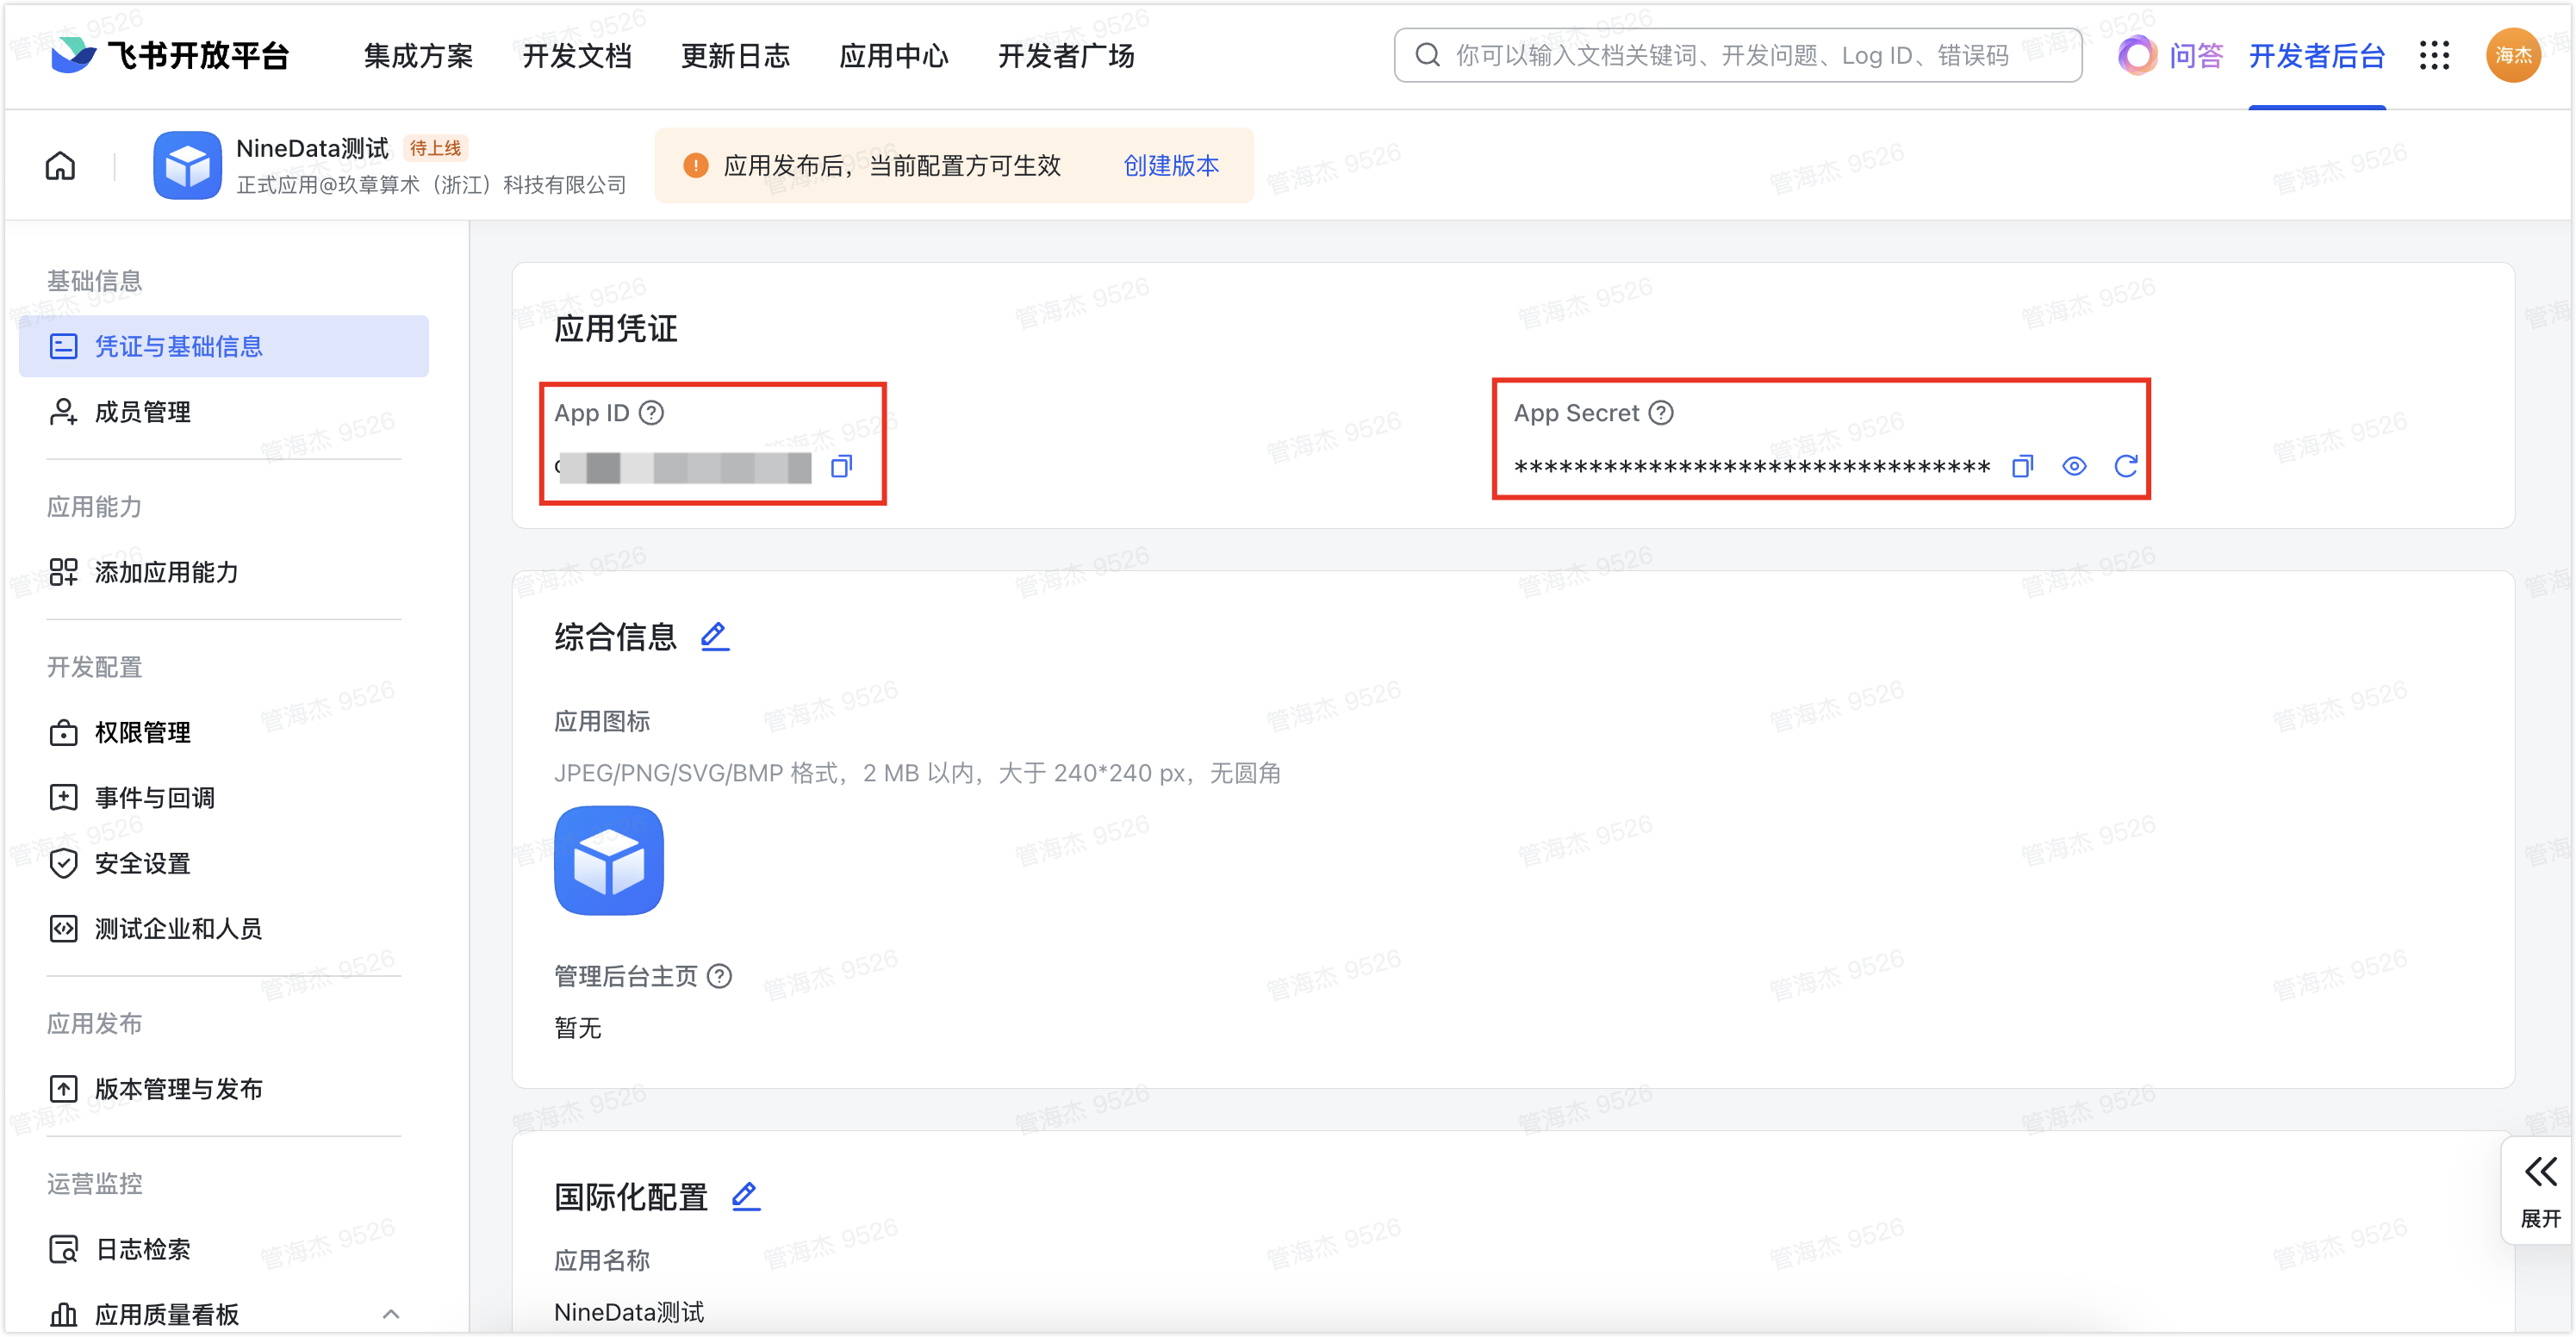
在左侧导航栏,单击基础信息下方的凭证与基础信息,记录应用凭证区域中的 App ID 和 App Secret。
在左侧导航栏,单击开发配置下方的权限管理,然后单击页面中的批量导入/导出权限。在导入页签中的 JSON 框中,粘贴如下 JSON 串,然后单击下一步,确认新增权限,并单击申请开通。
{
  "scopes": {
    "tenant": [
      "approval:approval",
      "approval:approval:readonly",
      "approval:definition",
      "contact:user.id:readonly"
    ],
    "user": [
      "approval:approval",
      "approval:definition",
      "contact:user.id:readonly"
    ]
  }
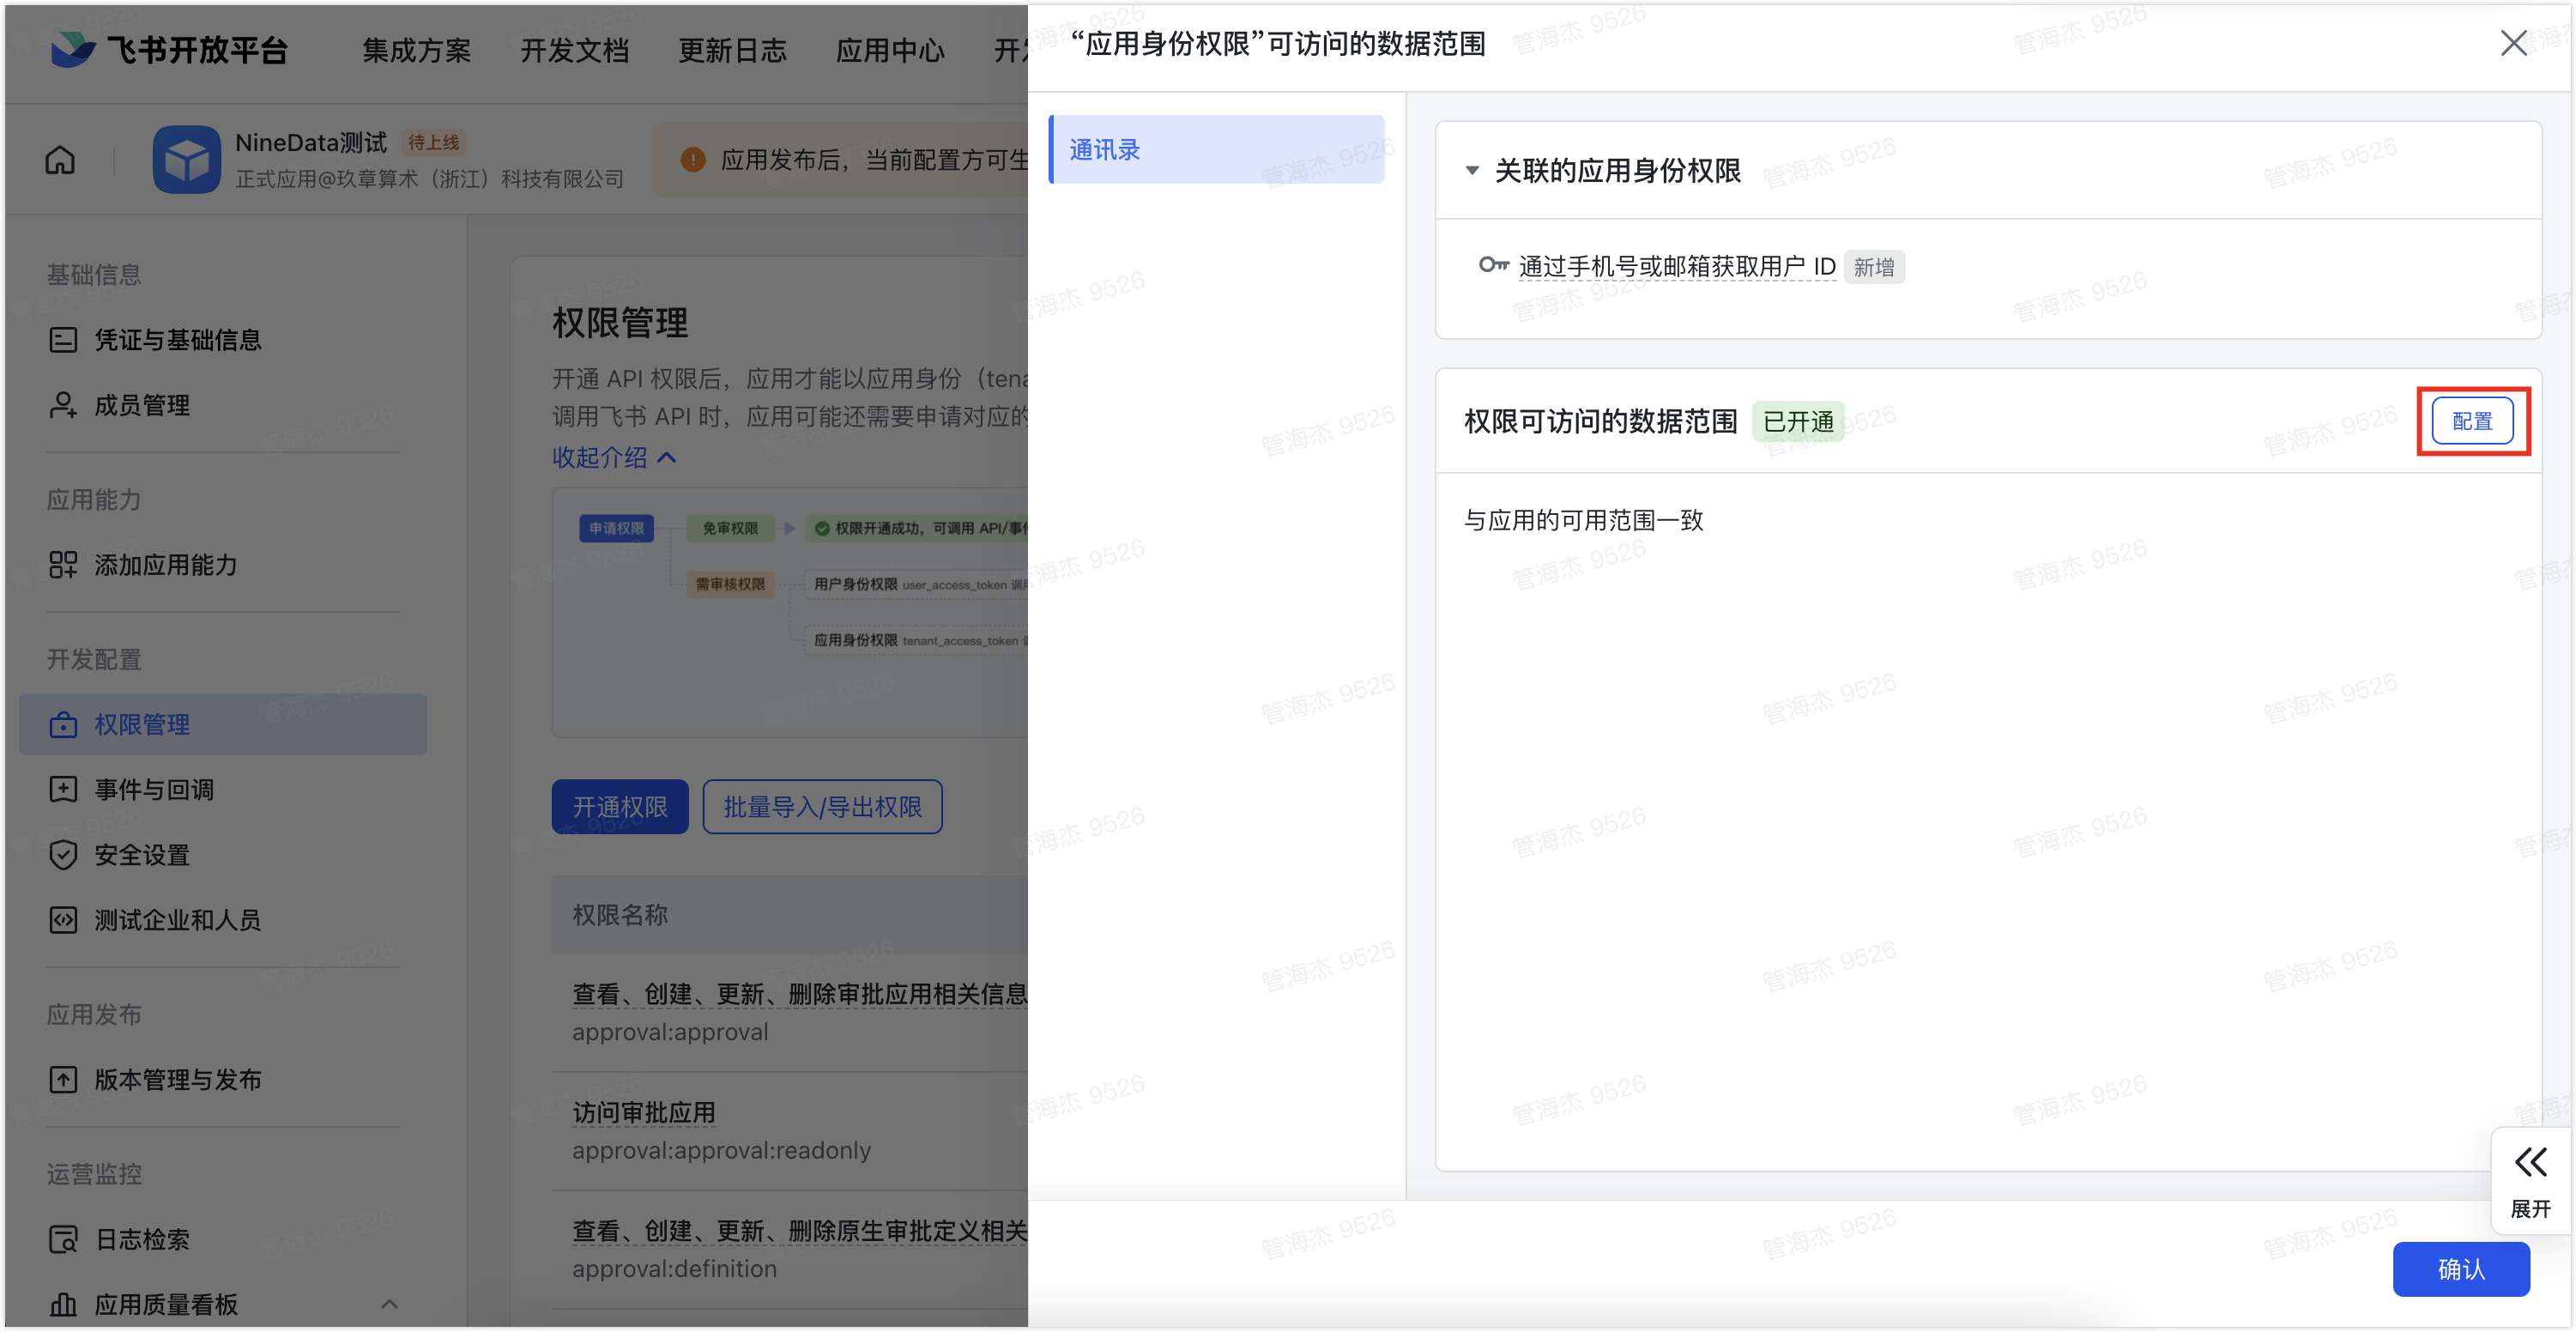
}页面跳转至“应用身份权限”可访问的数据范围,在通讯录 > 权限可访问的数据范围右侧,单击配置。
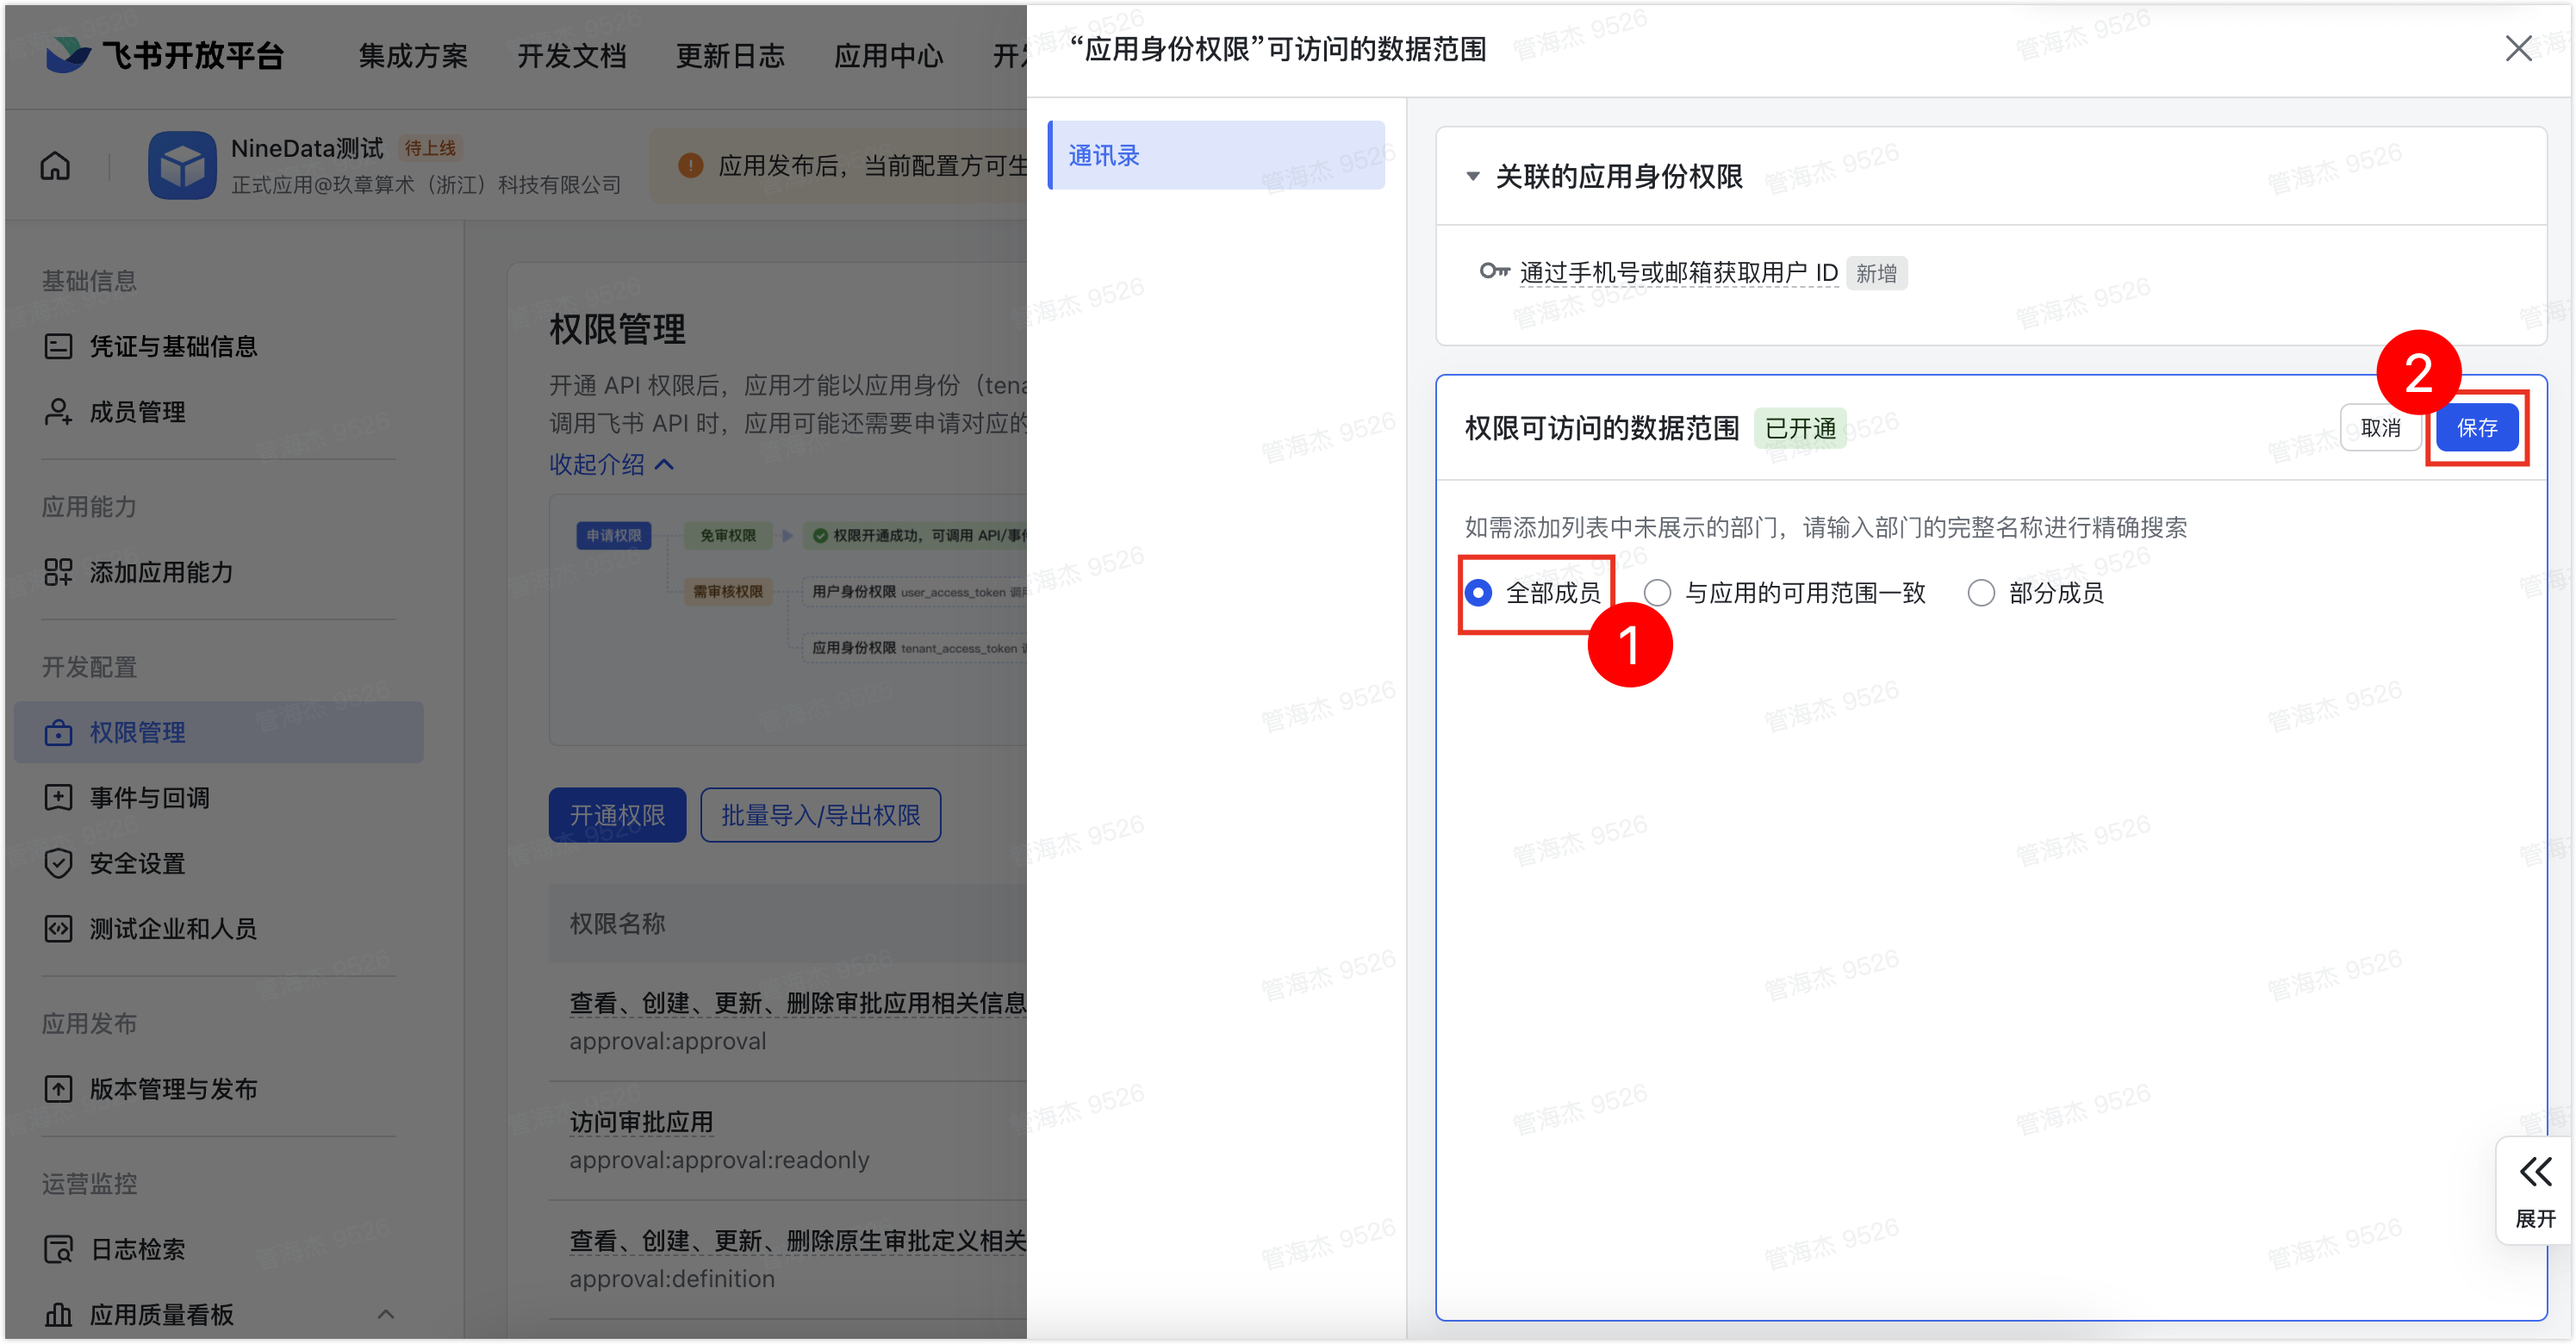
单击全部成员,单后单击保存。
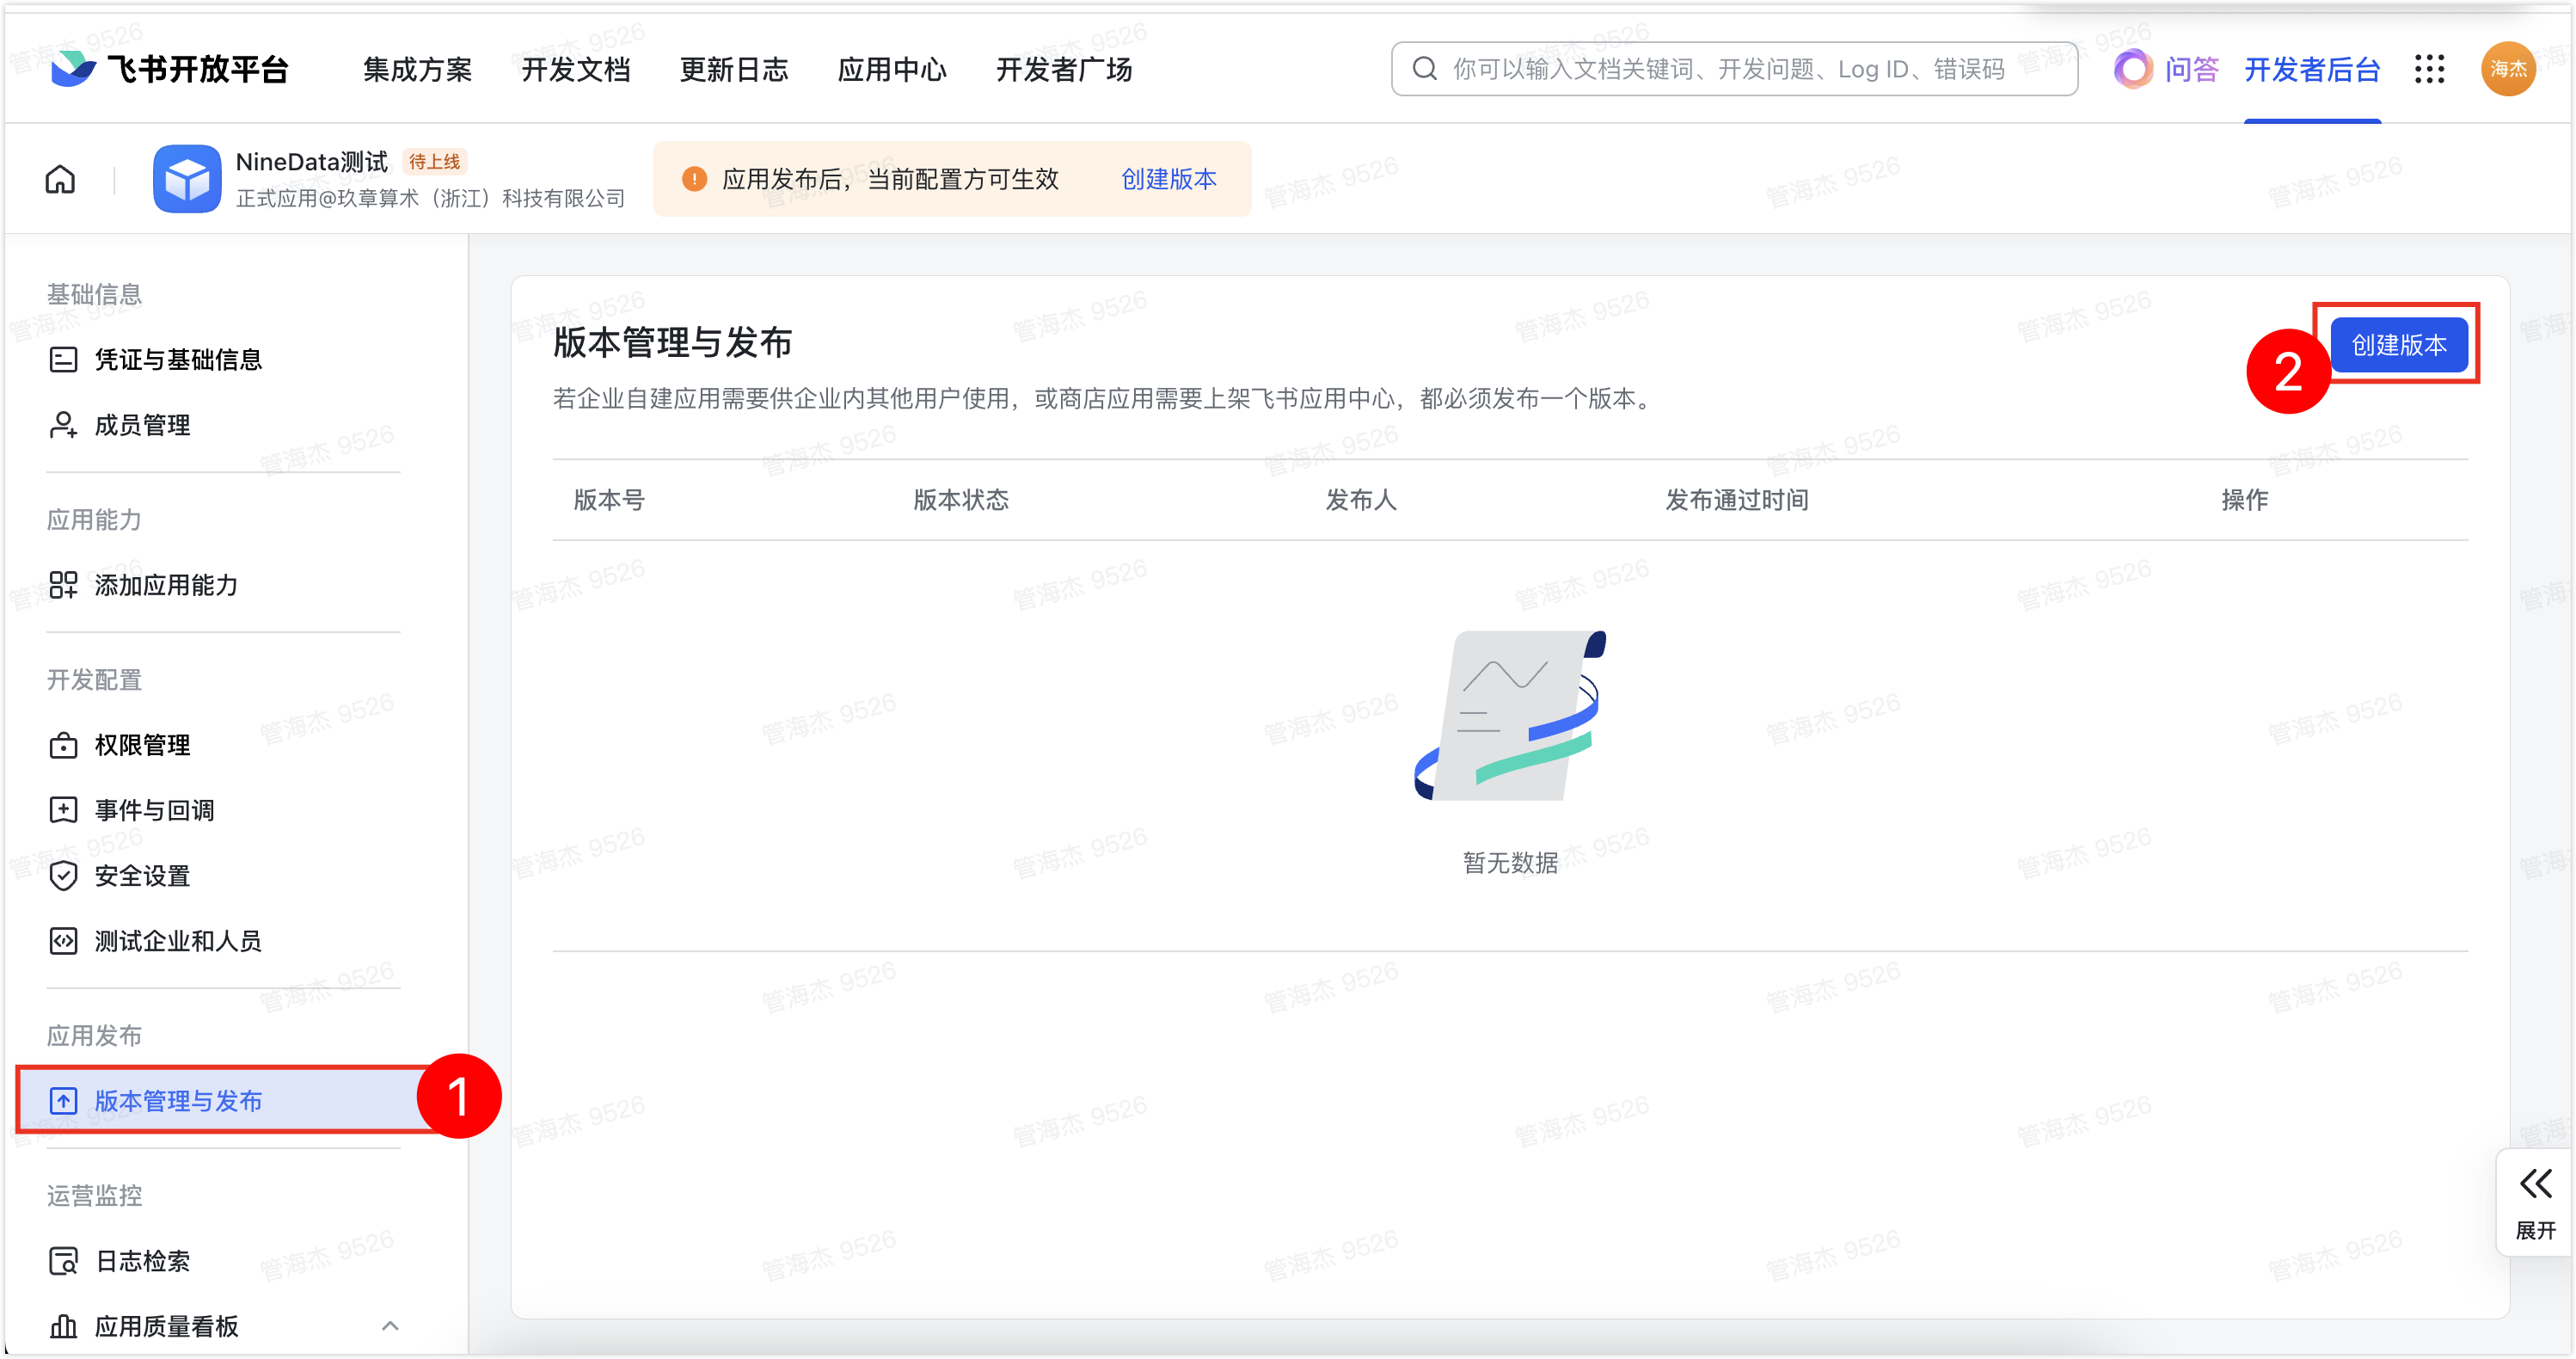
在左侧导航栏,单击应用发布下方的版本管理与发布,然后单击页面右侧的创建版本。
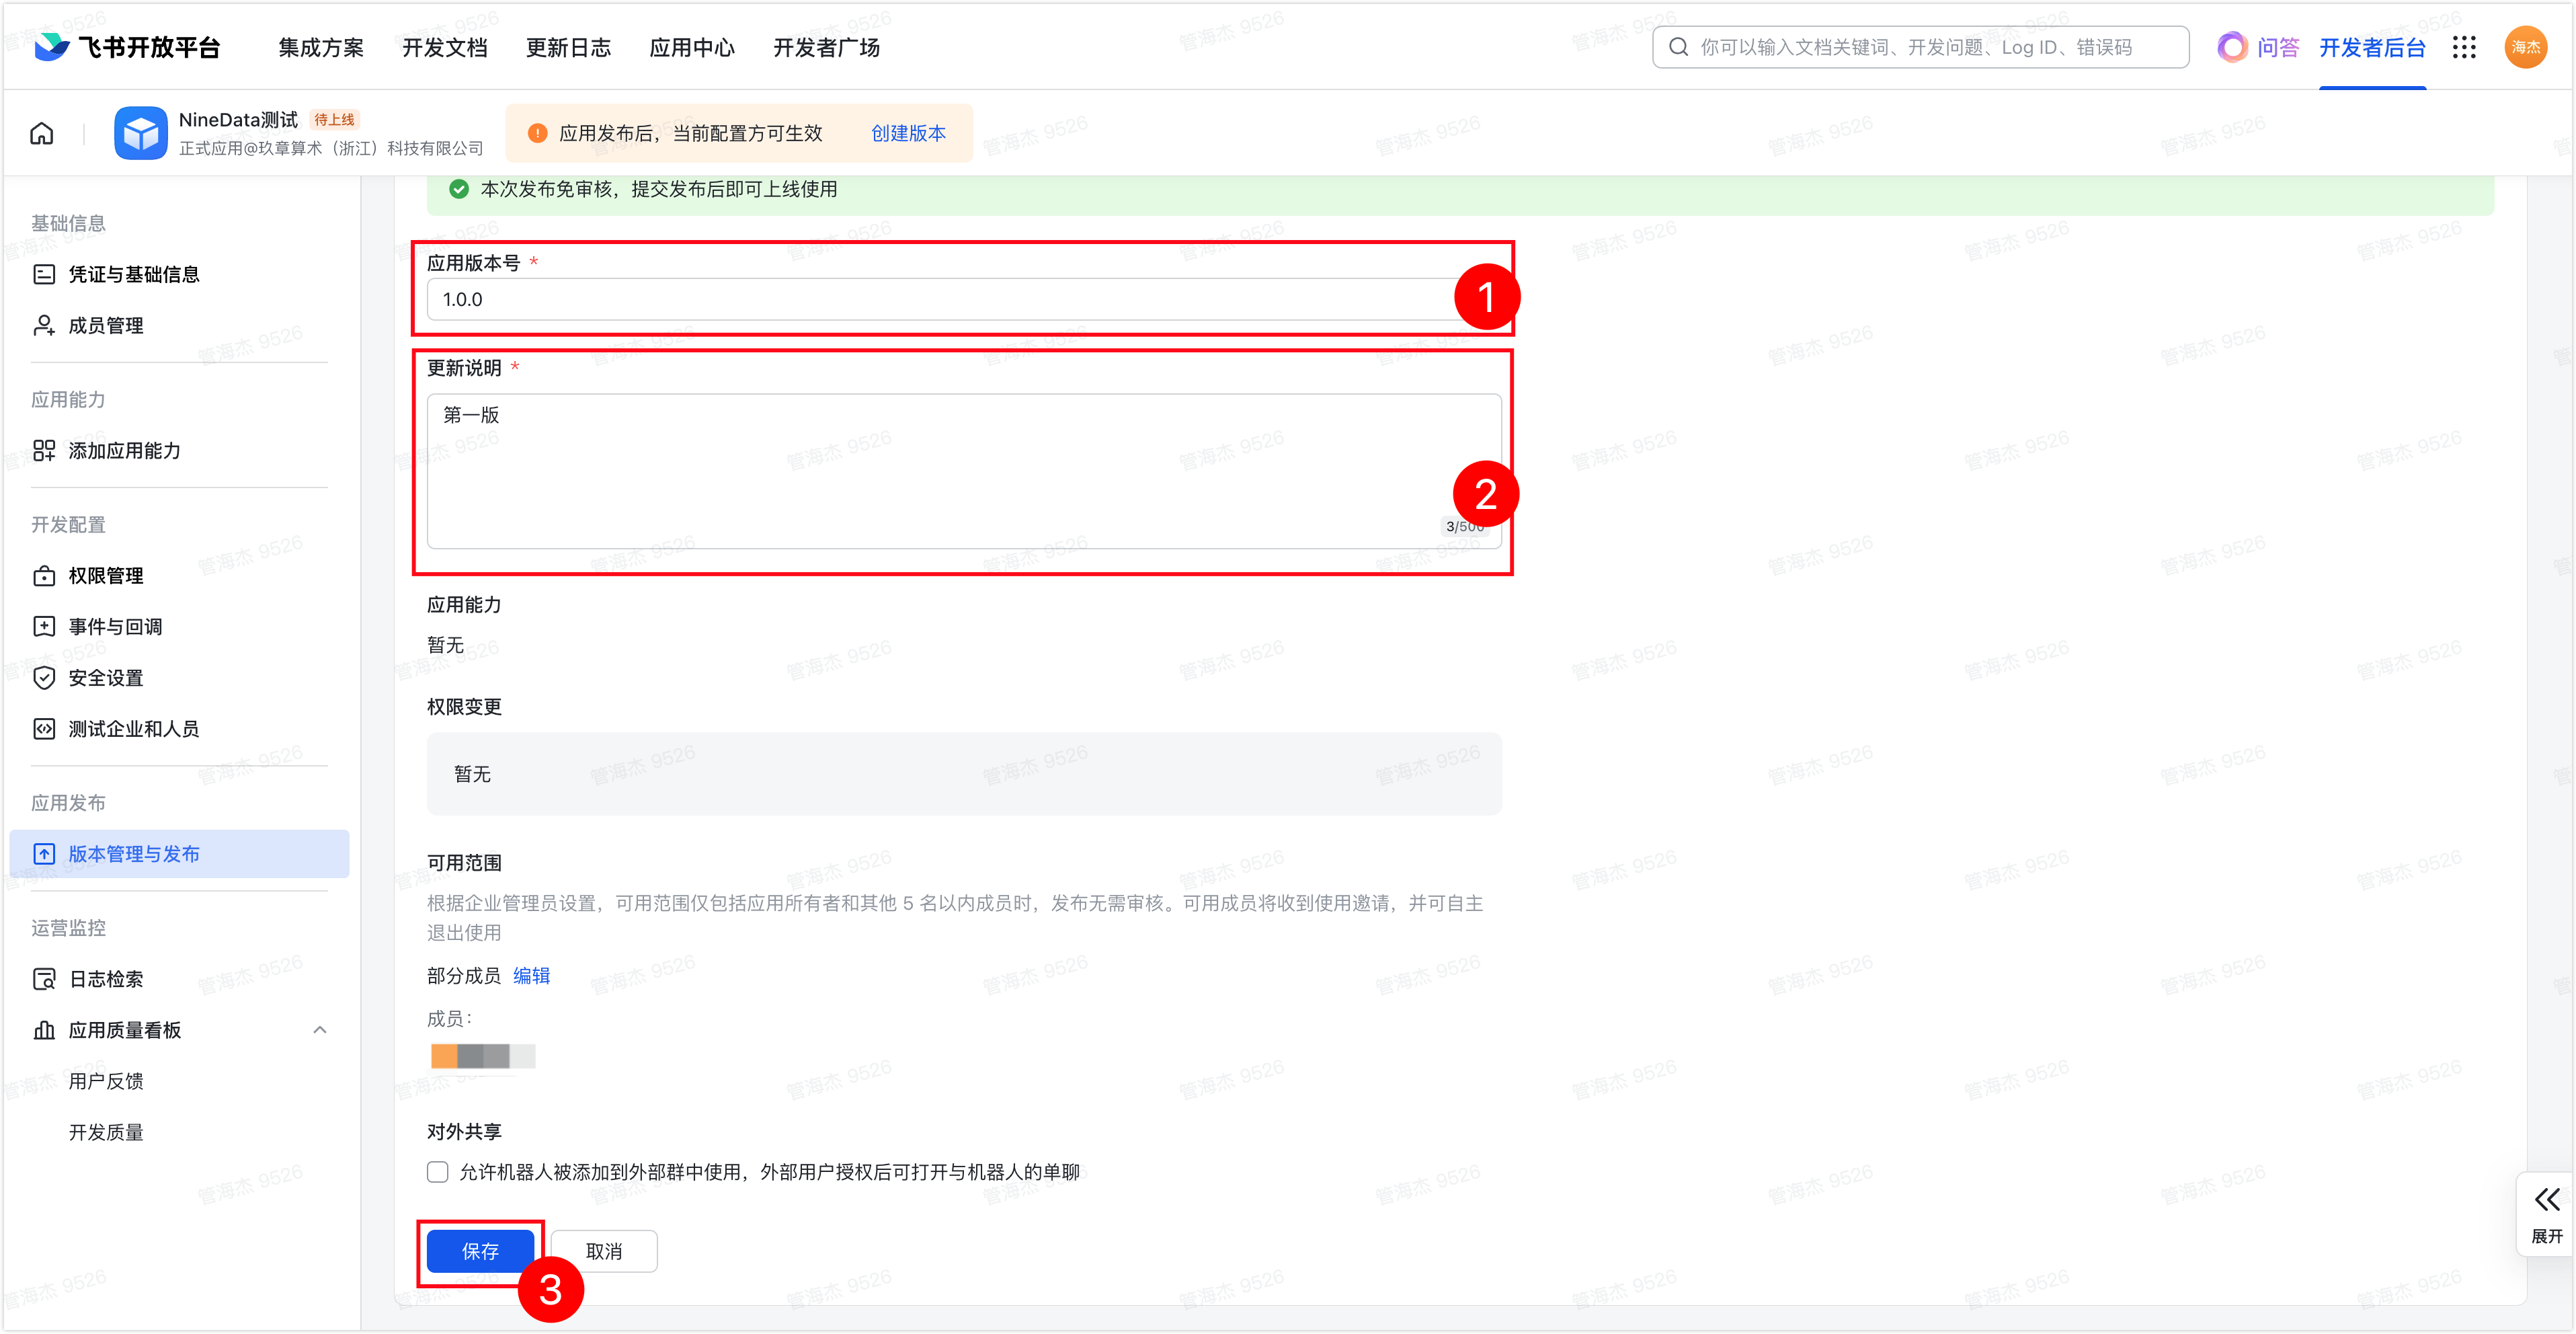
输入应用版本号和更新说明,单击保存。在确认窗口中,单击确认发布即可。
步骤二:在 NineData 中绑定飞书应用
登录 NineData 控制台。
在左侧导航栏,单击数据库 DevOps > 规范与流程。
单击审批流程页签,然后单击页面 右侧的外部流程渠道。
单击飞书下方的立即配置。
在配置飞书渠道窗口中,输入【步骤一】的第 3 步中记录的 AppID和AppSecret,选中自动初始化审批定义,然后单击确定即可。
tip选中自动初始化审批定义的情况下,NineData 会自动在飞书审批管理后台创建审批流程。
绑定完成后,单击飞书渠道中已配置右侧的 ID。
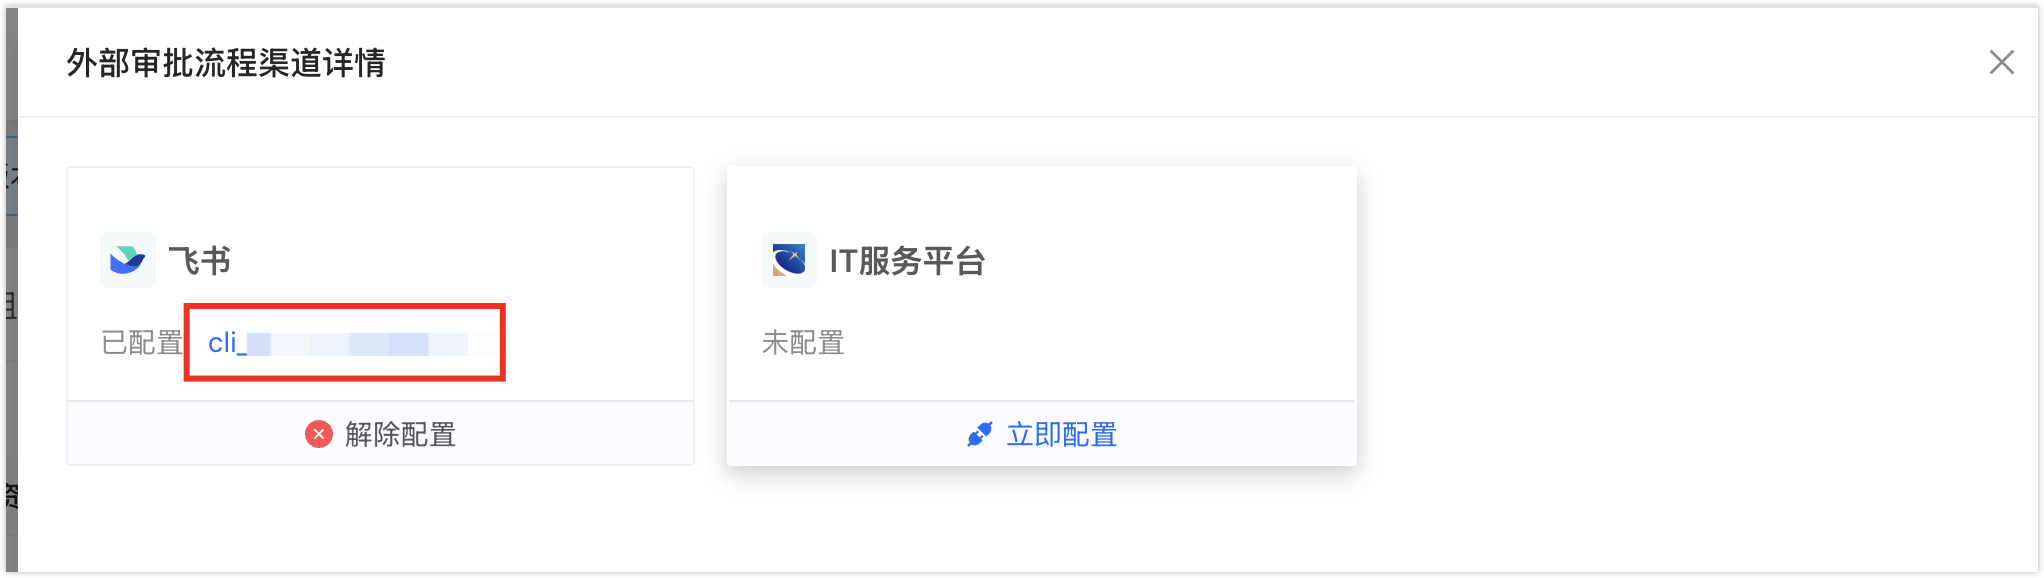
在配置飞书渠道窗口中,记录回调地址。
步骤三:配置回调事件监听
访问飞书开放平台。
单击步骤一中创建的应用,在左侧导航栏,单击开发配置下方的事件与回调。
在事件配置页签,单击订阅方式右侧的
 图标,选择将事件发送至开发者服务器。在请求地址下方的文本框中,输入步骤二的第 7 步记录的"回调地址",然后单击保存。注意
如果是私有化部署版本的 NineData,需要确保回调地址可以被公网访问。
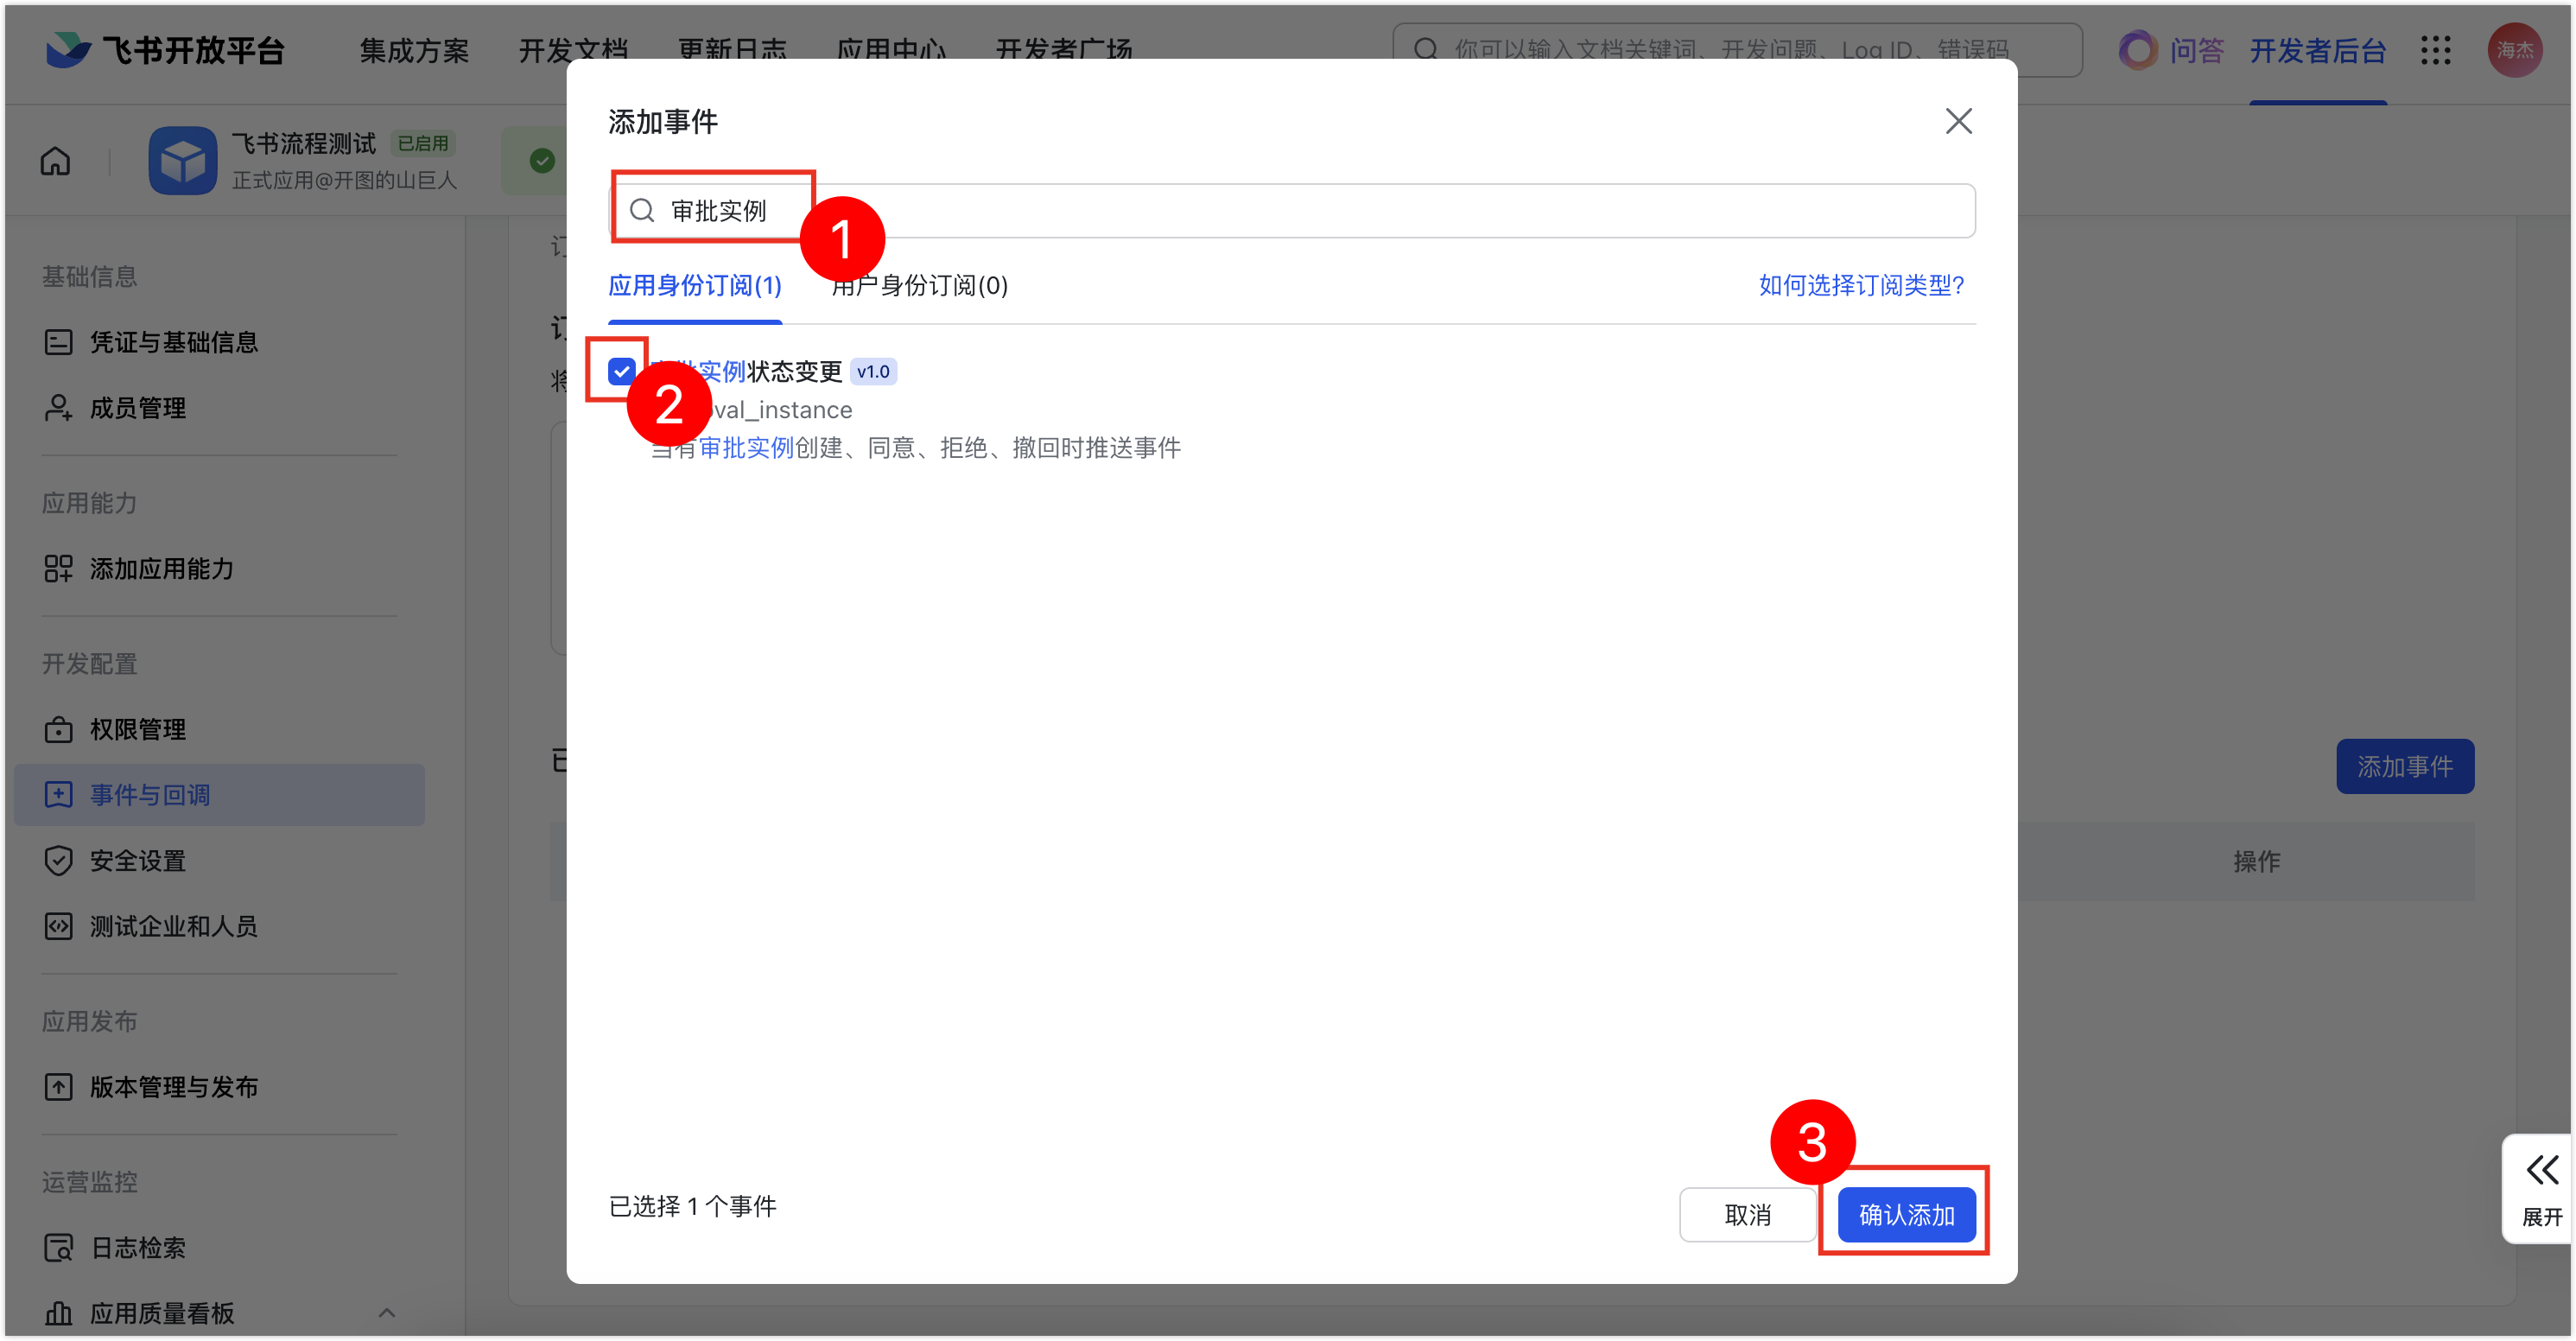
在页面下方已添加事件区域,单击右侧的添加事件。在添加事件页面,输入关键字【审批实例】,查找到审批实例状态变更项,选中该项然后单击确认添加即可。
步骤四:调整默认审批流程
对于 NineData 自动创建的默认审批流程,您可以对流程设计进行调整,添加条件分支、审批人、抄送人、办理人等信息。
访问飞书审批管理后台。
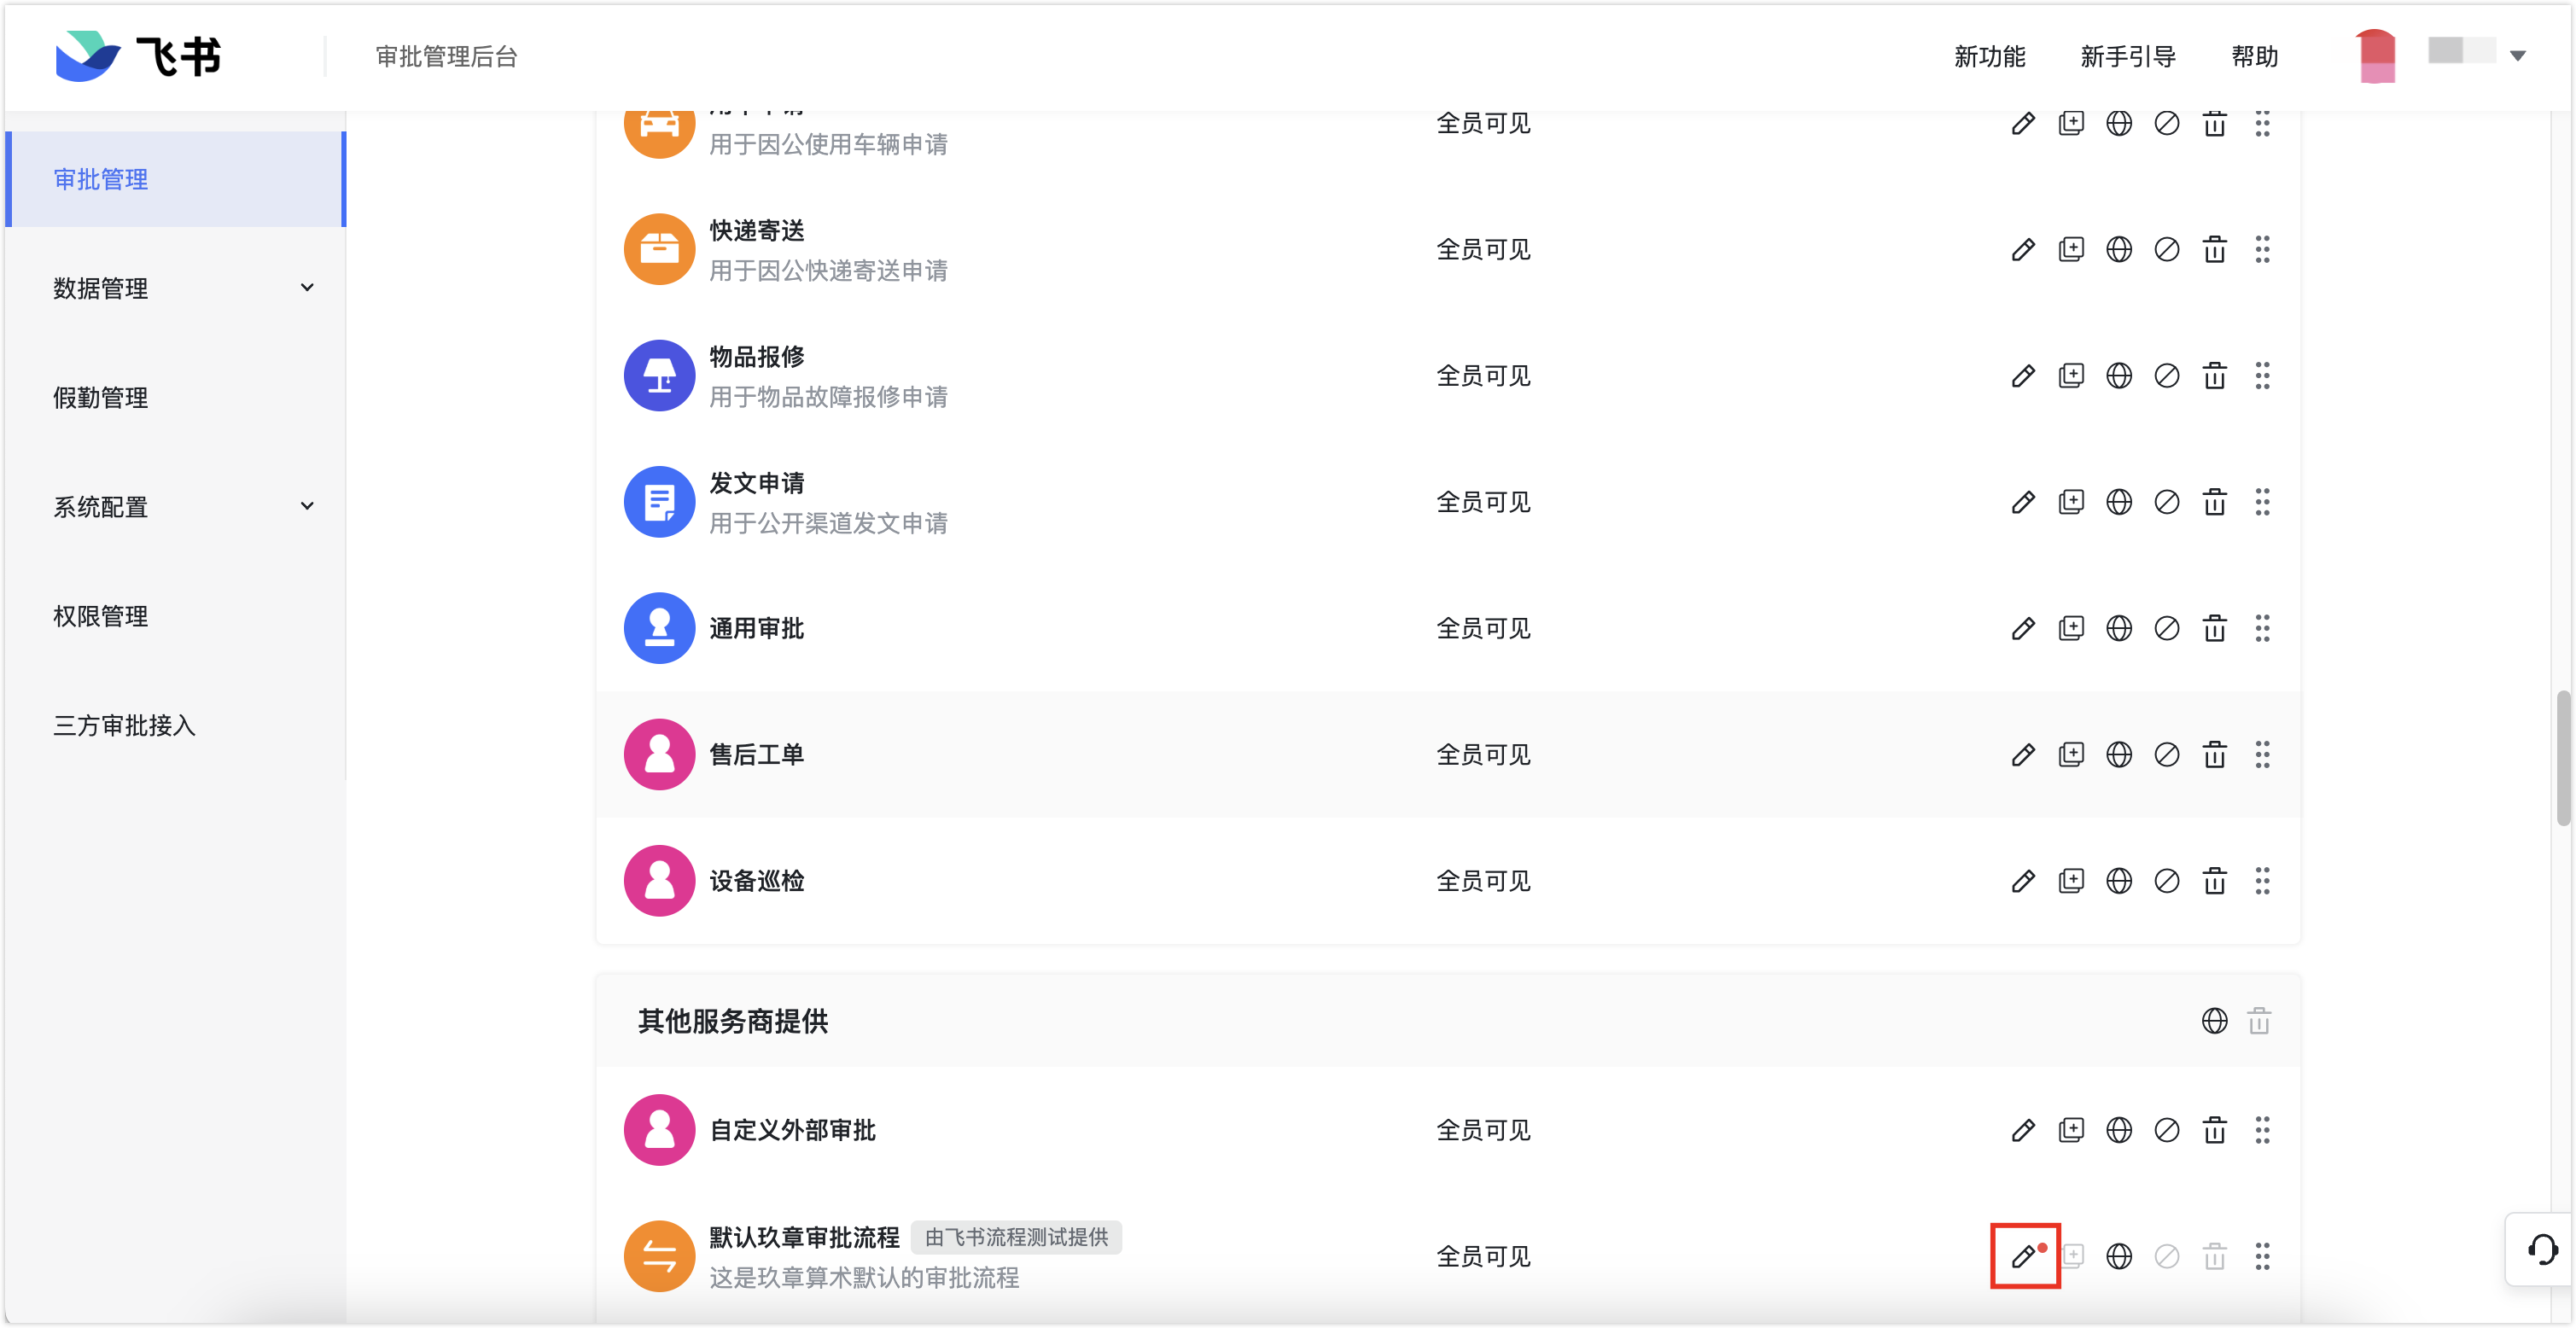
在审批管理页面,往下滚动页面至其他服务商提供区域,找到 NineData 自动创建的默认审批流程,单击其右侧的铅笔图标。
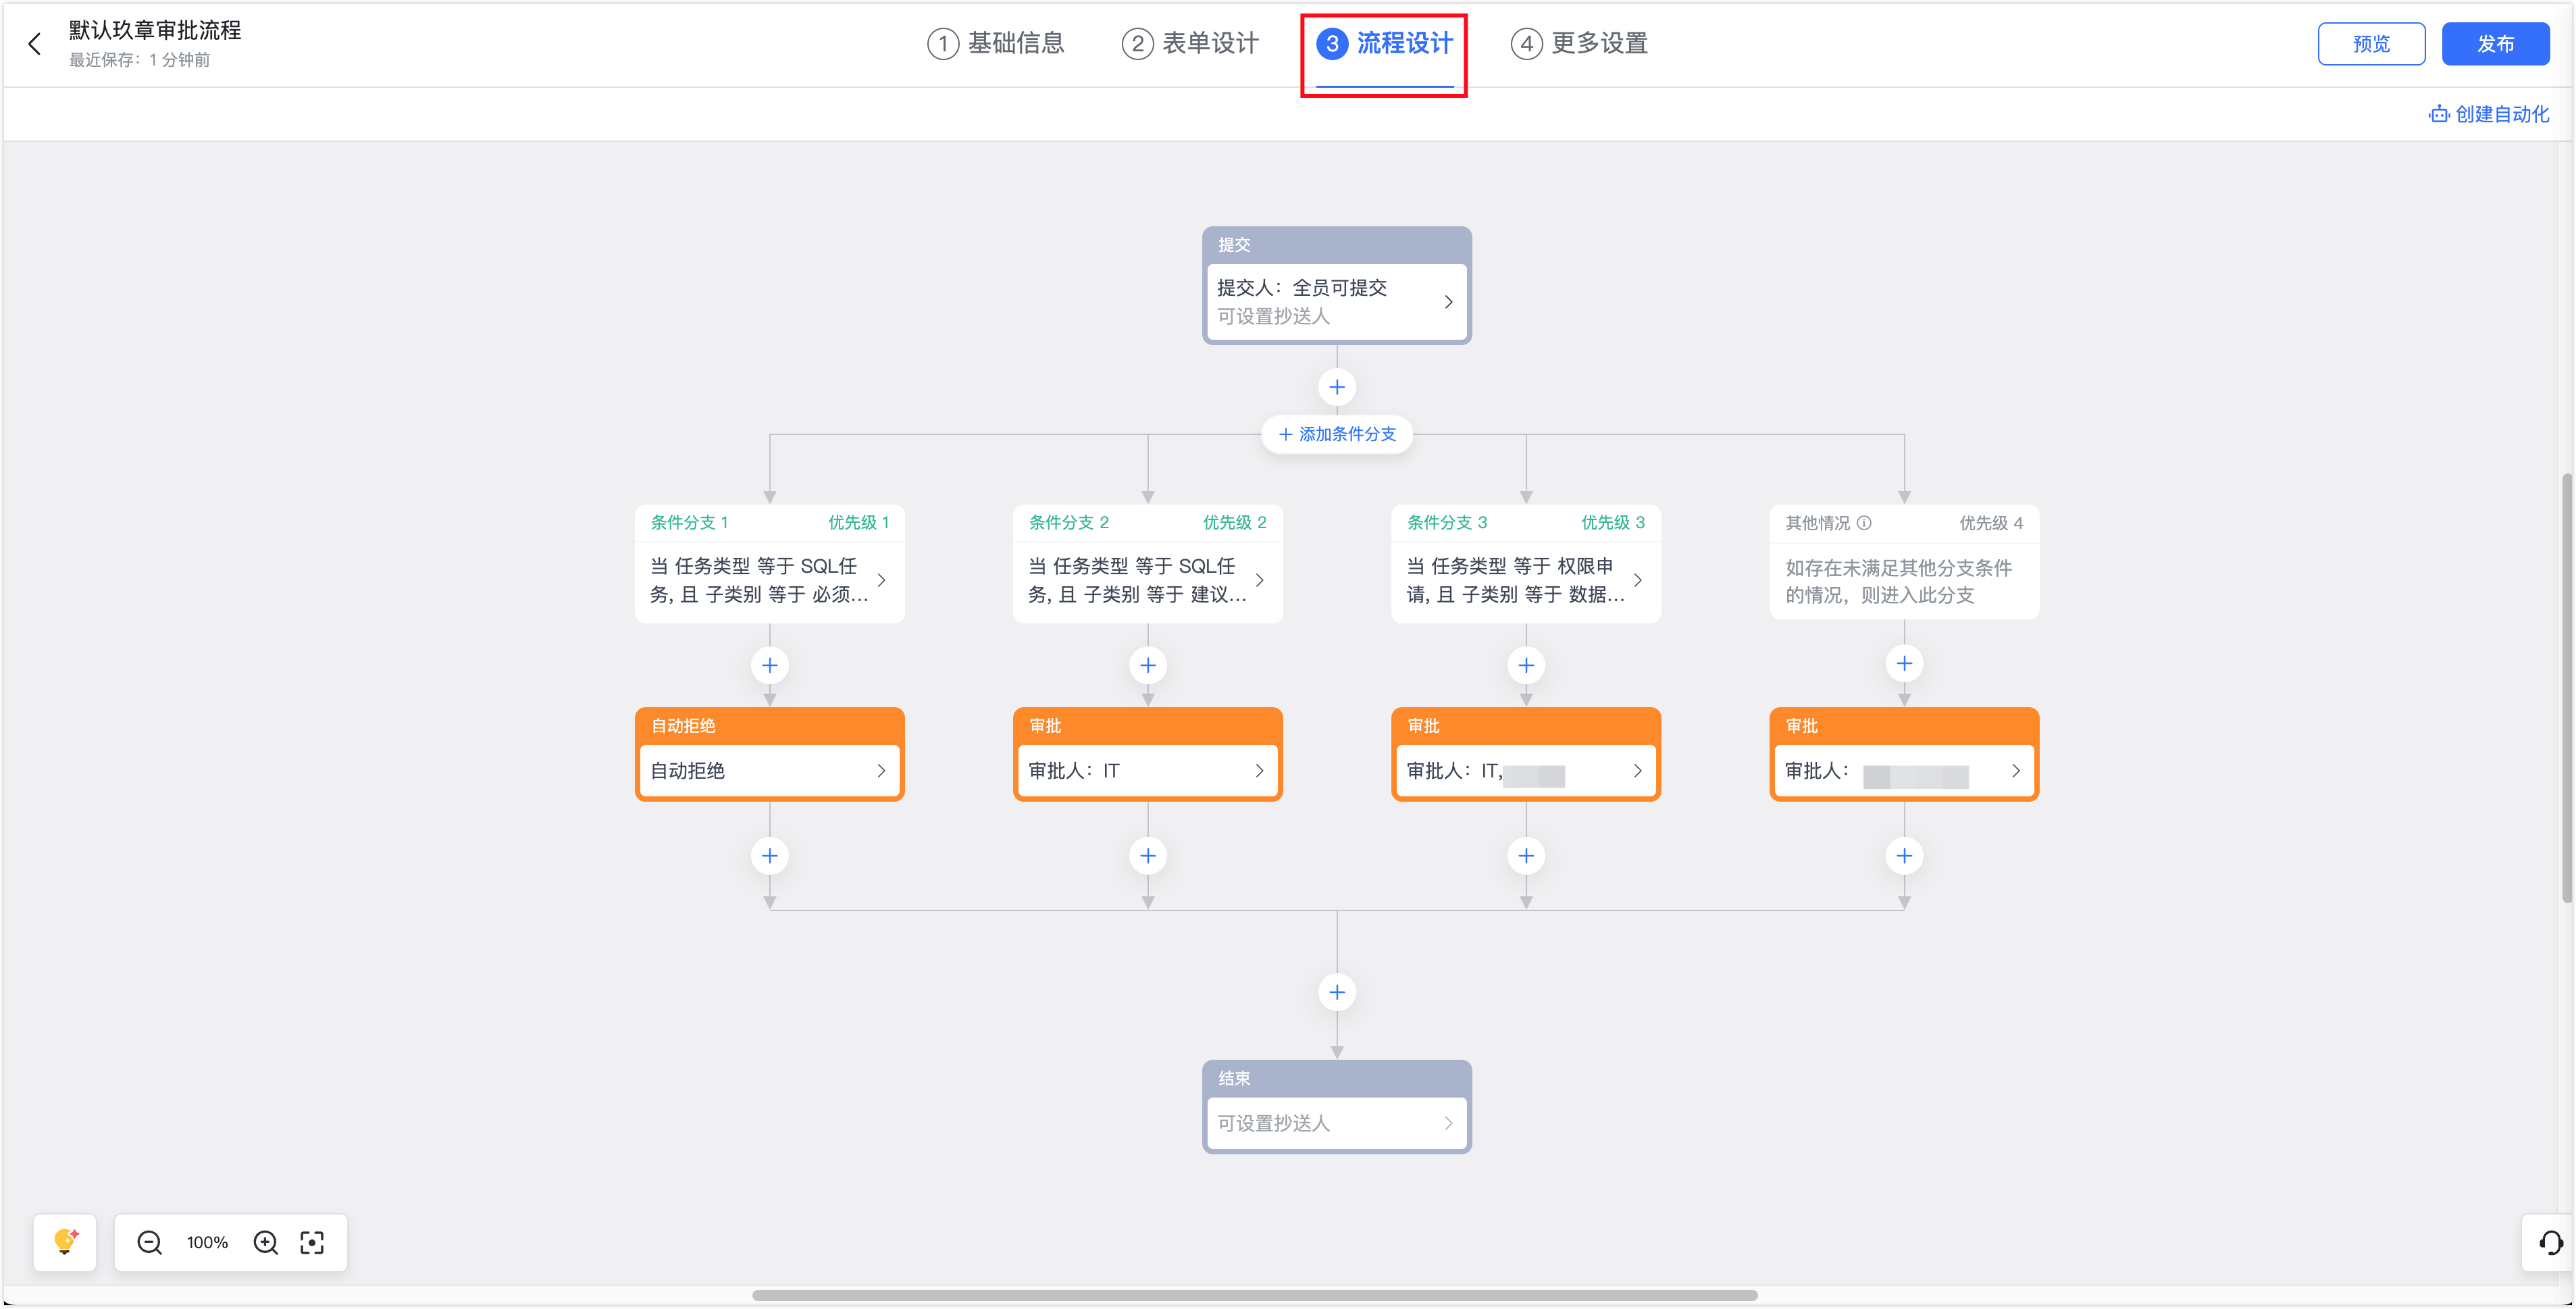
单击流程设计页签,按需配置审批流程的分支、审批人等信息。例如,下图创建四种不同情况下的审批流程,分别分配给不同的审批人。
更多信息,请参见管理员设计审批流程。
配置完成后,单击右上角的发布即可。
步骤五(可选):创建自定义审批流程
如果 NineData 创建的默认审批流程无法满足业务需求,可以在飞书创建自定义审批流程,然后在 NineData 控制台进行绑定和字段映射等操作。
访问飞书审批管理后台。
在审批管理页面,单击页面右侧的创建审批,然后在模板库中单击创建自定义审批。
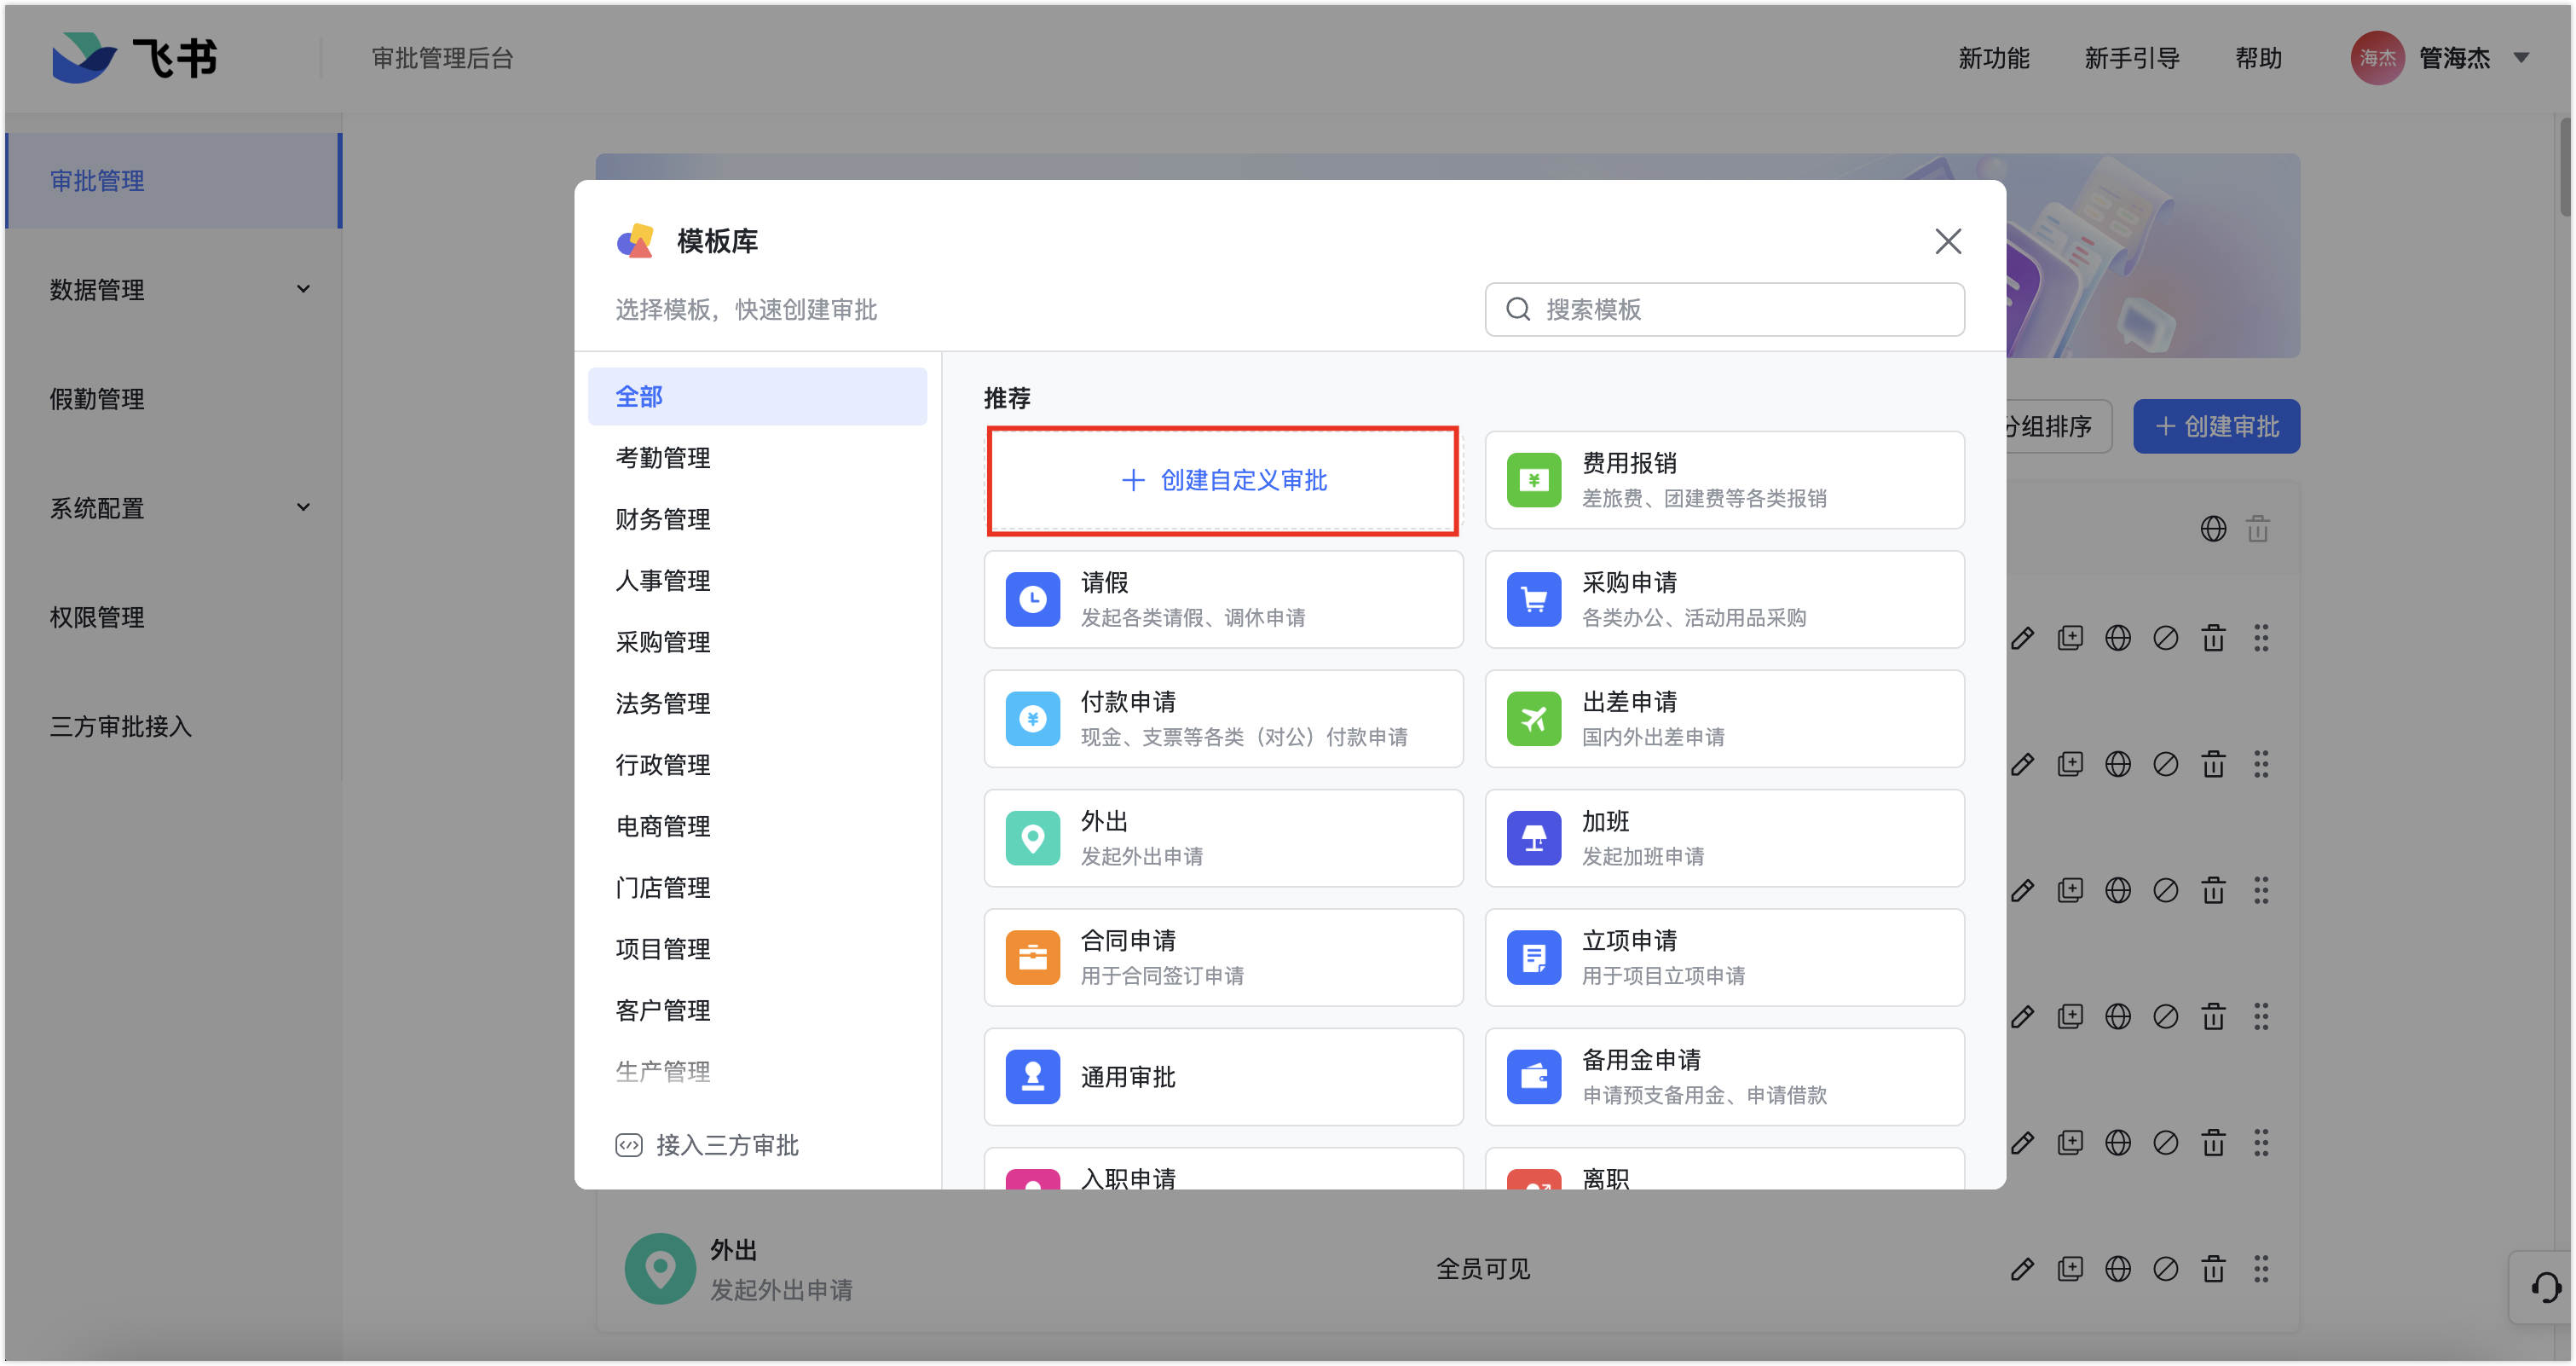
根据业务需求分别配置基础信息、表单设计、流程设计、更多设置,并记录浏览器地址栏中 URL 末尾的 definitionCode,然后单击右上角的发布。更多表单设计相关信息,请参见管理员设计审批表单。
 注意
注意当前支持添加的控件如下:
- 选项:单选、多选
- 文本:单行文本、多行文本
登录 NineData 控制台,在左侧导航栏,单击数据库 DevOps > 规范与流程。
单击审批流程页签,然后单击页面右侧的外部流程渠道。
单击审批流程映射定义页签,然后单击添加审批流程定义。
在创建审批流程定义页面,选择关联应用,输入名称,然后在审批定义ID中粘贴第 3 步中记录的 definitionCode,系统将自动拉取所有的飞书审批定义字段。
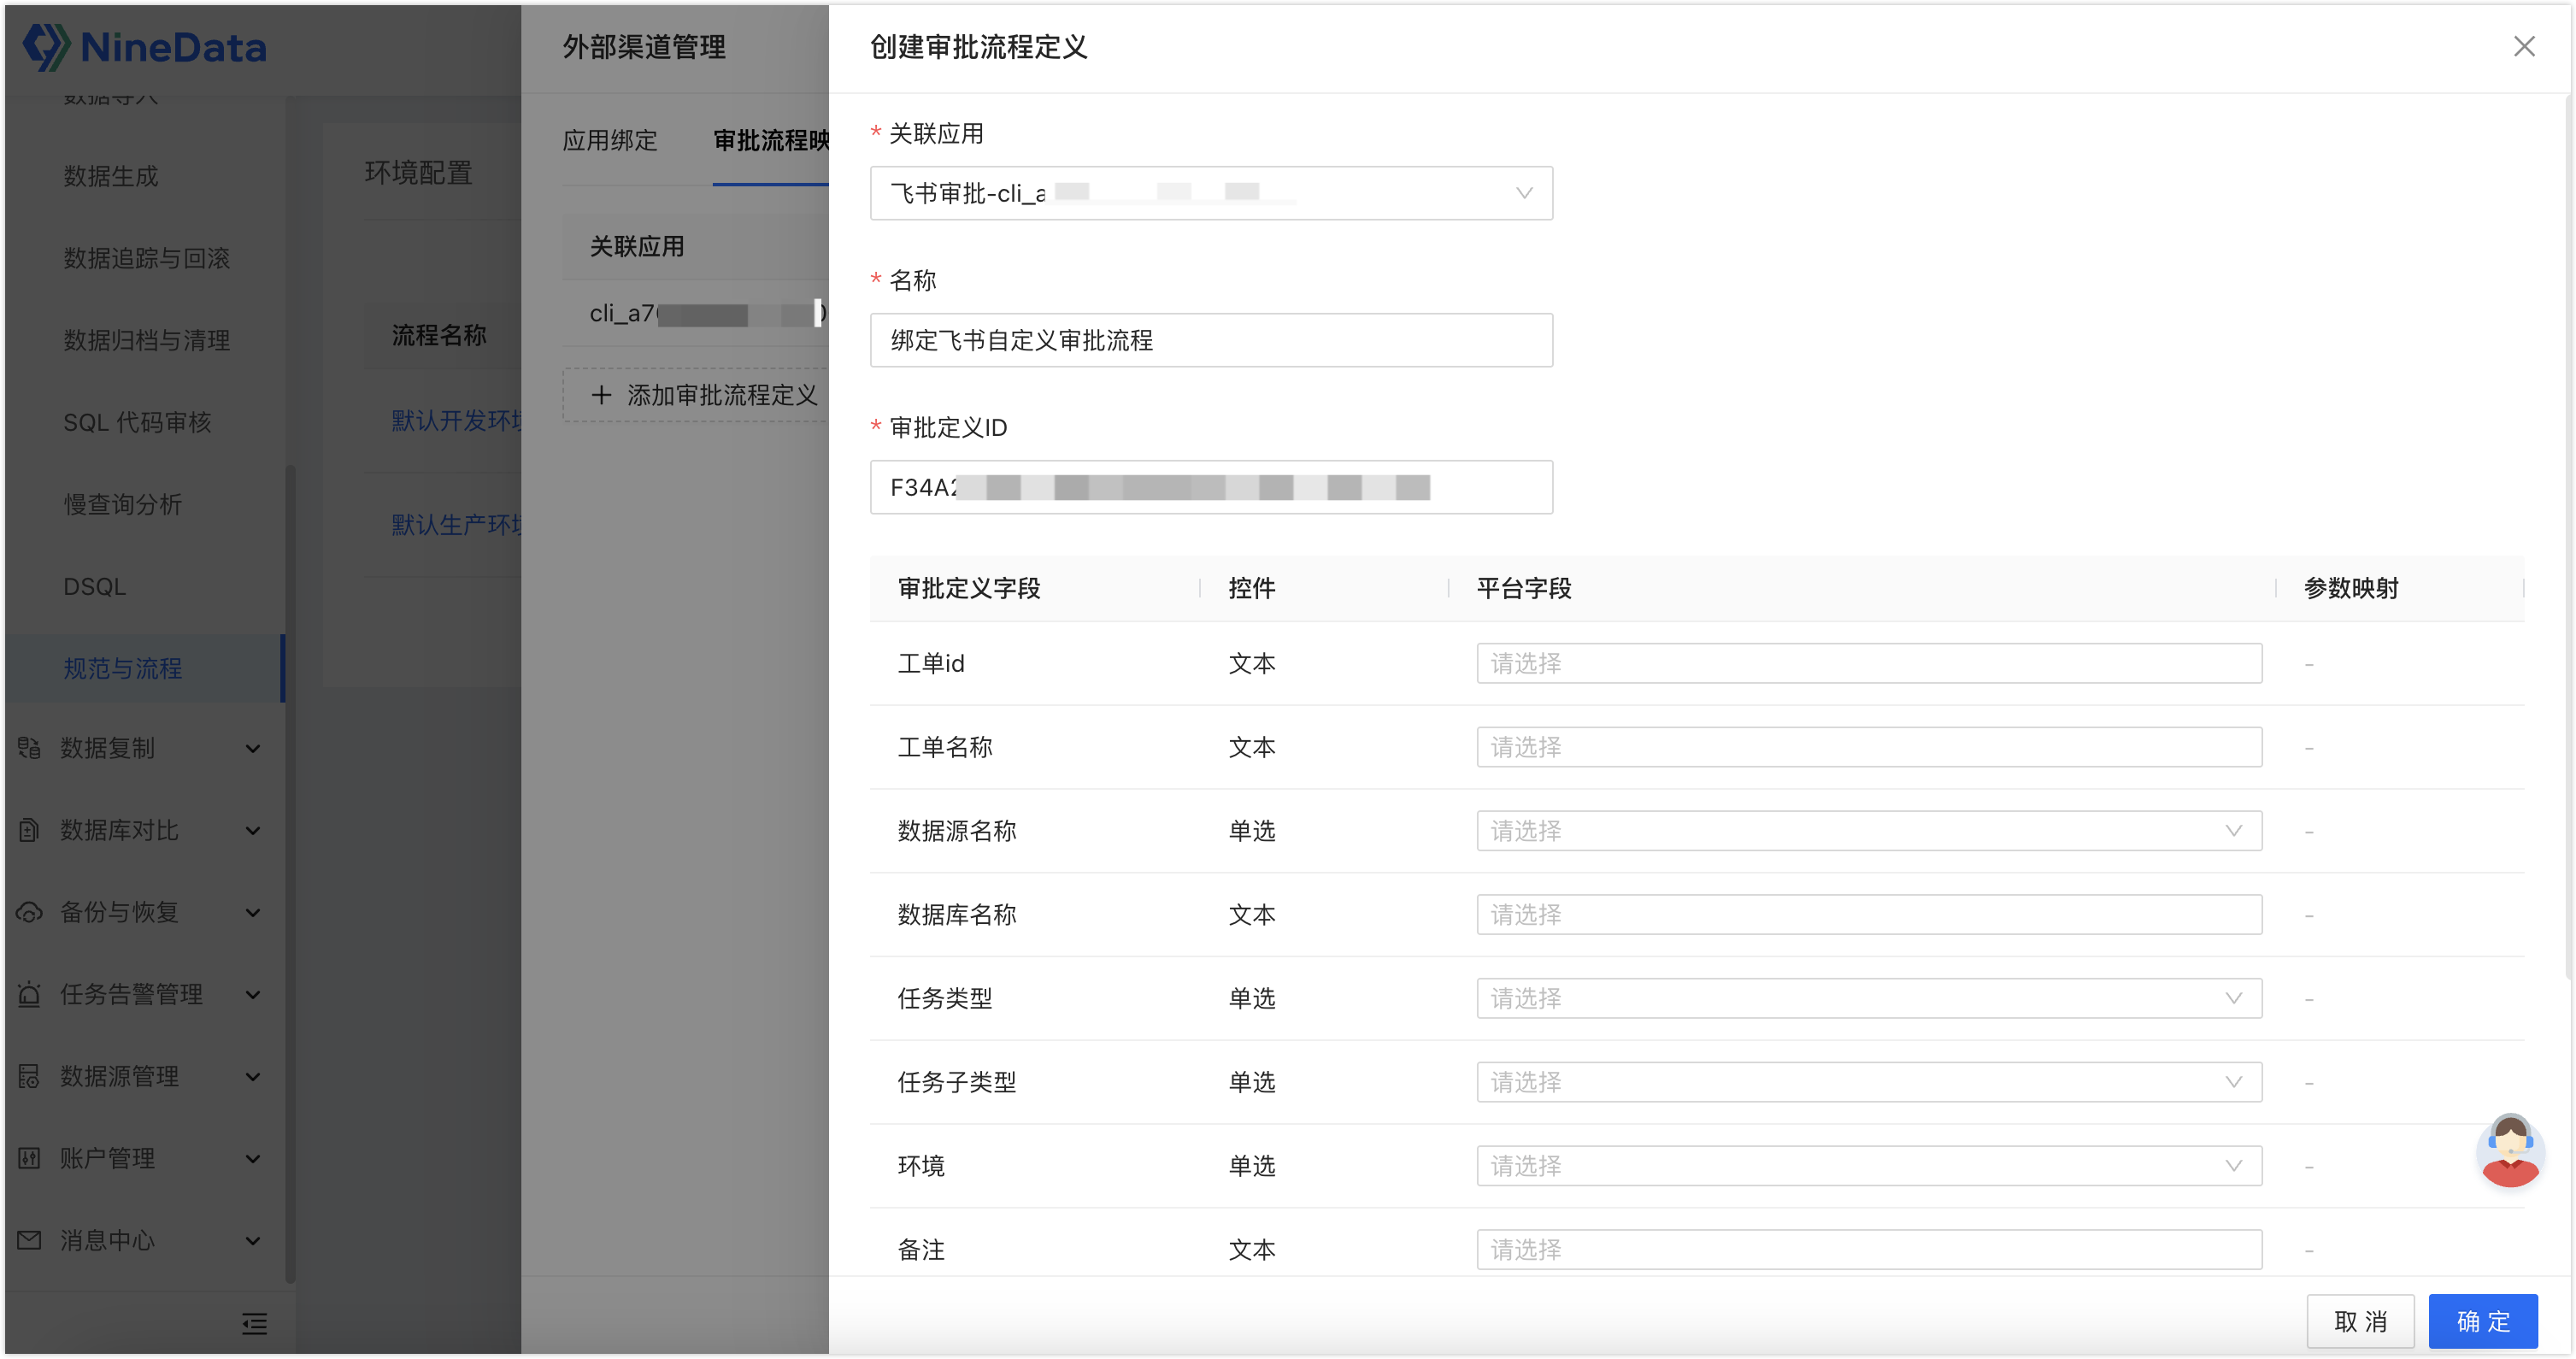
为每个审批定义字段映射 NineData 对应的平台字段,对于单选项,还需要配置参数映射。配置完成后,单击确定。
步骤六:配置审批流程
登录 NineData 控制台。
在左侧导航栏,单击数据库 DevOps > 规范与流程。
单击审批流程页签,找到目标需要启用飞书审批的审批流程,单击流程名称,进入审批流程详情页面。
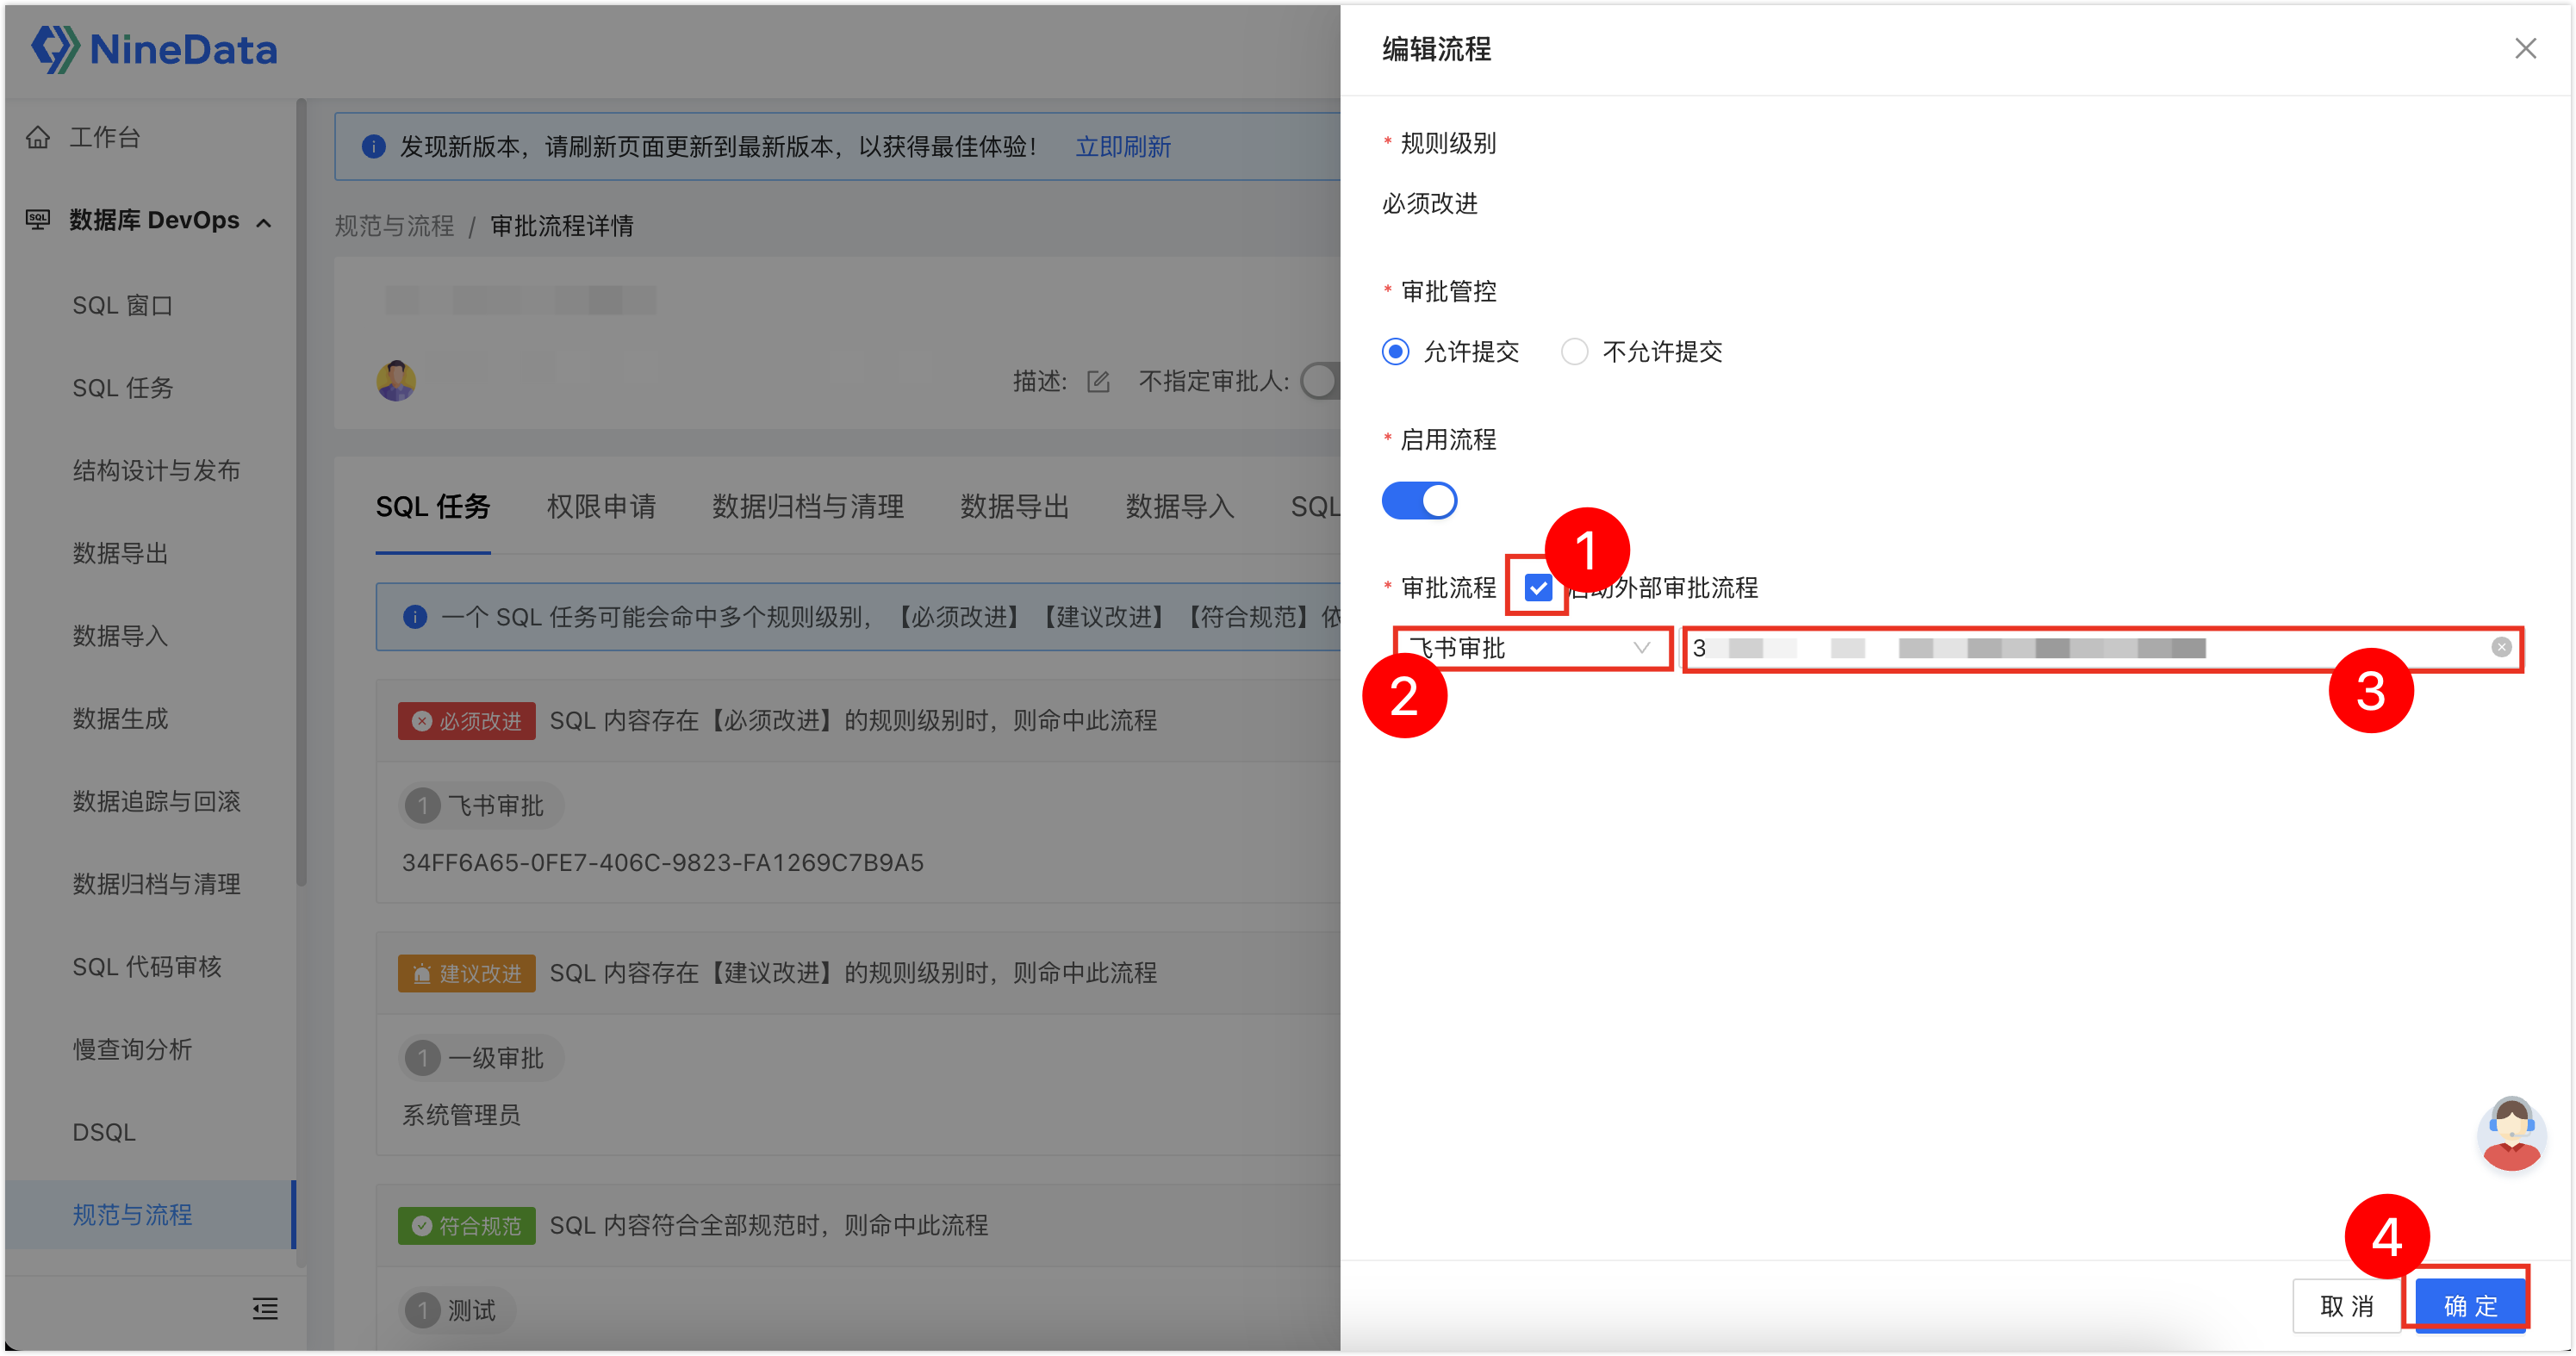
单击需配置的任务类型页签,然后单击目标流程右侧的编辑。勾选编辑流程页面下方的启动外部审批流程,在下方左侧选框中选择飞书审批,然后在右侧选择对应的飞书流程 ID,单击确定即可。
附录一:表单项参数列表
| 变量编码 | 变量含义 |
|---|---|
| TASK_NAME | 任务名称 |
| TASK_ID | 任务 ID |
| TASK_TYPE | 任务类型 |
| TASK_SUBTYPE | 子类型 |
| COMMENT | 备注 |
| ENV_NAME | 环境 |
| DATASOURCE_NAME | 数据源名称 |
| DATASOURCE_URL | 数据源链接地址 |
| DATABASE | 数据库名称 |
| EXPORT_METHOD | 导出方式 |
| EXPORT_CONTENT | 导出内容 |
| REASON | 原因 |
| AUTH_TYPE | 申请类型 |
| SUBMITTER | 提交人 |
| SQL_CONTENT | SQL 文本(摘要,前 200 字符) |
| SQL_FULL_CONTENT | SQL 文本(全文,最大 5000 字符) |
| TASK_URL | 任务申请地址 |
| FILE_TYPE | 导出/导入 文件类型 |
| AUTH_SENSITIVE | 敏感列 |
| AUTH_EXPIRATION_TIME | 权限有效期 |
| AUTH_APPLY_TYPE | 权限类型 |
| CREATE_TIME | 提交时间 |
| EST_AFFECTED_ROWS | 预估影响行数 |
| AUTH_APPLY_OBJECT_DB | 申请库 |
| AUTH_APPLY_OBJECT_TB | 申请表 |
| DATASOURCE_ID | 数据源 ID |
| EXECUTOR | 执行人 |
| EXPORT_OBJECT | 导出对象(包含库表信息或 SQL 语句) |
| TASK_DETAILS | 任务详情 |
| SUBMITER_PHONE | 提交人手机号 |
| APPROVAL_CODE | 外部审批模板编码 |
附录二:NineData 任务类型与子类型
| 任务类型 | 子类型 |
|---|---|
| SQL任务(含结构设计与发布) | 必须改进 |
| 建议改进 | |
| 符合规范 | |
| 权限申请 | 数据源 |
| 库 | |
| 表 | |
| 敏感等级S1 | |
| 敏感等级S2 | |
| 敏感等级S3 | |
| 敏感等级S4 | |
| 敏感等级S5 | |
| 数据导出 | SQL导出 |
| 导出库 | |
| 导出表 | |
| 数据导入 | 极速模式 |
| 数据生成 | 数据生成 |
| 数据追踪与回滚 | 数据追踪与回滚 |
| 数据归档与清理 | 清理 |
| 归档 | |
| 清理+归档 | |
| SQL代码审核 | SQL审核-推荐索引 |
| SQL审核-必须改进 | |
| SQL审核-建议改进 | |
| SQL审核-符合规范 |