Replicating Sharded Databases and Tables
NineData supports data replication for MySQL sharded databases and tables, allowing you to replicate data from multiple sharded databases and tables to other sharded databases or aggregate them into another MySQL instance.
Prerequisites
The source and target data sources must be added to NineData. For details on how to add data sources, see Adding Data Sources.
Usage Restrictions
- When creating database table groups, the physical sharded tables must exist and be extractable using an extraction expression.
- The data replication feature only applies to user databases in the data source. System databases will not be replicated. For example, in MySQL data sources,
information_schema,mysql,performance_schema, andsysdatabases will not be replicated. - The account for the source data source must have
SELECTprivileges for the replication objects (structure replication, full data replication),SHOW VIEWprivileges (for view replication), andREPLICATION CLIENTandREPLICATION SLAVEprivileges (for incremental replication). The account for the target data source must have DML and DDL privileges. - Before performing data synchronization, assess the performance of both the source and target data sources. It is recommended to run data synchronization during off-peak business hours to avoid high load on the databases during the full data initialization, which consumes read and write resources.
- Only table objects are supported for replication; other objects will be automatically ignored.
- Ensure that every table in the synchronization object has a partition key, primary key, or unique constraint. Additionally, when using the sharding routing algorithm, the two rows of data routed to the same target table must not have the same primary key or unique constraint, or new data will overwrite the old data.
Step 1: Create Database Table Group
You need to add the sharded databases and tables from the source data source into NineData’s database table group to enable their migration. If your replication target also involves sharded databases and tables, follow this step to create a target database table group as well.
Log in to the NineData Console.
In the left navigation pane, click Datasource > Datasource.
Click the Database Grouping tab and click Create Database Grouping on the page.
Configure the form according to the table below, and click Create Database Grouping.
Parameter Description Database Grouping Name Enter the name of the database group, using only English characters, numbers, and underscores, starting with an English letter. To facilitate future use and management, use a meaningful name. Description (optional) Enter a business description for this database group. Environment Select the name of the environment your business belongs to, which will help you filter the data sources. Database Click Add Datasource, select the data sources to add to the group. You can select multiple data sources, select all, or deselect them. You can also search by data source name. After clicking OK, you will need to select the specific sharded databases. The page will automatically redirect to Database Grouping Detail. Click Create Table Grouping.
Configure the form according to the table below, and click Create Table Grouping.
Parameter Description Table Grouping Name Enter the name of the table group, using only English characters, numbers, and underscores, starting with an English letter. To facilitate future use and management, use a meaningful name. Methods Supports Add Manually and Add by Expression. Add by Expression When Methods is set to Add by Expression, you need to configure this option. Enter an expression and click Auto Fetch. The system will automatically traverse and extract all qualifying tables in the target database based on the expression provided. Routing Algorithm (optional) When Methods is set to Add by Expression, you can configure this parameter based on the routing algorithm used in your application, which allows quick resolution of the tables to be accessed. For the configuration method of Routing Algorithm, please refer to the Appendix of this document. Database When Methods is set to Add Manually, you need to configure this. Click Add Datasource, select the data sources to add to the group. You can select multiple data sources, select all, or deselect them. You can also search by data source name. After clicking OK, you will need to select specific databases and tables. Depending on the data source, you may also need to select a specific schema.
Step 2: Create Data Replication Task
NineData’s data replication product has been commercialized. You can still use 10 replication tasks for free, with the following considerations:
Among the 10 replication tasks, you can include 1 Incremental task, with a specification of Micro.
Tasks with a status of Terminated do not count towards the 10-task limit. If you have already created 10 replication tasks and want to create more, you can terminate previous replication tasks and then create new ones.
When creating replication tasks, you can only select the Spec you have purchased. Specifications that have not been purchased will be grayed out and cannot be selected. If you need to purchase additional specifications, please contact us through the customer service icon at the bottom right of the page.
Log in to the NineData Console.
In the left navigation bar, click Replication.
On the Replication page, click Create Replication in the upper right corner.
In the Source & Target tab, configure the settings according to the table below, and click Next.
Parameter Description Name Enter the name of the data synchronization task. To make it easier to find and manage later, try to use a meaningful name. Maximum 64 characters. Source Select the database group where the synchronization object is located. Target The target data source or database group to receive the synchronized object. Type Choose the content to be copied to the target data source or database group. - Schema: Only synchronize the structure of the source database group, not the data.
- Full: Synchronize all objects and data from the source database group, i.e., full data replication. The switch on the right is for periodic full replication. For more information, see Periodic Full Replication.
If target table already exists (required if Schema is selected) - Pre-Check Error and Stop Task: If a table with the same name is detected during the pre-check, stop the task.
- Skip and Continue Task: If a table with the same name is detected during the pre-check, continue the task with a warning. The table will be skipped during schema replication. If you also perform data replication, the data will be appended to the same-name table without overwriting existing data.
- Delete Objects and Rewrite: If a table with the same name is detected during the pre-check, continue the task with a warning. During schema replication, the target table will be dropped and recreated based on the source schema. If you also perform data replication, the data will be written after the schema replication.
- Keep Schema and Clear Data, then Rewrite (optional if performing both schema and data replication): If a table with the same name is detected during the pre-check, continue the task with a warning. The target table schema will be retained, and the data will be cleared before writing new data from the source table.
Target Table Exists Data (required if Schema is not selected) - Pre-Check Error and Stop Task: Stop the task if data is found in the target table during the pre-check.
- Ignore existing target data and append to it.: Ignore existing data in the target table and append new data.
- Clear target existing data before write: Delete existing data in the target table and replace it with new data from the source.
In the Objects tab, configure the following parameters, then click Next.
Parameter Description Replication Objects Choose the content to be copied. You can select All Objects to copy all contents of the source database, or Customized Object to manually select objects in the Source Object list and add them to the Target Object list on the right. Blacklist (optional) Click Add to add a blacklist record, selecting databases or objects that will not be copied. This is used for excluding certain databases or objects during full or custom replication. - Left dropdown: Select the database to be blacklisted.
- Right dropdown: Select specific objects within the database, or leave it empty to blacklist the entire database.
If you need to create multiple replication routes with the same objects, you can create a configuration file and import it when creating a new task. Click Import Config in the top right, then click Download Template to download the configuration file template. After editing, upload the file using Upload to import it in bulk. Configuration file instructions:
Parameter Description source_table_nameName of the source table containing the object to be synchronized. destination_table_nameName of the destination table to receive the synchronized object. source_schema_nameSchema name of the source table containing the object. destination_schema_nameSchema name of the destination table receiving the object. source_database_nameSource database name. target_database_nameTarget database name. column_listList of fields to be synchronized. extra_configurationAdditional configuration information can be set here: column_rules: Used to define column mapping and value rules. Field descriptions:column_name: Original column name.destination_column_name: Target column name.column_value: Value to assign, which can be an SQL function or a constant.
filter_condition: Used to specify row-level filtering conditions; only rows that meet the criteria will be copied.
tipExample content for
extra_configuration:{
"extra_config": {
"column_rules": [
{
"column_name": "created_time", // Original column name to map.
"destination_column_name": "migrated_time", // Target column name mapped to "migrated_time".
"column_value": "current_timestamp()" // Change the column value to the current timestamp.
}
],
"filter_condition": "id != 0" // Only rows where ID is not 0 will be synchronized.
}
}For a full example, see the downloaded template.
In the "Mapping" tab, choose different operations based on the type of replication, then click Save and Pre-Check. If there are updates to the source or target data sources, click Refresh Metadata in the top right to retrieve the latest information.
If Schema is included: Configure the target table's name in the target data source after synchronization.
If Schema is not included: The system defaults to selecting a target database with the same name. If the target database does not exist, you must manually choose it. The table and column names in the target database should match the source. You can also manually map table and column names if they differ.
In addition, you can perform ETL (Extract, Transform, Load) operations:
Use Field Expr.: For example, to remove trailing spaces from a field name, click Mapping & Filtering next to the target table, find the desired field, and enter
removepattern(x,' +$')in the Field Expr. field, then click Submit and OK.
Add a new column to the target table: For example, to add a
hospital_codecolumn with a constant value, click Mapping & Filtering next to the target table, then click Add columns to the target table under Add, fill in the column name, expression, and type, and click OK.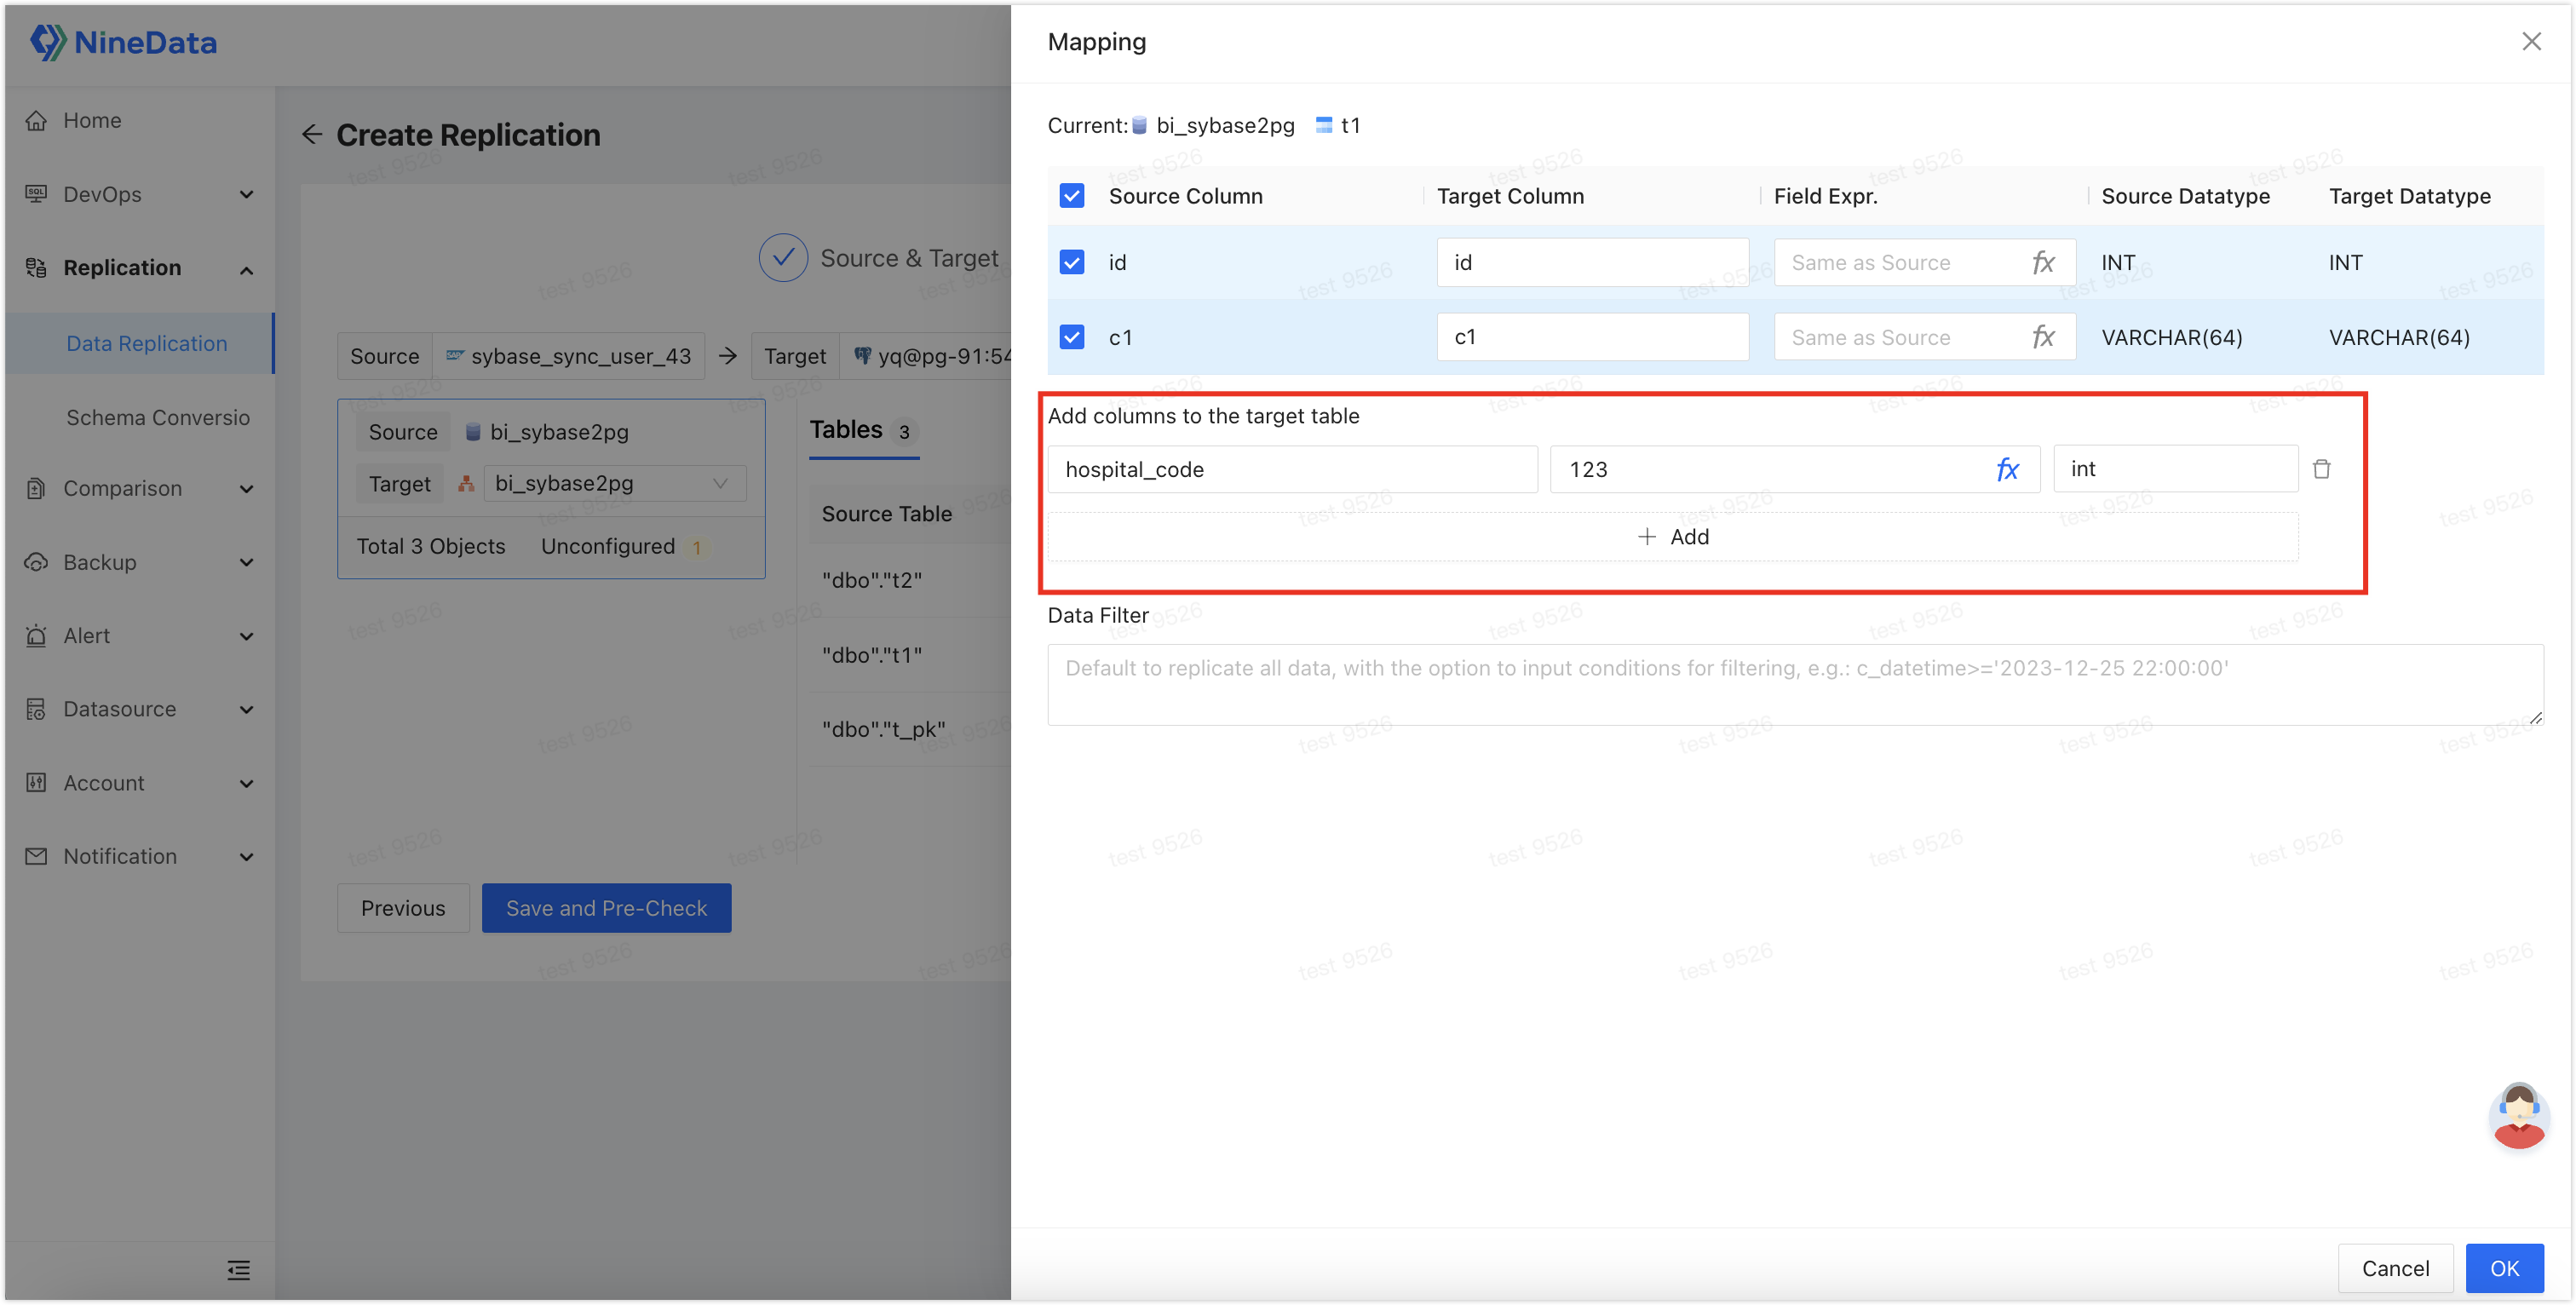
Set Data Filter: Click Mapping & Filtering on the right side of the page, and in the Data Filter field, enter
emp_no>=10005to exclude rows where emp_no is less than 10005 from being synchronized to the target data source.
In the "Pre-check" tab, wait for the system to complete the pre-check. After the pre-check passes, click Launch.
You can select Enable data consistency comparison to automatically start a data consistency comparison after the synchronization task is completed, ensuring data consistency between the source and destination. Depending on the Type you select, Enable data consistency comparison will start at the following times:
- Schema: After schema replication is completed.
- Schema + Full, Full: After full replication is completed.
If the pre-check fails, click Details in the Actions column next to the failed check item to troubleshoot the issue, then click Check Again to rerun the pre-check until it passes.
For items marked with Warning, you can decide whether to fix or ignore them based on the specific situation.
In the Launch page, once Launch Successfully appears, the synchronization task will begin. At this point, you can:
Click View Details to view the progress of each stage of the synchronization task.
Click Back to list to return to the Replication task list page.
Step 3: View Synchronization Results
Log in to the NineData Console.
Click on Replication > Data Replication in the left navigation pane.
On the Replication page, click on the Task ID of the target synchronization task, and the page description is as follows.

Number Function Description 1 Configure Alerts After configuring alerts, the system will notify you in the selected way when the task fails. For more information, please refer to Operational Monitoring Overview. 2 More - Pause: Pause the task. Only tasks with the status Running are selectable.
- Duplicate: Create a new replication task with the same configuration as the current task.
- Terminate: End tasks that are incomplete or in listening (i.e., in incremental synchronization). After terminating the task, it cannot be restarted, so please proceed with caution. If triggers are included in the synchronization object, trigger replication options will pop up, please choose as needed.
- Delete: Delete the task. Once the task is deleted, it cannot be recovered, so please proceed with caution.
3 Structural Replication (Displayed in scenarios involving structural replication) Display the progress and details of structural replication. - Click on Log on the right side of the page: View the execution log of structural replication.
- Click on
 on the right side of the page: View the latest information.
 - Click on View DDL in the Actions column on the right side of the target object in the list: View SQL playback.
4 Full Replication (Displayed in scenarios involving full replication) Display the progress and details of full replication. - Click on Monitor on the right side of the page: View various monitoring indicators during full replication. During full replication, you can also click on Flow Control Settings on the right side of the monitoring indicator page to limit the rate of data written to the target data source per second. The unit is rows/second.
- Click on Log on the right side of the page: View the execution log of full replication.
- Click on on the right side of the page: View the latest information.
5 Data Comparison Display the comparison results between the source data source and the target data source. If you have not enabled data comparison, click Enable Comparison on the page. - Click on Re-compare on the right side of the page: Re-initiate the comparison of data between the current source and target ends.
- Click on Stop on the right side of the page: After starting the comparison task, you can click this button to stop the comparison task immediately.
- Click on Log on the right side of the page: View the execution log of consistency comparison.
- Click on Monitor (only displayed in data comparison): View the trend chart of RPS (records per second compared) for comparison. Click on Details to view records from earlier times.
- Click on
 in the Actions column on the right side of the comparison list (displayed only under the Data tab when there is inconsistency): View detailed comparison between the source and target ends.
 - Click on
 in the Actions column on the right side of the comparison list (displayed only in case of inconsistency): Generate change SQL, which you can directly copy to the target data source to execute and modify the inconsistent content.
6 Expand Display detailed information of the current replication task. Common Options: - Export table configuration: Export the current task's database and table configuration, allowing for quick import when creating a new replication task. This helps rapidly establish multiple replication links with the same replication objects.
- Alert Rules: Configure the alarm strategy for the current task.
Appendix: Routing Algorithm Description
The main function of routing algorithms is to automatically complete data routing. In routing algorithm configuration, target sharding of databases and tables is defined through the following expressions:
'<dbname_expression>''.<tablename_expression>'
<dbname_expression>: Database name expression in the format:'<dbname_prefix>'+(<expression>)+'<dbname_suffix>'.'<dbname_prefix>': The prefix of the database name, such as'logical_db_0'.(<expression>): The dynamic numeric part of the database name composition, e.g.,#user_id#%4. Suppose the value of theuser_idcolumn is1. Dividing1by4and taking the remainder gives1, resulting in a database name oflogical_db_01when combined with the prefix. NineData specifies using#to enclose field names in routing algorithms for easier parsing.'<dbname_suffix>': The suffix of the database name, which can be configured as needed or left empty, e.g.,'_bak'. The final database name would belogical_db_01_bak.
Example: If the result of
#user_id#%4is0, the corresponding database routing<dbname_expression>would be written as follows:Target Database Name <dbname_expression>Examplelogical_db_01 'logical_db_0'+(#user_id#%4+1) logical_db_01_bak 'logical_db_0'+(#user_id#%4+1)+'_bak' logical_db_00 'logical_db_0'+(#user_id#%4) logical_db_1 'logicaldb'+(#user_id#%4+1) .<tablename_expression>: Table name expression in the format:'.<tablename_prefix>'+(<expression>)+'<tablename_suffix>'.'.<tablename_prefix>': The prefix of the table name, such as'.test_time_0'. The dot (.) indicates the table belongs to the preceding database.(<expression>): The dynamic numeric part of the table name composition, e.g.,#user_id#%4. Suppose the value of theuser_idcolumn is1. Dividing1by4and taking the remainder gives1, resulting in a table name oftest_time_01when combined with the prefix. NineData specifies using#to enclose field names in routing algorithms for easier parsing.'<tablename_suffix>': The suffix of the table name, which can be configured as needed or left empty, e.g.,'_bak'. The final table name would be.test_time_01_bak.
Example: If the result of
#user_id#%4is0, the corresponding table routing.<tablename_expression>would be written as follows:Target Table Name <tablename_expression>Exampletest_time_01 '.test_time_0'+(#user_id#%4+1) test_time_01_bak '.test_time_0'+(#user_id#%4+1)+'_bak' test_time_00 '.test_time_0'+(#user_id#%4) test_time_1 '.testtime'+(#user_id#%4+1)
Using the examples above, if the value of the user_id column is 0, the following routing algorithm will route to the test_time_01 table in the logical_db_01 database:
'logical_db_0'+(#user_id#%4+1)'.test_time_0'+(#user_id#%4+1)