Three-Minute Guide to Database DevOps Professional Edition | Enterprise Edition
This article will introduce you from scratch on how to use NineData's Database DevOps Professional Edition | Enterprise Edition, helping you quickly understand and get started with it.
Please select your scenario to jump to the appropriate operation steps
Promotion Details
Database DevOps Professional Edition offers 10 instances for permanent free use.
Step One: Register for a NineData Account
Open the NineData Registration Page.
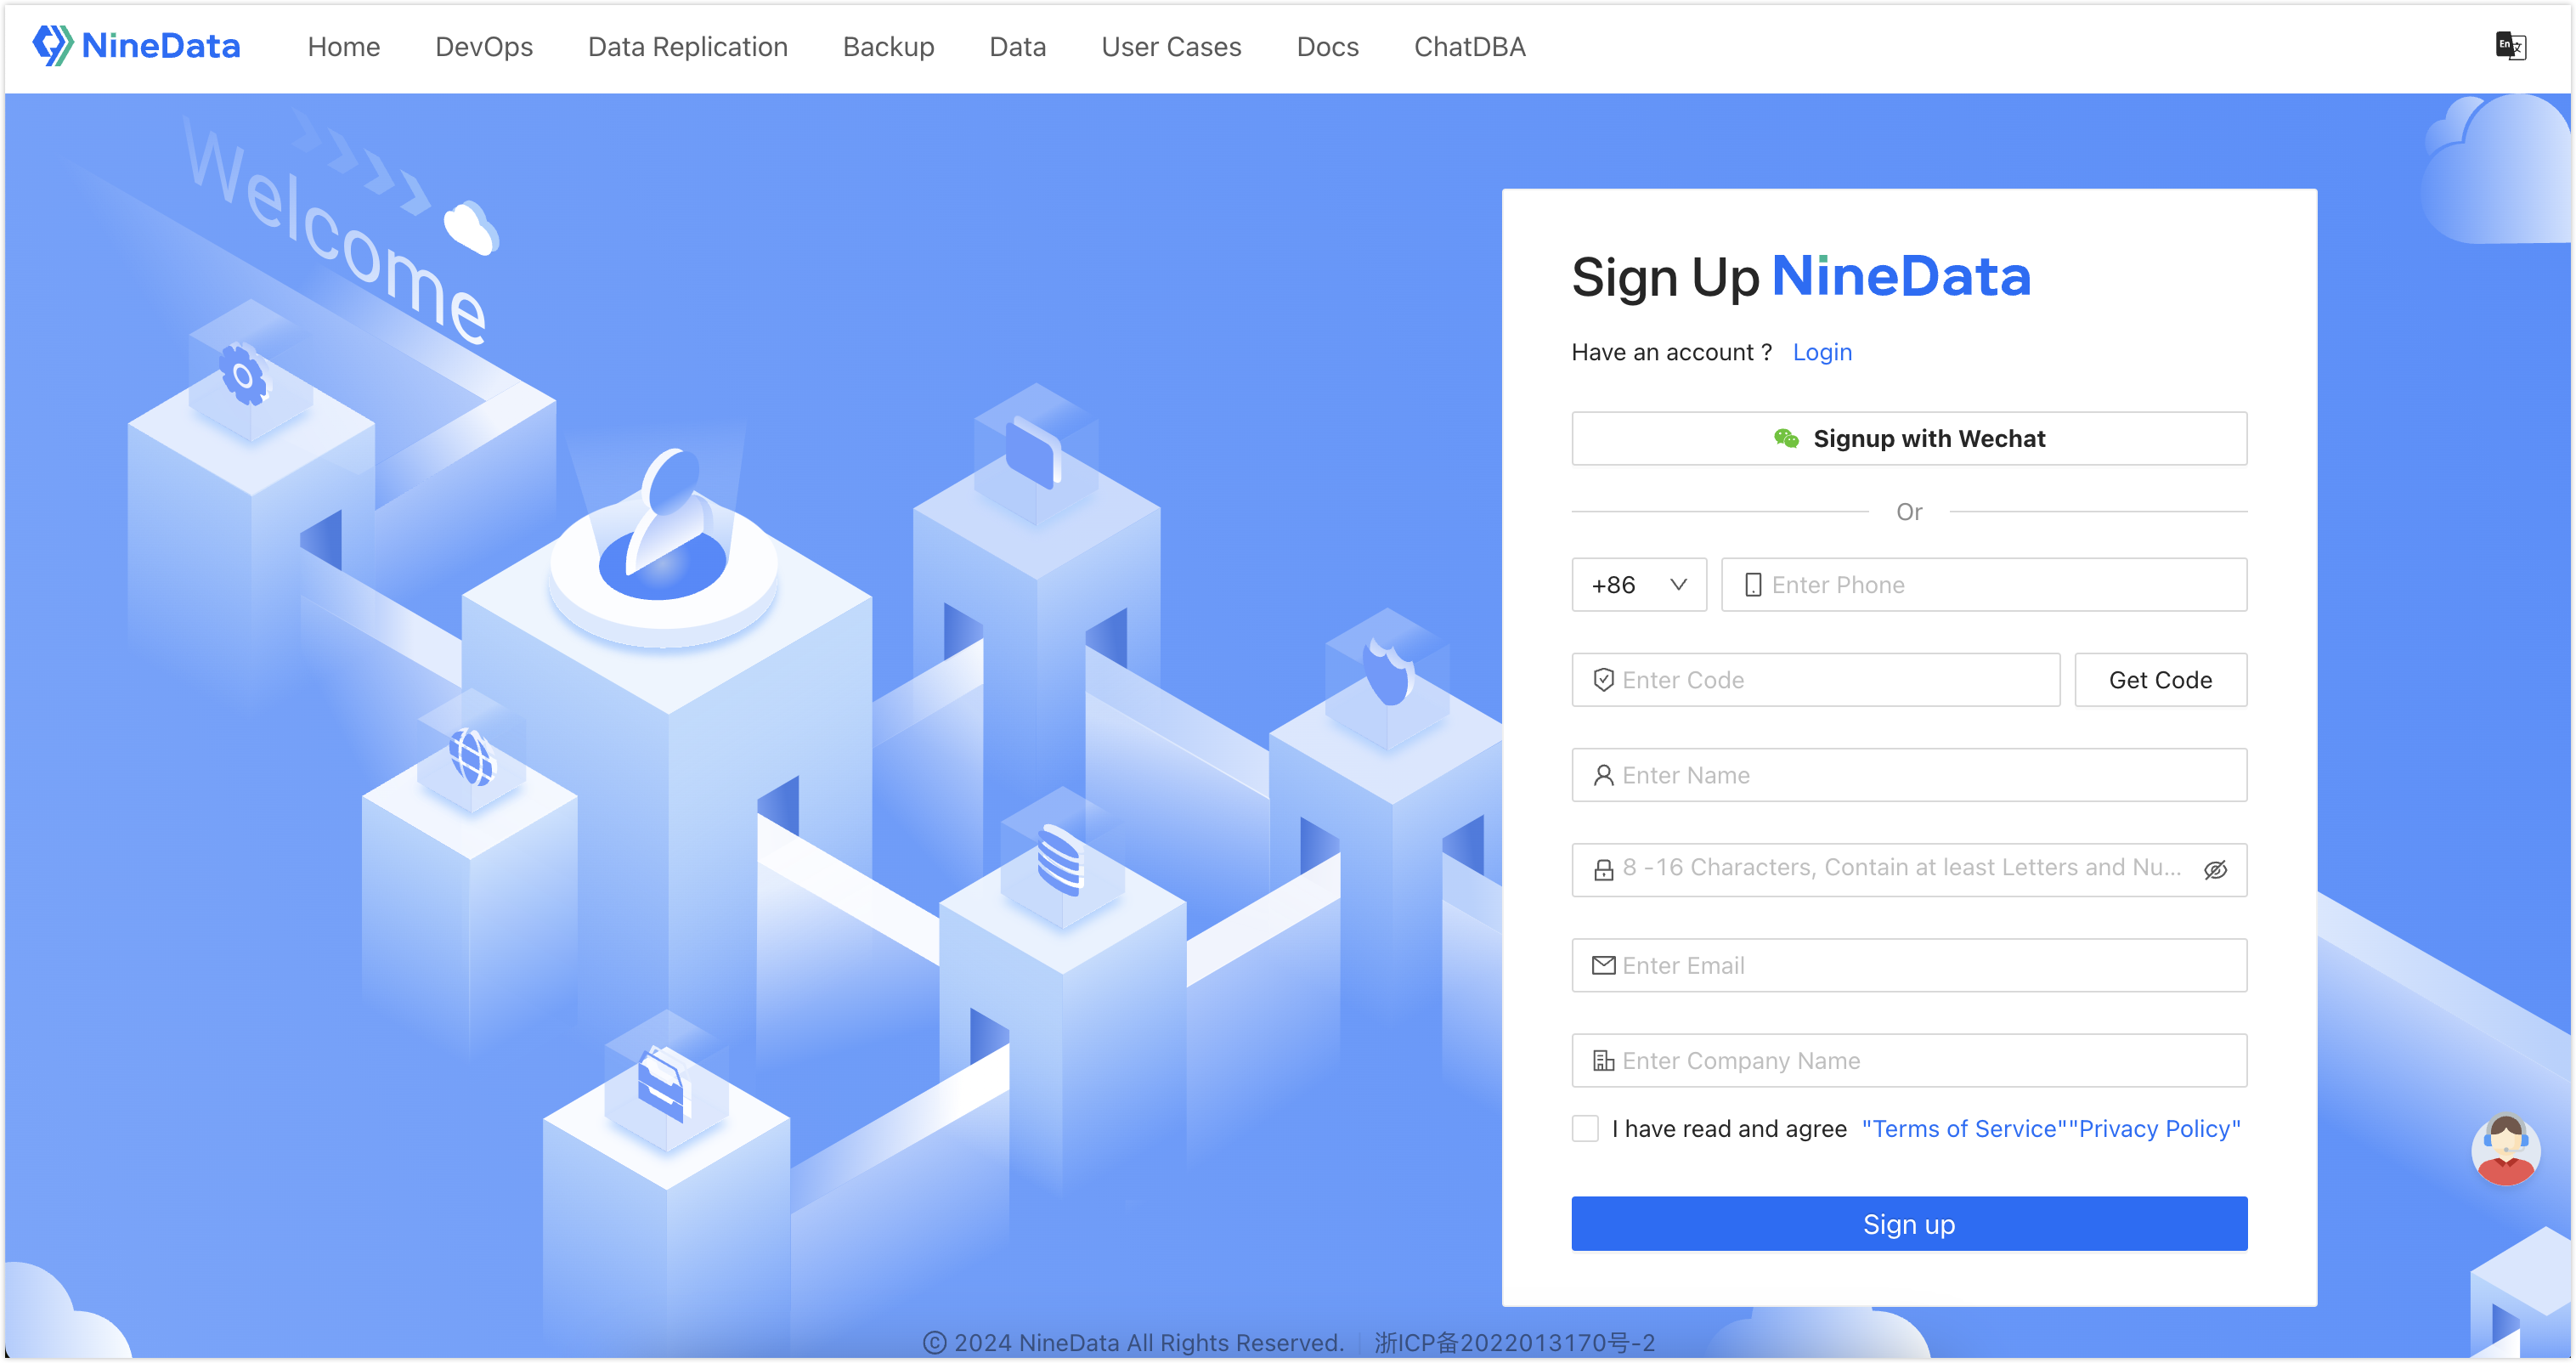
Enter your phone number and click Get Verification Code, then enter the verification code sent by the NineData system.
tipOnly phone numbers from Mainland China are currently supported. If you are using a phone number outside the +86 area, you can only receive the verification code via email.
Enter your username and password.
tipThe password strength requirements are as follows:
The password can contain letters, numbers, and special characters.
Length is 8~16 characters.
Must contain both letters and numbers.
Cannot contain empty characters (spaces).
Enter your email and company name, read the Terms of Service and Privacy Policy carefully, then check the box in front of , and click .
tipIf you have already entered your email in the above steps, you do not need to enter it again.
Step Two: Log in to NineData
Open the NineData Login Page.
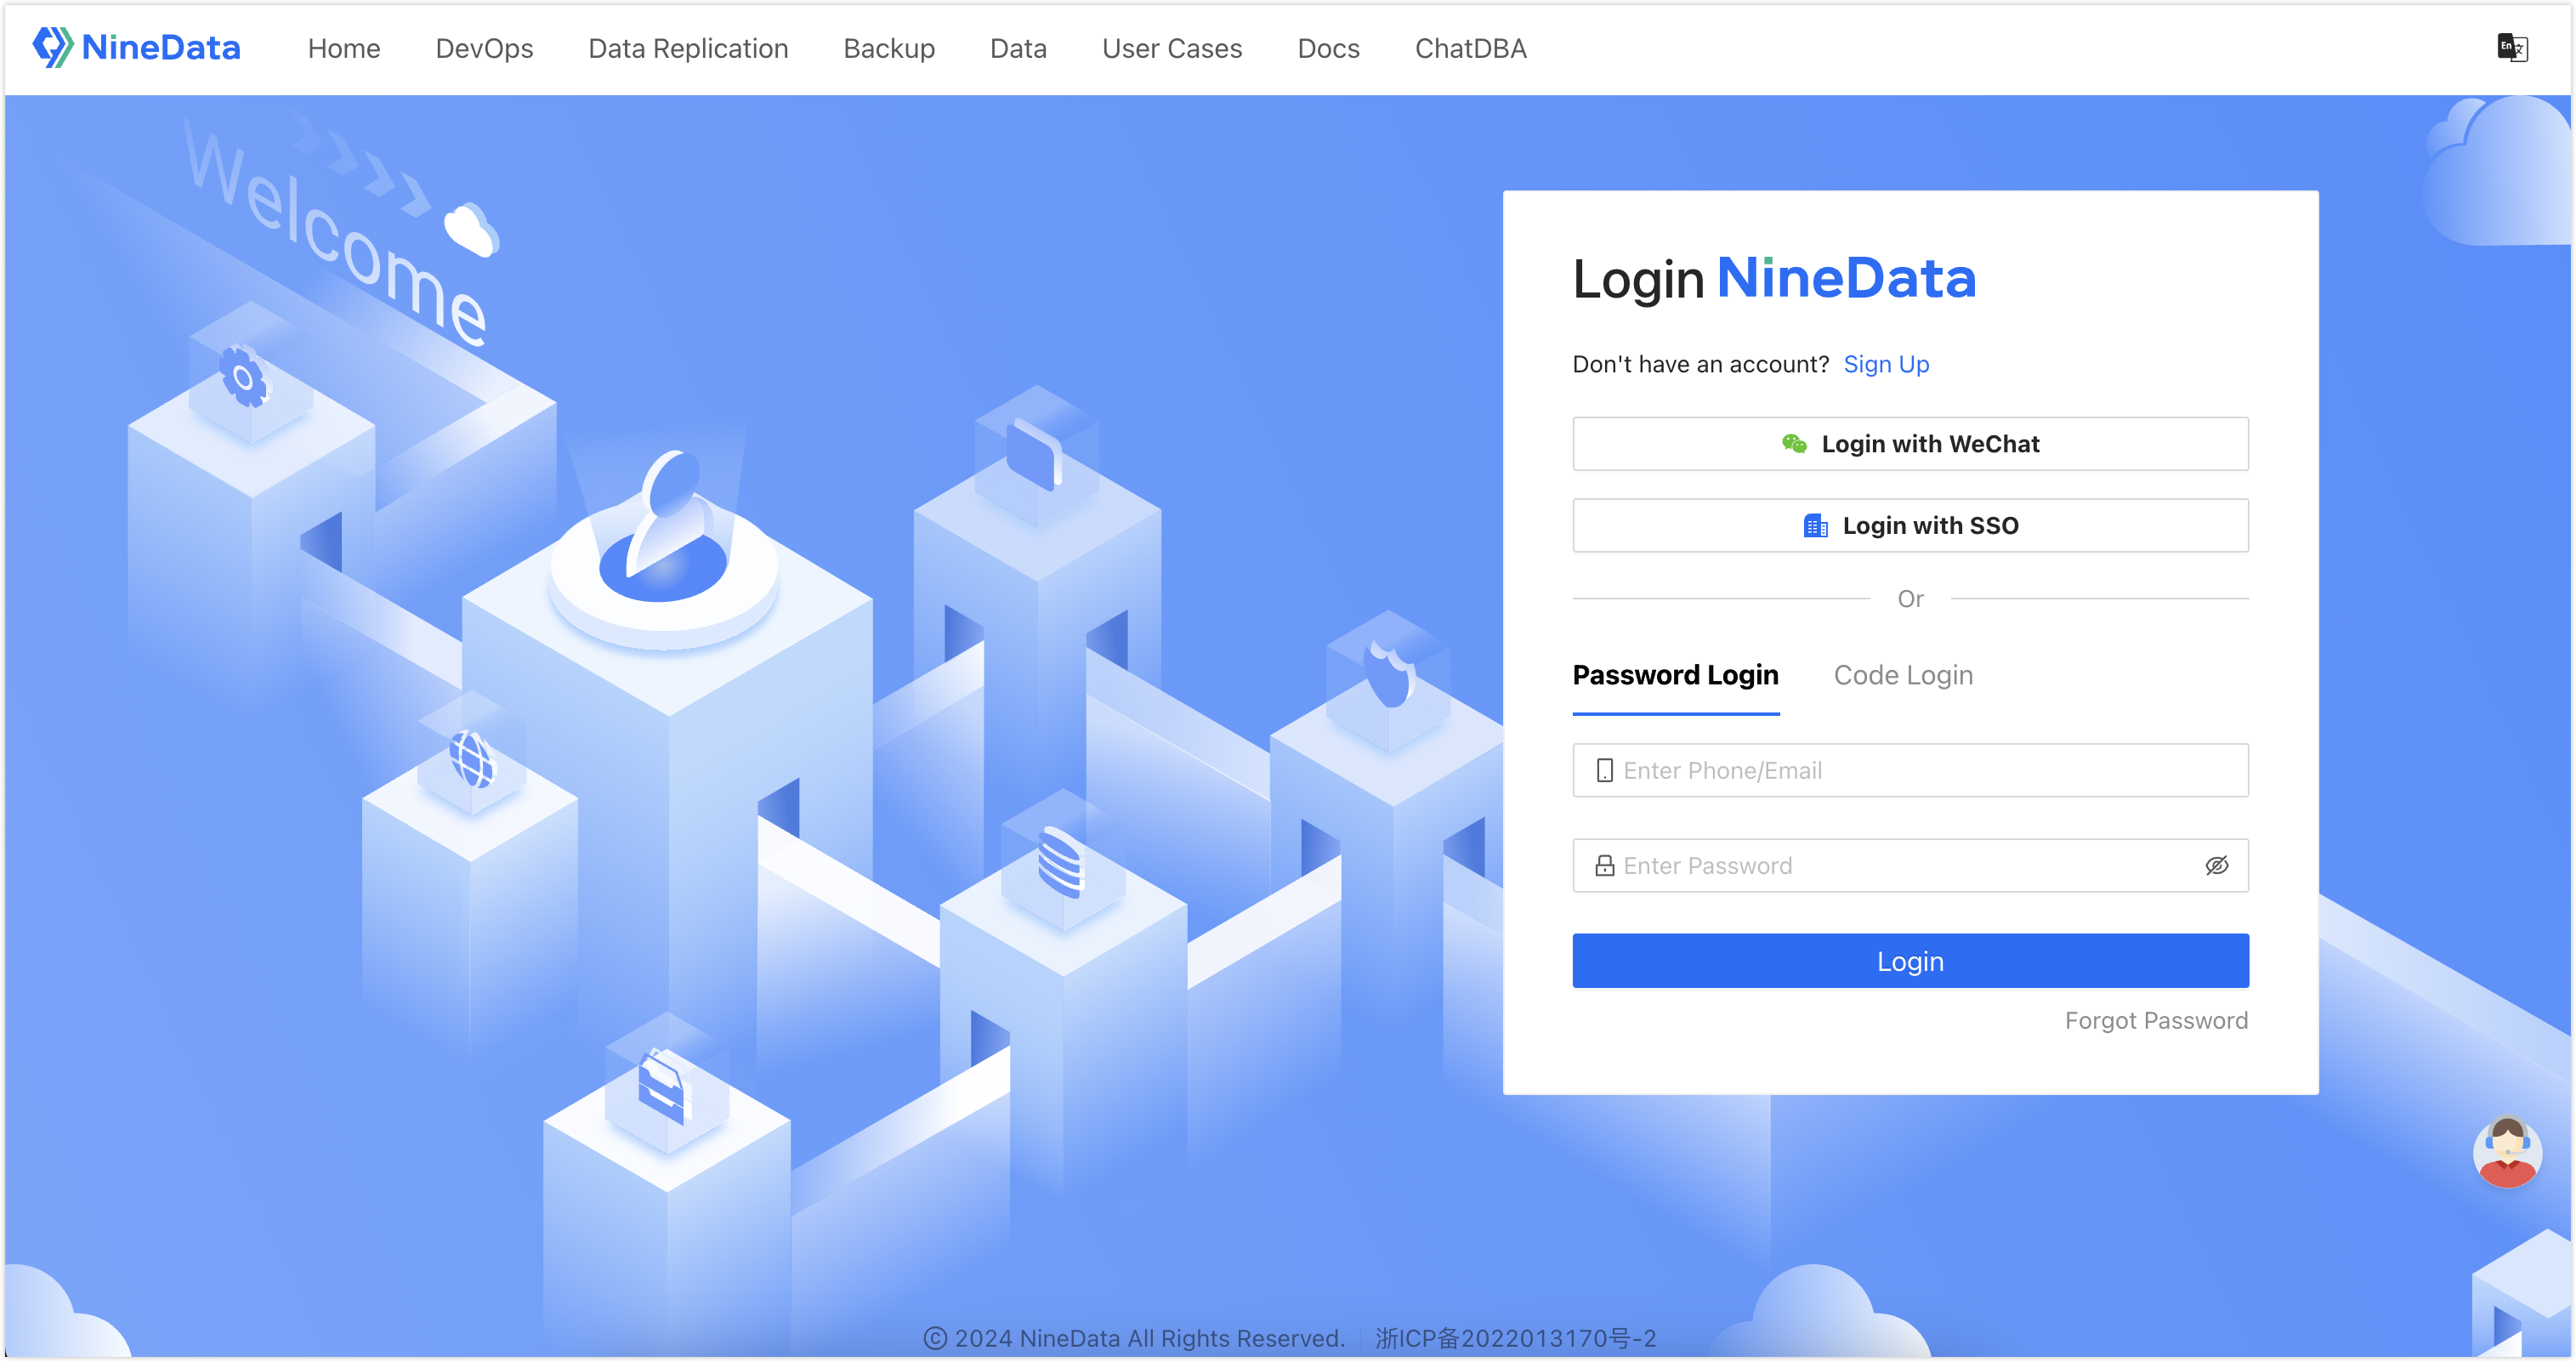
You can choose to log in via , , , or .
- : Enter the phone number or email used during registration, and enter the password, then click .tip
- If you are using a phone number outside the +86 area, you cannot log in via phone number at the moment. Please use the email used during registration to log in.
- If you have forgotten your login password, you can click in the lower right corner to .
- Click , enter the phone number used during registration, click , and enter the verification code sent by the NineData system, then click .tip
If you are using a phone number outside the +86 area, please enter the email used during registration to receive the verification code.
: Log in to NineData via SSO. For more information, please refer to Log in to NineData via SSO.
- : Log in to NineData by scanning the WeChat QR code.
- : Enter the phone number or email used during registration, and enter the password, then click .
Step Three: Invite Enterprise Members
Log in to the NineData Console.
In the left navigation bar, click .
tipIf you cannot find , please confirm that your console is in organization mode. How to switch from personal mode to organization mode, please refer to Switch to Organization.
On the page, click in the upper right corner.
In the dialog box, enter the email of the member you wish to invite to join the organization, and assign a role to that member by binding, then click . You can also click to invite multiple users at once.
Role DescriptionEach role corresponds to a series of permissions. Users who are bound to a certain role have all the permissions corresponding to that role. You can also create custom roles according to your needs and authorize them. For more information, please refer to Manage Roles.
Click to complete the user invitation. At this point, NineData will send an invitation email to the user's email. After the user accepts the invitation and completes the registration or login, they can join the organization.
Step Four: Add Data Sources
This article takes adding an Alibaba Cloud RDS MySQL public instance to NineData as an example to introduce how to add data sources. For other scenarios, please refer to Create Data Sources.
Add the following NineData service node IPs to the whitelist of the Alibaba Cloud RDS MySQL instance. How to add a whitelist, please refer to the Alibaba Cloud Official Documentation.
- Hangzhou: 121.199.39.25
- Beijing: 123.57.58.208
- Zhangjiakou: 39.98.193.245
- Shenzhen: 112.74.171.41
- Shanghai: 116.63.42.85
Log in to the NineData Console.
In the left navigation bar, click .
Configure the data source according to the page prompts.
After all configurations are completed, click next to to test whether the data source can be accessed normally. If prompted with , you can click to complete the addition of the data source. Otherwise, please recheck the connection settings until the connection test is successful.
tipFor more detailed information on adding data sources, please refer to Create Data Sources.
Step Five: Configure Data Source Access Permissions
NineData supports the following three authorization methods. The permissions obtained through these three methods coexist in a complementary manner, with no priority. This section takes authorizing through roles as an example to introduce how to grant data source access permissions to organization members.
| Authorization Method | Authorization Initiator | Description |
|---|---|---|
| Apply through Work Order | Organization Member | Organization members apply for permissions through the function, suitable for scenarios where temporary business needs exist but there are no operational permissions. |
| Authorize through Roles | System Administrator | The system administrator binds roles with organization members to achieve simple and efficient group permission management. When a member leaves the project, simply unbind the role, eliminating future worries. |
| Direct Authorization by Administrator | System Administrator | The system administrator independently authorizes specific members, suitable for scenarios where permissions need to be customized according to specific needs, providing greater flexibility. |
Log in to the NineData Console.
In the left navigation bar, click .
tipIf you cannot find , please confirm that your console is in organization mode. How to switch from personal mode to organization mode, please refer to Switch to Organization.
Click in the lower left corner of the page.
In the dialog box, enter the name of the new role. This name is used to identify the role's purpose. Please use a meaningful name, supporting up to 16 characters.
Click to complete the creation of the new role. At this point, the page automatically jumps to the permission configuration page for the newly created role. Under the tab, click .
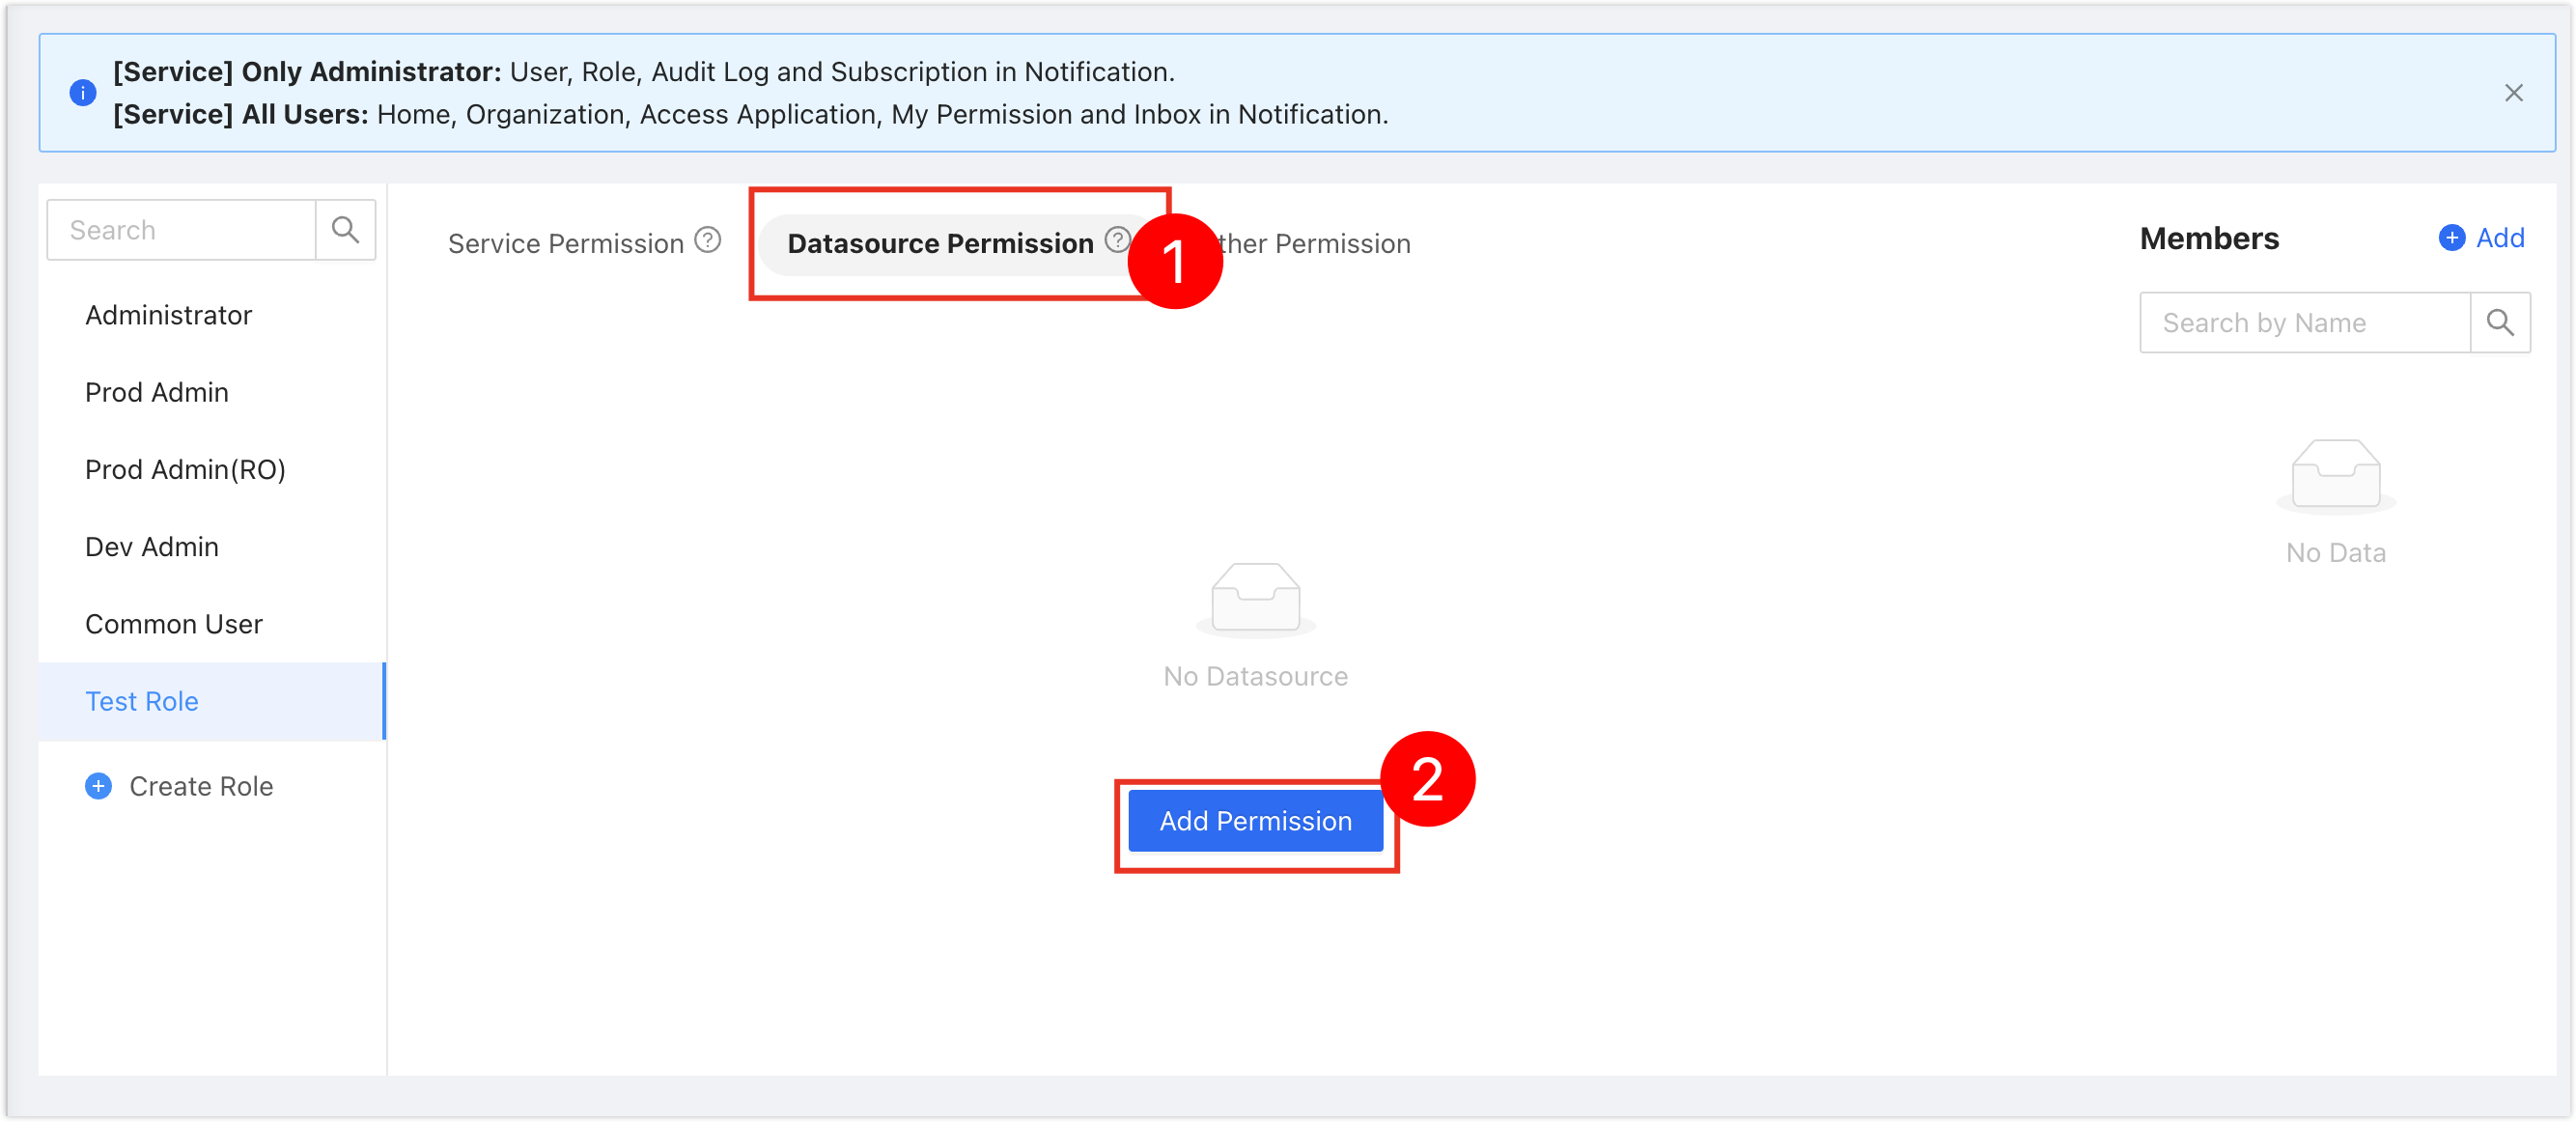
In the window, select or to authorize the new role, then click .
tip- : Authorize based on the environment configured during Adding Data Sources. Please note that an environment may be bound to multiple data sources.
- : Directly select the corresponding data source for authorization.
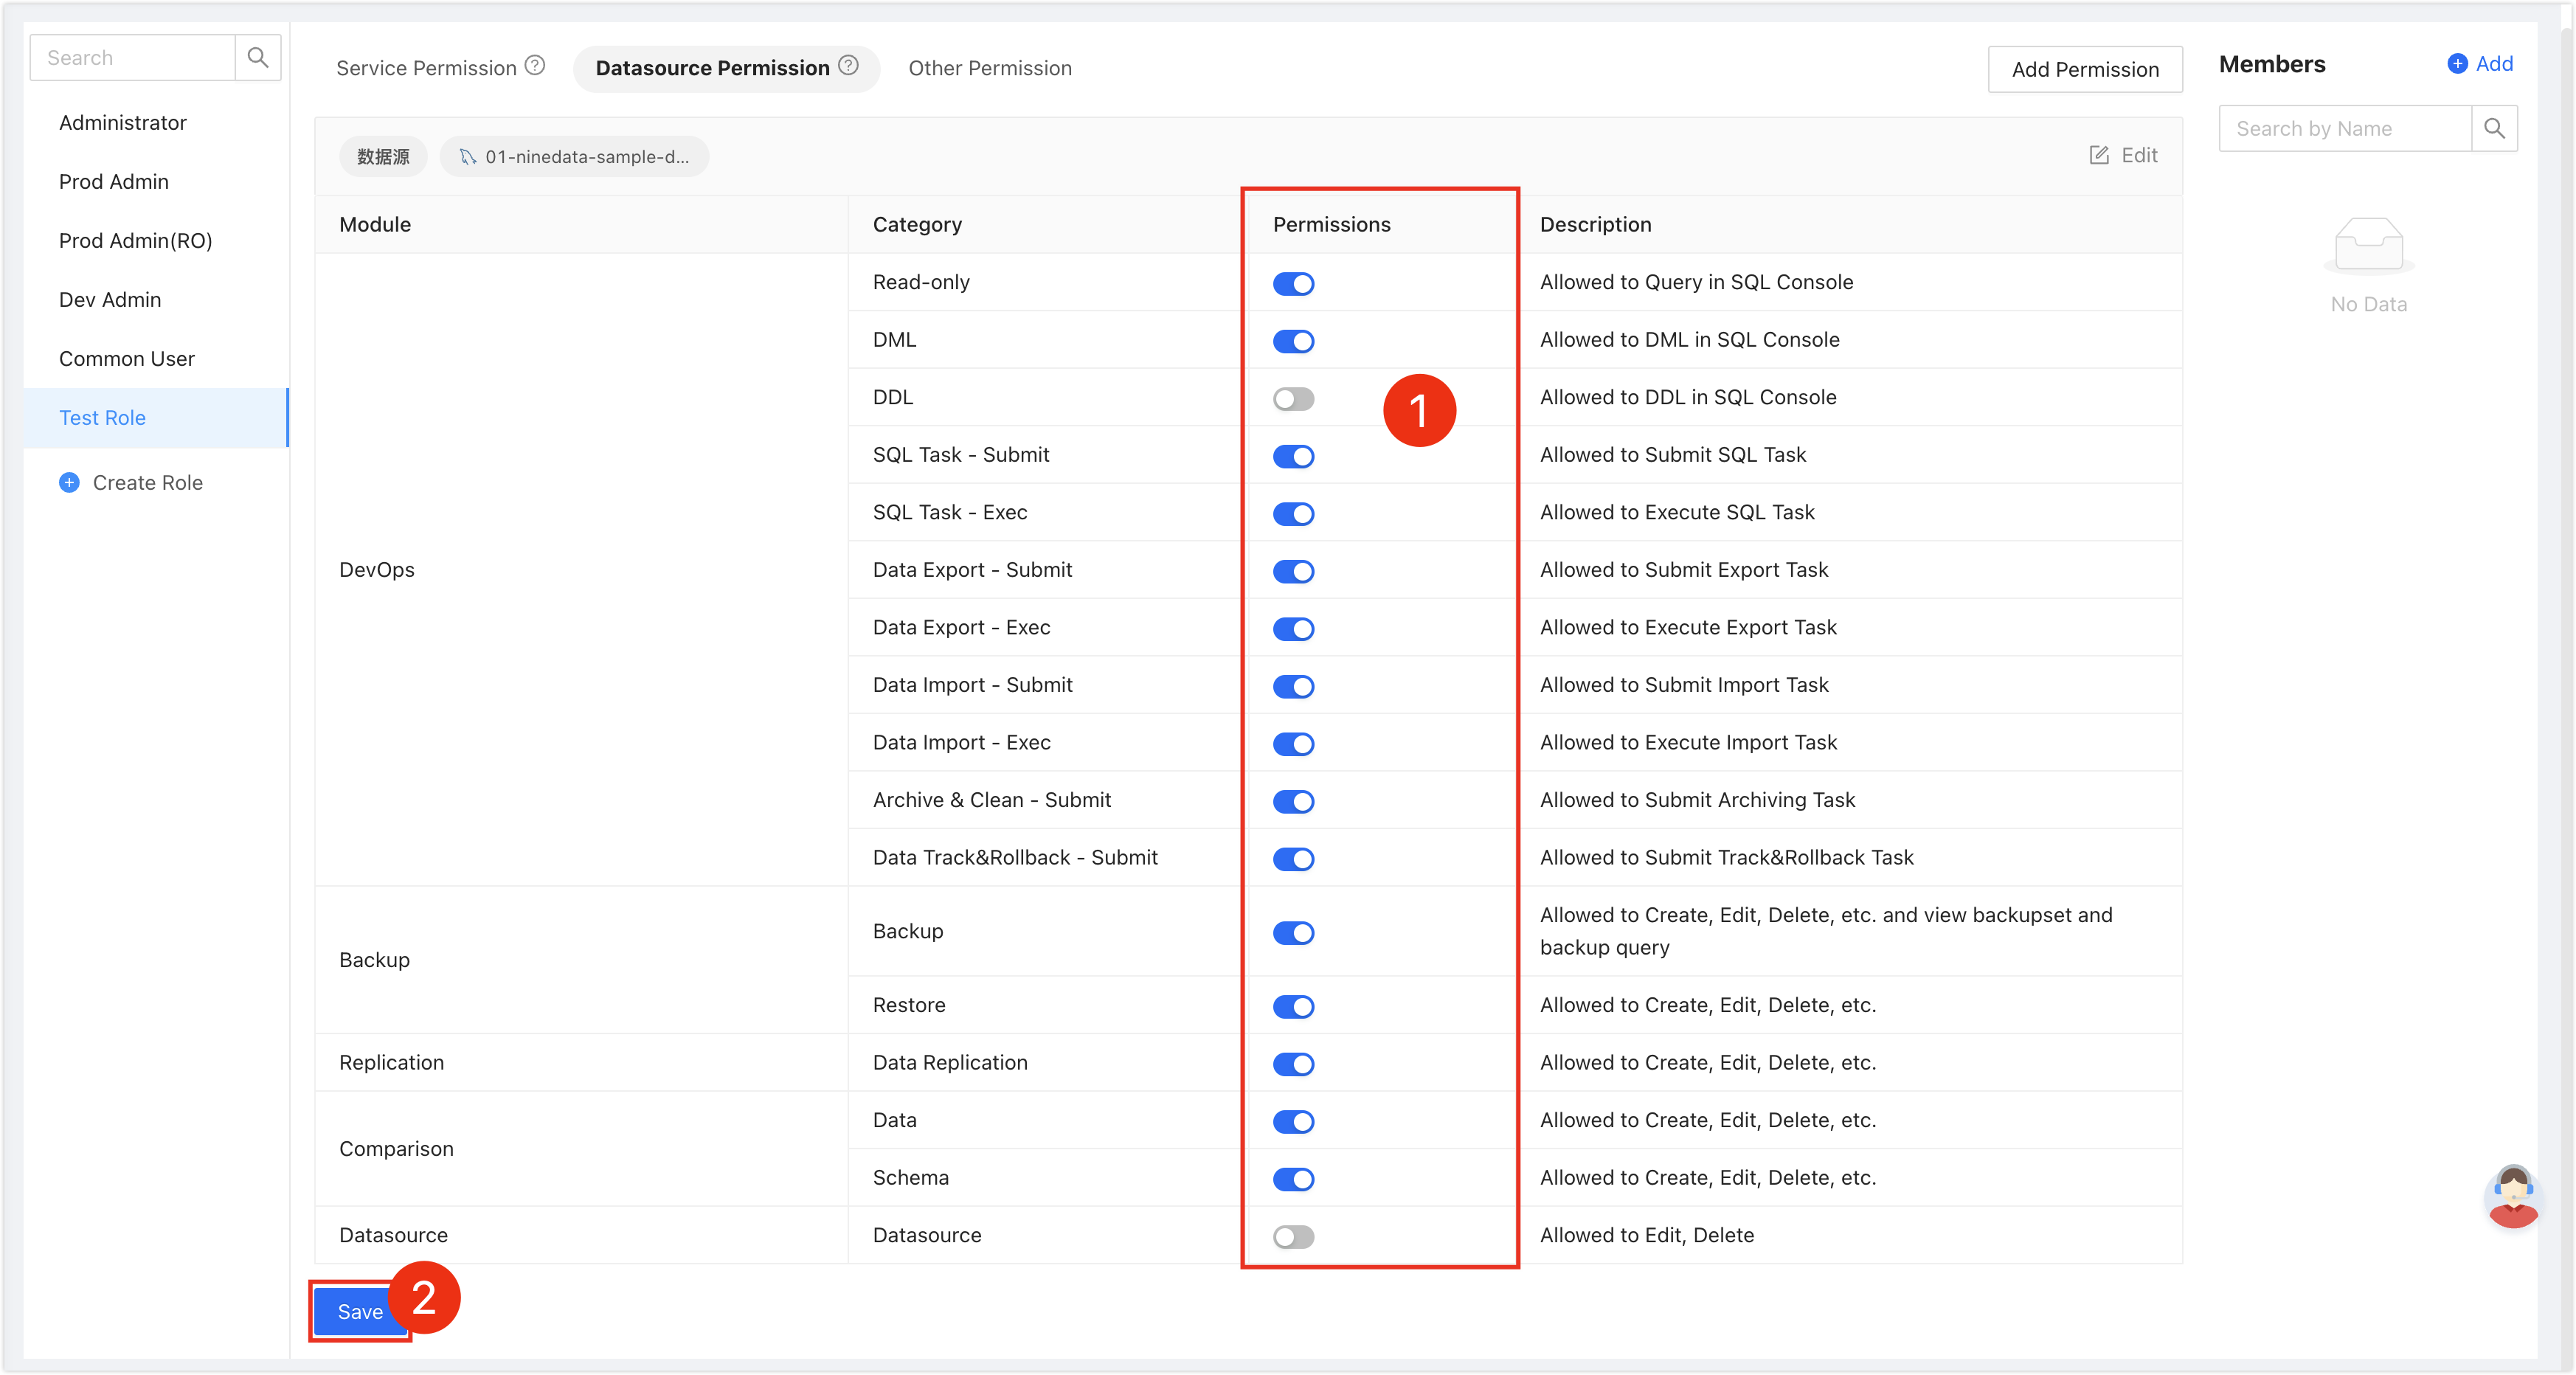
Configure the permissions for each module of the data source according to actual needs, then click .
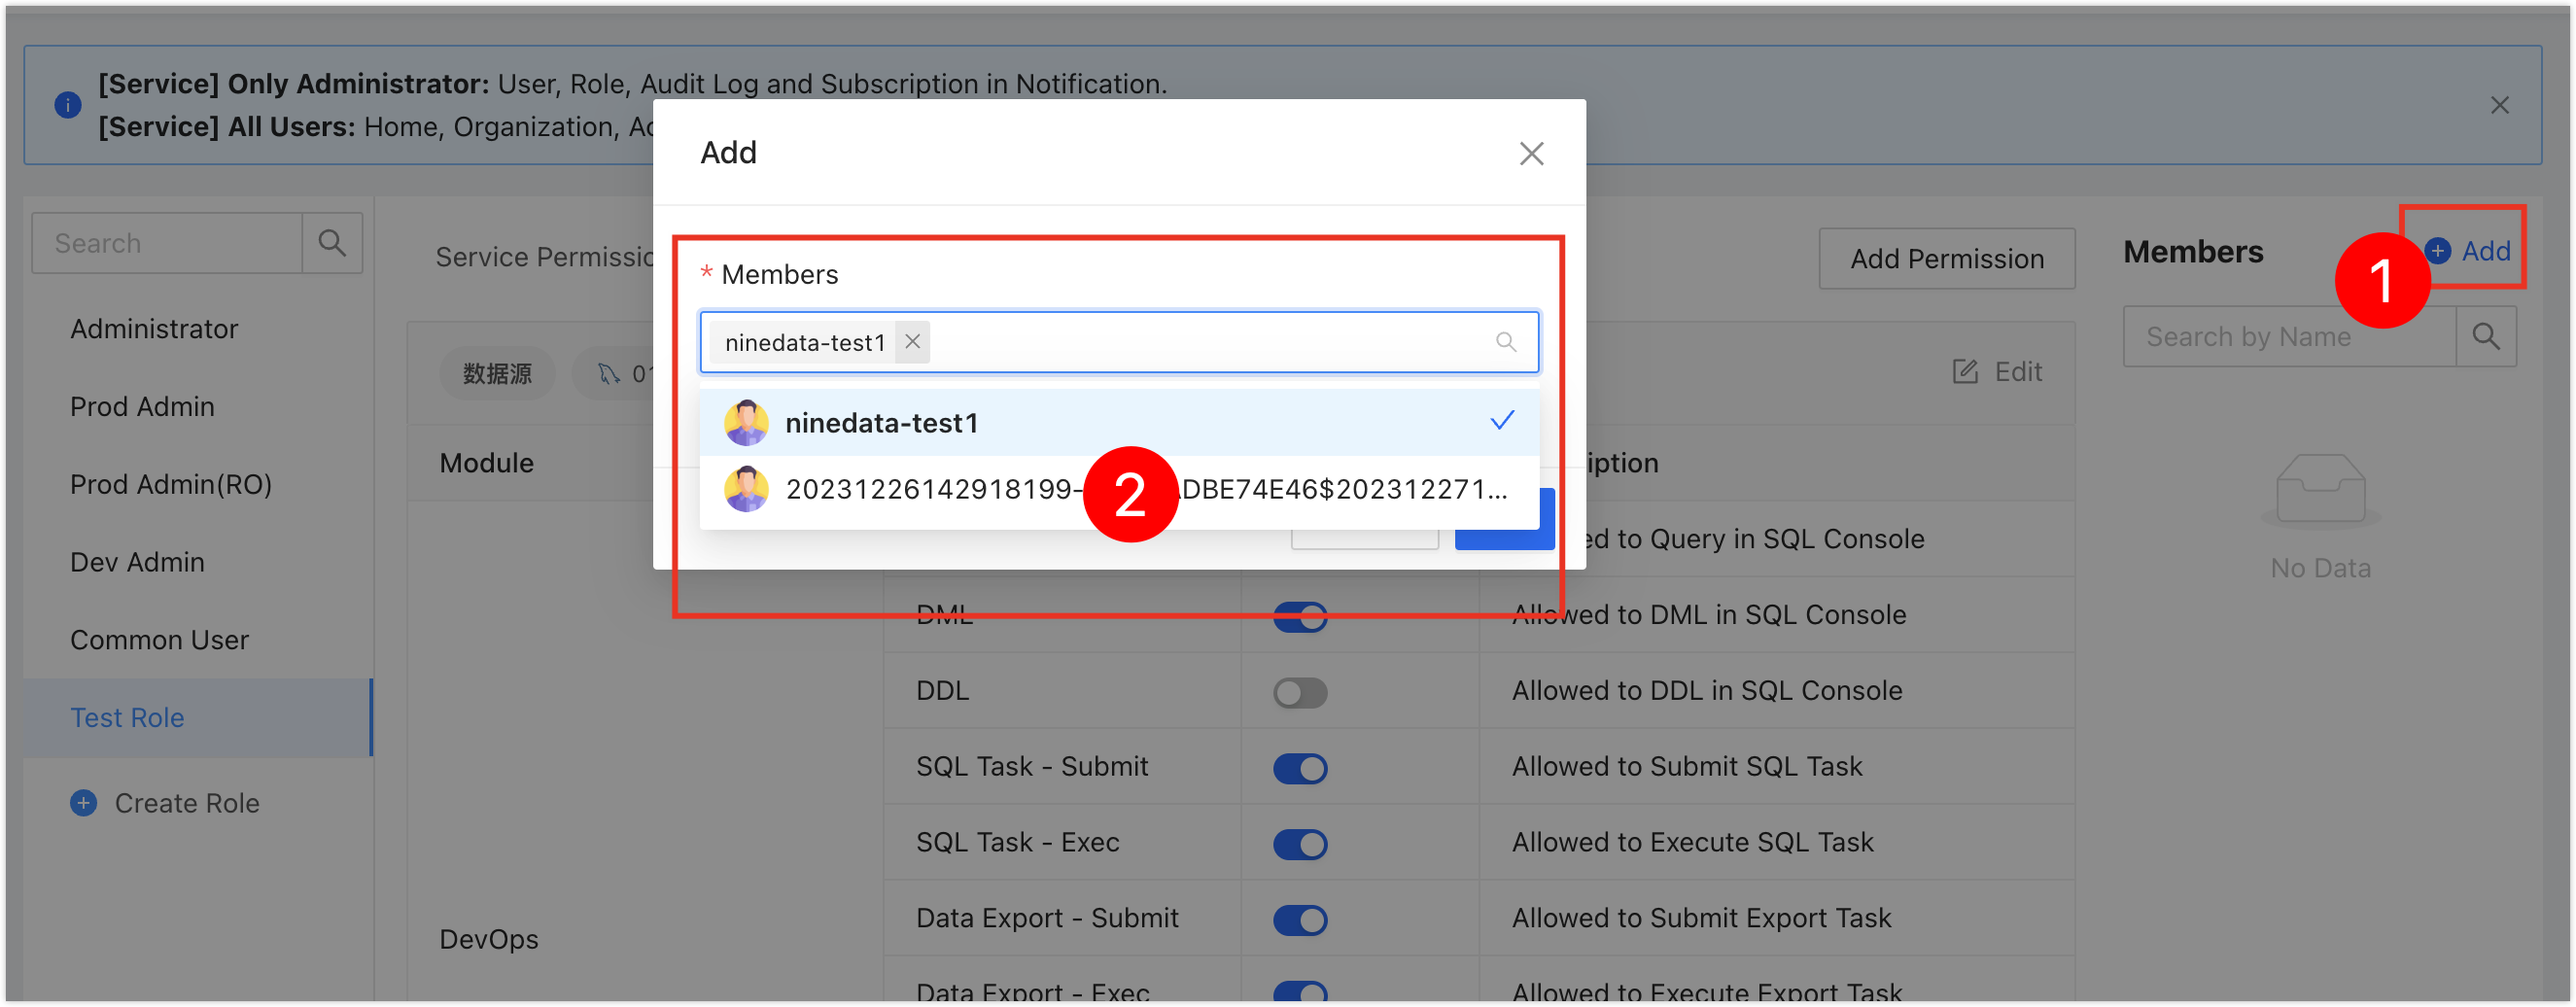
Click next to in the upper right corner of the page, then in the window, select one or more members who need to be bound to this role.
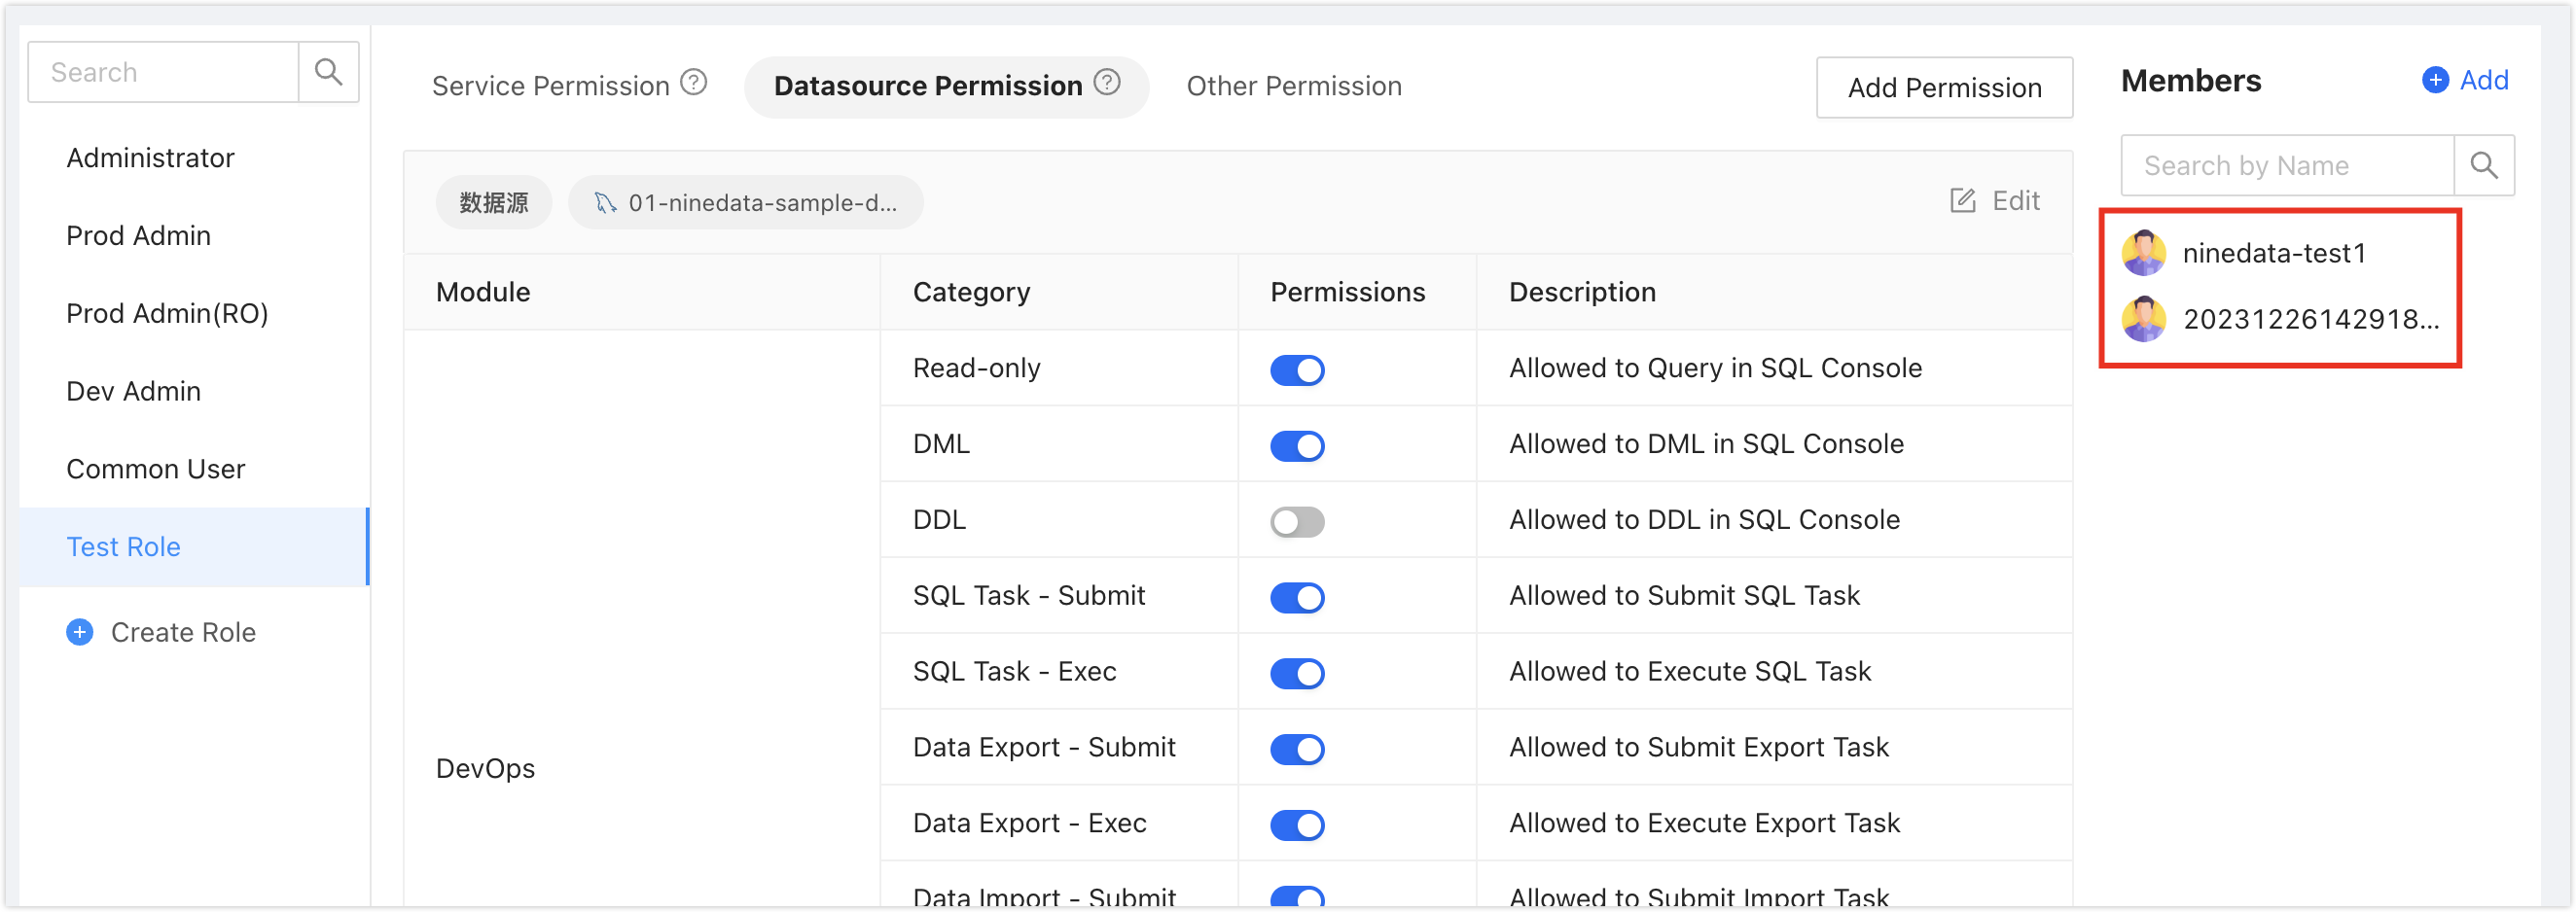
After clicking , the members who are bound to the current role will be displayed in the on the right. These members can already access the corresponding data sources.
Step Six: Manage Data with SQL Console
Log in to the NineData Console.
Click in the left navigation bar.
tipIf you have previously logged in to the data source and have not closed it, you will automatically enter the data source page.
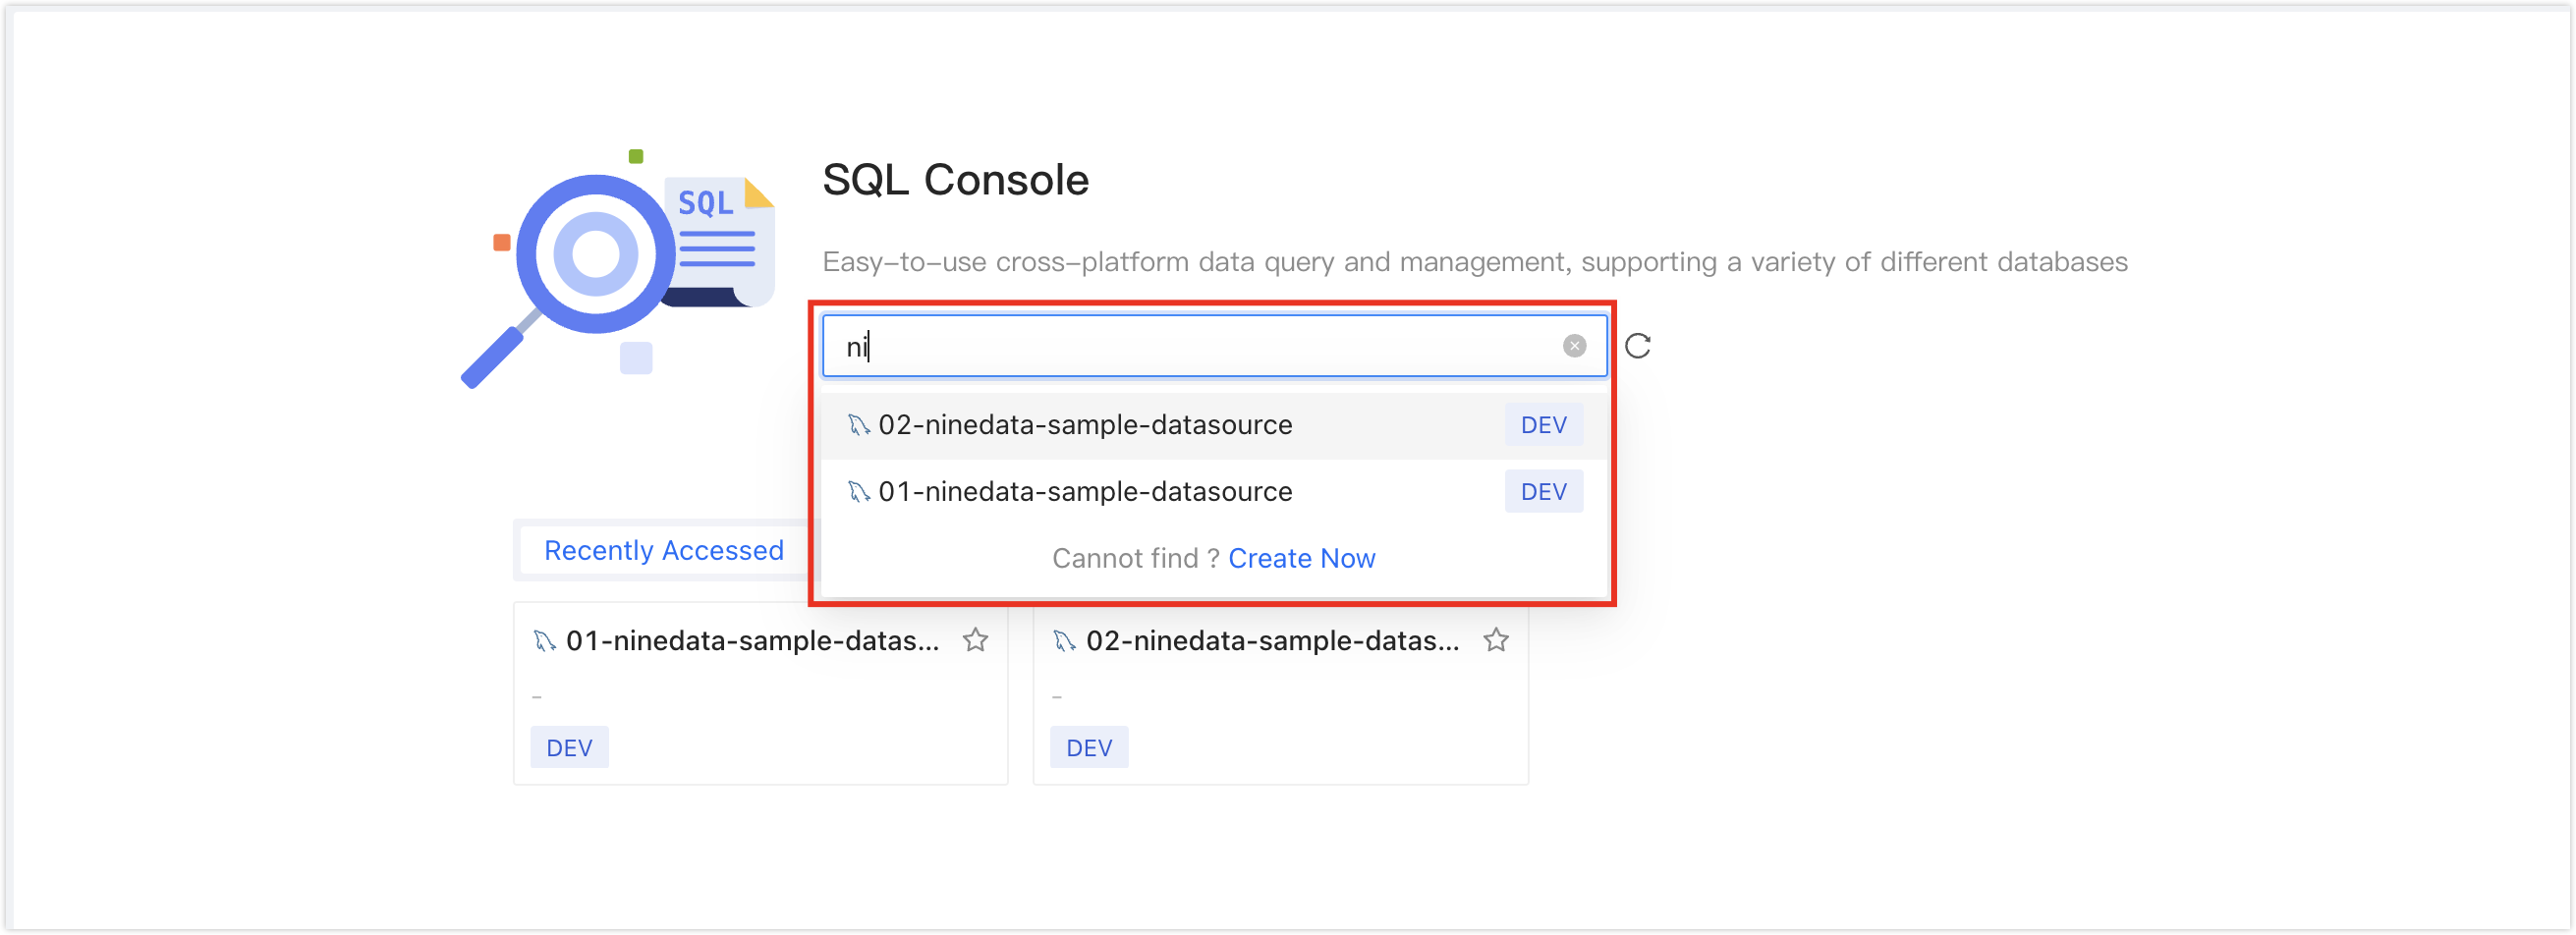
Click the text box under , and the available data sources will pop up. Click the target data source and click to jump to the SQL Console.
tipIf there are multiple data sources, you can enter the full or partial keywords in the box for precise or fuzzy search. The following fields are supported for search:
Data source name
IP address
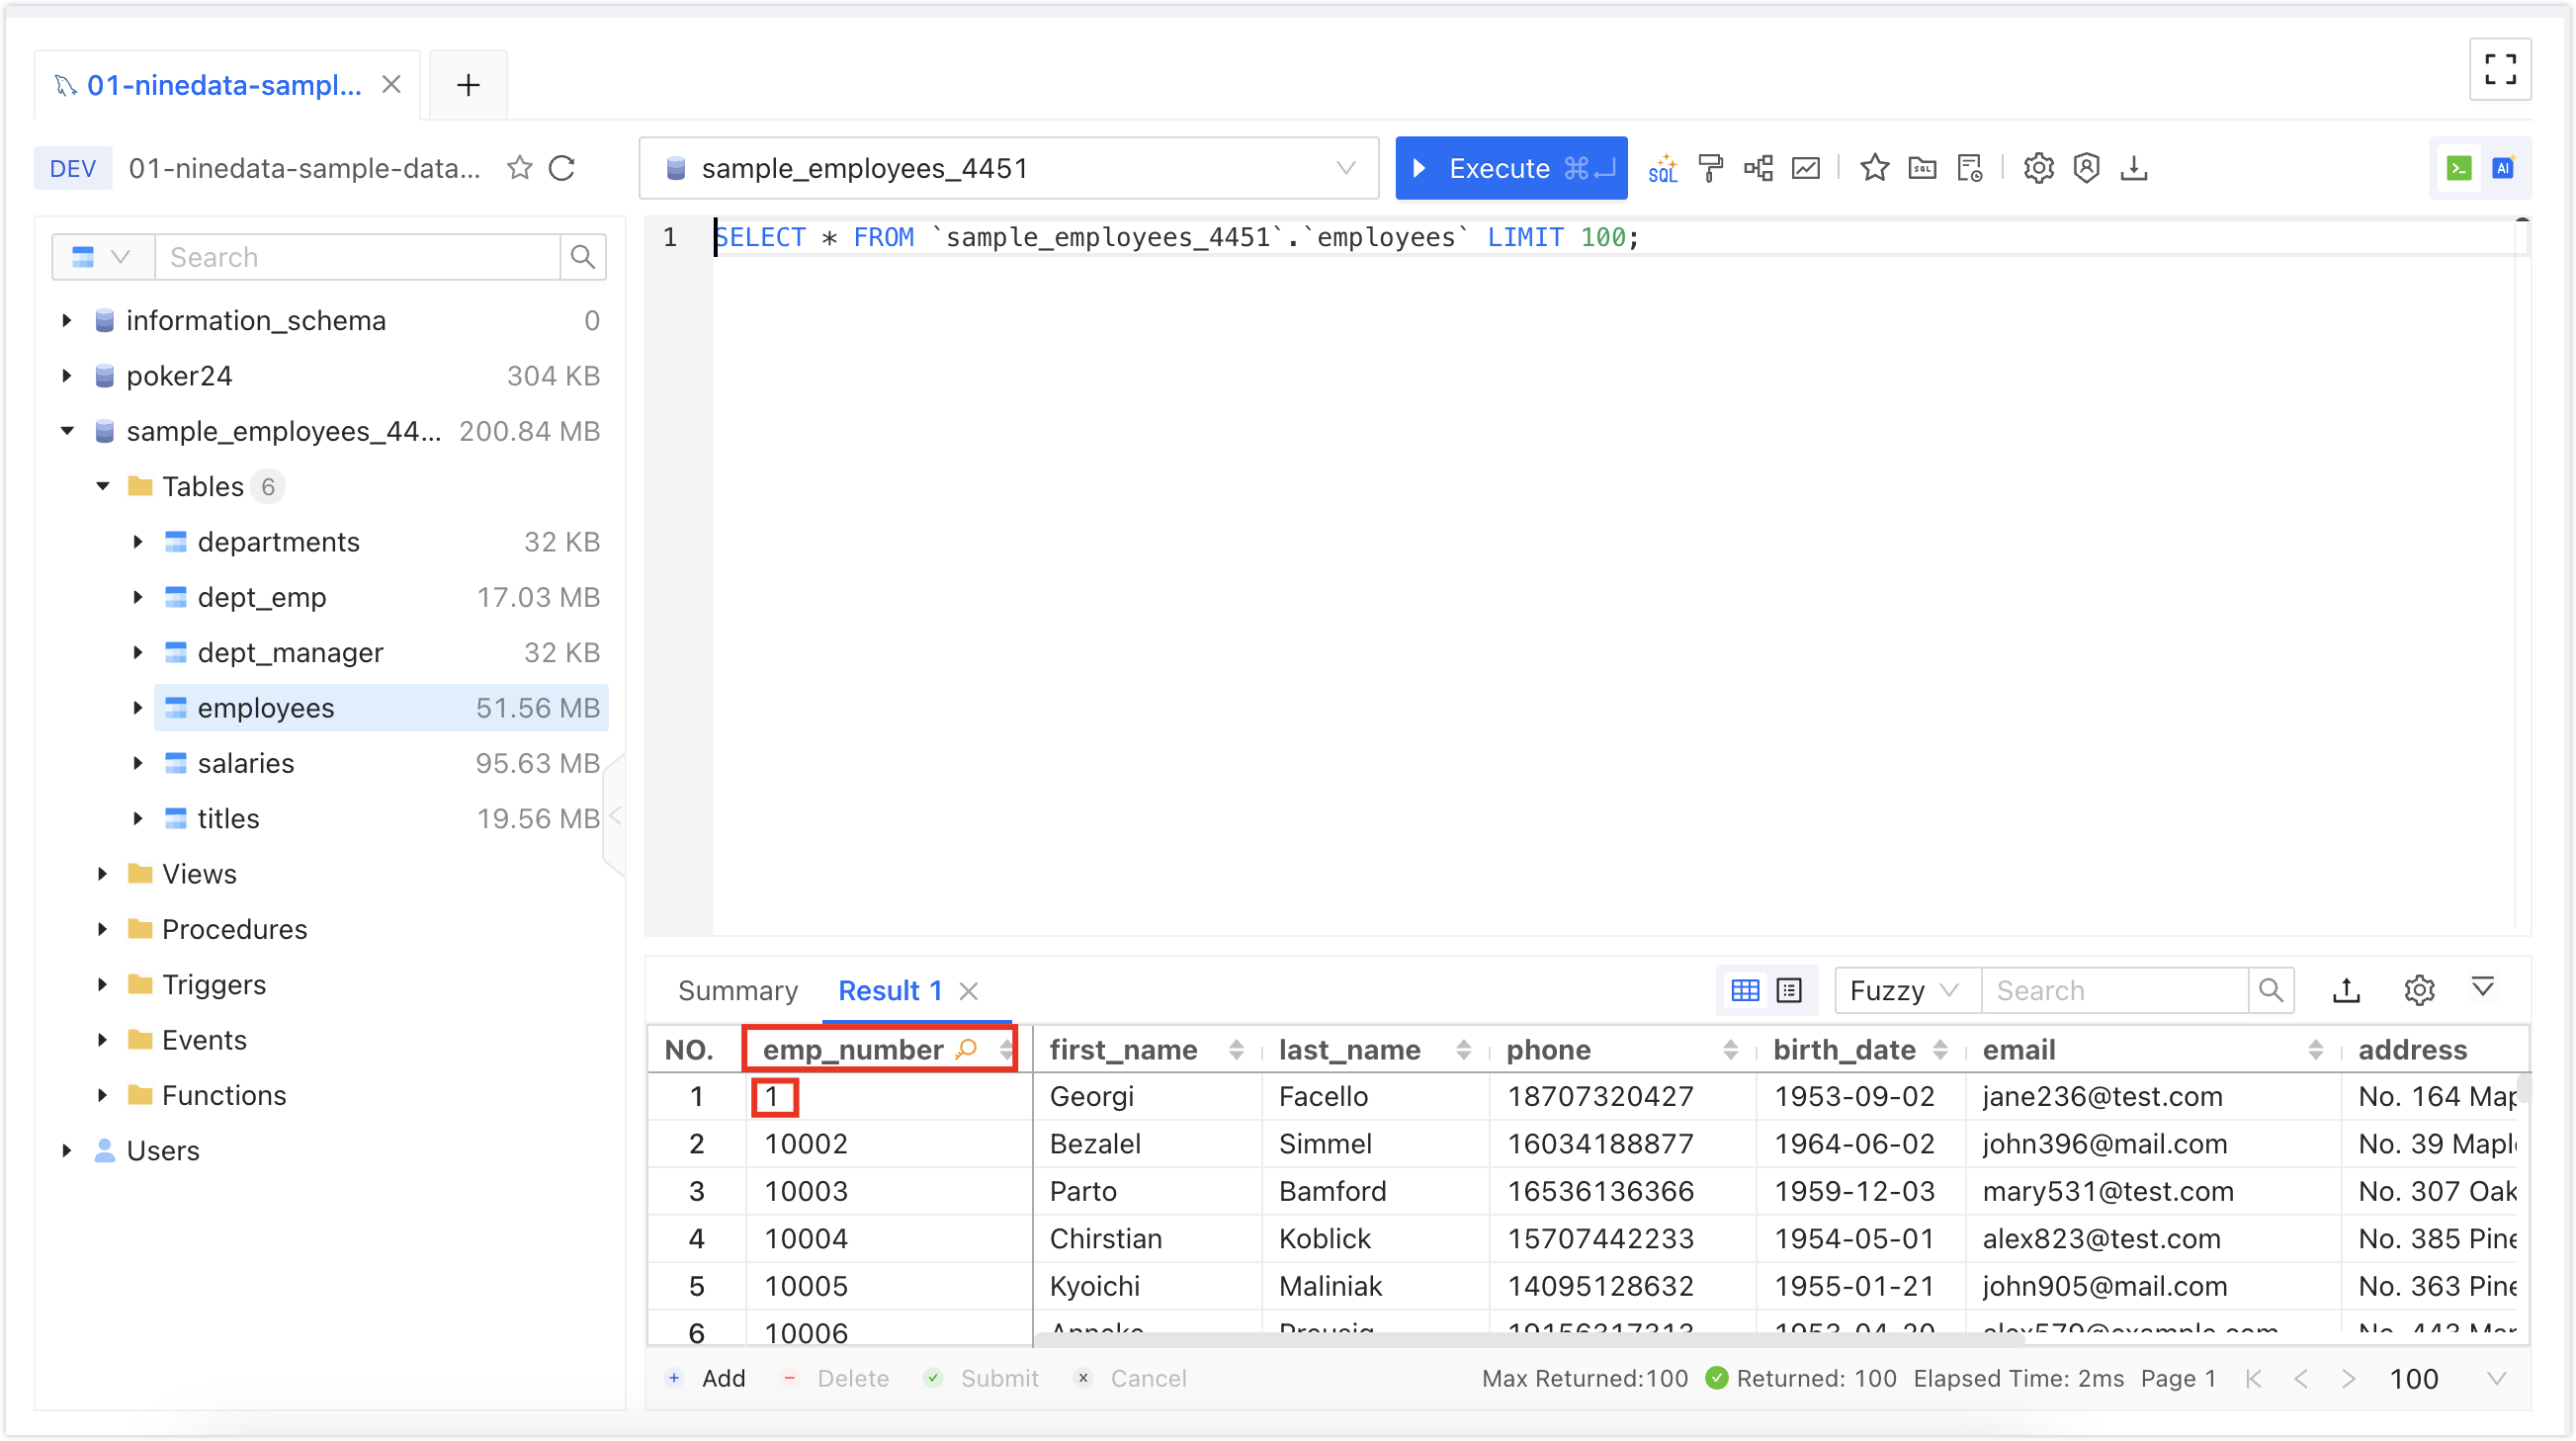
After opening the SQL Console, you can perform data management operations on the data source. As shown in the figure below:
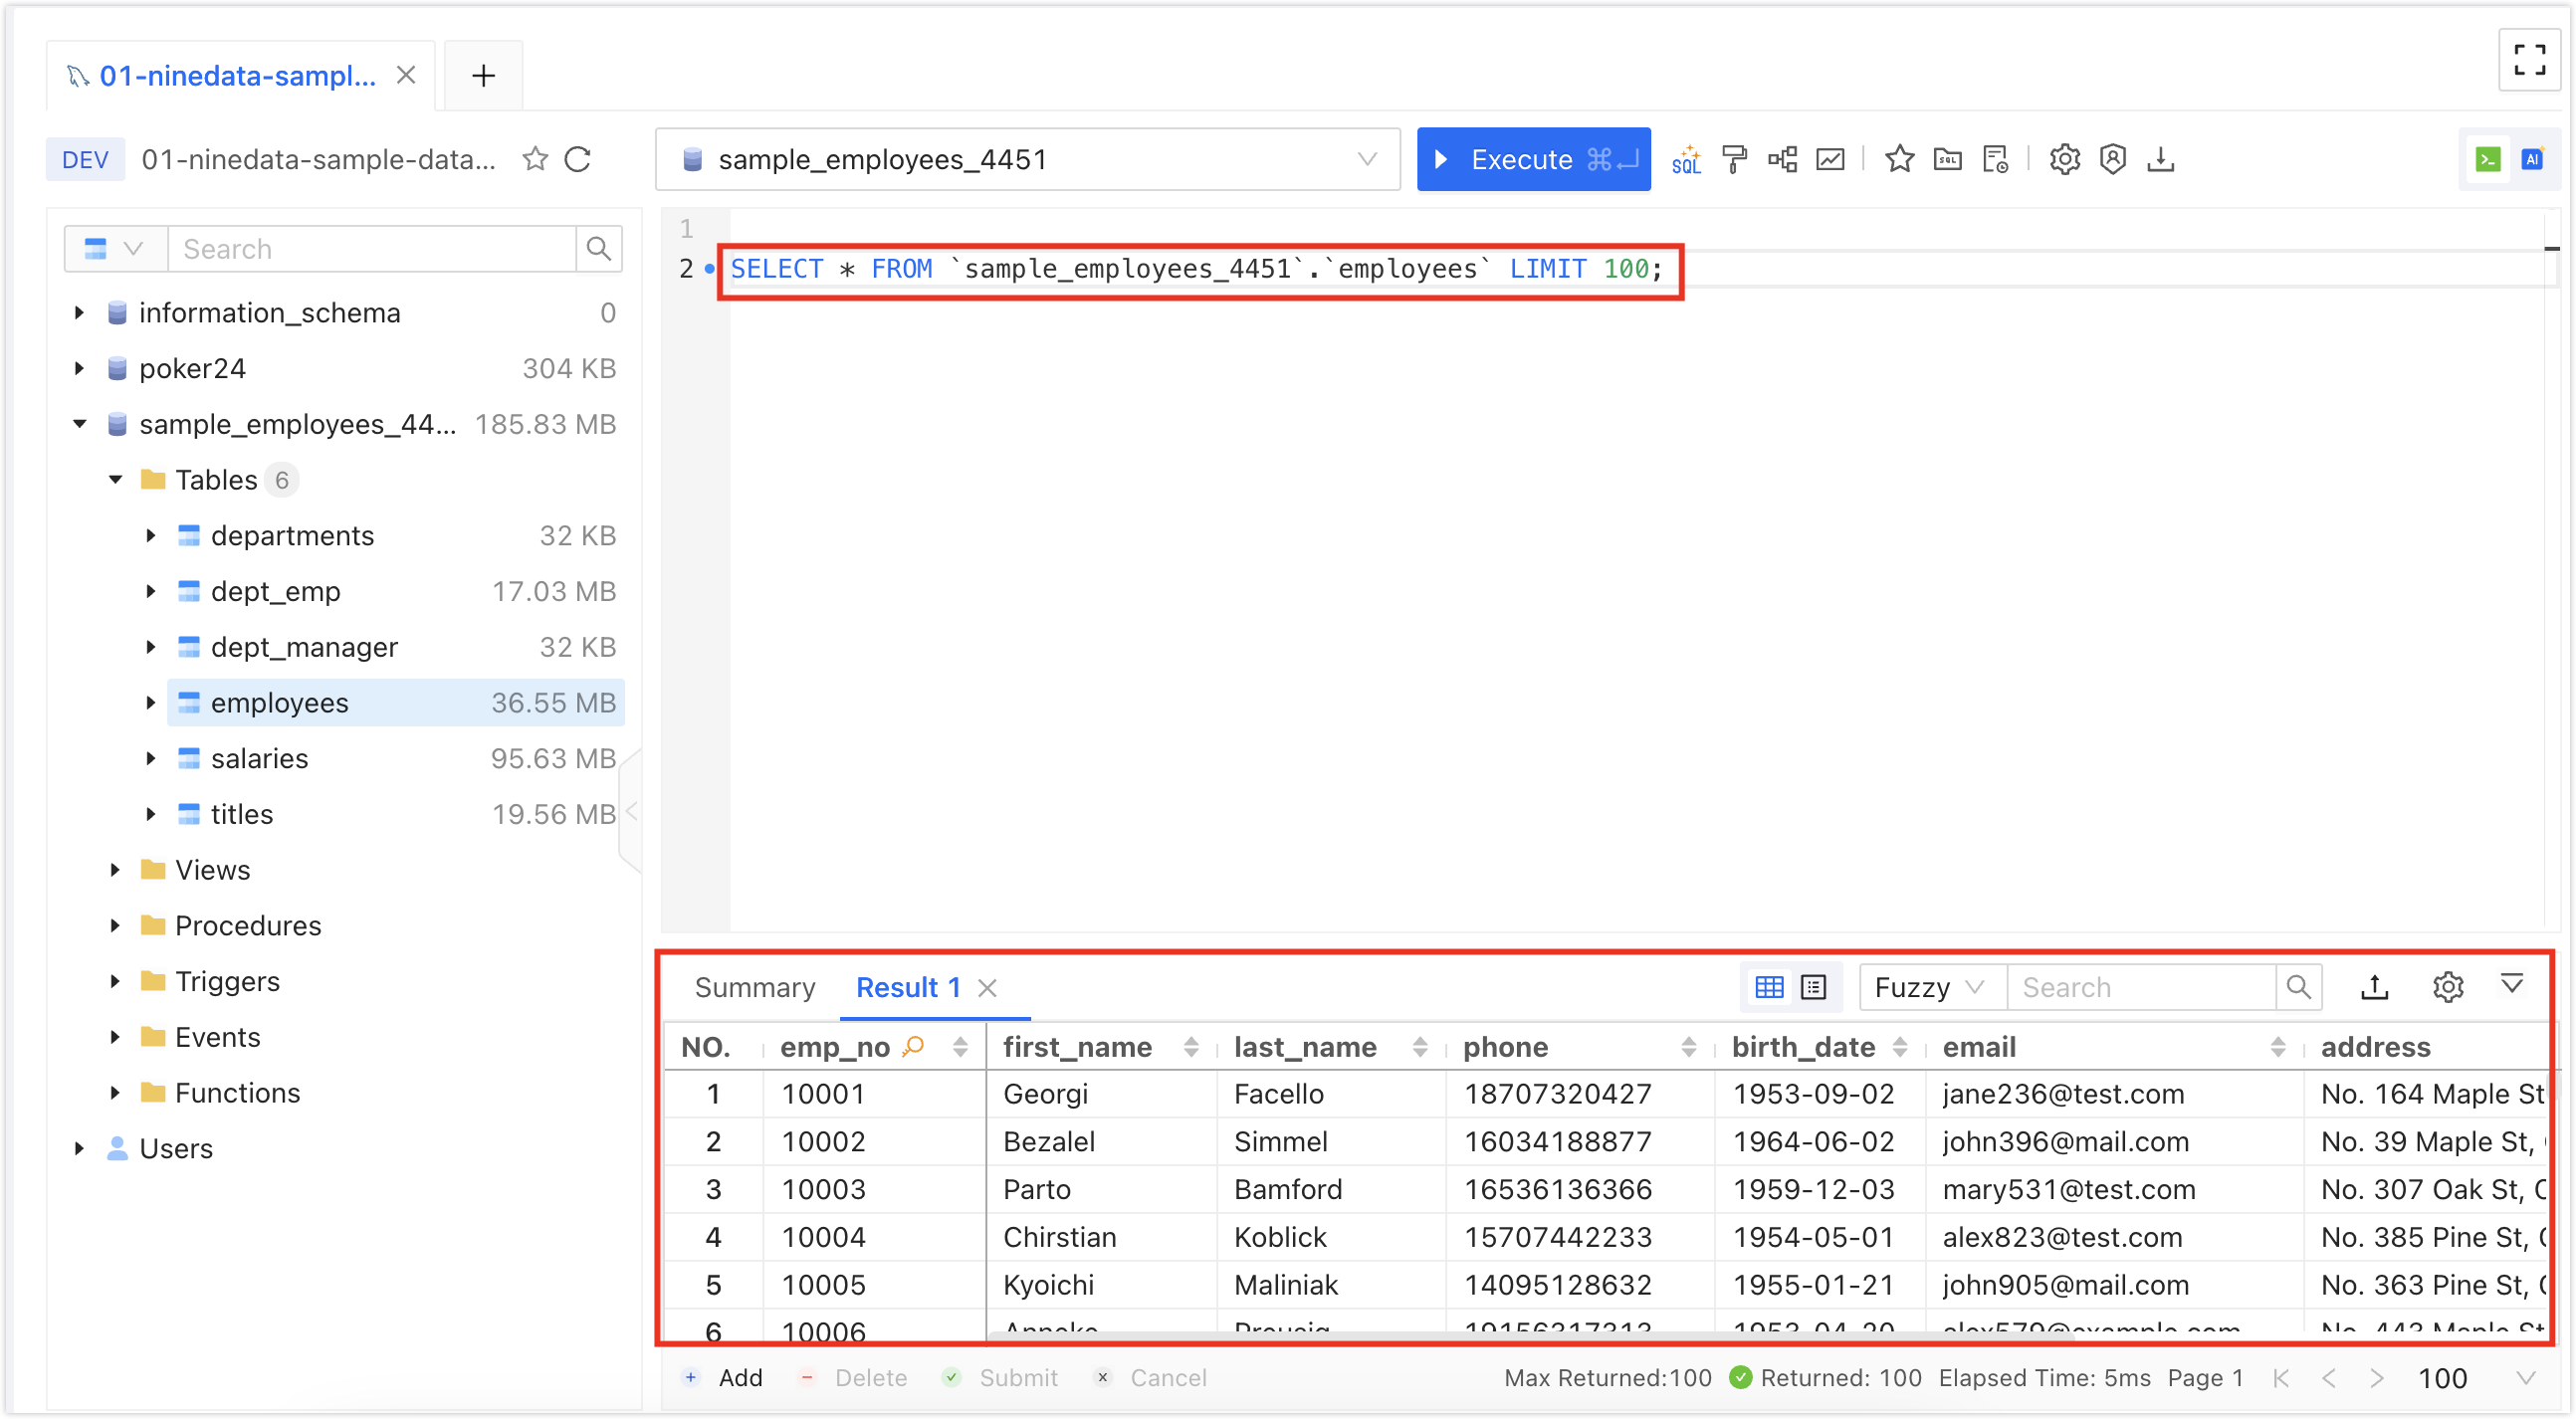
For operations involving changes in the production environment, it is recommended to configure specifications and disable the change capability of the SQL Console. Instead, use the SQL task feature with standard pre-audit + approval process + data backup triple insurance to completely eliminate data security risks. For more information, please refer to Step Eight: Release Production Changes.
Step Seven: Release Production Changes
For data security reasons, it is recommended to use NineData's SQL development specifications and SQL tasks in combination to achieve the effect of releasing production changes through an approval process.
① Disable the SQL Console Change Capability for Production Databases
In the left navigation bar, click .
On the page, click the tab, and then click the associated with the production data source.
The console jumps to the page, click the tab, find the following two rules, and configure them according to the table below:
Rule Name Switch Edit Details On Click in the right column, find , delete all operation types in the text box, and click . 
On Click in the right column, find , delete all operation types in the text box, and click . 
Click back to the SQL Console by clicking in the left navigation bar, and try to change the data. You will find that the change statement is intercepted and cannot be executed. You can only submit an SQL task to perform the change.
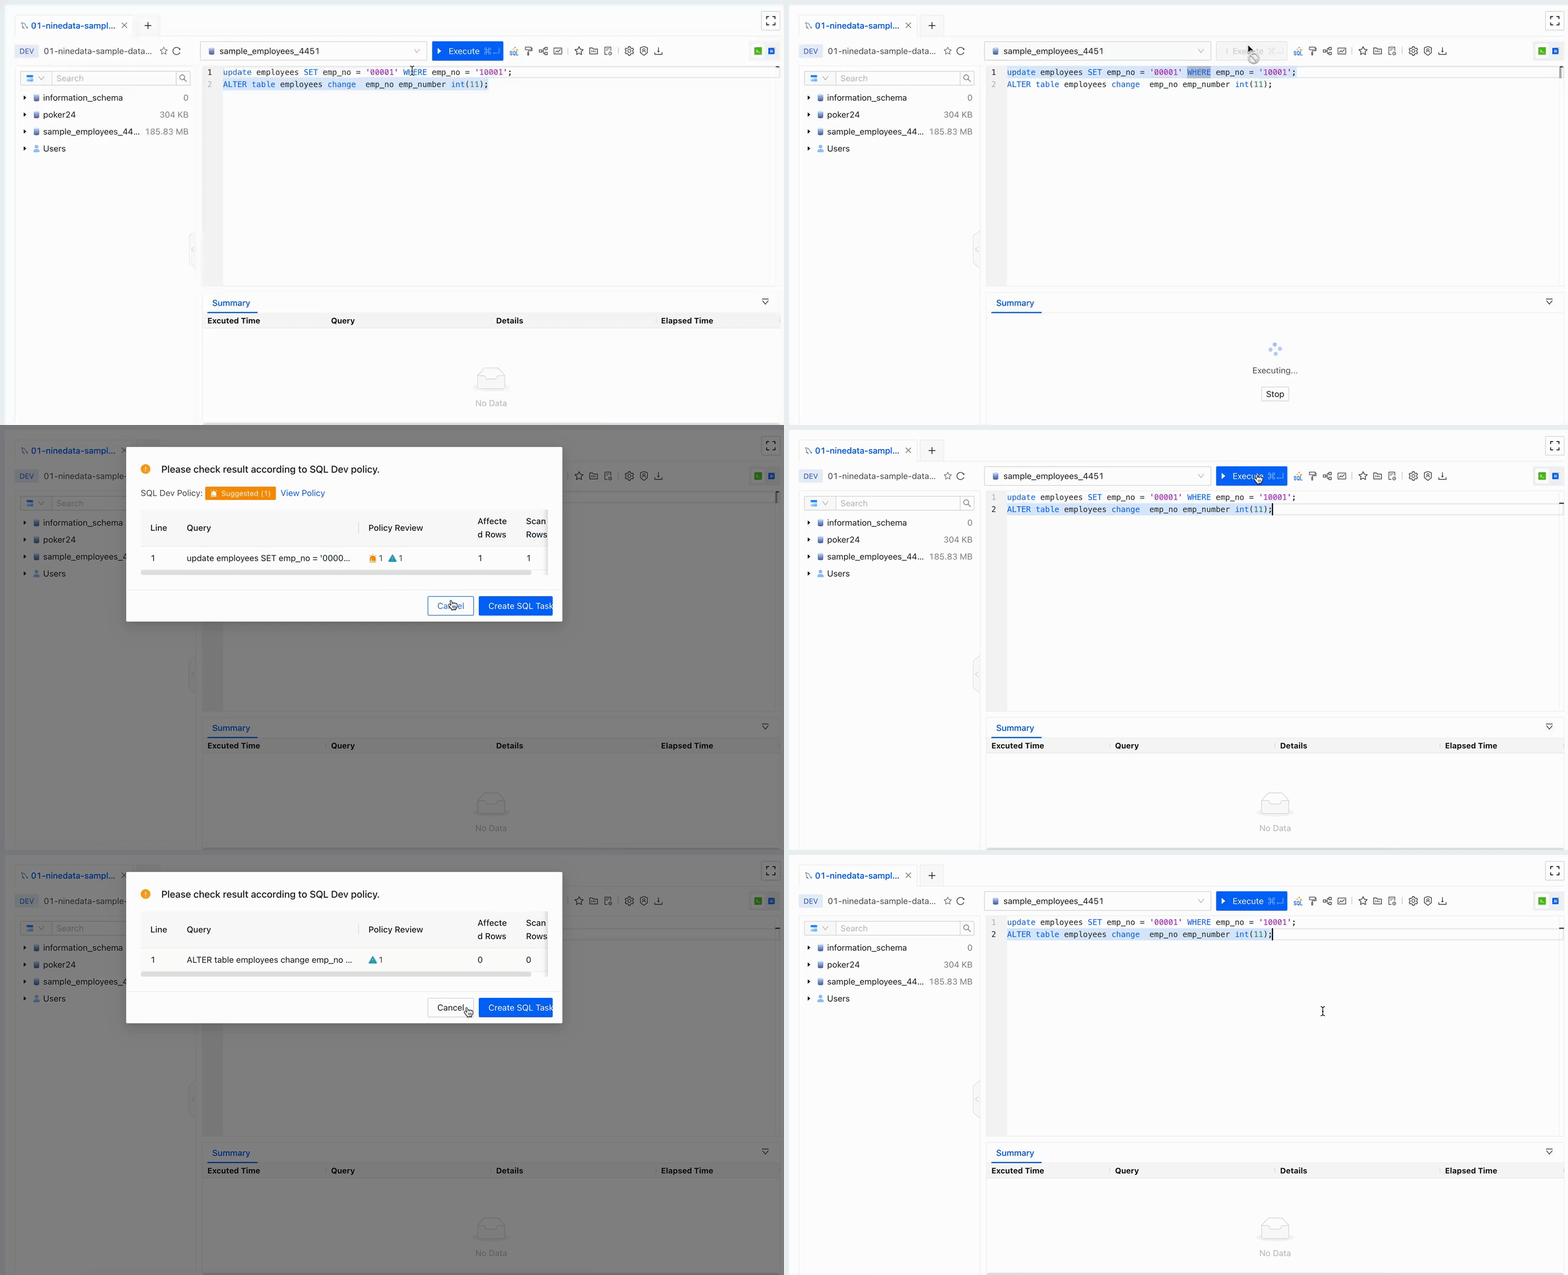
② Release Changes through SQL Tasks
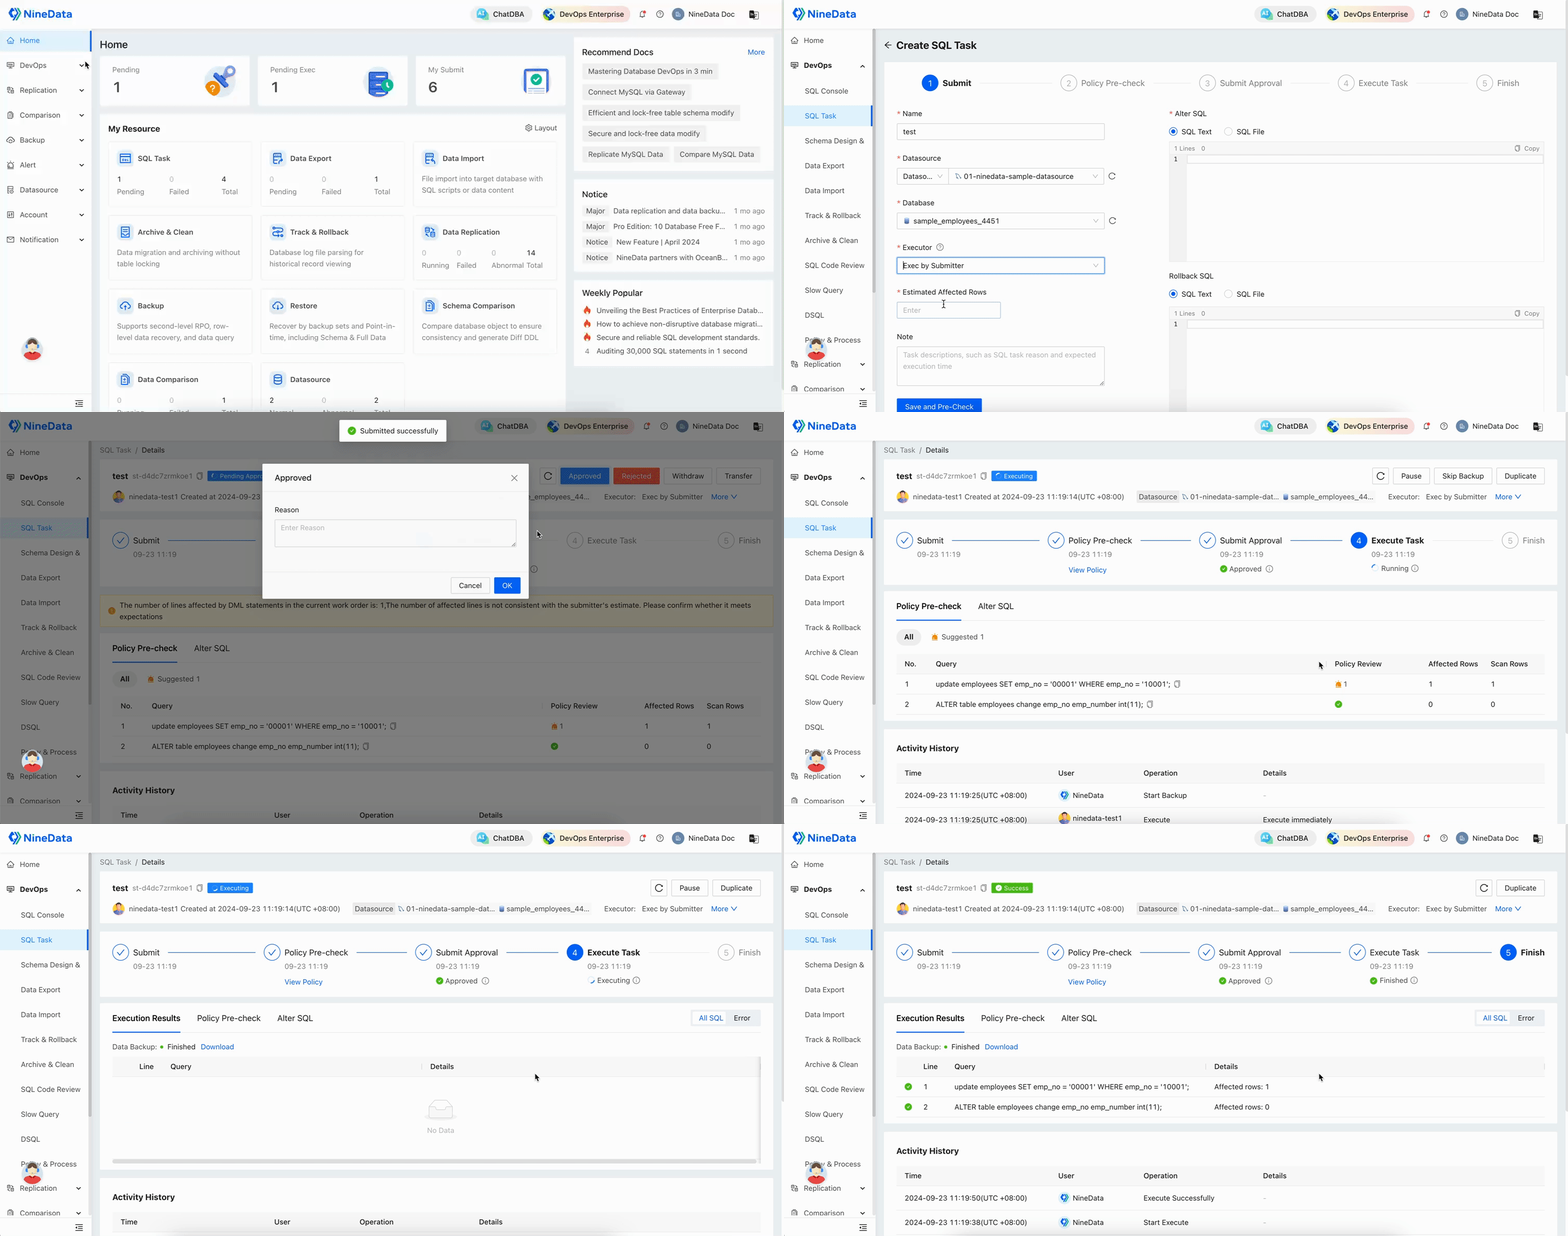
In the left navigation bar, click .
On the page, click in the upper right corner.
On the page, configure the SQL task.
Parameter Description Enter the name of the SQL task. The name usually includes the purpose of the SQL statement execution. To reduce communication costs, please use a meaningful name. Up to 64 characters are supported. The data source where the target database for change is located. The database where the SQL change needs to be executed. The person who executes the SQL statement after the current SQL task is approved.
Note: The options in the list depend on the following two situations:- If the current data source is configured with development specifications: The options in the list are based on the rule configured in the current specification. This rule is located in the tab. How to configure development specifications, please refer to Edit Specifications.
- If the current data source is not configured with development specifications: The options in the list are users who have the permission for the current data source. More information about authorization, please refer to Configure User Permissions.
(Optional) A description of any unresolved matters for the current SQL task, such as the reason for executing the task, the expected execution time, etc. Enter the SQL statement to be executed or upload a file containing the SQL statement. - : Directly enter the SQL statement to be executed in the text box.
- : Click , select and upload a file containing the SQL statement to be executed.
Note: After uploading, move the mouse over the filename, and you can choose(Preview File) or
(Delete File) on the right side of the filename.
(Optional) For enterprises that need to provide a rollback plan for changes, the rollback SQL entered here will be recorded in the current SQL task, but it will not have any impact during the entire lifecycle of the current SQL task, and is only used for compliance operations. Click , the system will check the SQL statement in advance to exclude situations that cannot be executed due to syntax errors, etc. If there is a problem with the SQL statement, prompts will appear below. Click in the prompt to view the specific error information, which will help you locate and modify it.
After is passed, click to enter the page.
tipThe system will pre-audit the SQL statement based on the SQL Development Specifications associated with the current data source, and there will be the following results:
- Pre-audit passed: Depending on the configuration of the approval process, the task status will change to or . If it is the former, please continue to the next step. If it is the latter, this process is over.
- Pre-audit not passed: The task status will change to . You can click in the upper right corner of the page to pre-audit again, or you can withdraw the task and re-edit and submit it.
Click in the upper right corner of the page, and select the process approval personnel in the pop-up window, then click .
tipDepending on the different configurations of the approval process, the number of approval personnel required here is different. Please select according to the actual situation.
The task status changes to , waiting for approval to be passed, and the task can be executed by the designated . Before the approval is passed, you can perform the following operations.
- : Withdraw the SQL task.
- : Change the approver of the SQL task.
After the execution is completed, return to the SQL Console to verify whether the changes have been successfully released.
