Deploy and Access a NineData Dedicated Cluster
Use this guide to deploy a NineData Dedicated Cluster with the NiUP command-line tool and access the cluster after installation.
Installed components
NiUP installs the following components: Container Service (Docker), Kubernetes (K3S), Image Repository, Metadata Database (MySQL), and NineData Service.
Minimum Hardware Requirements
- CPU: x86 architecture with 4 cores
- Memory: 8 GB
- Storage: 40 GB
Use two or more servers for production deployments.
Operating System Requirements
Linux kernel 3.10 or later. CentOS 7 is recommended.
Before you begin
- Contact NineData support to obtain the installation package and copy it to the server where NineData will be deployed.
- If deploying on two or more hosts simultaneously, ensure that the hosts can communicate over the internal network.
Generate the configuration file
Sign in to the host where NineData will be deployed. If you are deploying on a remote machine, connect to the target host.
ssh -p<remote_host_port> <remote_host_username>@<remote_host_name/IP>
// Example: ssh -p22 root@192.168.1.100
Go to the NineData installation directory and extract the
niup.tar.gzinstallation package. This example uses theprivate_installdirectory under the current user's home directory.cd ~/private_install
tar -zxvf niup.tar.gzGo to the extracted
niupdirectory and run the following command to generate the installation configuration file../niup config cluster ninedatatipIn this command,
niup config clusteris fixed, andninedatais the cluster name. Specify a different name if required.Follow the prompts to complete the configuration.
Steps Message Text Description Example 1 Enter the data disk directory. Default is the root directory:Specify the directory for storing NineData files. Press Enter to default to the root directory /.~/ninedata2 Enter the console access address (can be left empty):Specify the IP address for accessing the NineData cluster. Press Enter to default to the local machine IP address. 192.168.2.1002-1 Enter the console access port:After entering the IP address in 2, customize the port for accessing the NineData service. 803 Enter machine information. Leave IP empty to finish input:Provide host information. None 3-1 Enter IP:Enter the private IP address of the first host to deploy the NineData cluster and press Enter. 192.168.2.1003-2 Enter Port:Enter the SSH login port of the first host to deploy the NineData cluster, default is 22, then press Enter.223-3 Continue adding machines? (y/N):To add another host for this dual-node setup, input yand press Enter, then repeat 3-1 and 3-2. If no more hosts are required, inputNand press Enter.y3-4 Enter the SSH connection username:Enter the SSH login username of the host, then press Enter. root3-5 Enter the SSH connection method, 'pwd' for password-based, 'pem' for key-based:Enter the SSH login method, supporting password ( pwd) and key (pem). Press Enter after input.pwd3-6 Enter the SSH login password:After inputting pwdin 3-5, enter the SSH login password here and press Enter.1234563-7 Enter the absolute file path of the PEM fileAfter inputting pemin 3-5, enter the absolute path where the SSH key is located here./home/ninedata/.ssh/id_rsa4 Enter database connection URL:Enter the address of the MySQL database used to store NineData metadata. Use your own MySQL endpoint in production. Press Enter to deploy a single-node MySQL container for testing on the host. rm-**eo.rds.aliyuncs.com4-1 Enter connection port:Enter the access port of the MySQL database, then press Enter. 33064-2 Enter connection username:Enter the username of the MySQL database, then press Enter. root4-3 Enter connection password:Enter the access password of the MySQL database, then press Enter. Test1234565 Starting to input object storage information, Leave it blank to skip:Configure information for the storage repository component (MinIO). None 5-1 Enter the storage deployment machine (default is the current machine):Configure the installation location of the MinIO component. Enter the private IP address of either host. Press Enter to use the current host. 192.168.2.1005-2 Enter the username, Leave it blank to skip:Configure the username of the MinIO component. Press Enter to skip the configuration. minio_user5-3 Enter the password, Leave it blank to skip:Configure the password of the MinIO component. Press Enter to skip the configuration. Test1234565-4 Enter the storage access domain, Leave it blank to skip:Configure the domain for accessing MinIO. Press Enter to skip the configuration. example.comAfter the configuration file is generated, view and modify it at
<installation_directory>/niup/config/<cluster_name>-config.yaml.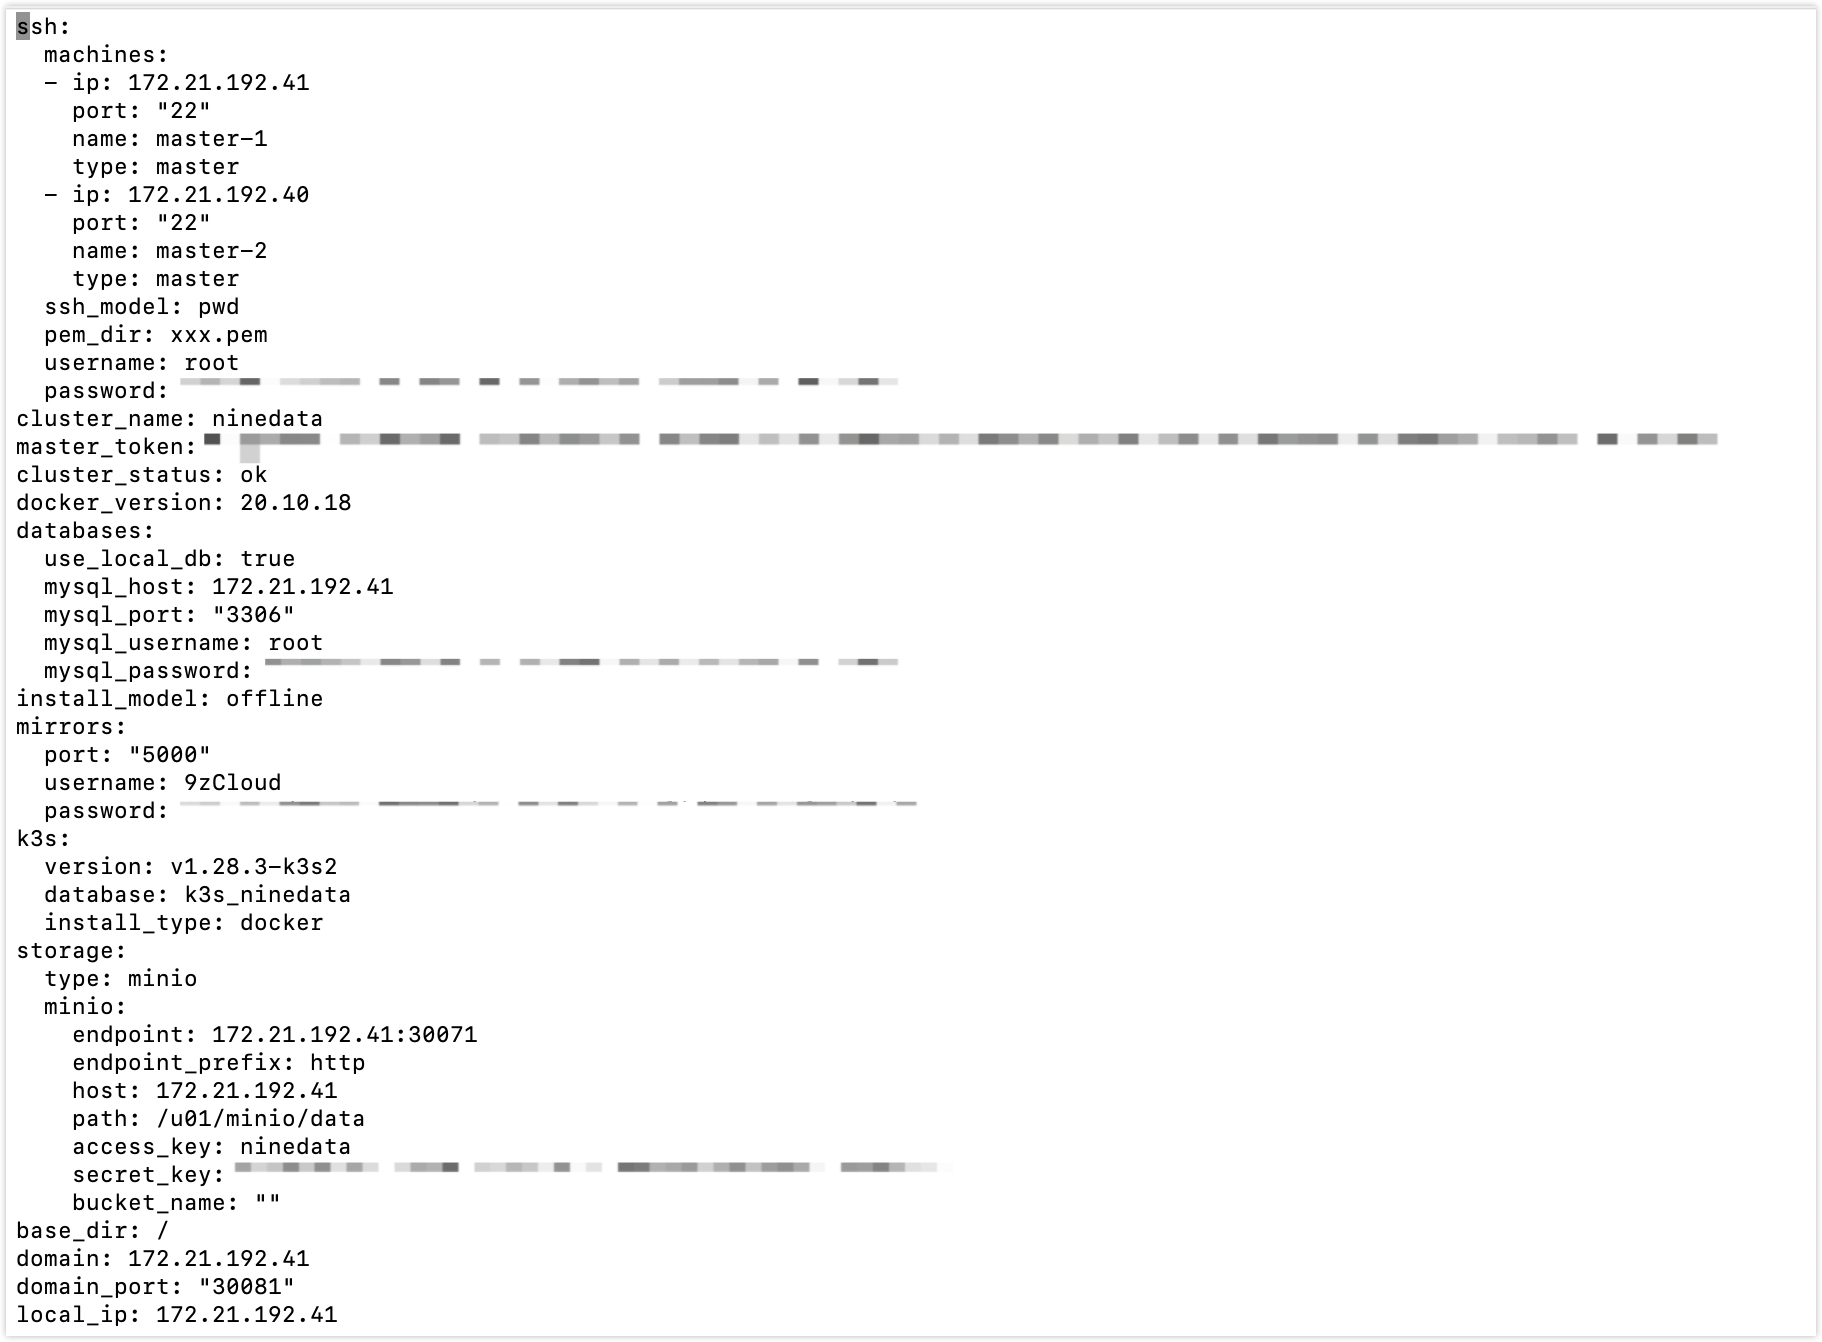
Install the cluster
Run the following command to start the cluster installation.
./niup install cluster ninedataWait until the command line displays the following message, which indicates that the cluster was installed successfully.
Cluster [ninedata] was installed successfullyThe components start in the background. Check component startup status by running
kubectl get pod -Aon each host. After all components are running, open the NineData access address in a browser.
Access the NineData console
Open the NiUP configuration file from the generated configuration path.
In the configuration file, find the
domainanddomain_portparameters.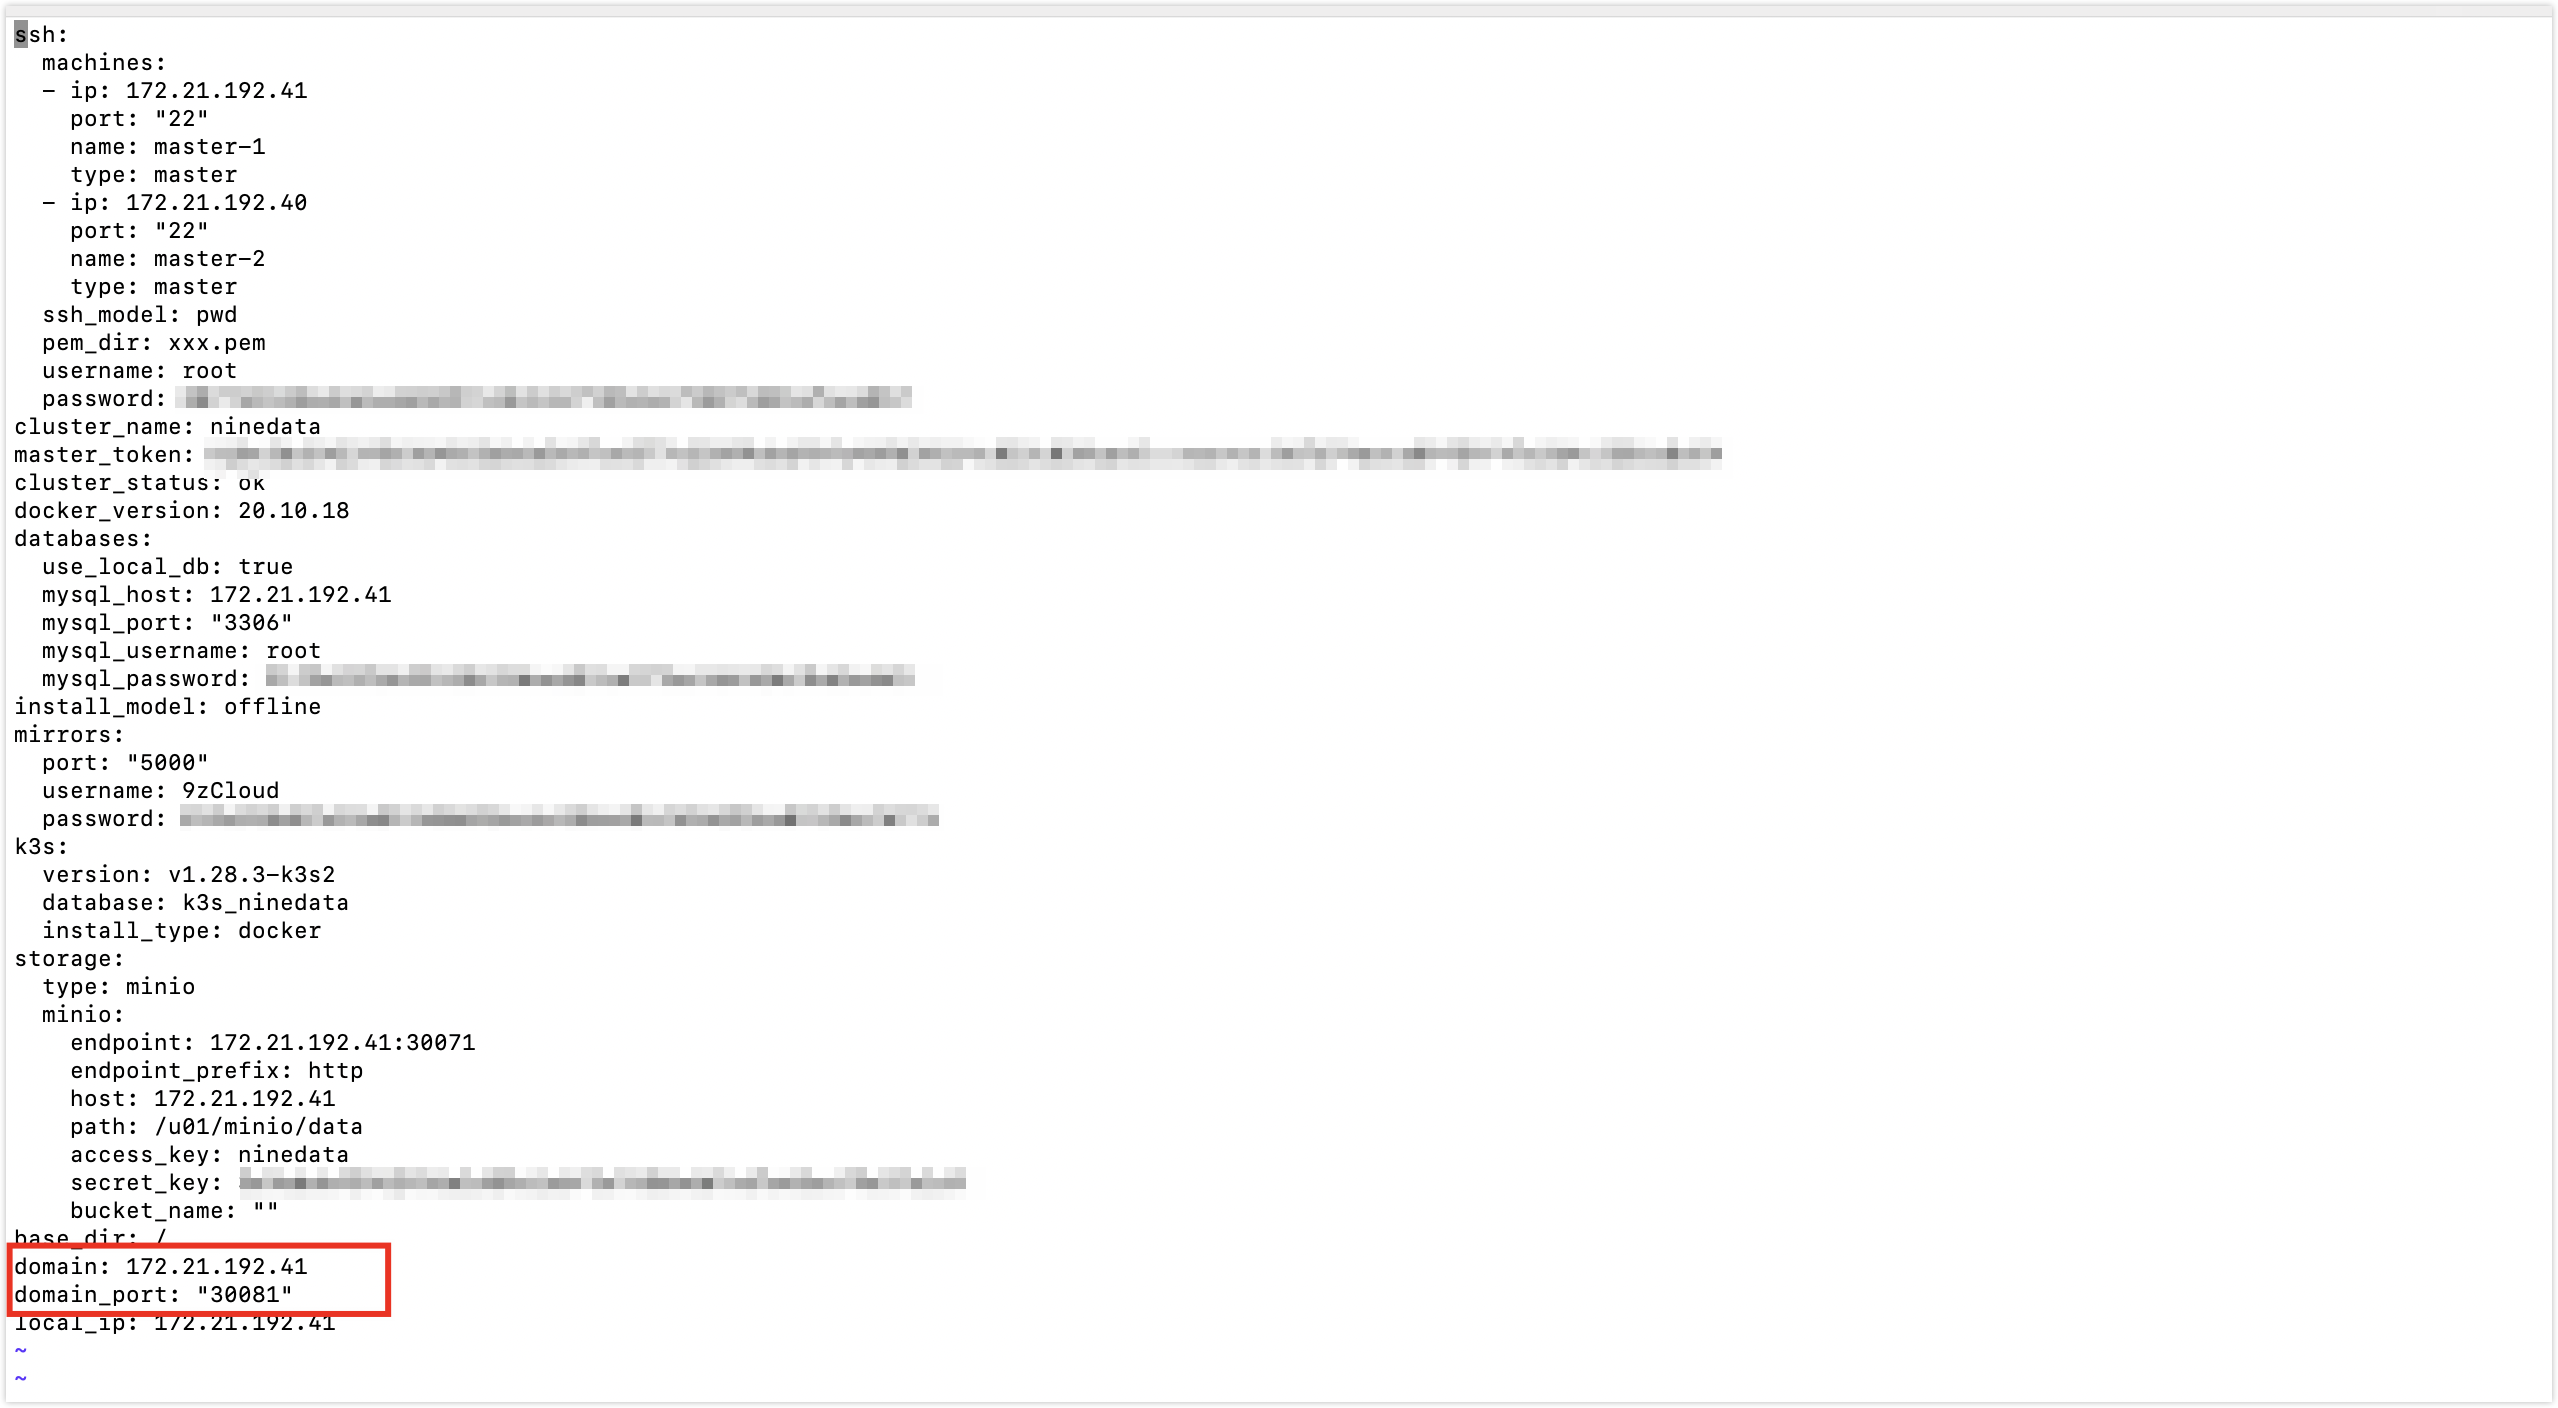
The access address for the NineData cluster console uses the format
<host_IP_address>:<port_number>. Thehost_IP_addressvalue corresponds to thedomainparameter, and theport_numbervalue corresponds to thedomain_portparameter. In this example, the access address is172.21.192.41:30081.On the login page, enter the administrator account and password for the NineData cluster. The initial credentials are:
- Administrator account: admin
- Administrator password: admin
Result
The NineData Dedicated Cluster is installed, all required components are running, and the NineData console is available from the configured cluster access address.
Next steps
- Change the initial administrator password after signing in.
- Configure data sources and create the required tasks in the dedicated cluster environment.